tailgate Citroen C4 2014.5 2.G Owner's Manual
[x] Cancel search | Manufacturer: CITROEN, Model Year: 2014.5, Model line: C4, Model: Citroen C4 2014.5 2.GPages: 494, PDF Size: 21.47 MB
Page 61 of 494
59
"Keyless Entry and Starting" system
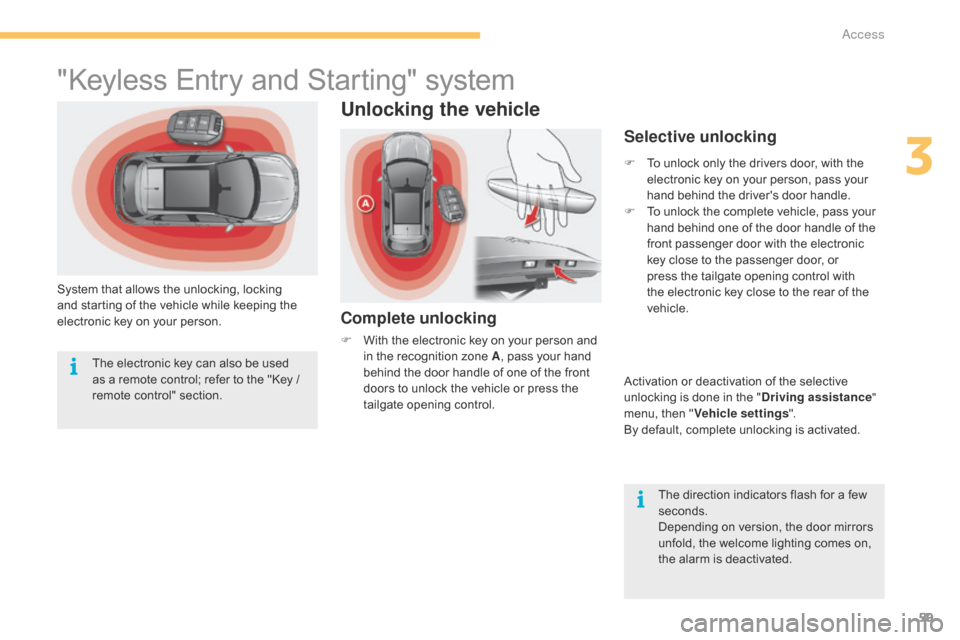
System that allows the unlocking, locking and starting of the vehicle while keeping the
e
lectronic key on your person.
Unlocking the vehicle
Complete unlocking
F With the electronic key on your person and i
n the recognition zone A,
pass your hand
b
ehind the door handle of one of the front
d
oors to unlock the vehicle or press the
t
ailgate opening control.
Selective unlocking
F To unlock only the drivers door, with the e
lectronic key on your person, pass your
h
and behind the driver's door handle.
F
T
o unlock the complete vehicle, pass your
h
and behind one of the door handle of the
f
ront passenger door with the electronic
k
ey close to the passenger door, or
p
ress the tailgate opening control with
t
he electronic key close to the rear of the
v
ehicle.
Activation
or deactivation of the selective
u
nlocking is done in the "Driving assistance "
menu,
then "Vehicle settings ".
By
default, complete unlocking is activated.
The
direction indicators flash for a few
se
conds.
Depending
on version, the door mirrors
u
nfold, the welcome lighting comes on,
t
he alarm is deactivated.
The
electronic
key
can
also
be
used
a
s
a
remote
control;
refer
to
the
"Key
/
r
emote
c
ontrol"
s
ection.
3
Access
Page 74 of 494
72
boot
Opening using the remote
control
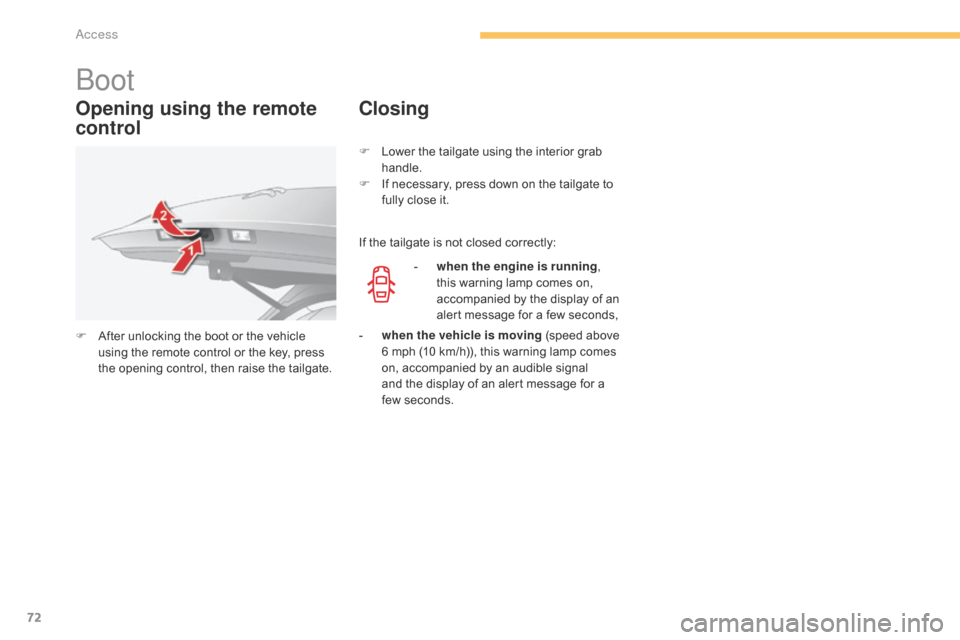
F After unlocking the boot or the vehicle u
sing the remote control or the key, press
t
he opening control, then raise the tailgate.
Closing
If the tailgate is not closed correctly:
-
w
hen the engine is running ,
this
warning lamp comes on,
a
ccompanied by the display of an
a
lert message for a few seconds,
F
L
ower the tailgate using the interior grab
han
dle.
F
I
f necessary, press down on the tailgate to
f
ully close it.
-
w
hen the vehicle is moving (speed above
6
mph (10 km/h)), this warning lamp comes
o
n, accompanied by an audible signal
and
the display of an alert message for a
f
ew seconds.
access
Page 75 of 494
73
Opening using the Keyless
Entry and Starting system
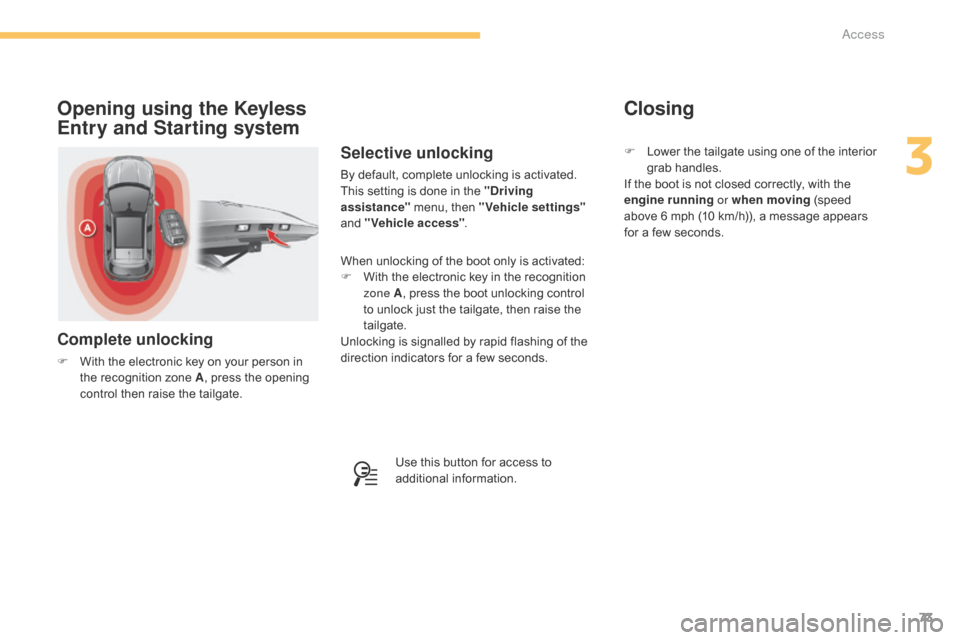
Complete unlocking
F With the electronic key on your person in t
he recognition zone A,
press the opening
c
ontrol then raise the tailgate.
Selective unlocking
By default, complete unlocking is activated.
T his setting is done in the "Driving
assistance"
menu, then "Vehicle settings"
and
"Vehicle access" .
Use
this button for access to
a
dditional
in
formation.
When
unlocking of the boot only is activated:
F
W
ith the electronic key in the recognition
z
one A ,
press the boot unlocking control
t
o unlock just the tailgate, then raise the
t
ailgate.
Unlocking
is signalled by rapid flashing of the
d
irection indicators for a few seconds.F
L
ower the tailgate using one of the interior g
rab han dles.
If the boot is not closed correctly, with the
e
ngine running or when moving
(speed
a
bove 6 mph (10 km/h)), a message appears
f
or a few seconds.
Closing
3
Access
Page 76 of 494
74
Tailgate release
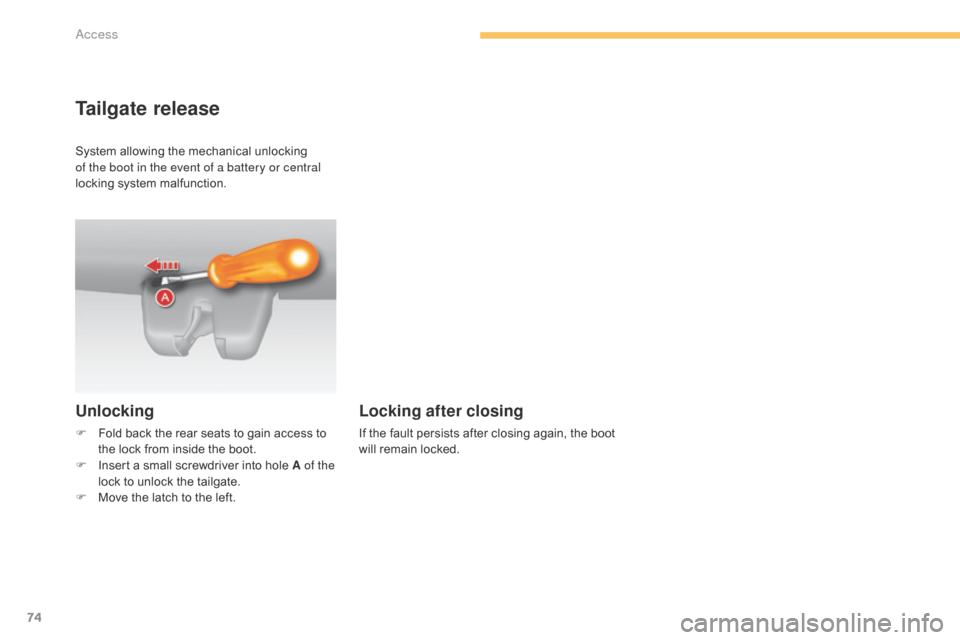
Unlocking
F Fold back the rear seats to gain access to t
he lock from inside the boot.
F
I
nsert a small screwdriver into hole A of the
lock
to unlock the tailgate.
F
M
ove the latch to the left.
Locking after closing
If the fault persists after closing again, the boot will remain locked.
System
allowing
the
mechanical
unlocking
o
f the boot in the event of a battery or central
locking
system
malfunction.
Access
Page 131 of 494
129
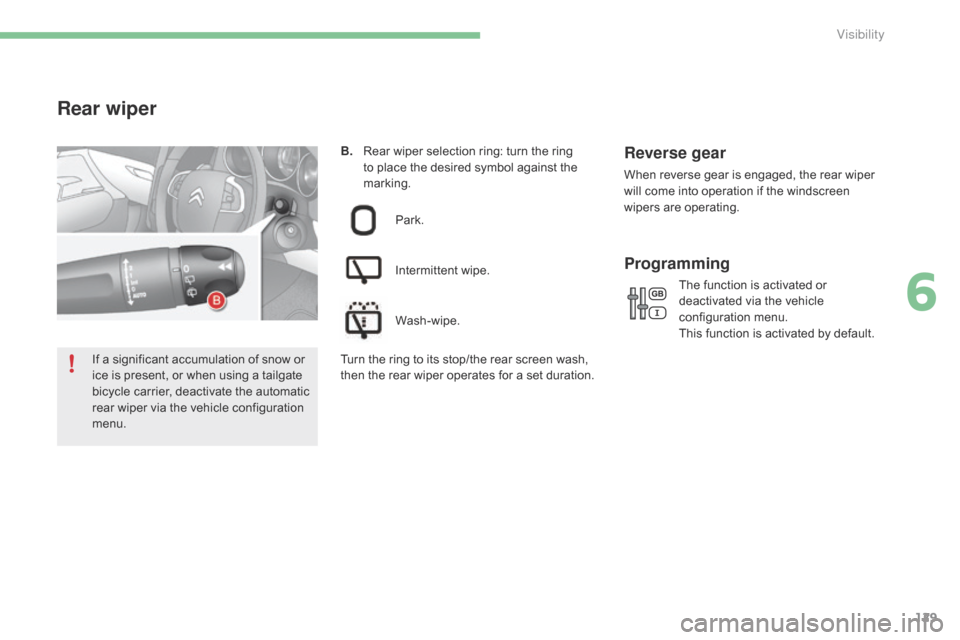
B. Rear wiper selection ring: turn the ring t
o place the desired symbol against the
m
arking.
Rear wiper
Park.
Intermittent
wipe.
Wash-wipe.
Reverse gear
When reverse gear is engaged, the rear wiper w ill come into operation if the windscreen
w
ipers are operating.
The
function is activated or
d
eactivated via the vehicle
c
onfiguration
m
enu.
This
function is activated by default.
Programming
If a significant accumulation of snow or ice is present, or when using a tailgate
b
icycle carrier, deactivate the automatic
r
ear wiper via the vehicle configuration
m
enu. T urn the ring to its stop/the rear screen wash, t
hen the rear wiper operates for a set duration.
6
Visibility
Page 246 of 494
244
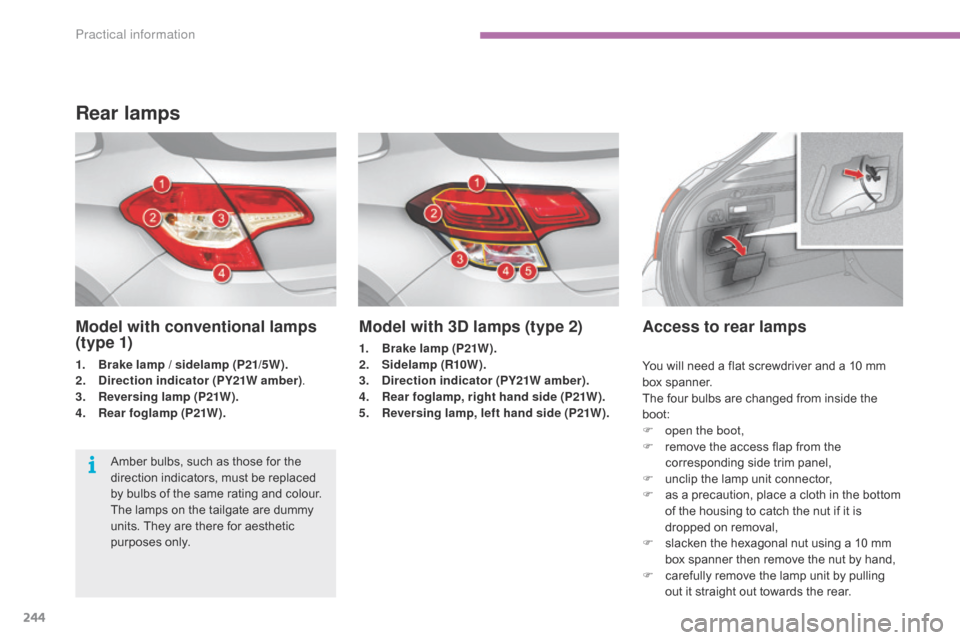
Model with 3D lamps (type 2)
1. Brake lamp (P21W).
2. Sidelamp (R10W ).
3.
D
irection indicator (PY21W amber) .
4.
R
ear foglamp, right hand side (P21W).
5.
R
eversing lamp, left hand side (P21W).
Access to rear lamps
Amber bulbs, such as those for the direction indicators, must be replaced
b
y bulbs of the same rating and colour.
The
lamps on the tailgate are dummy
u
nits. They are there for aesthetic
p
urposes only.
Rear lamps
Model with conventional lamps
(t y p e 1)
1. Brake lamp / sidelamp (P21/5W).
2. Direction indicator (PY21W amber) .
3.
R
eversing lamp (P21W).
4.
R
ear foglamp (P21W). You
will need a flat screwdriver and a 10 mm
b
ox
span
ner.
The
four bulbs are changed from inside the
b
oot:
F
o
pen the boot,
F
r
emove the access flap from the
c
orresponding side trim panel,
F
u
nclip the lamp unit connector,
F
a
s a precaution, place a cloth in the bottom
o
f the housing to catch the nut if it is
d
ropped on removal,
F
s
lacken the hexagonal nut using a 10 mm
b
ox spanner then remove the nut by hand,
F
c
arefully remove the lamp unit by pulling
o
ut it straight out towards the rear.
Practical information
Page 248 of 494
246
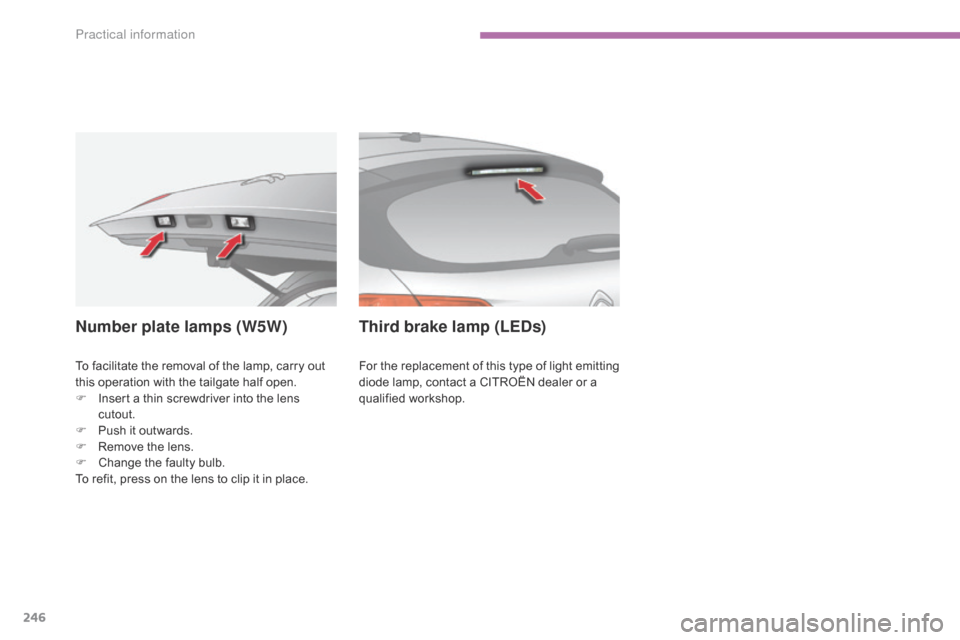
To facilitate the removal of the lamp, carry out this operation with the tailgate half open.
F
I
nsert a thin screwdriver into the lens
c
utout.
F
P
ush it outwards.
F
R
emove the lens.
F
C
hange the faulty bulb.
To
refit, press on the lens to clip it in place.
Third brake lamp (LEDs)
For the replacement of this type of light emitting diode lamp, contact a CITROËN dealer or a
q
ualified
w
orkshop.
Number plate lamps (W5W)
Practical information
Page 271 of 494
269
accessories
Conversion kits
You can obtain an "Enterprise" kit to convert a trade vehicle to a private car and vice-versa.
"Comfort":
door deflectors, side window blinds, rear screen blind, insulated module, coat hanger
f
ixed to head restraint, reading lamp, mirror for
c
aravan, cruise control, scented air freshener
a
nd cartridges, parking sensors...
"Transport systems":
boot carpet, boot liner, boot net, boot spacers,
transverse roof bars, bicycle carrier, ski carrier,
r
oof boxes, towbars, towbar wiring harnesses...
"Styling":
gear lever knobs, aluminium foot rest, alloy wheels, wheel embellishers, chrome mirror
s
hells, chrome door
a
perture finishers, door sill
f
inishers, tailgate lower chrome finisher...
*
T
o avoid any risk of jamming the pedals:
-
e
nsure that mats are correctly positioned
a
nd secured,
-
n
ever fit one mat on top of
a
nother.
"Security and safety":
anti-intrusion alarm, microwave sensor, anti-tilt sensor, stolen vehicle tracking system, child
s
eats and booster cushions, breathalyser, first
a
id kit, fire extinguisher, warning triangle, high
v
isibility vest, dog guard, pet seat belt, wheel
s
ecurity bolts, snow chains, non-slip covers,
f
ront foglamp kit...
"Protection":
mats*, seat covers compatible with l ateral a
irbags, door sill protectors, mud flaps, door
p
rotective rubbing strips, bumper protection
s
trips, protective covers for pets, vehicle
cover...
If
a
towbar
and
wiring
harness
are
fitted
o
utside
the
CITROËN
dealer
network,
t
he
installation
must
be
done
using
t
he
vehicle's
electrical
pre-equipment
a
nd
in
line
with
the
manufacturer's
r
ecommendations.
A
wide
range
of
accessories
and
genuine
parts
is
available
from
the
CITROËN
dealer
network.
These
accessories
and
parts
are
all
suitable
for
your
vehicle
and
benefit
from
CITROËN's
recommendation and warranty.
11
Practical information