run flat Citroen C4 2015 2.G Owner's Manual
[x] Cancel search | Manufacturer: CITROEN, Model Year: 2015, Model line: C4, Model: Citroen C4 2015 2.GPages: 494, PDF Size: 20.49 MB
Page 5 of 494
C4-2_en_Chap00a_sommaire_ed01-2015
C4-2_en_Chap00a_sommaire_ed01-2015
Technical data
Checks
Practical
i
nformation
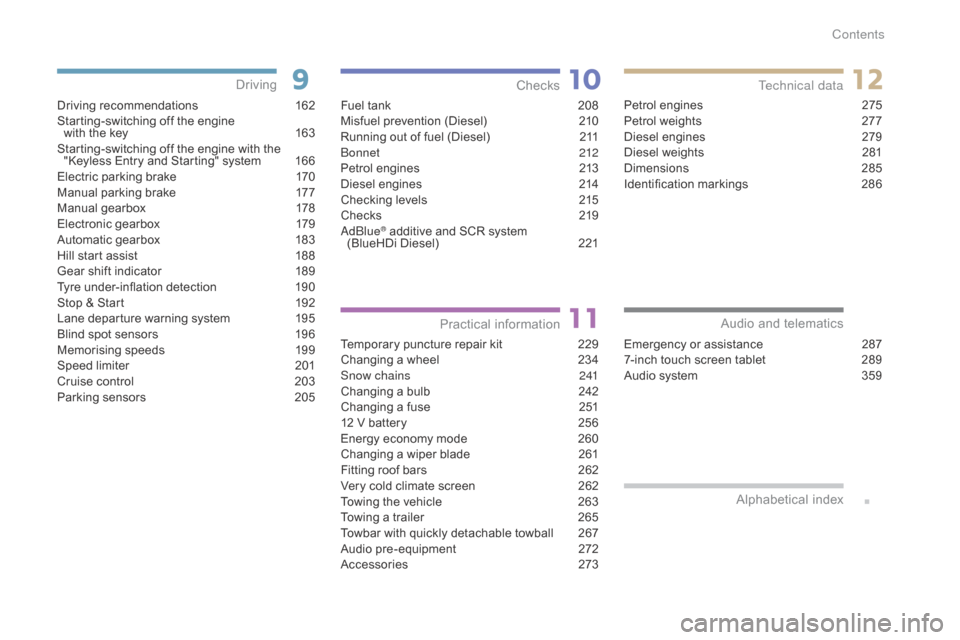
Driving recommendations 1 62
Starting-switching off the engine
with
the key
1
63
Starting-switching
off the engine with the
"
Keyless Entry and Starting" system
1
66
Electric
parking brake
1
70
Manual
par
king
b
rake
1
77
Manual
g
earbox
1
78
Electronic
gearbox
1
79
Automatic
gearbox
1
83
Hill
start assist
1
88
Gear
shift indicator
1
89
Tyre
under-inflation detection
1
90
Stop
& Start
1
92
Lane
departure warning system
1
95
Blind
spot sensors
1
96
Memorising
speeds
1
99
Speed
l
imiter
20
1
Cruise
control
2
03
Parking
sensors
2
05
Driving
Emergency or assistance 2 87
7-inch touch screen tablet 2 89
Audio
system
3
59
Audio and telematics
Alphabetical
in
dex
Fuel tank 2 08
Misfuel prevention (Diesel) 2 10
Running
out of fuel (Diesel)
2
11
bo
nnet
212
Petrol
engines
2
13
Diesel
engines
2
14
Checking
levels
2
15
Checks
2
19
a
d
blu
e
® additive and SCR system
(
BlueHDi Diesel) 2 21
Temporary
puncture repair kit
2
29
Changing
a wheel
2
34
Snow chains
2
41
Changing
a bulb
2
42
Changing
a fuse
2
51
12
V
battery
2
56
Energy
economy mode
2
60
Changing
a wiper blade
2
61
Fitting
roof bars
2
62
Very
cold climate screen
2
62
Towing
the vehicle
2
63
Towing
a trailer
2
65
Towbar
with quickly detachable towball
2
67
Audio
pre-equipment
2
72
Accessories
2
73Petrol
engines
2
75
Petrol weights
2
77
Diesel engines
2
79
Diesel weights
2
81
Dimensions
2
85
Identification
ma
rkings
2
86
Contents
Page 189 of 494
187
C4-2_en_Chap09_conduite_ed01-2015
C4-2_en_Chap09_conduite_ed01-2015
When the ignition is on, the lighting of this warning lamp,
a
ccompanied by an audible signal
a
nd a message in the multifunction
s
creen, indicates a gearbox
m
alfunction.
Operating fault
You risk damaging the gearbox:
- i f you press the accelerator and
brake
pedals at the same time,
-
i
f
y
ou
f
orce
t
he
l
ever
f
rom
p
osition P
to another position when the
battery
is flat.
To
reduce fuel consumption when
s
tationary for long periods with the
e
ngine running (traffic jam...), position
t
he gear lever at N and apply the
parking
brake, unless it is programmed
i
n automatic mode.
In
this
case,
the
gearbox
switches
to
back-up
m
ode
and
is
locked
in
3rd
gear.
You
may
feel
a
substantial
knock
when
changing
from
P
to R
and
from
N to R .
This
will
not
cause
any
d
amage
to
the
gearbox.
Do
not
exceed
60
mph
(100
km/h),
local
speed
r
estrictions
p
ermitting.
Have
it
checked
by
a
CITROËN
dealer
or
a
q
ualified
w
orkshop.
This
warning
lamp
may
also
come
on
if
a
door
i
s
ope
ned.
9
Driving
Page 235 of 494
233
C4-2_en_Chap11_info-pratique_ed01-2015
C4-2_en_Chap11_info-pratique_ed01-2015
Removing the cartridge
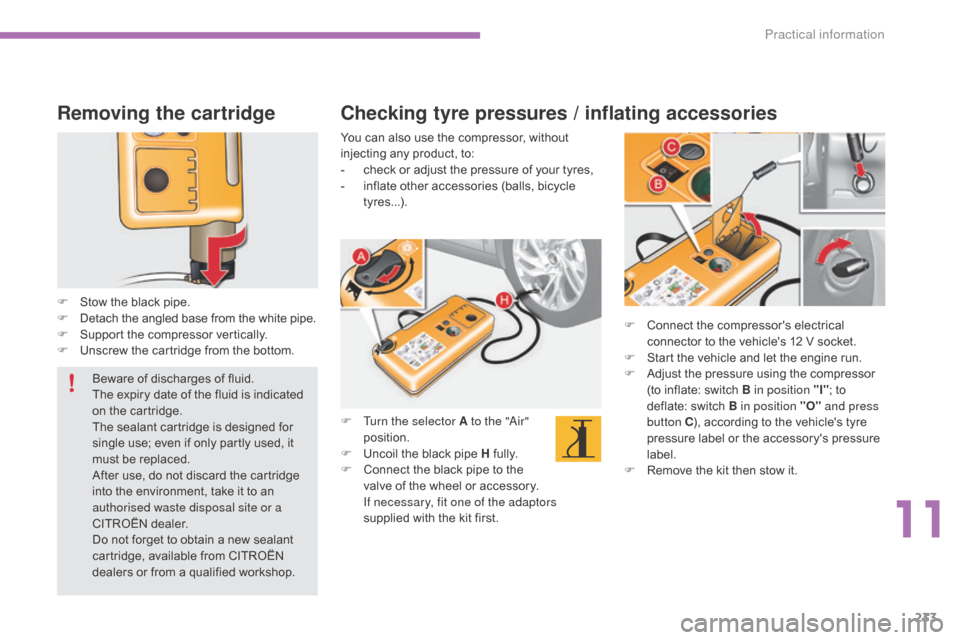
F Stow the black pipe.
F D etach the angled base from the white pipe.
F
S
upport the compressor vertically.
F
U
nscrew the cartridge from the bottom. F
C
onnect the compressor's electrical
c
onnector to the vehicle's 12 V socket.
F
S
tart the vehicle and let the engine run.
F
A
djust the pressure using the compressor
(
to inflate: switch B in position "I";
to
d
eflate: switch B in position "O" and press
button C ),
according to the vehicle's tyre
p
ressure label or the accessory's pressure
lab
el.
F
R
emove the kit then stow it.
Checking tyre pressures / inflating accessories
You can also use the compressor, without injecting any product, to:
-
c
heck or adjust the pressure of your tyres,
-
i
nflate other accessories (balls, bicycle
t
yres...).
F
T
urn the selector A to the "
ai
r"
position.
F
U
ncoil the black pipe H
f
ully.
F
C
onnect the black pipe to the
v
alve of the wheel or accessory.
I
f necessary, fit one of the adaptors
supplied
with the kit first.
Beware
of
discharges
of
fluid.
The
expiry
date
of
the
fluid
is
indicated
o
n
the
cartridge.
The
sealant
cartridge
is
designed
for
s
ingle
use;
even
if
only
partly
used,
it
m
ust
be
replaced.
After
use,
do
not
discard
the
cartridge
i
nto
the
environment,
take
it
to
an
a
uthorised waste disposal site or a
CITROËN
dealer.
Do
not
forget
to
obtain
a
new
sealant
c
artridge,
available
from
CITROËN
d
ealers
or
from
a
qualified
workshop.
11
Practical information
Page 243 of 494
241
C4-2_en_Chap11_info-pratique_ed01-2015
C4-2_en_Chap11_info-pratique_ed01-2015
Snow chains
In wintry conditions, snow chains improve traction as well as the behaviour of the vehicle when braking.
Advice on installation
F If you have to fit the chains during a j
ourney, stop the vehicle on a flat sur face
o
n the side of the road.
F
A
pply the parking brake and position any
w
heel chocks to prevent movement of your
v
ehicle.
F
F
it the chains following the instructions
p
rovided by the manufacturer.
F
M
ove off gently and drive for a few
m
oments, without exceeding 30 mph
(
50 km/h).
F
S
top your vehicle and check that the snow
c
hains are correctly tightened.
Use
only
the
chains
designed
to
be
fitted
to
the
t
ype
of
wheel
fitted
to
your
vehicle:
Original
tyre
size Maximum
link
size.
195/65
R15 9
mm
205/55
R16
225/45
R17
225/40
R18
cannot be fitted with chains
For more information on snow chains, contact a C ITROËN dealer or a qualified workshop.
It
is strongly recommended that before
y
ou leave, you practise fitting the snow
c
hains on a level and dry sur face.
The
snow
chains
must
be
fitted
only
t
o
the
front
wheels.
They
must
never
b
e fitted to "space-saver" type spare
wheels.
Take account of the legislation in force
i
n your country on the use of snow
chains
and the maximum running speed
a
uthorised. Avoid
driving with snow chains on roads
t
hat have been cleared of snow, to
avoid
damaging your vehicle's tyres and
t
he road sur face. If your vehicle is fitted
w
ith alloy wheels, check that no part of
t
he chain or its fixings is in contact with
t
he wheel rim.
11
Practical information
Page 259 of 494
257
C4-2_en_Chap11_info-pratique_ed01-2015
C4-2_en_Chap11_info-pratique_ed01-2015
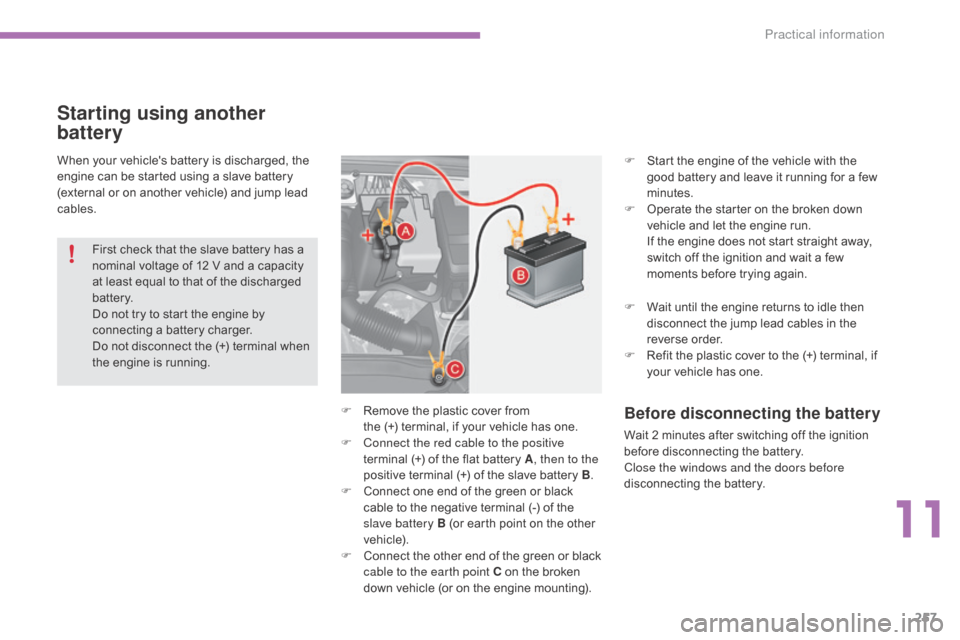
When your vehicle's battery is discharged, the engine can be started using a slave battery
(
external or on another vehicle) and jump lead
c
ables.
Starting using another
battery
First check that the slave battery has a n ominal voltage of 12 V and a capacity
a
t least equal to that of the discharged
b
attery.
Do
not try to start the engine by
c
onnecting a battery charger.
Do
not disconnect the (+) terminal when
t
he engine is running. F
S
tart the engine of the vehicle with the
g
ood battery and leave it running for a few
m
inutes.
F
O
perate the starter on the broken down
v
ehicle and let the engine run. I
f the engine does not start straight away, s
witch off the ignition and wait a few
m
oments before trying again.
Before disconnecting the battery
Wait 2 minutes after switching off the ignition before disconnecting the battery.
Close the windows and the doors before
disconnecting
the battery.
F
R
emove
the
plastic
cover
from
the
(+)
terminal,
if
your
vehicle
has
one.
F
C
onnect the red cable to the positive
terminal
(+)
of
the
flat
battery
A , then to the
positive
terminal
(+)
of
the
slave
battery
B.
F
C
onnect
one
end
of
the
green
or
black
c
able
to
the
negative
terminal
(-)
of
the
s
lave battery B
(or
earth
point
on
the
other
v
ehicle).
F
C
onnect
t
he
o
ther
e
nd
o
f
t
he
g
reen
o
r
b
lack
c
able to the earth point C
on
the
broken
d
own
vehicle
(or
on
the
engine
mounting). F
W
ait until the engine returns to idle then
d
isconnect the jump lead cables in the
r
everse
o
rder.
F
R
efit the plastic cover to the (+) terminal, if
y
our vehicle has one.
11
Practical information
Page 262 of 494
260
C4-2_en_Chap11_info-pratique_ed01-2015
C4-2_en_Chap11_info-pratique_ed01-2015
Load reduction modeE nergy ec onomy m ode
Switching to economy mode
Once this period has elapsed, a message a
ppears in the screen indicating that the
v
ehicle has switched to economy mode and the
a
ctive functions are put on standby.
Exiting economy mode
These functions are reactivated automatically the next time the vehicle is driven.
F
I
n order to resume the use of these functions
i
mmediately, start the engine and let it run for a
f
ew
m
inutes.
The
time available to you will then be double
t
he period for which the engine is left running.
H
owever, this period will always be between
five
and thirty minutes.
System
which
manages
the
use
of
certain
f
unctions
according
to
the
level
of
charge
r
emaining
in
the
battery.
When
the
vehicle
is
being
driven,
the
load
r
eduction
function
temporarily
deactivates
c
ertain
functions,
such
as
the
air
conditioning,
t
he
heated
rear
screen...
The deactivated functions are reactivated
automatically
as
soon
as
conditions
permit. System
which
manages
the
period
of
use
of
certain
functions to conserve a sufficient level of
c
harge
in
the
battery.
After
the
engine
has
stopped,
you
can
still
use
functions such as the audio equipment, windscreen
w
ipers,
dipped
beam
headlamps,
courtesy
lamps,
etc. for
a m
aximum
c
ombined
p
eriod
o
f
t
hirty
m
inutes.
A flat battery prevents the engine from
s
tarting (refer to the corresponding
par
agraph).
This
period
may
be
greatly
reduced
if
t
he
battery
is
not
fully
charged.
If
the
telephone
is
being
used
at
the
s
ame
time
on
the
navigation
system,
i
t
w
ill
be
interrupted
after
1
0
m
inutes.
Practical information
Page 399 of 494
397
C4-2_en_Chap14_index-alpha_ed01-2015
C4-2_en_Chap14_index-alpha_ed01-2015
Reversing lamps .......................................... 24 8
Risk areas (update) ...................................... 3
21
Roof bars
...................................................... 2
62
Roof blind
...............................
........................78
Routine
checks
.................................... 2
19, 220
Running
out of fuel (Diesel)
..........................2
11Ski
flap .............................. ............................112
Snow chains .................................................. 2
41
Spare wheel
...............................
..................235
Speakers
(
fitting)
..........................................2
72
Speed
l
imiter
...............................
......... 199, 201
Speedometer
..............................
...............12-14
Spotlamps,
si
de
....................................1
24, 247
Starting
the engine
......................................16
3
Starting
using another battery
.....................2
57
Steering
mounted controls................... 293, 361
Stop & Start
........................................5
2, 85, 89,
192,
208, 212, 219, 256
Storage
................
.. 101, 102, 104, 107, 108, 113
Storage
c
ompartments
................................10
4
Storage
d
rawer
..............................
...............111
Storage
n
et
....................................................11
3
Storing
driving
positions ....................................................... 95
Stowing
r
ings
..............................
..................113
Sun visor
...................................................... 10
2
Switching
off
the
eng
ine
...............................
...................163
Synchronising
the remote
control
.................................................... 5
8, 63
Synthesiser, voice
........................................ 3
31
System
se
ttings
............................................339
T
able of weights
....................................2
77, 281
Tables
of engines
...............................
.. 275, 279
Safety for children
..................1
35 -149, 157, 159
Screen
menu map
........2
94, 296, 298, 312, 314,
316,
332, 342, 344, 385 -387
Screen,
m
onochrome
...................... 3
7, 39, 385
Screen,
m
ultifunction
(
with audio equipment)
.................. 3
7, 39, 362
Screenwash, front
........................................ 13
0
SCR
(Selective Catalytic
Reduction)
................................................. 2
21
Seat
adjustment
...............................
........ 91, 92
Seat belts
..............................1
41, 154, 156, 157
Seats, electric
................................................ 92
S
eats, rear
...................................................... 96
S
erial number, vehicle
.................................28
6
Service indicator
............................................ 3
0
Service
warning
lamp
...............
.............................................. 19
Servicing
...............................
.........................10
Setting
the clock
.......................... 3
4, 38, 43, 48
Sidelamps
.................... 1
18, 122, 242, 246, 248
Side repeater
..............................
.................247
S
T
Tables of fuses .............................................. 2 51
Tank, AdBlue® additive ........................ 2 21, 226
Tank,
fuel
............................... ....................... 210
Technical data
....................................... 2
75 -286
Telephone
.....................................3
46 -349, 351
Temperature
control for
heated seats
................................................ 93
T
emporary
puncture repair kit
.....................2
29
Ticket
holder
................................................ 10
1
TMC
(Traffic
info)
......................................... 32
6
To o l s
................
............................................. 234
To r c h
..............................
............................... 115
Total distance recorder
.................................. 33
T
ouch screen .................................... 44- 48,
289
Touch screen tablet ( M e nu s)
...............................
................. 44, 290
To w b a r
................
.......................................... 265
Towbar
with
quickly detachable
towball
...............................
......................... 267
Towed loads
......................................... 2
75, 279
Towing
another vehicle
................................ 26
4
Traction
control (ASR)
................................. 15
2
Traffic
information (TA)
........................ 3
27, 364
Traffic
information (TMC)
............................. 32
6
Tr a i l e r
...............
............................................ 265
Trajectory
control systems
........................... 15
2
Trip
computer
............................................ 4
9-52
Trip distance recorder
.................................... 33
T
yre pressures
..............................
...............286
Ty r e s
..............................................................
.10
Tyre under-inflation detection
...............
..................................... 19 0
.
alphabetical index