headlamp Citroen C4 2016 2.G Owner's Guide
[x] Cancel search | Manufacturer: CITROEN, Model Year: 2016, Model line: C4, Model: Citroen C4 2016 2.GPages: 396, PDF Size: 10.22 MB
Page 172 of 396
170
C4-2_en_Chap06_conduite_ed02-2015
Switching off the engine
Energy economy mode
After switching off the engine (position 1- Stop), f
or a maximum of 30 minutes you can still use
f
unctions such as the audio and telematic
s
ystem, the wipers, dipped beam headlamps,
c
ourtesy lamps, ...
F
C
heck
that
the
parking
brake
is
correctly
a
pplied,
particularly
on
sloping
ground.
Never
switch
off
the
ignition
before
the
v
ehicle
is
at
a
complete
stop.
With
the
e
ngine
off,
the
braking
and
steering
a
ssistance
systems
are
also
cut
off:
risk
o
f
loss
of
control
of
the
vehicle.
To
facilitate
unlocking
of
the
steering
c
olumn,
it
is
recommended
that
the
w
heels
be
returned
to
the
straight
ahead
p
osition
before
switching
off
the
engine.
When
you
leave
the
vehicle,
keep
the
k
ey
with
you
and
lock
the
vehicle. For
more information on the
e
nergy economy mode, refer to the
c
orresponding
s
ection.Key left in the "Ignition on" position
If the key has been left in the ignition switch at position 2 (Ignition on) ,
the
ignition will be switched off
a
utomatically after one hour.
To
switch the ignition back on, turn the
k
ey to position 1 (Stop),
then back to
p
osition 2 (Ignition on) .
F
S
top
the
vehicle.
F
W
ith
the
engine
running
at
idle,
turn
the
key
t
o position 1 .
F
R
emove
the
key
from
the
ignition
switch.
F
T
o
lock
the
steering
column,
turn
the
s
teering
until
it
locks.
Driving
Page 217 of 396
215
C4-2_en_Chap07_infos-pratiques_ed02-2015
Before each use
Check that the towball is correctly fitted by verifying the following points:
- t he towball is correctly locked in place (position A),
-
t
he security key lock is on and the key removed; the locking wheel can no longer be
ope
rated,
-
t
he towball must no longer move at all in its carrier; try to shake it by hand.
During use
Never unlock the device when a trailer or load carrier is fitted to the towball.
N ever exceed the maximum authorised weight for the vehicle plus trailer (Gross Train
W
eight - GTW).
Before
driving, check the adjustment of the headlamp beam height.
For
more information on adjusting the headlamps, refer to the corresponding section.
After use
For journeys made without a trailer or load carrier, the trailer harness socket must be folded away, the towball removed and the blanking plug inserted in the carrier. This measure
a
pplies particularly if the towball could hinder visibility of the number plate or lighting.
7
Practical information
Page 221 of 396
219
C4-2_en_Chap07_infos-pratiques_ed02-2015
Load reduction modeE nergy ec onomy m ode
Switching to economy mode
Once this period has elapsed, a message a
ppears in the screen indicating that the
v
ehicle has switched to economy mode and the
a
ctive functions are put on standby.
Exiting economy mode
These functions are reactivated automatically the next time the vehicle is driven.
F
I
n order to resume the use of these
f
unctions immediately, start the engine and
l
et it run for a few minutes.
The
time available to you will then be double
t
he period for which the engine is left running.
H
owever, this period will always be between
five
and thirty minutes.
System
which
manages
the
use
of
certain
f
unctions
according
to
the
level
of
charge
r
emaining
in
the
battery.
When
the
vehicle
is
being
driven,
the
load
r
eduction
function
temporarily
deactivates
c
ertain
functions,
such
as
the
air
conditioning,
t
he
heated
rear
screen...
The deactivated functions are reactivated
automatically
as
soon
as
conditions
permit. System
which
manages
the
period
of
use
of
certain
functions to conserve a sufficient level of
c
harge
in
the
battery.
After
the
engine
has
stopped,
you
can
still
use
functions such as the audio equipment, windscreen
w
ipers,
dipped
beam
headlamps, courtesy
lamps,
etc. for a maximum combined period of
t
hirty minutes.
A flat battery prevents the engine from
s
tarting.
For
more information on the 12 V
b
attery, refer to the corresponding
s
ection.
This
period
may
be
greatly
reduced
if
t
he
battery
is
not
fully
charged.
If
the
telephone
is
being
used
at
the
s
ame
time
with
the
touch
screen
tablet,
i
t
will
be
interrupted
after
10
minutes.
7
Practical information
Page 226 of 396
224
C4-2_en_Chap07_infos-pratiques_ed02-2015
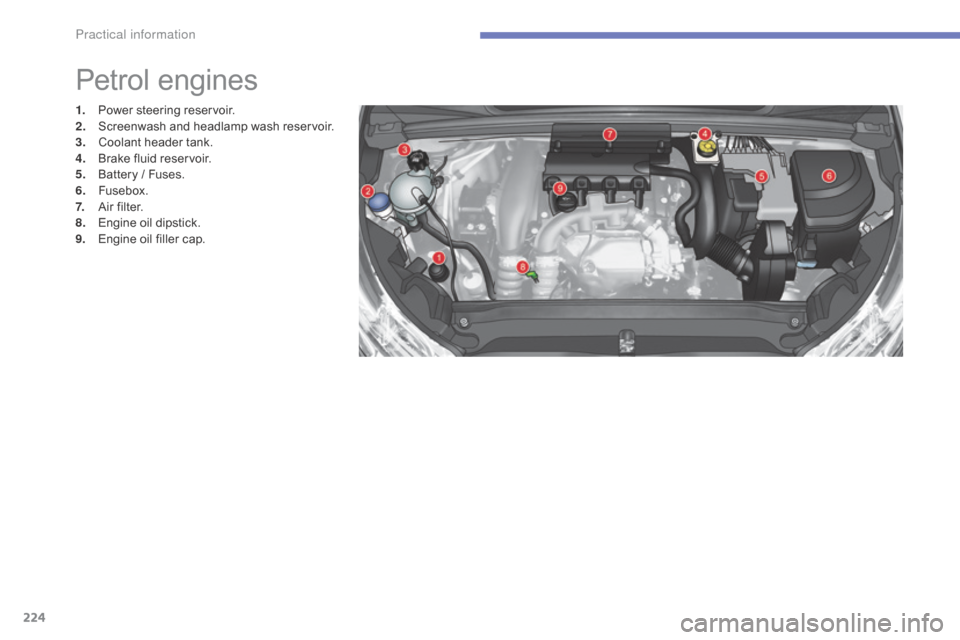
Petrol engines
1. Power steering r eservoir.
2. S creenwash and headlamp wash reservoir.
3.
C
oolant header tank.
4.
B
rake fluid reservoir.
5.
B
attery / Fuses.
6.
F
usebox.
7.
A
ir filter.
8.
E
ngine oil dipstick.
9.
E
ngine oil filler cap.
Practical information
Page 227 of 396
225
C4-2_en_Chap07_infos-pratiques_ed02-2015
* According to engine.
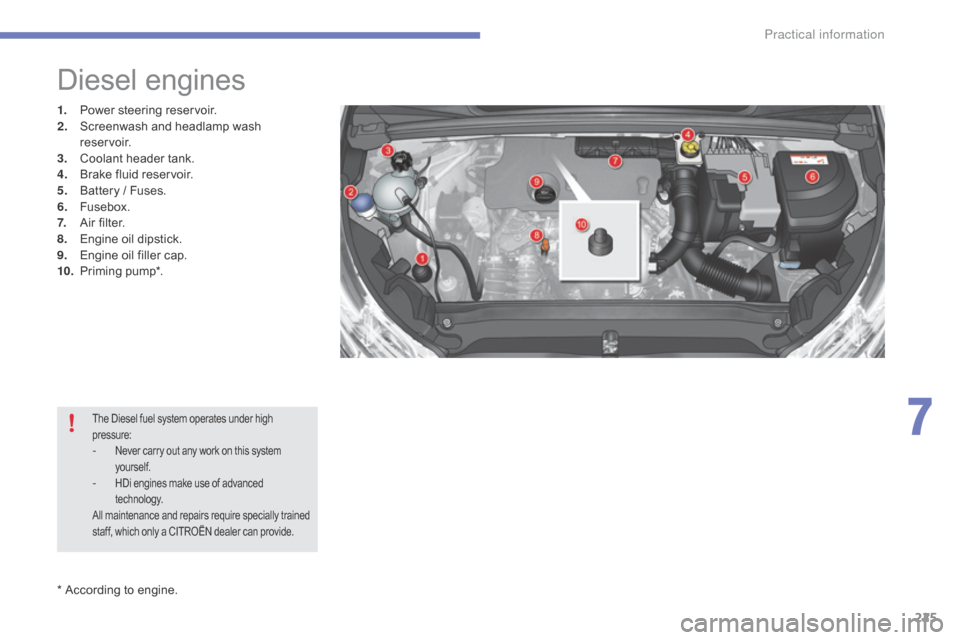
Diesel engines
1. Power steering r eservoir.
2. S creenwash and headlamp wash
reservoir.
3.
C
oolant header tank.
4.
B
rake fluid reservoir.
5.
B
attery / Fuses.
6.
F
usebox.
7.
A
ir filter.
8.
E
ngine oil dipstick.
9.
E
ngine oil filler cap.
10.
P
riming
pu
mp*.
The Diesel fuel system operates under high pressure:
- Never carry out any work on this system y
ourself.
- HDi engines make use of advanced t
echnology.
All
maintenance and repairs require specially trained
s
taff, which only a CITROËN dealer can provide.
7
Practical information
Page 230 of 396
228
C4-2_en_Chap07_infos-pratiques_ed02-2015
Screenwash / headlamp
wash fluid level
Specification of the fluid
To ensure optimum cleaning and to avoid freezing, the fluid should never be topped up or r
eplaced by plain water.
In wintry conditions, the use of a fluid
with
an ethyl alcohol or methanol base is
re
commended.
To
check
the
level
or
top
up
the
f
luid
on
vehicle
fitted
with
headlamp
w
ashers,
immobilise
the
vehicle
and
s
witch
of
the
engine.
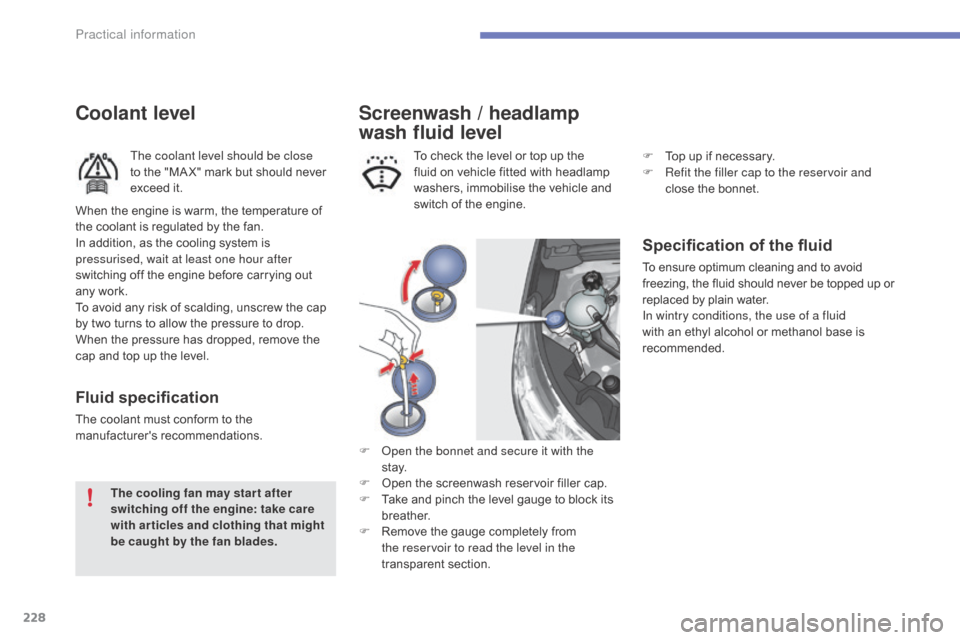
F
O
pen the bonnet and secure it with the
st ay.
F
O
pen
the
screenwash
reservoir
filler
cap.
F
T
ake
and
pinch
the
level
gauge
to
block
its
b
reather.
F
R
emove
the
gauge
completely
from
t
he reservoir to read the level in the
transparent
s
ection.
Coolant level
The coolant level should be close
to the "MA X" mark but should never
e
xceed it.
Fluid specification
The coolant must conform to the manufacturer's r ecommendations.
The cooling fan may star t after
switching off the engine: take care
with articles and clothing that might
be caught by the fan blades.
When
the engine is warm, the temperature of
t
he coolant is regulated by the fan.
In addition, as the cooling system is
p
ressurised, wait at least one hour after
switching off the engine before carrying out
any work.
To avoid any risk of scalding, unscrew the cap
b
y two turns to allow the pressure to drop.
W
hen the pressure has dropped, remove the
c
ap and top up the level. F
T
op up if necessary.
F
R
efit the filler cap to the reservoir and
close the bonnet.
Practical information
Page 253 of 396
251
C4-2_en_Chap08_en-cas-de-panne_ed02-2015
Changing a bulb
The headlamps are fitted with polycarbonate glass with a protective
c
oating:
F
d
o not clean them using a dr y
or abrasive cloth, nor with a
detergent or solvent product,
F
u
se a sponge and soapy water or a
p
H neutral product,
F
w
hen using a high pressure washer
o
n persistent marks, do not keep
t
he lance directed towards the
lamps
or their edges for too long,
s
o as not to damage their protective
c
oating
a
nd
sea
ls.
Changing
a bulb should only be done
a
fter the headlamp has been switched
o
ff for several minutes (risk of serious
b
urns).
F
D
o not touch the bulb directly with
your
fingers, use a lint-free cloth.
It
is imperative to use only anti-
ultraviolet
(UV) type bulbs to avoid
d
amaging
t
he
h
eadlamp.
Always replace a failed bulb with a
new
bulb with the same type and
s
pecification.Front lamps
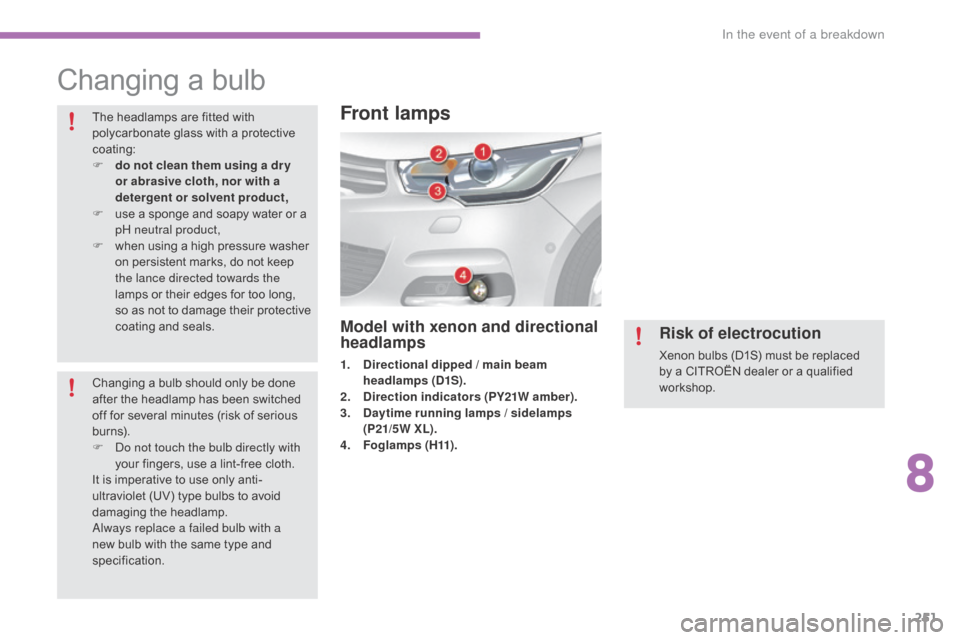
Model with xenon and directional
headlamps
1. Directional dipped / main beam headlamps (D1S).
2.
D
irection indicators (PY21W amber).
3.
D
aytime running lamps / sidelamps
(P21/5W XL).
4.
F
o g l a m p s ( H11) .
Risk of electrocution
Xenon bulbs (D1S) must be replaced by a CITROËN dealer or a qualified
w
orkshop.
8
In the event of a breakdown
Page 254 of 396
252
C4-2_en_Chap08_en-cas-de-panne_ed02-2015
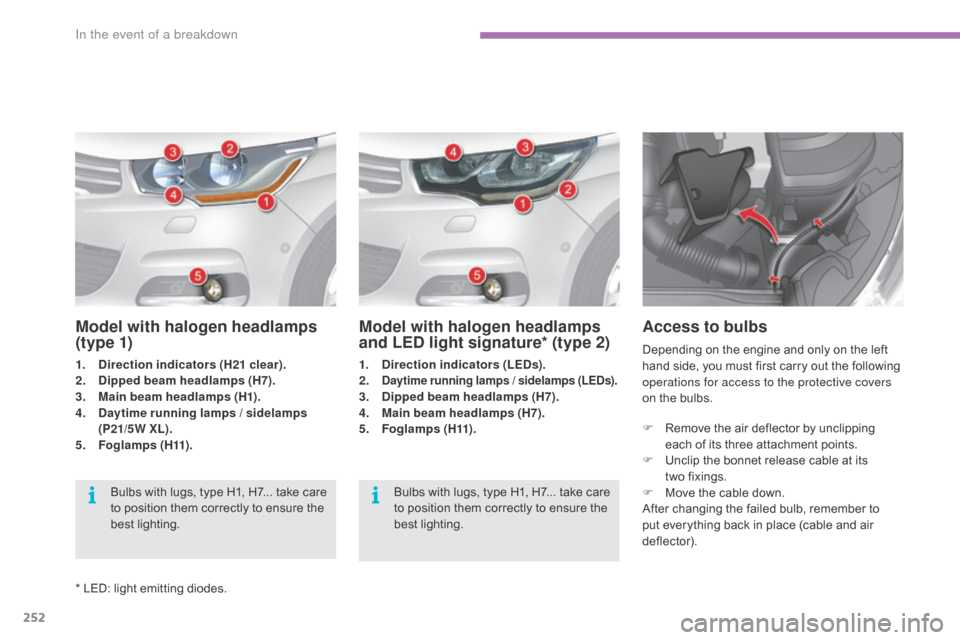
F Remove the air deflector by unclipping e
ach of its three attachment points.
F
U
nclip the bonnet release cable at its
two
fixings.
F
M
ove the cable down.
After
changing the failed bulb, remember to
p
ut everything back in place (cable and air
d
eflector).
Depending
on the engine and only on the left
h
and side, you must first carry out the following
o
perations for access to the protective covers
on the bulbs.
Access to bulbs
Model with halogen headlamps
and LED light signature* (type 2)
1. Direction indicators (LEDs).
2. Daytime running lamps / sidelamps (LEDs).3. Dipped beam headlamps (H7).
4. M
ain beam headlamps (H7).
5.
F
o g l a m p s ( H11) .
Bulbs
with lugs, type H1, H7... take care
t
o position them correctly to ensure the
b
est
l
ighting.
Model with halogen headlamps
(t y p e 1)
1. Direction indicators (H21 clear).
2. Dipped beam headlamps (H7).
3.
M
ain beam headlamps (H1).
4.
D
aytime running lamps / sidelamps
(P21/5W XL).
5.
F
o g l a m p s ( H11) .Bulbs
with lugs, type H1, H7... take care
t
o position them correctly to ensure the
b
est
l
ighting.
*
LED: light emitting diodes.
In the event of a breakdown
Page 255 of 396
253
C4-2_en_Chap08_en-cas-de-panne_ed02-2015
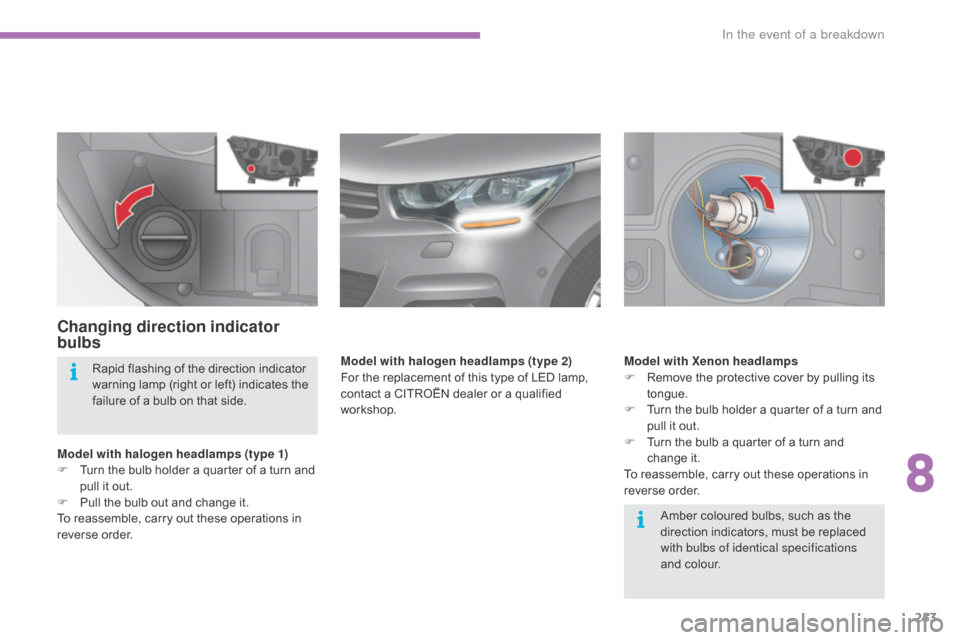
Changing direction indicator
bulbs
Model with halogen headlamps (type 1)
F T urn the bulb holder a quarter of a turn and
p
ull it out.
F
P
ull the bulb out and change it.
To
reassemble, carry out these operations in
r
everse
o
rder. Model with Xenon headlamps
F
R
emove the protective cover by pulling its
t
ongue.
F
T
urn the bulb holder a quarter of a turn and
p
ull it out.
F T urn the bulb a quarter of a turn and c
hange it .
To
reassemble, carry out these operations in
r
everse
o
rder.
Amber
coloured bulbs, such as the
d
irection indicators, must be replaced
w
ith bulbs of identical specifications
and
colour.
Rapid
flashing of the direction indicator
w
arning lamp (right or left) indicates the
f
ailure of a bulb on that side.
Model with halogen headlamps (type 2)
For the replacement of this type of LED lamp,
c
ontact a CITROËN dealer or a qualified
w
orkshop.
8
In the event of a breakdown
Page 256 of 396
254
C4-2_en_Chap08_en-cas-de-panne_ed02-2015
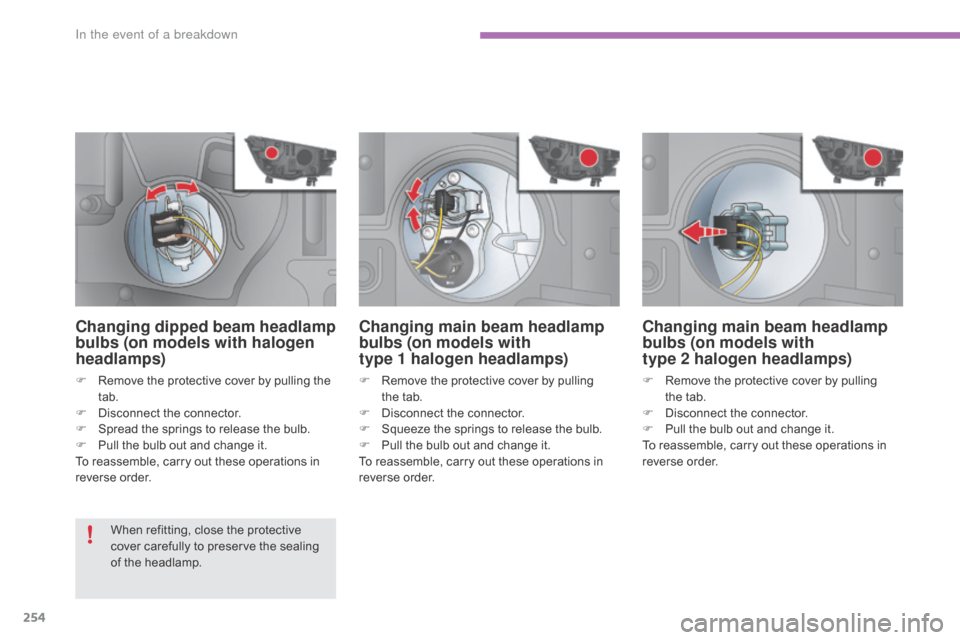
Changing main beam headlamp
bulbs (on models with
type
1
halogen headlamps)
F Remove the protective cover by pulling t
he tab.
F
D
isconnect the connector.
F
S
queeze the springs to release the bulb.
F
P
ull the bulb out and change it.
To
reassemble, carry out these operations in
r
everse
o
rder.
Changing main beam headlamp
bulbs (on models with
type
2
halogen headlamps)
F Remove the protective cover by pulling t
he tab.
F
D
isconnect the connector.
F
P
ull the bulb out and change it.
To
reassemble, carry out these operations in
r
everse
o
rder.
Changing dipped beam headlamp
bulbs (on models with halogen
headlamps)
F Remove the protective cover by pulling the t
ab.
F
D
isconnect the connector.
F
S
pread the springs to release the bulb.
F
P
ull the bulb out and change it.
To
reassemble, carry out these operations in
r
everse
o
rder.
When
refitting, close the protective
c
over carefully to preserve the sealing
o
f the headlamp.
In the event of a breakdown