CITROEN C4 2018 Owners Manual
Manufacturer: CITROEN, Model Year: 2018, Model line: C4, Model: CITROEN C4 2018Pages: 317, PDF Size: 9.31 MB
Page 311 of 317
4
Safety
Localised Assistance Call
If you purchased your vehicle outside the Brand's dealer network, we invite you to have a dealer check the configuration of these services and, if desired, modified to suit your wishes. In a multi-lingual country, configuration is possible in the official national language of your choice.
For technical reasons and in particular to improve the quality of "Telematic services" services to customers, the manufacturer reserves the right to carry out updates to the vehicle's on-board telematic system.
A fault with the system does not prevent the vehicle being driven.
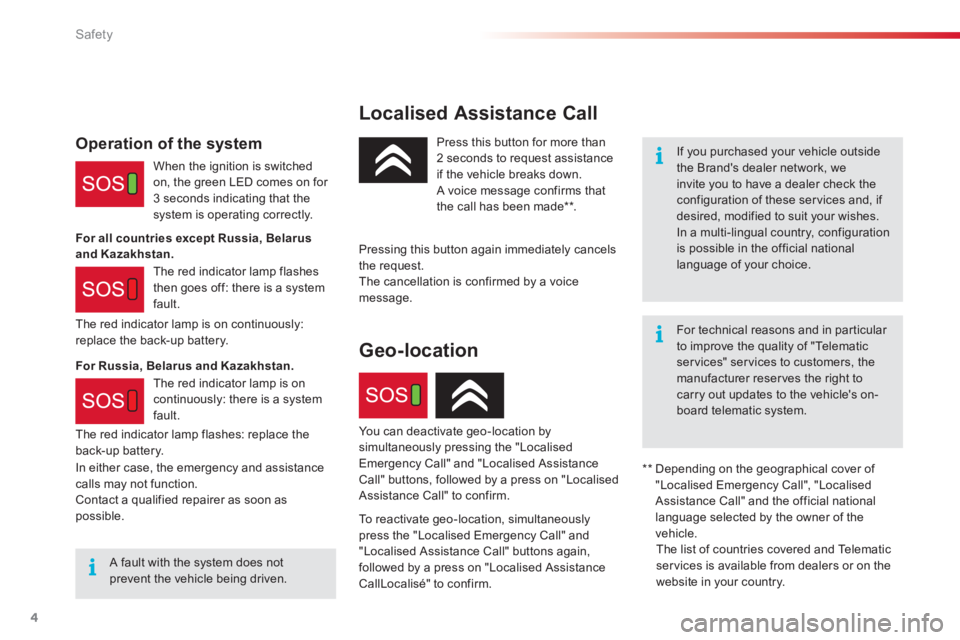
Press this button for more than 2 seconds to request assistance if the vehicle breaks down. A voice message confirms that the call has been made ** .
Pressing this button again immediately cancels the request. The cancellation is confirmed by a voice message.
The red indicator lamp is on continuously: replace the back-up battery.
Operation of the system
When the ignition is switched on, the green LED comes on for 3 seconds indicating that the system is operating correctly.
The red indicator lamp flashes then goes off: there is a system fault.
** Depending on the geographical cover of "Localised Emergency Call", "Localised Assistance Call" and the official national language selected by the owner of the vehicle. The list of countries covered and Telematic services is available from dealers or on the website in your country.
For all countries except Russia, Belarus and Kazakhstan.
For Russia, Belarus and Kazakhstan.
In either case, the emergency and assistance calls may not function. Contact a qualified repairer as soon as possible.
Geo-location
You can deactivate geo-location by simultaneously pressing the "Localised Emergency Call" and "Localised Assistance Call" buttons, followed by a press on "Localised Assistance Call" to confirm.
To reactivate geo-location, simultaneously press the "Localised Emergency Call" and "Localised Assistance Call" buttons again, followed by a press on "Localised Assistance CallLocalisé" to confirm.
The red indicator lamp is on continuously: there is a system fault.
The red indicator lamp flashes: replace the back-up battery.
Page 312 of 317
6
In the event of a breakdown
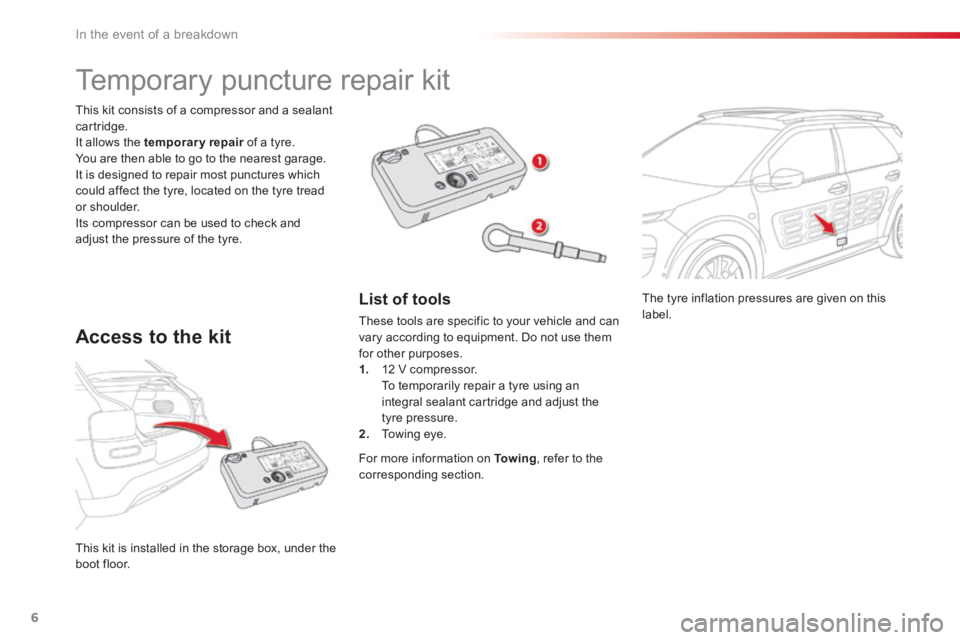
The tyre inflation pressures are given on this label.
This kit is installed in the storage box, under the boot floor.
This kit consists of a compressor and a sealant cartridge. It allows the temporary repair of a tyre. temporary repair of a tyre. temporary repair You are then able to go to the nearest garage. It is designed to repair most punctures which could affect the tyre, located on the tyre tread or shoulder. Its compressor can be used to check and adjust the pressure of the tyre.
Temporary puncture repair kit
Access to the kit
List of tools
These tools are specific to your vehicle and can vary according to equipment. Do not use them for other purposes. 1. 12 V compressor. To temporarily repair a tyre using an
integral sealant cartridge and adjust the tyre pressure. 2. Towing eye.
For more information on To w i n g , refer to the corresponding section.
Page 313 of 317
7
8
In the event of a breakdown
1. Sealing
Repair procedure
Avoid removing any foreign bodies which have penetrated into the tyre.
Switch off the ignition.
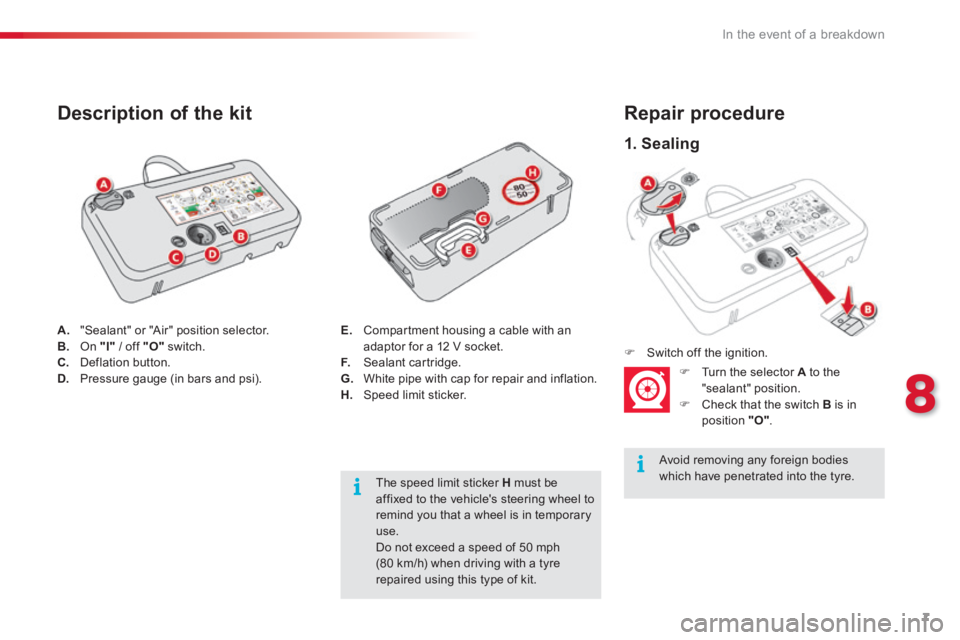
Turn the selector A to the "sealant" position. Check that the switch B is in position "O" .
A. "Sealant" or "Air" position selector. B. On "I" / off "O" switch. C. Deflation button. D. Pressure gauge (in bars and psi).
Description of the kit
The speed limit sticker H must be affixed to the vehicle's steering wheel to remind you that a wheel is in temporary use.
Do not exceed a speed of 50 mph (80 km/h) when driving with a tyre repaired using this type of kit.
E. Compartment housing a cable with an adaptor for a 12 V socket. F. Sealant cartridge. G. White pipe with cap for repair and inflation. H. Speed limit sticker.
Page 314 of 317
8
In the event of a breakdown
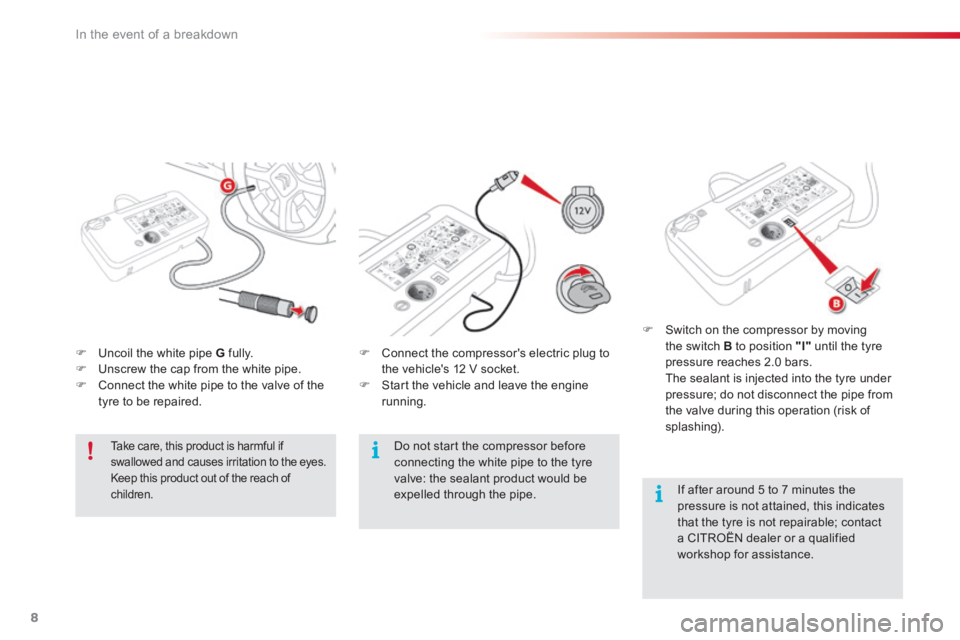
Uncoil the white pipe G fully. Unscrew the cap from the white pipe. Connect the white pipe to the valve of the tyre to be repaired.
Connect the compressor's electric plug to the vehicle's 12 V socket. Start the vehicle and leave the engine running.
Take care, this product is harmful if swallowed and causes irritation to the eyes. Keep this product out of the reach of children.
Do not start the compressor before connecting the white pipe to the tyre valve: the sealant product would be expelled through the pipe.
Switch on the compressor by moving the switch B to position "I" until the tyre pressure reaches 2.0 bars. The sealant is injected into the tyre under pressure; do not disconnect the pipe from the valve during this operation (risk of splashing).
If after around 5 to 7 minutes the pressure is not attained, this indicates that the tyre is not repairable; contact a CITROËN dealer or a qualified workshop for assistance.
Page 315 of 317
9
8
In the event of a breakdown
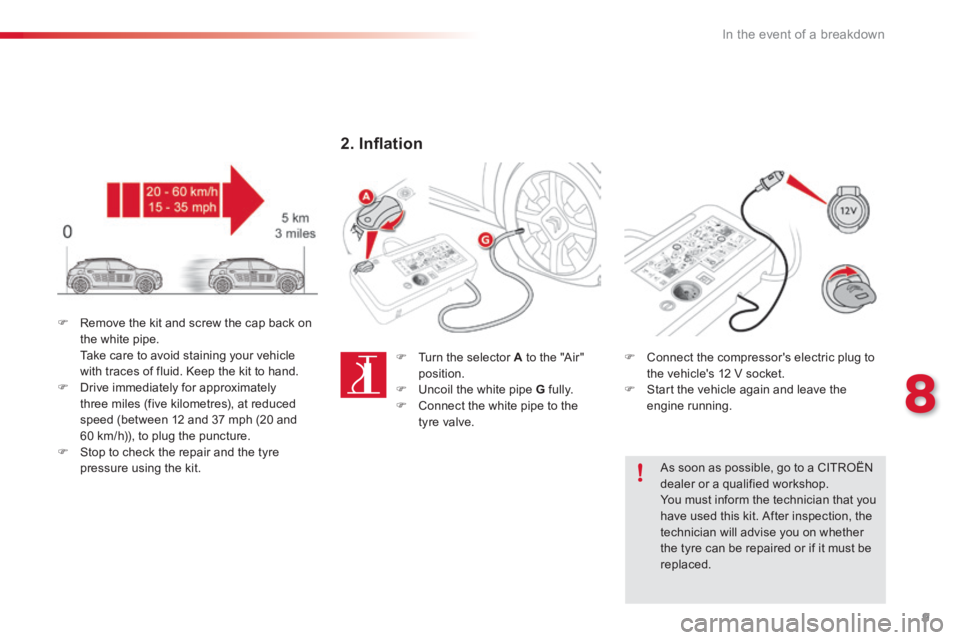
Connect the compressor's electric plug to the vehicle's 12 V socket. Start the vehicle again and leave the engine running.
As soon as possible, go to a CITROËN dealer or a qualified workshop. You must inform the technician that you have used this kit. After inspection, the technician will advise you on whether the tyre can be repaired or if it must be replaced.
Remove the kit and screw the cap back on the white pipe. Take care to avoid staining your vehicle with traces of fluid. Keep the kit to hand. Drive immediately for approximately three miles (five kilometres), at reduced speed (between 12 and 37 mph (20 and 60 km/h)), to plug the puncture. Stop to check the repair and the tyre pressure using the kit.
2 . I n fl a t i o n
Turn the selector A to the "Air" position. Uncoil the white pipe G fully. Connect the white pipe to the tyre valve.
Page 316 of 317
10
In the event of a breakdown
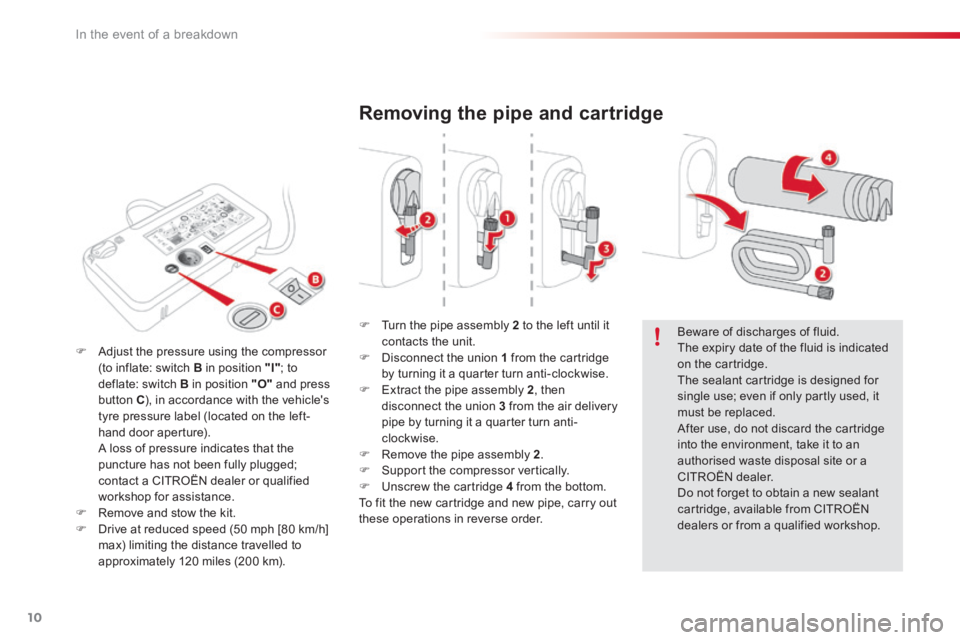
Removing the pipe and cartridge
Turn the pipe assembly 2 to the left until it contacts the unit. Disconnect the union 1 from the cartridge by turning it a quarter turn anti-clockwise. Extract the pipe assembly 2 , then disconnect the union 3 from the air delivery pipe by turning it a quarter turn anti-clockwise. Remove the pipe assembly 2 . Support the compressor vertically. Unscrew the cartridge 4 from the bottom. To fit the new cartridge and new pipe, carry out these operations in reverse order.
Beware of discharges of fluid. The expiry date of the fluid is indicated on the cartridge. The sealant cartridge is designed for single use; even if only partly used, it must be replaced. After use, do not discard the cartridge into the environment, take it to an authorised waste disposal site or a CITROËN dealer. Do not forget to obtain a new sealant cartridge, available from CITROËN dealers or from a qualified workshop.
Adjust the pressure using the compressor (to inflate: switch B in position "I" ; to deflate: switch B in position "O" and press button C ), in accordance with the vehicle's tyre pressure label (located on the left-hand door aperture). A loss of pressure indicates that the puncture has not been fully plugged; contact a CITROËN dealer or qualified workshop for assistance. Remove and stow the kit. Drive at reduced speed (50 mph [80 km/h]
max) limiting the distance travelled to approximately 120 miles (200 km).
Page 317 of 317
11
8
In the event of a breakdown
Checking / adjusting tyre pressures
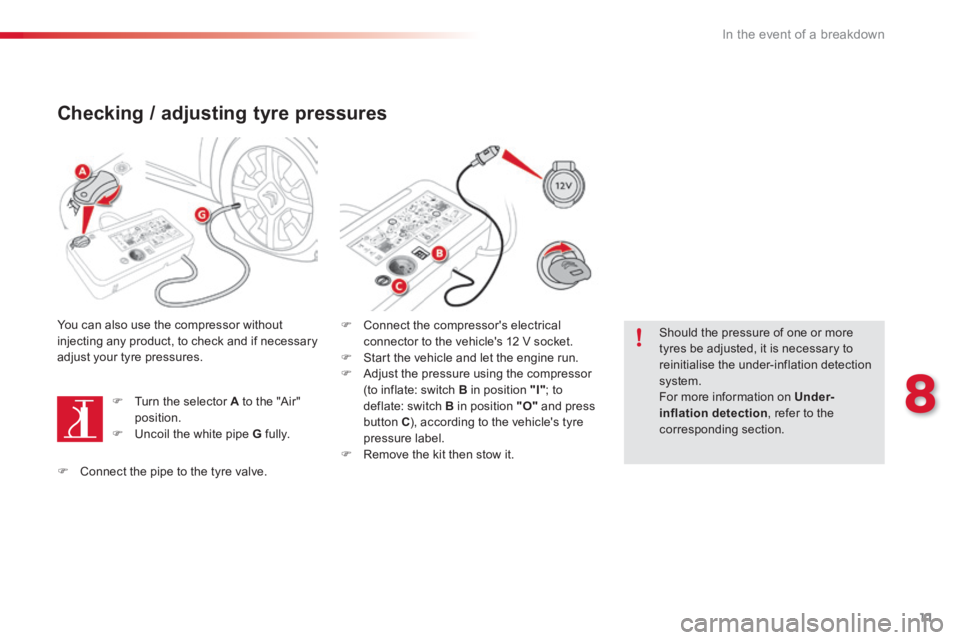
You can also use the compressor without injecting any product, to check and if necessary adjust your tyre pressures.
Turn the selector A to the "Air" position. Uncoil the white pipe G fully.
Connect the compressor's electrical connector to the vehicle's 12 V socket. Start the vehicle and let the engine run. Adjust the pressure using the compressor (to inflate: switch B in position "I" ; to deflate: switch B in position "O" and press button C ), according to the vehicle's tyre pressure label. Remove the kit then stow it.
Should the pressure of one or more tyres be adjusted, it is necessary to reinitialise the under-inflation detection system. For more information on Under-inflation detection , refer to the corresponding section.
Connect the pipe to the tyre valve.