check engine CITROEN C4 2020 Owners Manual
[x] Cancel search | Manufacturer: CITROEN, Model Year: 2020, Model line: C4, Model: CITROEN C4 2020Pages: 260, PDF Size: 7.12 MB
Page 5 of 260
3
Contents
Active lane departure warning system 11 8
Blind spot monitoring 121
Active Safety Brake with Collision Risk Alert and
Intelligent emergency braking assistance
122
Distraction detection 125
Parking sensors 126
Reversing camera 127
Top Rear Vision - 360 vision 128
Park Assist 132
7Practical informationCompatibility of fuels 137
Refuelling 137
Misfuel prevention (Diesel) 138
Charging system (Electric) 138
Charging the traction battery (Electric) 145
Towing device 149
Towing device with quickly detachable towball 150
Roof bars 152
Snow chains 153
Energy economy mode 153
Bonnet 154
Engine compartment 155
Checking levels 156
Checks 158
AdBlue® (BlueHDi) 160
Free-wheeling 162
Advice on care and maintenance 162
8In the event of a breakdownWarning triangle 165
Running out of fuel (Diesel) 165
Tool kit 165
Temporary puncture repair kit 166
Spare wheel 169
Changing a bulb 171
Fuses 174
12
V battery
/ Accessory battery 175
Towing the vehicle 178
9Technical dataEngine technical data and towed loads 181
Petrol engines 182
Diesel engines 183
Electric motor 184
Dimensions 185
Identification markings 185
10Touch screen BLUETOOTH audio systemFirst steps 186
Steering mounted controls 186
Menus 187
Radio 188
DAB (Digital Audio Broadcasting) radio 189
Media 190
Telephone 191
Settings 193
Frequently asked questions 193
11MyCitroën PlayFirst steps 196
Steering mounted controls 197
Menus 197
Radio 198
DAB (Digital Audio Broadcasting) radio 199
Media 200
Telephone 201
Applications 205
Settings 205
Frequently asked questions 206
12CITROËN Connect NavFirst steps 209
Steering mounted controls 210
Menus 210
Voice commands 212
Navigation 215
Connected navigation 218
Applications 220
Radio 223
DAB (Digital Audio Broadcasting) radio 224
Media 224
Telephone 226
Settings 228
Frequently asked questions 230
13Event data recorders
■
Alphabetical index
http://q-r.to/bagGl9
Access to additional videos
Page 9 of 260
7
Eco-driving
Eco-driving
Eco-driving refers to a range of everyday
practices that allow the motorist to optimise
the vehicle's energy consumption (fuel and/or
electricity) and CO
2 emissions.
Optimise your use of the gearbox
With a manual gearbox, move off gently and
change up promptly. While accelerating, change
up early.
With an automatic gearbox, favour automatic
mode. Do not depress the accelerator pedal
heavily or suddenly.
The gear shift indicator prompts you to engage
the most suitable gear. Whenever this indication
is displayed on the instrument panel, follow it
straight away.
With an automatic gearbox, this indicator
appears only in manual mode.
Drive smoothly
Maintain a safe distance between vehicles, use
engine braking rather than the brake pedal and
press the accelerator gradually. These practices
help to save on energy consumption, reduce
CO
2 emissions and decrease general traffic
noise.
When the traffic is flowing smoothly, select the
cruise control.
Control the use of electrical equipment
Before moving off, if the passenger compartment
is too warm, ventilate it by opening the windows
and air vents before using the air conditioning.
At speeds above 31
mph (50 km/h), close the
windows and leave the air vents open.
Consider using equipment that can help keep
the temperature in the passenger compartment
down (e.g.
sunroof blind, window blinds).
Unless automatically regulated, switch off the air
conditioning as soon as the desired temperature
has been reached.
Switch off the demisting and defrosting functions,
if they are not managed automatically.
Switch off the heated seat as soon as possible.
Adapt your use of the headlamps and/or
foglamps to the level of visibility, in accordance
with current legislation in the country in which
you are driving.
Avoid running the engine before moving off,
particularly in winter (other than in severe wintry
conditions: temperature below -23°C). The
vehicle will warm up much faster while driving.
As a passenger, avoid connecting your
multimedia devices (e.g.
film, music, video
game) to help reduce the consumption of energy.
Disconnect all portable devices before leaving
the vehicle.
Limit the causes of excess consumption
Spread loads throughout the vehicle. Place the
heaviest items in the boot as close as possible to
the rear seats. Limit the loads carried in the vehicle and
minimise wind resistance (e.g.
roof bars, roof
rack, bicycle carrier, trailer). Preferably, use a
roof box.
Remove roof bars and roof racks after use.
At the end of winter, remove snow tyres and refit
summer tyres.
Comply with the servicing instructions
Check tyre pressures regularly, with the tyres
cold, referring to the label in the door aperture on
the driver's side.
Carry out this check in particular:
–
before a long journey
.
–
at each change of season.
–
after a long period out of use.
Do not forget the spare wheel and, where
applicable, the tyres on your trailer or caravan.
Have your vehicle serviced regularly (e.g.
engine
oil, oil filter, air filter, passenger compartment
filter, etc.). Observe the schedule of operations in
the manufacturer's service schedule.
With a BlueHDi Diesel engine, if the SCR system
has a fault, your vehicle will emit pollution. Visit
a CITROËN dealer or a qualified workshop
as soon as possible to restore your vehicle's
nitrogen oxide emissions to legal levels.
When filling the fuel tank, do not continue after
the third cut-out of the nozzle, to avoid overflow.
You will only see the fuel consumption of your
new vehicle settle down to a consistent average
after the first 1,900 miles (3,000 kilometres).
Page 17 of 260

15
Instruments
1If automatic release is not available, use manual
release or carry out (3).
Hill start assistFixed, accompanied by the
message "Anti roll-back system
fault".
The system has a fault.
Carry out (3).
Dynamic stability control (DSC)/Anti-slip
regulation (ASR)
Fixed.
The system is deactivated.
The DSC/ASR system is reactivated
automatically when the vehicle is restarted,
and at speeds above approximately 31 mph
(50
km/h).
At speeds below 31
mph (50 km/h), it can be
reactivated manually.
Under-inflationFixed.
The pressure in one or more tyres is too
low.
Check the pressure of the tyres as soon as
possible.
Reinitialise the detection system after adjusting
the pressure.
Under-inflation warning lamp
flashing then fixed and Service
warning lamp fixed.
The tyre pressure monitoring system is faulty.
Under-inflation detection is no longer monitored. Check the tyre pressures as soon as possible
and carry out (3).
Engine pre-heating (Diesel)Temporarily on
(up to approximately 30 seconds in
severe weather conditions).
When switching on the ignition, if the weather
conditions and the engine temperature make it
necessary.
Wait until the warning lamp goes off before
starting.
When the warning lamp goes off, starting will
occur immediately if you press and hold:
–
the clutch pedal with a manual gearbox.
–
the brake pedal with an automatic gearbox.
If the engine does not start, make the engine
starting request again, while keeping your foot
on the pedal.
Particle filter (Diesel)Fixed, accompanied by an audible signal
and a message about the risk of particle
filter blockage.
The particle filter is nearing saturation.
As soon as traffic conditions permit, regenerate
the filter by driving at a speed of at least 37
mph
(60
km/h) until the warning lamp goes off.
Fuel filter (Diesel)Fixed.
The Diesel fuel filter contains water.
Carry out (2) without delay. Risk of damaging the
fuel injection system!
AirbagsFixed.
One of the airbags or seat belt
pyrotechnic pretensioners is faulty.
Carry out (3).
Front passenger airbag (ON)Fixed.
The front passenger airbag is activated.
The control is in the "ON" position.
In this case, do NOT install a "rearward
facing" child seat on the front passenger seat
- risk of serious injury!
Front passenger airbag (OFF)Fixed.
The front passenger airbag is deactivated.
The control is set to the “OFF ” position.
A "rearward facing" child seat can be installed,
unless there is a fault with the airbags (Airbags
warning lamp on).
Low fuel level (Petrol or Diesel)Fixed, with the reserve level shown in red,
accompanied by an audible signal and
the display of a message.
When it first comes on, you have approximately
6 litres of fuel remaining in the tank (reserve).
Until the fuel level is topped up, this alert will
be repeated every time the ignition is switched
on, with increasing frequency as the fuel level
decreases and approaches zero.
Refuel without delay to avoid running out of fuel.
Page 21 of 260

19
Instruments
1
► Press and hold the button located on the end
of the lighting control stalk.
►
Switch on the ignition without starting the
engine; a temporary
display window appears and
a countdown begins.
►
When the display indicates =0, release the
lighting control stalk button; the spanner symbol
disappears.
If you disconnect the battery following
this operation, lock the vehicle and wait
at least 5 minutes for the reset to be
registered.
Reminder of the servicing information
You can view the servicing information by pressing the " Check" button in the
Driving/Vehicle touch screen menu.
Engine oil level indicator
(Depending on version)
On versions fitted with an electric gauge, the
engine oil level status is displayed on the
instrument panel for a few seconds when
the ignition is switched on, after the servicing
information.
The level read will only be correct if the vehicle is on level ground and the engine
has been off for more than 30 minutes.
Oil level correct
This is indicated by the display of " OIL OK" or by
the message "Oil level correct" (depending on
the instrument panel).
Low oil level
This is indicated by the display of " OIL" or by
the message "Oil level incorrect" (depending
on the instrument panel), accompanied by the
lighting of the Service warning lamp and an
audible signal.
If a low oil level is confirmed by a check using
the dipstick, the level must be topped up to avoid
damage to the engine.
For more information on Checking levels, refer
to the corresponding section.
Oil gauge malfunction
This is indicated by the display of " OIL_ _"
or by the message "Oil level measurement
invalid " (depending on the instrument panel),
accompanied by the lighting of the Service
warning lamp and an audible signal.
Contact a CITROËN dealer or a qualified
workshop.
In the event of a malfunction of the
electric gauge, the oil level is no longer
monitored.
If the system is faulty, you must check the
engine oil level using the manual dipstick
located in the engine compartment.
For more information on Checking levels,
refer to the corresponding section.
Coolant temperature
indicator
Depending on the type of instrument panel, this
information is only available in the instrument
panel's customisable area.
With the engine running:
– In zone A, the temperature is correct.
–
In zone
B, the temperature is too high.
The associated warning lamp and the
STOP
warning lamp light up in red on the
instrument panel, accompanied by the display of
a message and an audible signal.
You must stop the vehicle as soon as it is
safe to do so.
Wait a few minutes before switching off the
engine.
Page 22 of 260

20
Instruments
After switching off the ignition, carefully open the bonnet and check the coolant
level.
For more information on Checking
levels, refer to the corresponding
section.
AdBlue® range indicators
(BlueHDi)
The Diesel BlueHDi engines are equipped with
a system that associates the SCR (Selective
Catalytic Reduction) emissions control system
and the Diesel particle filter (DPF) for the
treatment of exhaust gases. They cannot
function without AdBlue
® fluid.
When the level of AdBlue® falls below the
reserve level (between 1,500 and 0 miles (2,400
and 0
km)), a warning lamp lights up when
the ignition is switched on and an estimate
of the distance that can be travelled before
engine starting is prevented is displayed in the
instrument panel.
The engine starting prevention system required by regulations is activated
automatically once the AdBlue
® tank is empty.
It is then no longer possible to start the
engine until the minimum level of AdBlue
® has
been topped up.
Manual display of driving range
While the driving range is greater than
1,500 miles (2,400 km), it is not displayed
automatically.
You can view the range information by pressing the " Check" button
in
the
Driving/Vehicle touch screen menu.
Actions required related to a lack of AdBlue®
The following warning lamps light up when the
quantity of AdBlue® is below the reserve level:
driving range of 1,500 miles (2,400 km).
Together with the warning lamps, messages
regularly remind you of the need to top up to
avoid engine starting being prevented. Refer to
the Warning and indicator lamps section for
details of the messages displayed.
For more information on AdBlue®
(BlueHDi) and in particular on topping
up, refer to the corresponding section.
Warning/ indicator
lamps on Action Remaining
range
Top up. Between 1,500 miles
and 500
miles (2,400
km and 800
km)
Top up as
soon as
possible.Between
500 miles
and 62
miles (800
km and
100
km)
A top-up is
vital, there is
a risk that the
engine will
be prevented
from starting.Between 62
miles and 0
miles (100
km and 0
km)
To be able
to restart the
engine, add at
least 5 litres of
AdBlue
® to the
tank. 0 miles (km)
Page 23 of 260

21
Instruments
1Malfunction of the SCR emissions
control system
Malfunction detection
If a malfunction is detected,
these warning lamps come
on, accompanied by an
audible signal and the
display of an "Emissions
control
fault" message.
The alert is triggered while driving when the
fault is detected for the first time, and thereafter
when switching on the ignition for subsequent
journeys, for as long as the cause of the fault
persists.
If the fault is temporary, the alert
disappears during the next journey, after
self-diagnostic checks of the SCR emissions
control system.
Malfunction confirmed during the
permitted driving phase (between 685
miles and 0
miles (1,100 km and 0 km))
If the fault indication is still displayed
permanently after 31 miles (50 km) of driving, the
fault in the SCR system is confirmed.
The AdBlue warning lamp flashes and
a message is displayed (" Emissions
control
fault: starting prevented in X miles
(kms)"), indicating the driving range in miles or
kilometres.
While driving, the message is displayed every 30
seconds. The alert is repeated when switching
on the ignition.
You can continue driving for up to 685 miles
(1,100
km) before the engine starting
prevention system is triggered.
Have it checked by a CITROËN dealer or
a qualified workshop.
Starting prevented
Every time the ignition is switched on, the
message "Emissions control fault: Starting
prevented" is displayed.
To restart the engine
Contact a CITROËN dealer or a qualified
workshop.
Power indicator (Electric)
CHARGE
Traction battery charging during deceleration
and braking.
ECO
Moderate energy consumption and optimised
driving range.
POWER
Energy consumption by the drive train during
acceleration.
Charge level indicator
(Electric)
The traction battery's actual charge level and
the remaining range are displayed continuously
when the vehicle is started.
With the ignition off, opening the driver's
door activates the indicator.
Associated warning lamps
Two successive alert levels indicate that the
energy available has dropped to a low level:
1st level: Reserve
The state of charge of the traction battery is low.
Fixed, accompanied by an audible signal.
►
V
iew the remaining range on the instrument
panel.
►
Put the vehicle on charge as soon as
possible.
2nd level: Critical
The state of charge of the traction battery is critical.
Fixed, together with the reserve warning lamp,
accompanied by an audible signal.
►
Y
ou must put the vehicle on charge.
Page 24 of 260
22
Instruments
The remaining range is no longer calculated. The drive train power
gradually decreases.
The heating and air conditioning are switched
off (even if the thermal comfort consumption
indicator is not at the "ECO" level).
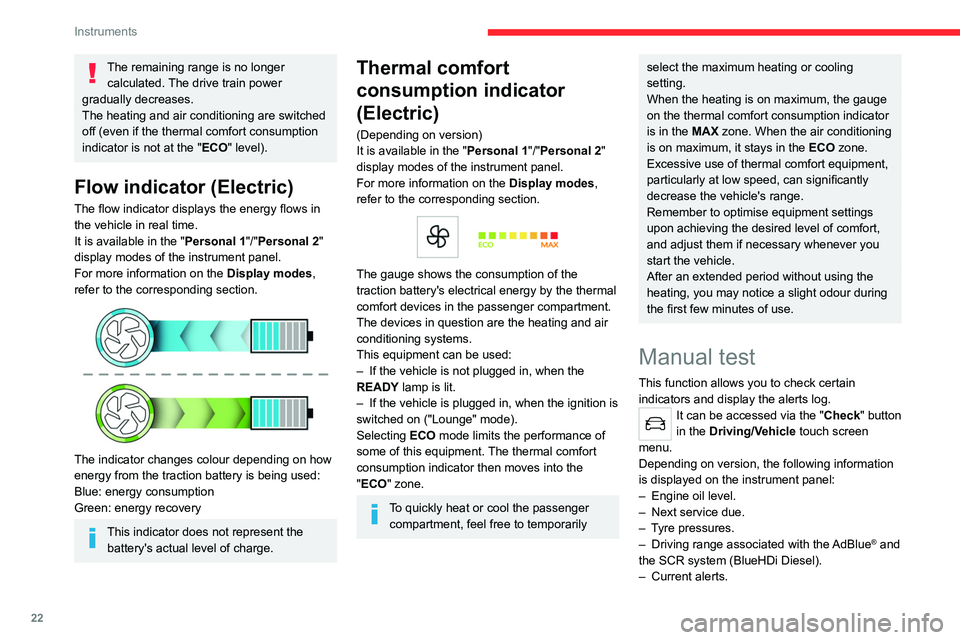
Flow indicator (Electric)
The flow indicator displays the energy flows in
the vehicle in real time.
It is available in the " Personal 1"/"Personal 2"
display modes of the instrument panel.
For more information on the Display modes,
refer to the corresponding section.
The indicator changes colour depending on how
energy from the traction battery is being used:
Blue: energy consumption
Green: energy recovery
This indicator does not represent the battery's actual level of charge.
Thermal comfort
consumption indicator
(Electric)
(Depending on version)
It is available in the " Personal 1"/"Personal 2"
display modes of the instrument panel.
For more information on the Display modes,
refer to the corresponding section.
The gauge shows the consumption of the
traction battery's electrical energy by the thermal
comfort devices in the passenger compartment.
The devices in question are the heating and air
conditioning systems.
This equipment can be used:
–
If the vehicle is not plugged in, when the
READY
lamp is lit.
–
If the vehicle is plugged in, when the ignition is
switched on ("Lounge" mode).
Selecting ECO
mode limits the performance of
some of this equipment. The thermal comfort
consumption indicator then moves into the
"ECO" zone.
To quickly heat or cool the passenger compartment, feel free to temporarily
select the maximum heating or cooling
setting.
When the heating is on maximum, the gauge
on the thermal comfort consumption indicator
is in the MAX zone. When the air conditioning
is on maximum, it stays in the ECO zone.
Excessive use of thermal comfort equipment,
particularly at low speed, can significantly
decrease the vehicle's range.
Remember to optimise equipment settings
upon achieving the desired level of comfort,
and adjust them if necessary whenever you
start the vehicle.
After an extended period without using the
heating, you may notice a slight odour during
the first few minutes of use.
Manual test
This function allows you to check certain
indicators and display the alerts log.
It can be accessed via the "Check" button
in the Driving/Vehicle touch screen
menu.
Depending on version, the following information
is displayed on the instrument panel:
–
Engine oil level.
–
Next service due.
–
T
yre pressures.
–
Driving range associated with the
AdBlue® and
the SCR system (BlueHDi Diesel).
–
Current alerts.
Page 37 of 260
35
Access
2If the fault persists after reinitialisation, contact a
CITROËN dealer or a qualified workshop without
delay.
Doors
Opening
From outside
► After unlocking the vehicle or with the
"Keyless Entry and Start" system electronic key
in the recognition zone, pull the door handle.
From inside
► Pull the interior opening control of a door; this
unlocks the vehicle completely .
With selective unlocking activated:
– Opening the driver's door unlocks
the driver's door only (if the vehicle has not
already been completely unlocked).
–
Opening one of the passenger doors
unlocks the rest of the vehicle.
Closing
If a door is not properly closed, this
warning lamp comes on accompanied by
a message if the engine is running, and an
audible signal when the vehicle is travelling at
more than 6
mph (10 km/h).
Boot
Opening
► After unlocking the vehicle, press the opening
control and then lift the tailgate.
Closing
► Lower the tailgate using one of the interior
grab handles.
In the event of a malfunction or if you
experience difficulty opening or closing
the tailgate, have it checked by a CITROËN
dealer or a qualified workshop without delay,
to avoid the issue deteriorating and prevent
any risk of the tailgate dropping, potentially
causing serious injury.
Back-up release
To manually unlock the boot in the event of a
battery or central locking failure.
Unlocking
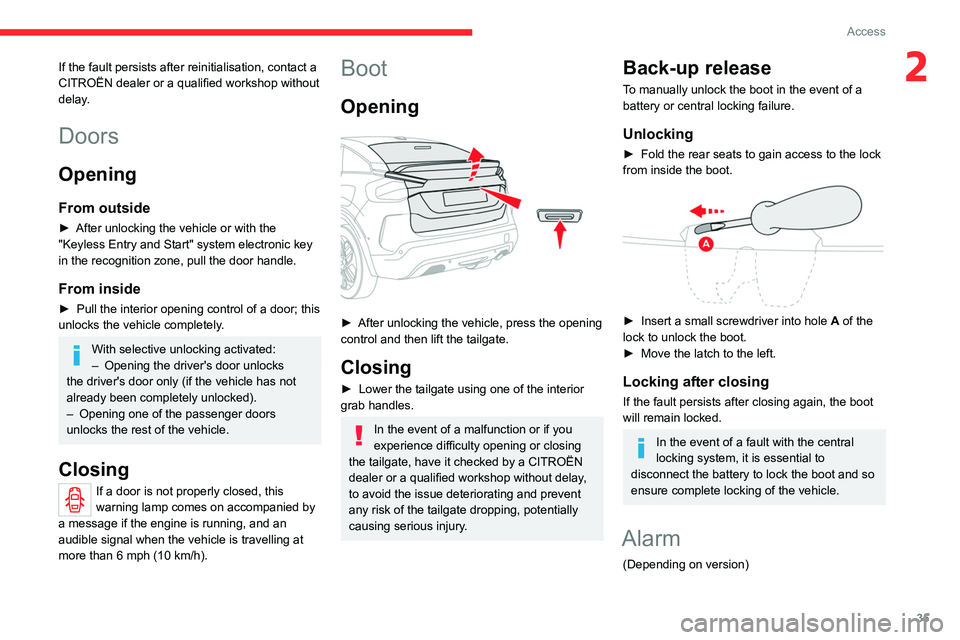
► Fold the rear seats to gain access to the lock
from inside the boot.
► Insert a small screwdriver into hole A of the
lock to unlock the boot.
►
Move the latch to the left.
Locking after closing
If the fault persists after closing again, the boot
will remain locked.
In the event of a fault with the central
locking system, it is essential to
disconnect the battery to lock the boot and so
ensure complete locking of the vehicle.
Alarm
(Depending on version)
Page 47 of 260
45
Ease of use and comfort
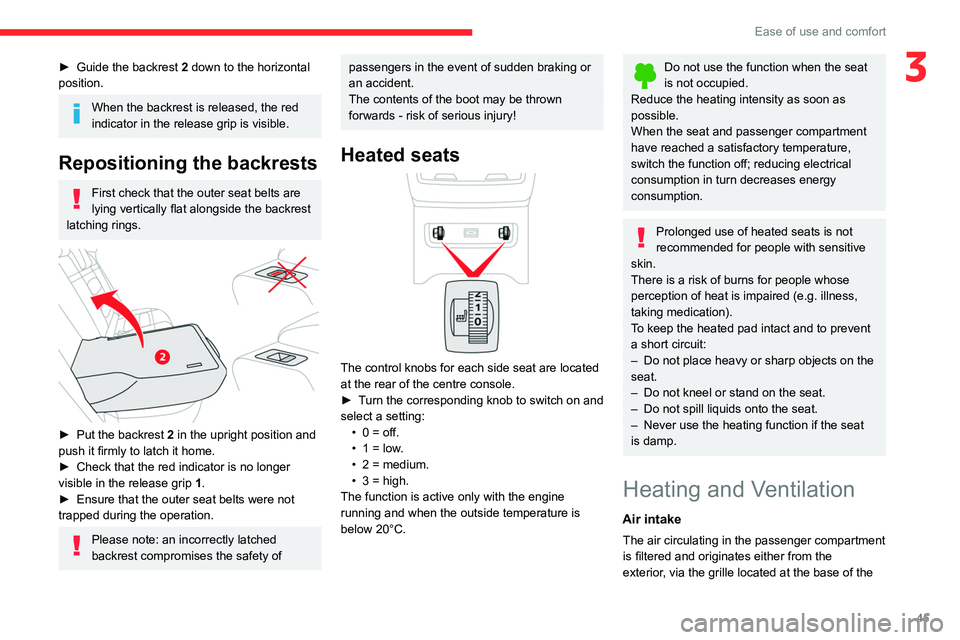
3► Guide the backrest 2 down to the horizontal
position.
When the backrest is released, the red
indicator in the release grip is visible.
Repositioning the backrests
First check that the outer seat belts are
lying vertically flat alongside the backrest
latching rings.
► Put the backrest 2 in the upright position and
push it firmly to latch it home.
►
Check that the red indicator is no longer
visible in the release grip 1
.
►
Ensure that the outer seat belts were not
trapped during the operation.
Please note: an incorrectly latched
backrest compromises the safety of
passengers in the event of sudden braking or
an accident.
The contents of the boot may be thrown
forwards - risk of serious injury!
Heated seats
The control knobs for each side seat are located
at the rear of the centre console.
►
T
urn the corresponding knob to switch on and
select a setting: •
0 = off.
•
1 = low
.
•
2 = medium.
•
3 = high.
The function is active only with the engine
running and when the outside temperature is
below 20°C.
Do not use the function when the seat
is not occupied.
Reduce the heating intensity as soon as
possible.
When the seat and passenger compartment
have reached a satisfactory temperature,
switch the function off; reducing electrical
consumption in turn decreases energy
consumption.
Prolonged use of heated seats is not
recommended for people with sensitive
skin.
There is a risk of burns for people whose
perception of heat is impaired (e.g.
illness,
taking medication).
To keep the heated pad intact and to prevent
a short circuit:
–
Do not place heavy or sharp objects on the
seat.
–
Do not kneel or stand on the seat.
–
Do not spill liquids onto the seat.
–
Never use the heating function if the seat
is damp.
Heating and Ventilation
Air intake
The air circulating in the passenger compartment
is filtered and originates either from the
exterior, via the grille located at the base of the
Page 48 of 260

46
Ease of use and comfort
windscreen, or from the inside in air recirculation
mode.
Controls
Depending on version, the controls are
accessible in the Climate touch screen menu
or are grouped together on the centre console
panel.
Air distribution
1. Windscreen demisting/de-icing vents
2. Front side window demisting/de-icing vents
3. Adjustable and closable side air vents
4. Adjustable and closable central air vents
5. Air outlets to the front footwells
6. Air outlets to the rear footwells
7. Adjustable and closable air vents
Advice
Using the ventilation and air
conditioning system
►
T
o ensure that air is distributed evenly,
keep the external air intake grilles at the base
of the windscreen, the nozzles, the vents, the
air outlets and the air extractor in the boot
free from obstructions.
►
Do not cover the sunshine sensor located
on the dashboard; this sensor is used to
regulate the automatic air conditioning
system.
►
Operate the air conditioning system for at
least 5 to 10 minutes once or twice a month to
keep it in good working order
.
►
If the system does not produce cold air
,
switch it off and contact a CITROËN dealer or
a qualified workshop.
When towing a large load on a steep gradient
in high temperatures, switching off the air
conditioning increases the available engine
power, enhancing the towing capacity.
Avoid driving for too long with the ventilation off or with prolonged operation
of interior air recirculation. Risk of misting and
deterioration of the air quality!
If the interior temperature is very high
after the vehicle has stood for a long
time in the sunshine, air the passenger
compartment for a few moments.
Put the air flow control at a setting high
enough to quickly change the air in the
passenger compartment.
Condensation created by the air
conditioning results in a discharge of
water underneath the vehicle. This is perfectly
normal.
Servicing the ventilation and air
conditioning system
►
Ensure that the passenger compartment
filter is in good condition and have the filter
elements replaced regularly
.
We recommend using a composite passenger
compartment filter. Its specific active additive
helps protect against polluting gases and bad
smells.
►
T
o ensure correct operation of the
air conditioning system, have it checked
according to the recommendations in the
Manufacturer’s service schedule.
Stop & Start
The heating and air conditioning systems
only operate when the engine is running.
Temporarily deactivate the Stop & Start
system to maintain a comfortable temperature
in the passenger compartment.