changing CITROEN C4 2022 User Guide
[x] Cancel search | Manufacturer: CITROEN, Model Year: 2022, Model line: C4, Model: CITROEN C4 2022Pages: 292, PDF Size: 7.79 MB
Page 111 of 292

109
Driving
6blow-out. This is because analysis of the
values read by the wheel's speed sensors
can take several minutes.
The alert may be delayed at speeds below
25 mph (40 km/h), or when adopting a sporty
driving mode.
The alert is kept active until the system is reinitialised.
Reinitialisation
► The system must be reinitialised after any
adjustment to the pressure of one or more tyres,
and after changing one or more wheels.
Before reinitialising the system, make
sure that the pressures of the four tyres
are correct for the conditions of use of the
vehicle and conform to the values written on
the tyre pressure label.
Check the pressures of the four tyres before
performing the reinitialisation.
The system does not advise if a pressure is
incorrect at the time of reinitialisation.
With Touch screen BLUETOOTH audio
system or MyCitroën Play
With the vehicle stationary, the system
can be reinitialised via the Driving touch
screen menu.
With MyCitroën Drive
With the vehicle stationary, the system
can be reinitialised via the Vehicle touch
screen menu.
With MyCitroën Drive Plus
With the vehicle stationary, the system
can be reinitialised in the
Settings>Vehicle touch screen application.
►
Then select
Safety > Tire Pressure Setup.
►
Press
YES to confirm.
The reinitialisation is confirmed by the display of
a message and an audible signal.
Malfunction
In the event of a malfunction,
these warning lamps light up on
the instrument panel.
A message appears, accompanied by an audible
signal.
In this case, the tyre under-inflation monitoring
function is no longer performed.
Have it checked by a CITROËN dealer or a
qualified workshop.
Non-standard or 'space-saver' spare
wheel
The use of this type of spare wheel may
suspend tyre pressure monitoring.
In this case, the malfunction warning lamp
comes on and disappears once the wheel
has been replaced by one of uniform size (the
same as the others), the pressure readjusted
and the reinitialisation carried out.
Driving and manoeuvring
aids - General
recommendations
Driving and manoeuvring aids cannot, in
any circumstances, replace the need for
vigilance on the part of the driver.
The driver must comply with the Highway
Code, must remain in control of the vehicle in
all circumstances and must be able to retake
control of it at all times. The driver must adapt
the speed to climatic conditions, traffic and
the state of the road.
It is the driver's responsibility to constantly
monitor traffic conditions, assess the distance
and relative speed of other vehicles, and
anticipate their manoeuvres before using the
direction indicator and changing lanes.
These systems do not make it possible to
exceed the laws of physics.
Driving aids
You should hold the steering wheel with
both hands, always use the door and interior
mirrors, always leave your feet close to the
pedals and take a break every 2 hours.
Page 114 of 292
11 2
Driving
Sign detected Suggested speed (calculated)
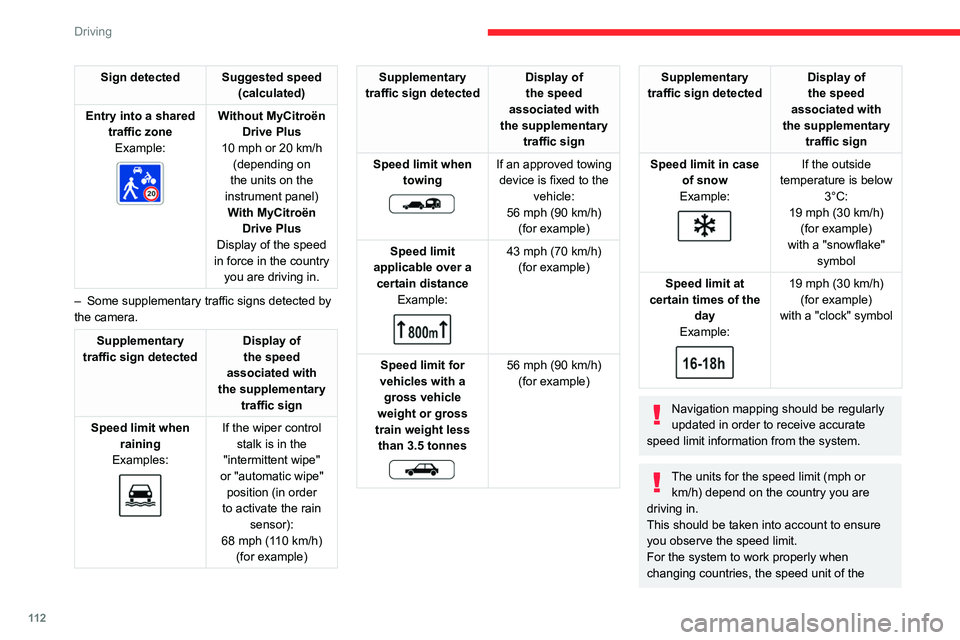
Entry into a shared traffic zoneExample:
Without MyCitroën
Drive Plus
10 mph or 20
km/h
(depending on
the units on the
instrument panel) With MyCitroën Drive Plus
Display of the speed
in force in the country you are driving in.
–
Some supplementary traffic signs detected by
the camera.
Supplementary
traffic sign detected Display of
the speed
associated with
the supplementary traffic sign
Speed limit when raining
Examples:
If the wiper control stalk is in the
"intermittent wipe"
or "automatic wipe" position (in order
to activate the rain sensor):
68 mph (110
km/h)
(for example)
Supplementary
traffic sign detected Display of
the speed
associated with
the supplementary traffic sign
Speed limit when towing
If an approved towing device is fixed to the vehicle:
56 mph (90
km/h)
(for example)
Speed limit
applicable over a certain distance Example:
43 mph (70 km/h)
(for example)
Speed limit for
vehicles with a gross vehicle
weight or gross
train weight less than 3.5 tonnes
56 mph (90 km/h)
(for example)
Supplementary
traffic sign detected Display of
the speed
associated with
the supplementary traffic sign
Speed limit in case of snow
Example:
If the outside
temperature is below 3°C:
19 mph (30
km/h)
(for example)
with a "snowflake" symbol
Speed limit at
certain times of the day
Example:
19 mph (30 km/h)
(for example)
with a "clock" symbol
Navigation mapping should be regularly
updated in order to receive accurate
speed limit information from the system.
The units for the speed limit (mph or km/h) depend on the country you are
driving in.
This should be taken into account to ensure
you observe the speed limit.
For the system to work properly when
changing countries, the speed unit of the
Page 119 of 292

11 7
Driving
6Cruise control
For more information, refer to the
General recommendations on the use
of driving and manoeuvring aids and the
Cruise control - particular
recommendations.
This system automatically maintains the vehicle’s speed at the value programmed
by the driver (speed setting), without the use of
the accelerator pedal.
Cruise control is switched on manually.
It requires a minimum vehicle speed of 25 mph
(40
km/h).
With a manual gearbox, third gear or higher must
be engaged.
With an automatic gearbox, mode
D
or second
gear or higher in mode
M
must be engaged.
With a drive selector, mode
D or B must be
engaged.
Cruise control remains active after
changing gear, regardless of the gearbox
type, on engines fitted with the Stop & Start
function.
Switching off the ignition cancels any
speed setting.
Steering-mounted controls
1. Cruise control selection
2. Switch on/pause cruise control at the
previously saved speed setting
3. Increase/Decrease the speed setting (if
cruise control activated)
Activation of cruise control in progress (if
cruise control deactivated)
4. Activation of cruise control in progress
Use the speed suggested by the Road signs
recognition
For more information on the Road signs
recognition
function, refer to the corresponding
section.
Information displayed on
the instrument panel
5. Cruise control mode selection indication
6. Cruise control on (green)/pause (grey)
indication
7. Speed setting value
8. Speed suggested by the Road signs
recognition function (depending on version)
Switching on/pausing
► Press button 1 to select the cruise control
mode; the function is paused (grey).
►
Press
3 upwards/downwards, or press 4-OK
to activate the cruise control and save a speed
setting as soon as the vehicle speed reaches the
desired level (green).
►
Pressing button 2-I I>
temporarily pauses the
function.
Page 123 of 292

121
Driving
6To change the speed setting using the
speed suggested by the Road signs
recognition function and displayed on the
instrument panel:
–
When passing the sign:
►
Press
4-OK to save the suggested speed.
This value is then immediately shown as the new
speed setting on the instrument panel.
–
After passing the sign:
►
Press
4-OK. The message "OK?" is
displayed to confirm the request to save.
►
Press
4-OK again to save the suggested
speed. The new speed setting value is displayed
on the instrument panel.
Pausing/resumption of cruise control
► Press 2-I I> or depress the brake pedal. The
symbol turns grey.
Cruise control may also have been paused:
–
automatically
, if the electronic stability control
(ESC) system is triggered.
–
by shifting to neutral or engaging reverse gear
.
–
by using the electric parking brake.
–
by unfastening the seat belt.
–
by opening the driver's door
.
►
Press
2-I I> or 4-OK to reactivate cruise
control.
With an EAT8 gearbox or a drive selector,
following braking that has brought the vehicle
to a complete stop, if the traffic conditions do
not allow the vehicle to begin moving again
within 3
seconds of stopping, press
2-I I>
or the
accelerator pedal to move off.
Cruise control remains active following a
gear change.
When cruise control is paused and the
driver tries to reactivate it, the message
"Activation refused, conditions unsuitable "
is temporarily displayed if reactivation is
impossible (required conditions not met).
Changing the programmed speed setting
with the Road signs recognition function
► Press 4-OK to accept the speed suggested
by the function on the instrument panel, then
press again to confirm.
If the selected speed is far from the
current vehicle speed, a strong
acceleration or deceleration is felt.
Changing the inter-vehicle distance
► Press 3 to display the distance setting
thresholds (" Distant", "Normal" or "Close"),
then make successive short presses upwards/
downwards to select a threshold.
After a few seconds, the option is accepted and
will be memorised when the ignition is switched
off.
The driver must keep a sufficient safety distance
from the vehicle in front.
Temporarily exceeding the speed setting
► Depress the accelerator pedal. The system
is suspended as long as the acceleration is
maintained. The speed next to the symbol
disappears from the instrument panel.
Deselecting the system
► Press 1-ASSIST until the symbols disappear
from the instrument panel.
Messages and alerts
The actual order of display of the messages or alerts may be different.
(grey symbol)
Cruise control selected, but
cannot be activated.
All the operating conditions have
not been met.
(grey symbol)
Cruise control selected, awaiting
activation.
All the operating conditions are
met.
(grey symbol)
Cruise control paused, but
cannot be reactivated.
All the operating conditions have
not been met.
Page 132 of 292

130
Driving
Function statusDisplayComments
ON
"Hold the steering
wheel" or "Stay in lane" (depending on version) If, while correcting the trajectory, the system determines that the correction will not be
enough and that a solid line will be crossed: the driver is warned that \
they must provide
additional trajectory adjustment.
If the steering wheel is not held properly, an audible warning sounds, accompanied by
a message, until the trajectory correction is completed or the driver ha\
s grasped the
steering wheel correctly.
The duration of audible warnings will increase if multiple corrections a\
re performed
in quick succession. The warning will become continuous, persisting until the driver
responds.
Operating limits
The system goes into standby automatically in
the following cases:
–
ESC deactivated or operation triggered.
–
Speed below 40 mph (65
km/h) or greater
than 112 mph (180
km/h).
–
Electrical connection to a trailer
.
–
Use of a"space-saver" spare wheel detected
(as detection is not immediate, deactivation of
the system is recommended).
–
Dynamic driving style detected, pressure on
the brake or accelerator pedal.
–
Driving over lane markings.
–
Activation
of the direction indicators.
–
Crossing the inside line on a bend.
–
Driving on a tight bend.
–
Inactivity by the driver detected during
correction.
–
Narrow lane detected.
The following situations may interfere with the operation of the system or
prevent it from working:
–
Insufficient contrast between the road
surface and the side of the road (e.g. shade).
–
Lane markings worn, hidden (snow
, mud)
or multiple (roadworks, etc.),
–
Close proximity to the vehicle in front (lane
markings may not be detected).
–
Roads that are narrow
, winding.
Risk of undesirable operation
The system should be deactivated in the
following situations:
–
When changing a wheel or working near a
wheel.
–
T
owing or with a bicycle carrier on a towing
device, especially with trailer not plugged in or
not approved. –
Road in poor condition, unstable or with very
poor grip (risk of aquaplaning, snow
, ice).
–
Adverse weather conditions.
–
Driving on racing circuits.
–
Driving on a rolling road.
Deactivation/Activation
By default, the system is automatically activated
at every engine start.
With the dashboard button
Page 136 of 292
134
Driving
– Towing a trailer (particularly a trailer without its
own braking system).
–
Carrying long objects on roof bars.
–
Driving with snow chains.
–
Using an automatic car wash.
–
Performing any maintenance (e.g.
changing a
wheel, working inside the engine compartment).
–
Placing the vehicle on a rolling bench in a
workshop.
–
T
owing the vehicle.
–
Following a damage of the windscreen close
to the detection camera.
The system is automatically deactivated when the use of certain types of
"space-saver" spare wheel (smaller diameter)
is detected, or if a fault with the brake pedal
switch or at least two brake lamps is detected.
Following a severe crash (e.g.
with airbag
deployment), the system is automatically
deactivated.
Have it checked by a CITROËN dealer or a
qualified workshop.
In case the detection is degraded or
temporarily unavailable by environment
conditions, then a driver indication is not
displayed (because a driver action is not
requested).
It can be dangerous to drive if the brake
lamps are not in perfect working order.
The driver must not overload the vehicle (keep within the GVW limit and load
height limits for roof bars).
Collision Risk Alert
This function warns the driver if there is a risk
of collision with the preceding vehicle, or with a
pedestrian or cyclist.
Modifying the alert trigger threshold
The trigger threshold determines the sensitivity
with which the function warns of the risk of
collision.
The selected threshold is memorised when the
ignition is switched off.
With Touch screen BLUETOOTH audio
system or MyCitroën Play
The threshold is set via the Driving touch screen menu.
►
Select one of the three pre-defined
thresholds: "
Far", "Normal" or "Close".
With MyCitroën Drive
The threshold is set via the Vehicle touch screen menu.
►
Select one of the three pre-defined
thresholds: "
Far", "Normal" or "Close".
With MyCitroën Drive Plus
The threshold is set via the ADAS touch screen application.
► Select one of the 3 preset thresholds: " Far ",
"Medium" or "Near".
Operation
Depending on the collision risk detected by the
system and the alert trigger threshold chosen
by the driver, different levels of alert may be
triggered and displayed on the instrument panel.
The system takes into account the vehicle
dynamics, the difference speed of the own
vehicle and the object identified for the
collision risk, and the operation of the vehicle
(e.g.
actions on the pedals, steering wheel) to
trigger the alert at the most relevant moment.
(orange)
Level 1: visual alert only, warning that the
preceding vehicle is very close.
The message "Vehicle close" is displayed.
(red)
Level 2: visual and audible alert, warning
that a collision is imminent.
The message "Brake! " is displayed.
Level 3: a micro-braking may be given,
confirming the risk of collision (optional).
While approaching a vehicle too quickly,
the level 2 alert may be displayed
directly.
Important: the level 1 alert depends on the
trigger threshold selected. It reacts only on
moving vehicles. It is disabled automatically
at lower speed.
Page 141 of 292
139
Driving
6The parking sensors are deactivated while the
Park Assist function is measuring a space.
For more information on the Park Assist
function, refer to the corresponding section.
When starting the vehicle, the graphic
and audible aids are only available after
the touch screen has started up.
Operating limits
If the boot is heavily loaded, the vehicle may tilt,
affecting distance measurements.
Malfunction
In the event of a malfunction when
changing into reverse gear, these
warning lamps light up on the instrument panel,
accompanied by the display of a message and
an audible signal (short beep).
Have it checked by a CITROËN dealer or a
qualified workshop.
Reversing camera
For more information, refer to the
General recommendations on the use
of driving and manoeuvring aids .
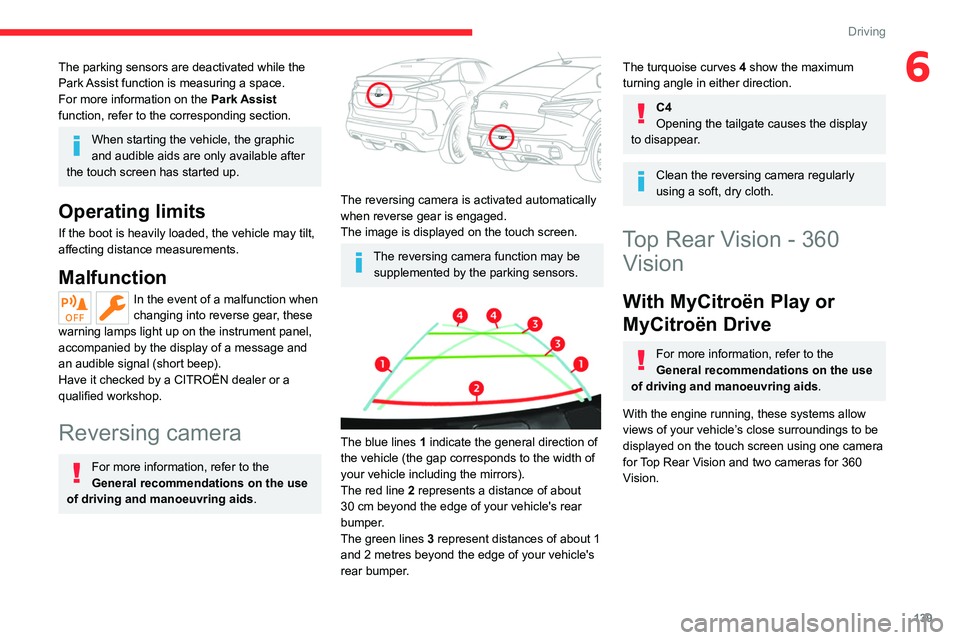
The reversing camera is activated automatically
when reverse gear is engaged.
The image is displayed on the touch screen.
The reversing camera function may be
supplemented by the parking sensors.
The blue lines 1 indicate the general direction of
the vehicle (the gap corresponds to the width of
your vehicle including the mirrors).
The red line 2 represents a distance of about
30
cm beyond the edge of your vehicle's rear
bumper.
The green lines 3 represent distances of about 1
and 2 metres beyond the edge of your vehicle's
rear bumper.
The turquoise curves 4 show the maximum
turning angle in either direction.
C4
Opening the tailgate causes the display
to disappear.
Clean the reversing camera regularly
using a soft, dry cloth.
Top Rear Vision - 360 Vision
With MyCitroën Play or
MyCitroën Drive
For more information, refer to the
General recommendations on the use
of driving and manoeuvring aids .
With the engine running, these systems allow
views of your vehicle’s close surroundings to be
displayed on the touch screen using one camera
for Top Rear Vision and two cameras for 360
Vision.
Page 142 of 292

140
Driving
The screen is divided into two parts with a
contextual view and a view from above the
vehicle in its close surroundings.
The parking sensors supplement the information
on the view from above the vehicle.
Various contextual views may be displayed:
–
Standard view
.
–
180° view
.
–
Zoom view
.
AUTO mode is activated by default.
In this mode, the system chooses the best
view
to display (standard or zoom).
You can change the type of view at any time
during a manoeuvre.
►
Press the button in the bottom left-hand
corner of the touch screen.
►
Select the type of view:
•
"Standard view".
•
"180° view". •
"Zoom view".
• "AUTO view".
The display is immediately updated with the type
of view selected.
The system status is not saved when the ignition
is switched off.
Operating principle
Using one or two cameras, the close
surroundings of the vehicle are recorded whilst
manoeuvring at low speed.
An image from above your vehicle in its close
surroundings is reconstructed (represented
between the brackets) in real time and as the
manoeuvre progresses.
It facilitates the alignment of your vehicle when
parking and allows obstacles close to the vehicle
to be seen. It is automatically deleted if the
vehicle remains stationary for too long.
With 360 Vision, the image is created using
both cameras, when going forward and when
reversing.
When the function is activated, it is possible
that the view from above is not displayed. If the system is activated when the vehicle has
already moved, the view from above can be fully
displayed.
Top Rear Vision
Rear view
To activate the camera located near the number
plate lamps, engage reverse gear and do not
exceed a speed of
6 mph (10 km/h).
The system is deactivated:
–
Automatically
, at speeds above approximately
12 mph (20
km/h),
–
Automatically
, if the boot is opened.
–
When changing out of reverse gear
.
–
By pressing the white arrow in the upper-left
corner of the touch screen.
Page 146 of 292
144
Driving
– Standard view.
– Panoramic view .
Depending on the context, the system chooses
the best view to display (standard or automatic
zoom).
The view type can be changed at any time
during the manoeuvre.
The system status is not saved when the ignition
is switched off.
Operating principle
Using the camera, the vehicle's close
surroundings are recorded during low speed
manoeuvres.
An image from above the vehicle in its close
surroundings is created in real time (on the side
of the screen), as the vehicle progresses.
This view makes it easier to align the vehicle
when parking and to perceive nearby obstacles.
It is automatically deleted if the vehicle remains
stationary for too long.
An additional jet is fitted above the number plate to clean the reversing camera (depending on
version). ►
The washing of the reversing camera is
triggered by operating the rear screenwash.
Settings
In the side menu, this menu allows you to
carry out the following operations:
–
adjust the volume of the audible signal.
–
adjust the brightness.
–
adjust the contrast.
Activation/Deactivation
To activate the camera, engage reverse gear.
The system is deactivated:
–
when changing out of reverse gear
.
–
by pressing the cross in the top left-hand
corner of the touch screen.
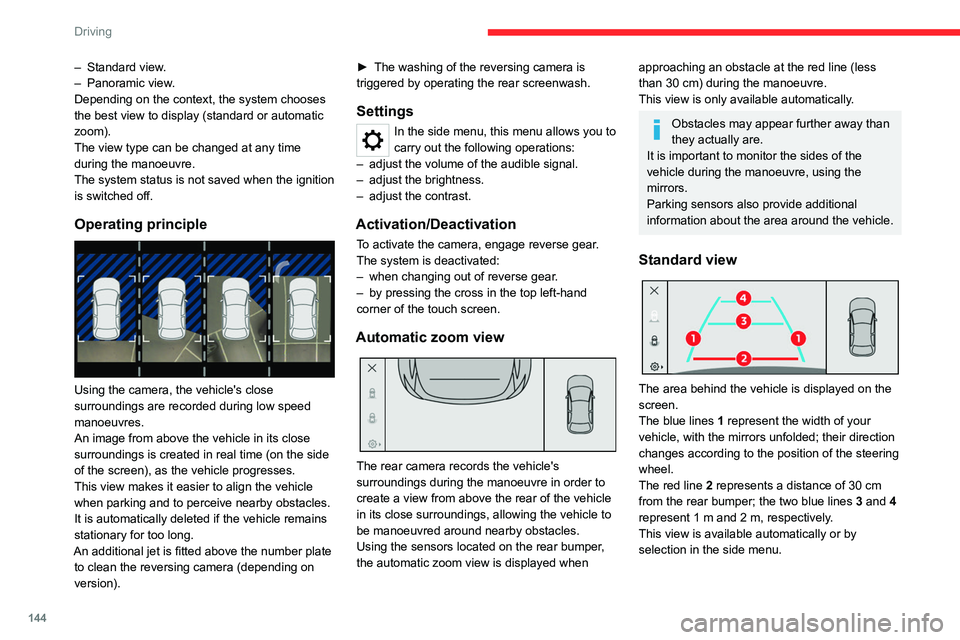
Automatic zoom view
The rear camera records the vehicle's
surroundings during the manoeuvre in order to
create a view from above the rear of the vehicle
in its close surroundings, allowing the vehicle to
be manoeuvred around nearby obstacles.
Using the sensors located on the rear bumper,
the automatic zoom view is displayed when
approaching an obstacle at the red line (less
than 30 cm) during the manoeuvre.
This view is only available automatically.
Obstacles may appear further away than
they actually are.
It is important to monitor the sides of the
vehicle during the manoeuvre, using the
mirrors.
Parking sensors also provide additional
information about the area around the vehicle.
Standard view
The area behind the vehicle is displayed on the
screen.
The blue lines 1 represent the width of your
vehicle, with the mirrors unfolded; their direction
changes according to the position of the steering
wheel.
The red line 2 represents a distance of 30
cm
from the rear bumper; the two blue lines 3 and 4
represent 1
m and 2 m, respectively.
This view is available automatically or by
selection in the side menu.
Page 148 of 292
146
Driving
– adjust the volume of the audible signal.
– adjust the brightness.
–
adjust the contrast.
Activation/Deactivation
Automatic
With the rear camera, engine running and
vehicle stationary, rear vision is displayed
automatically if reverse gear is engaged.
With the front camera, engine running and speed
below 10 mph (16 km/h), rear vision is displayed
automatically if a gear is engaged.
Manual
► In the ADAS touch screen application,
select Functions>Panoramic Camera.
The system is deactivated:
–
automatically for the rear
, when changing out
of reverse gear.
–
automatically for the front, above
approximately 10 mph (16 km/h).
–
by pressing the cross in the top left-hand
corner of the touch screen.
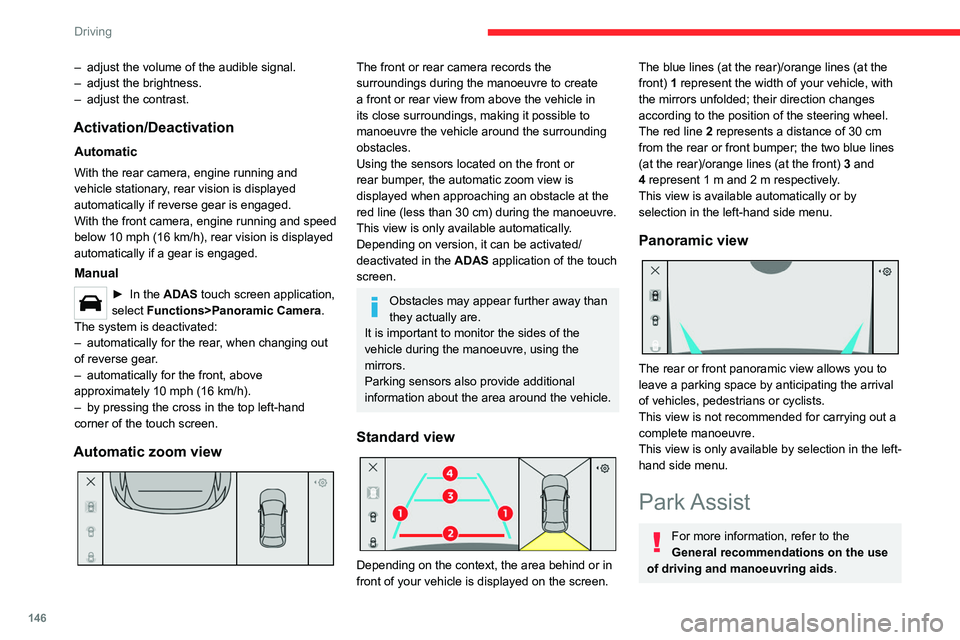
Automatic zoom view
The front or rear camera records the
surroundings during the manoeuvre to create
a front or rear view from above the vehicle in
its close surroundings, making it possible to
manoeuvre the vehicle around the surrounding
obstacles.
Using the sensors located on the front or
rear
bumper, the automatic zoom view is
displayed when approaching an obstacle at the
red line (less than 30 cm) during the manoeuvre.
This view is only available automatically.
Depending on version, it can be activated/
deactivated in the ADAS application of the touch
screen.
Obstacles may appear further away than
they actually are.
It is important to monitor the sides of the
vehicle during the manoeuvre, using the
mirrors.
Parking sensors also provide additional
information about the area around the vehicle.
Standard view
Depending on the context, the area behind or in
front of your vehicle is displayed on the screen.
The blue lines (at the rear)/orange lines (at the
front) 1 represent the width of your vehicle, with
the mirrors unfolded;
their direction changes
according to the position of the steering wheel.
The red line 2 represents a distance of 30 cm
from the rear or front bumper; the two blue lines
(at the rear)/orange lines (at the front)
3
and
4
represent 1 m and 2 m respectively.
This view is available automatically or by
selection in the left-hand side menu.
Panoramic view
The rear or front panoramic view allows you to
leave a parking space by anticipating the arrival
of vehicles, pedestrians or cyclists.
This view is not recommended for carrying out a
complete manoeuvre.
This view is only available by selection in the left-
hand side menu.
Park Assist
For more information, refer to the
General recommendations on the use
of driving and manoeuvring aids .