window CITROEN C4 2023 User Guide
[x] Cancel search | Manufacturer: CITROEN, Model Year: 2023, Model line: C4, Model: CITROEN C4 2023Pages: 292, PDF Size: 7.79 MB
Page 46 of 292
44
Access
Ensure that any luggage or accessories
carried on the roof bars do not interfere
with the movement of the sunroof.
Do not place heavy loads on the movable
glass panel of the sunroof.
If the sunroof is wet, following a shower
or washing the vehicle, wait until it is
completely dry before opening.
Do not operate the sunroof if it is covered by
snow or ice - risk of damage!
Use only plastic scrapers to remove snow or
ice from the sunroof.
Regularly check the condition of the
sunroof seals (e.g. presence of dust,
dead leaves).
If using a car wash, check first that the roof is
correctly closed and keep the high-pressure
jet at least 30 centimetres from the seals.
Never leave the vehicle with the sunroof
open.
Operation
When opening the sunroof fully, the movable
glass moves to a partially open position, then
slides over the roof. Any intermediate position is
possible.
Before operating the sunroof control
button, ensure that no object or person
might prevent the movement.
Pay particular attention to children when
operating the sunroof.
If something is trapped when operating the
sunroof, reverse the movement of the sunroof
by pressing the control button in question.
The driver must ensure that passengers use
the sunroof correctly.
Any manual intervention on the position of
the sunroof may disturb the anti-pinch device.
Perform a reinitialisation.
Anti-pinch system
If the sunroof encounters an obstacle when
closing, the movement is automatically reversed.
Opening/closing the sunroof
► To open the sunroof, use the part of the
button located towards the rear.
►
T
o close the sunroof, use the part of the
button located towards the front.
Operating the button
► Pressing the button beyond its point of
resistance opens or closes the sunroof fully .
►
Pressing the button again stops the
movement in progress.
►
By keeping the button pressed (without going
beyond the point of resistance), the movement of
the glass stops when this button is released.
► When the sunroof is closed: pressing once
without passing the point of resistance moves it
to the partially open position.
►
When the sunroof is partially open: pressing
once on the front part of the button, without
going beyond the point of resistance, closes it
completely
.
The sunroof and windows can be closed by holding down the remote control
locking button.
Opening/closing the blind
► To open the blind, pull its handle backwards
until the desired position is reached.
►
T
o close the blind, push its handle forwards
until the desired position is reached.
Reinitialisation
Reinitialisation is required after reconnecting the
battery, or if the sunroof malfunctions or moves
in a jerky manner.
►
Check that nothing is affecting the movement
of the sunroof and that the seals are clean.
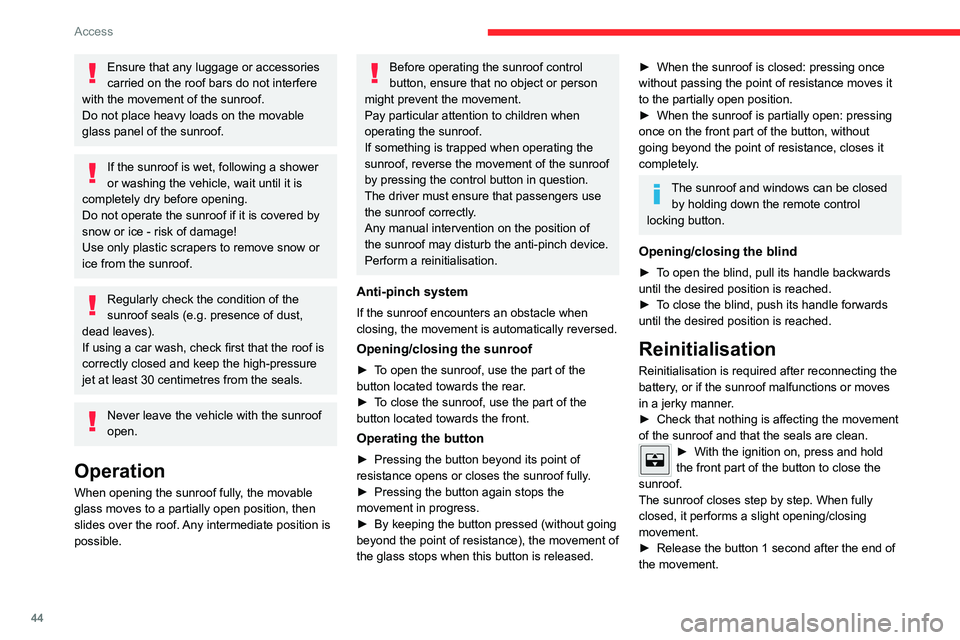
► With the ignition on, press and hold
the front part of the button to close the
sunroof.
The sunroof closes step by step. When fully
closed, it performs a slight opening/closing
movement.
►
Release the button 1 second after the end of
the movement.
Page 53 of 292

51
Ease of use and comfort
3consumption in turn decreases energy
consumption.
Prolonged use of heated seats is not
recommended for people with sensitive
skin.
There is a risk of burns for people whose
perception of heat is impaired (e.g.
illness,
taking medication).
To keep the heated pad intact and to prevent
a short circuit:
–
Do not place heavy or sharp objects on the
seat.
–
Do not kneel or stand on the seat.
–
Do not spill liquids onto the seat.
–
Never use the heating function if the seat
is damp.
Heating and Ventilation
Air intake
The air circulating in the passenger compartment
is filtered and originates either from the
exterior, via the grille located at the base of the
windscreen, or from the inside in air recirculation
mode.
Controls
Depending on version, the controls are
accessible in the touch screen or are
grouped together on the centre console panel.
Air distribution
1. Windscreen demisting/de-icing vents
2. Front side window demisting/de-icing vents
3. Adjustable and closable side air vents
4. Adjustable and closable central air vents
5. Air outlets to the front footwells
6. Air outlets to the rear footwells
7. Adjustable and closable air vents
Advice
Using the ventilation and air
conditioning system
►
T
o ensure that air is distributed evenly,
keep the external air intake grilles at the base
of the windscreen, the nozzles, the vents, the
air outlets and the air extractor in the boot
free from obstructions.
► Do not cover the sunshine sensor located
on the dashboard; this sensor is used to
regulate the automatic air conditioning
system.
►
Operate the air conditioning system for at
least 5 to 10 minutes once or twice a month to
keep it in good working order
.
►
If the system does not produce cold air
,
switch it off and contact a CITROËN dealer or
a qualified workshop.
When towing a large load on a steep gradient
in high temperatures, switching off the air
conditioning increases the available engine
power, enhancing the towing capacity.
Avoid driving for too long with the ventilation off or with prolonged operation
of interior air recirculation. Risk of misting and
deterioration of the air quality!
If the interior temperature is very high
after the vehicle has stood for a long
time in the sunshine, air the passenger
compartment for a few moments.
Put the air flow control at a setting high
enough to quickly change the air in the
passenger compartment.
Condensation created by the air
conditioning results in a discharge of
water underneath the vehicle. This is perfectly
normal.
Page 54 of 292
52
Ease of use and comfort
Servicing the ventilation and air
conditioning system
►
Ensure that the passenger compartment
filter is in good condition and have the filter
elements replaced regularly
.
We recommend using a composite passenger
compartment filter. Its specific active additive
helps protect against polluting gases and bad
smells.
►
T
o ensure correct operation of the
air conditioning system, have it checked
according to the recommendations in the
Manufacturer’s service schedule.
Stop & Start
The heating and air conditioning systems
only operate when the engine is running.
Temporarily deactivate the Stop & Start
system to maintain a comfortable temperature
in the passenger compartment.
For more information on the Stop &
Start
system, refer to the corresponding
section.
ECO driving mode
Selecting this mode reduces electrical
energy consumption, but restricts the
performance of the heating and air
conditioning systems, although it does not
deactivate them.
Manual air conditioning
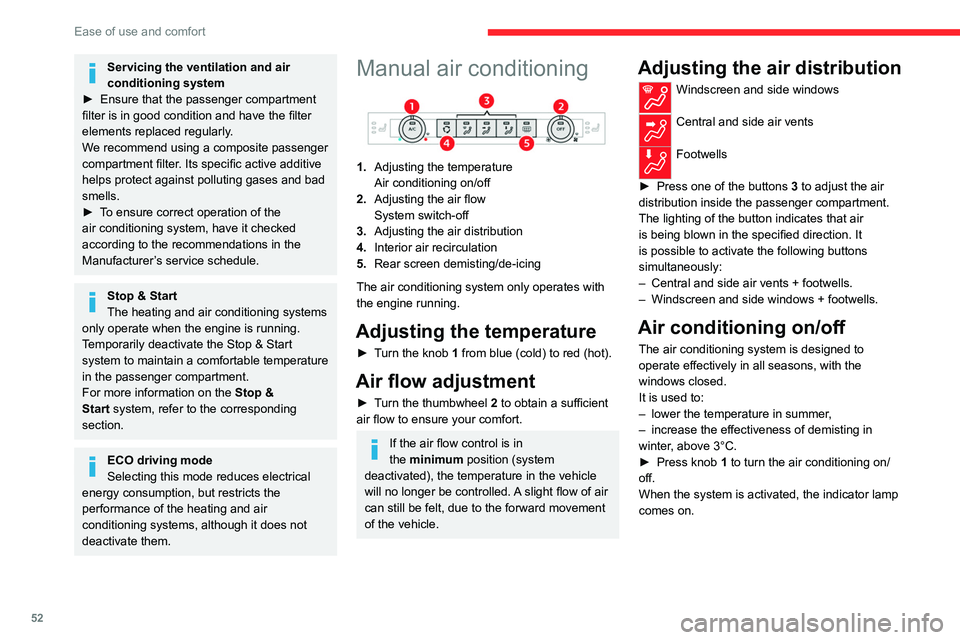
1. Adjusting the temperature
Air conditioning on/off
2. Adjusting the air flow
System switch-off
3. Adjusting the air distribution
4. Interior air recirculation
5. Rear screen demisting/de-icing
The air conditioning system only operates with
the engine running.
Adjusting the temperature
► Turn the knob 1 from blue (cold) to red (hot).
Air flow adjustment
► Turn the thumbwheel 2 to obtain a sufficient
air flow to ensure your comfort.
If the air flow control is in
the minimum position (system
deactivated), the temperature in the vehicle
will no longer be controlled. A slight flow of air
can still be felt, due to the forward movement
of the vehicle.
Adjusting the air distribution
Windscreen and side windows
Central and side air vents
Footwells
►
Press one of the buttons
3 to adjust the air
distribution inside the passenger compartment.
The lighting of the button indicates that air
is being blown in the specified direction. It
is possible to activate the following buttons
simultaneously:
–
Central and side air vents + footwells.
–
Windscreen and side windows + footwells.
Air conditioning on/off
The air conditioning system is designed to
operate effectively in all seasons, with the
windows closed.
It is used to:
–
lower the temperature in summer
,
–
increase the effectiveness of demisting in
winter
, above 3°C.
►
Press knob
1 to turn the air conditioning on/
off.
When the system is activated, the indicator lamp
comes on.
Page 56 of 292
54
Ease of use and comfort
Automatic Comfort programme
This automatic mode ensures optimum
management of the passenger compartment
temperature, air flow and air distribution, based
on the selected comfort level.
►
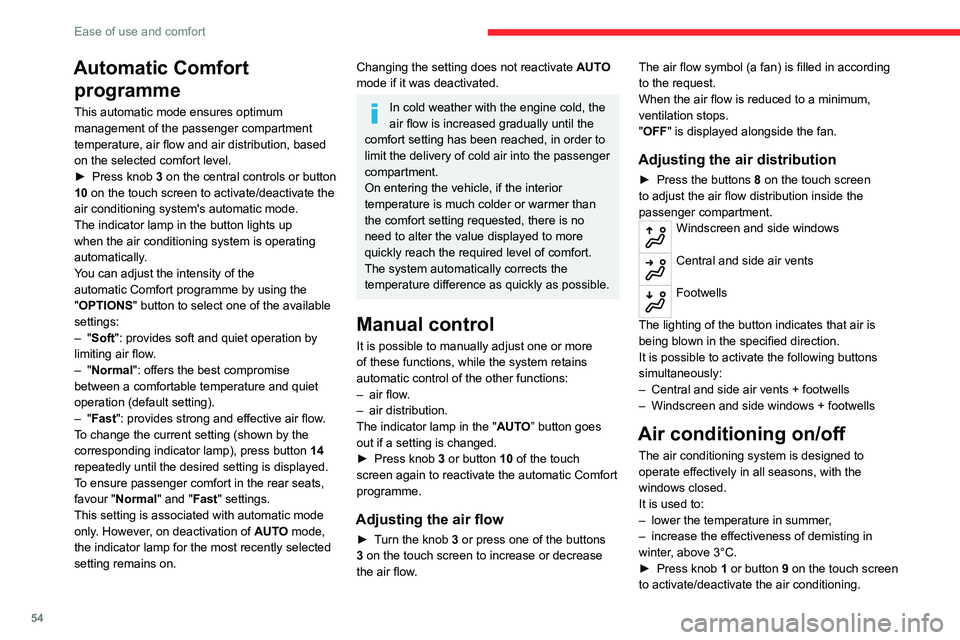
Press knob
3 on the central controls or button
10 on the touch screen to activate/deactivate the
air conditioning system's automatic mode.
The indicator lamp in the button lights up
when the air conditioning system is operating
automatically.
You can adjust the intensity of the
automatic Comfort programme by using the
"OPTIONS "
button to select one of the available
settings:
–
"Soft": provides soft and quiet operation by
limiting air flow.
–
"Normal": offers the best compromise
between a comfortable temperature and quiet
operation (default setting).
–
"Fast": provides strong and effective air flow.
To change the current setting (shown by the
corresponding indicator lamp), press button
14
repeatedly until the desired setting is displayed.
To ensure passenger comfort in the rear seats,
favour "Normal" and "Fast" settings.
This setting is associated with automatic mode
only. However, on deactivation of
AUTO mode,
the indicator lamp for the most recently selected
setting remains on.
Changing the setting does not reactivate AUTO
mode if it was deactivated.
In cold weather with the engine cold, the
air flow is increased gradually until the
comfort setting has been reached, in order to
limit the delivery of cold air into the passenger
compartment.
On entering the vehicle, if the interior
temperature is much colder or warmer than
the comfort setting requested, there is no
need to alter the value displayed to more
quickly reach the required level of comfort.
The system automatically corrects the
temperature difference as quickly as possible.
Manual control
It is possible to manually adjust one or more
of these functions, while the system retains
automatic control of the other functions:
–
air flow
.
–
air distribution.
The indicator lamp in the " AUT
O” button goes
out if a setting is changed.
►
Press knob
3 or button 10 of the touch
screen again to reactivate the automatic Comfort
programme.
Adjusting the air flow
► Turn the knob 3 or press one of the buttons
3 on the touch screen to increase or decrease
the air flow. The air flow symbol (a fan) is filled in according
to the request.
When the air flow is reduced to a minimum,
ventilation stops.
"OFF
" is displayed alongside the fan.
Adjusting the air distribution
► Press the buttons 8 on the touch screen
to adjust the air flow distribution inside the
passenger compartment.
Windscreen and side windows
Central and side air vents
Footwells
The lighting of the button indicates that air is
being blown in the specified direction.
It is possible to activate the following buttons
simultaneously:
–
Central and side air vents + footwells
–
Windscreen and side windows + footwells
Air conditioning on/off
The air conditioning system is designed to
operate effectively in all seasons, with the
windows closed.
It is used to:
–
lower the temperature in summer
,
–
increase the effectiveness of demisting in
winter
, above 3°C.
►
Press knob
1 or button 9 on the touch screen
to activate/deactivate the air conditioning.
Page 58 of 292
56
Ease of use and comfort
It is recommended that you avoid a difference of
more than 3°C in the settings for left and right.
Temperature
synchronisation
The driver side temperature setting is applied to
the passenger side.
►
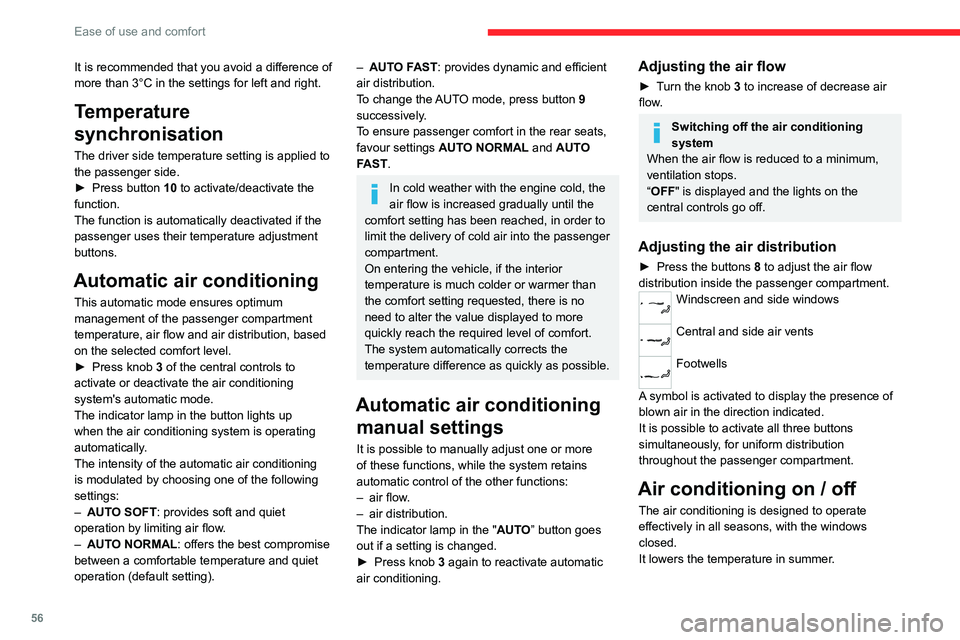
Press button
10 to activate/deactivate the
function.
The function is automatically deactivated if the
passenger uses their temperature adjustment
buttons.
Automatic air conditioning
This automatic mode ensures optimum
management of the passenger compartment
temperature, air flow and air distribution, based
on the selected comfort level.
►
Press knob
3 of the central controls to
activate or deactivate the air conditioning
system's automatic mode.
The indicator lamp in the button lights up
when the air conditioning system is operating
automatically.
The intensity of the automatic air conditioning
is modulated by choosing one of the following
settings:
–
AUT
O SOFT : provides soft and quiet
operation by limiting air flow.
–
AUT
O NORMAL: offers the best compromise
between a comfortable temperature and quiet
operation (default setting).
– AUTO FAST: provides dynamic and efficient
air distribution.
To change the AUTO mode, press button 9
successively.
To ensure passenger comfort in the rear seats,
favour settings AUTO NORMAL and AUTO
FAST.
In cold weather with the engine cold, the
air flow is increased gradually until the
comfort setting has been reached, in order to
limit the delivery of cold air into the passenger
compartment.
On entering the vehicle, if the interior
temperature is much colder or warmer than
the comfort setting requested, there is no
need to alter the value displayed to more
quickly reach the required level of comfort.
The system automatically corrects the
temperature difference as quickly as possible.
Automatic air conditioning manual settings
It is possible to manually adjust one or more
of these functions, while the system retains
automatic control of the other functions:
–
air flow
.
–
air distribution.
The indicator lamp in the " AUT
O” button goes
out if a setting is changed.
►
Press knob
3 again to reactivate automatic
air conditioning.
Adjusting the air flow
► Turn the knob 3 to increase of decrease air
flow.
Switching off the air conditioning
system
When the air flow is reduced to a minimum,
ventilation stops.
“OFF" is displayed and the lights on the
central controls go off.
Adjusting the air distribution
► Press the buttons 8 to adjust the air flow
distribution inside the passenger compartment.
Windscreen and side windows
Central and side air vents
Footwells
A symbol is activated to display the presence of
blown air in the direction indicated.
It is possible to activate all three buttons
simultaneously, for uniform distribution
throughout the passenger compartment.
Air conditioning on / off
The air conditioning is designed to operate
effectively in all seasons, with the windows
closed.
It lowers the temperature in summer.
Page 59 of 292
57
Ease of use and comfort
3It increases the effectiveness of demisting in
winter, above 3°C.
►
Press knob
1 to switch the air conditioning
on/off.
When the system is activated, the indicator lamp
of the button comes on.
Air conditioning does not operate when the air flow is deactivated.
To obtain cool air more quickly, enable interior
air recirculation for a brief period. Then return
to the intake of exterior air.
Switching off air conditioning may result in
some discomfort (humidity, misting).
Maximum air conditioning
This function automatically adjusts the
temperature setting to the lowest possible, the
air distribution towards the central and side air
vents, the air flow to maximum and activates
interior air recirculation.
►
Press knob
2 to activate/deactivate the
function (confirmed by the indicator lamp coming
on/switching off).
Once the function is deactivated, the system
returns to the previous settings.
Interior air recirculation
The intake of exterior air prevents the formation
of mist on the windscreen and side windows.
Recirculating the interior air isolates the
passenger compartment from outside odours
and fumes and allows the desired passenger
compartment temperature to be achieved more
rapidly.
► Press this button to activate/deactivate
the function (confirmed by the
illumination/extinction of the indicator lamp).
This function is activated automatically when reverse gear is engaged.
Front demisting
- defrosting
With manual air
conditioning
► Adjust the temperature to maximum (red).
► Adjust the air flow to maximum.
► Press this button to activate the air
distribution to the "Windscreen" position;
its indicator lamp comes on.
►
Check that the recirculation of interior air is
deactivated; its indicator lamp must be off.
►
Switch on the air conditioning by pressing the
"
A/C" button; its indicator lamp comes on.
With automatic dual-zone
air conditioning
Automatic Visibility programme
This mode allows the windscreen and side
windows to be demisted or defrosted as quickly
as possible.
► Press this button to activate/deactivate
the mode (confirmed by the illumination/
extinction of the
indicator lamp).
The programme automatically manages the air
conditioning (depending on version), air flow
and air intake, and provides optimum distribution
towards the windscreen and side windows.
It is possible to manually change the air flow
without deactivating the automatic Visibility
programme.
With Stop & Start, when demisting has
been activated, STOP mode is not
available.
In wintry conditions, before moving off,
remove all snow or ice on the windscreen
near the camera.
Otherwise, the operation of the equipment
using the camera may be affected.
Page 85 of 292
83
Safety
5Front airbags
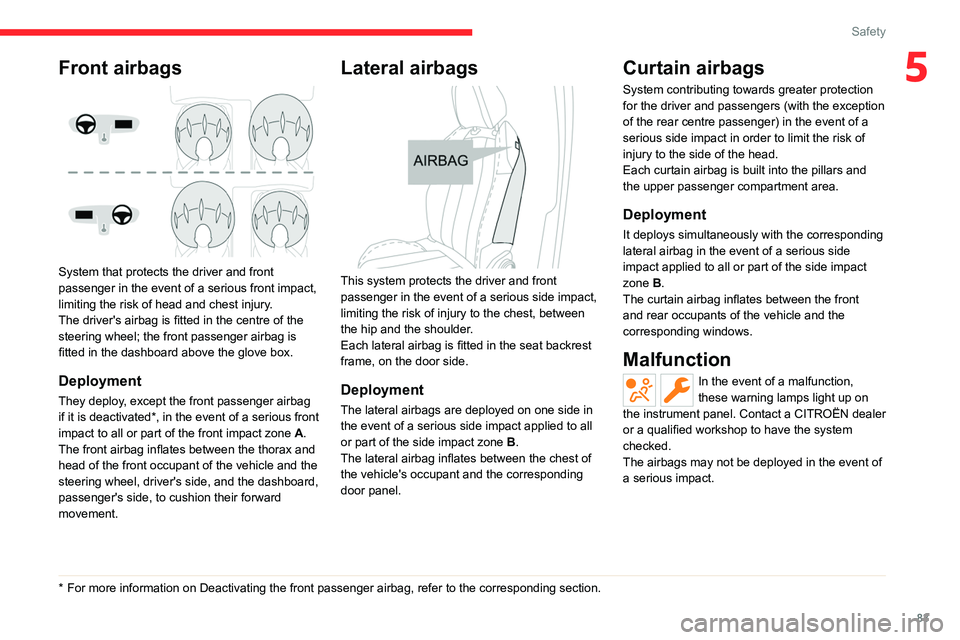
System that protects the driver and front
passenger in the event of a serious front impact,
limiting the risk of head and chest injury.
The driver's airbag is fitted in the centre of the
steering wheel; the front passenger airbag is
fitted in the dashboard above the glove box.
Deployment
They deploy, except the front passenger airbag
if it is deactivated*, in the event of a serious front
impact to all or part of the front impact zone A.
The front airbag inflates between the thorax and
head of the front occupant of the vehicle and the
steering wheel, driver's side, and the dashboard,
passenger's side, to cushion their forward
movement.
* For more information on Deactivating the front passenger airbag, refer t\
o the corresponding section.
Lateral airbags
This system protects the driver and front
passenger in the event of a serious side impact,
limiting the risk of injury to the chest, between
the hip and the shoulder.
Each lateral airbag is fitted in the seat backrest
frame, on the door side.
Deployment
The lateral airbags are deployed on one side in
the event of a serious side impact applied to all
or part of the side impact zone B.
The lateral airbag inflates between the chest of
the vehicle's occupant and the corresponding
door panel.
Curtain airbags
System contributing towards greater protection
for the driver and passengers (with the exception
of the rear centre passenger) in the event of a
serious side impact in order to limit the risk of
injury to the side of the head.
Each curtain airbag is built into the pillars and
the upper passenger compartment area.
Deployment
It deploys simultaneously with the corresponding
lateral airbag in the event of a serious side
impact applied to all or part of the side impact
zone B.
The curtain airbag inflates between the front
and rear occupants of the vehicle and the
corresponding windows.
Malfunction
In the event of a malfunction,
these warning lamps light up on
the instrument panel. Contact a CITROËN dealer
or a qualified workshop to have the system
checked.
The airbags may not be deployed in the event of
a serious impact.
Page 87 of 292

85
Safety
5It is recommended that children travel
on the rear seats of the vehicle:
–
"rearward facing" up to the age of 3,
–
"forward facing" over the age of 3.
Make sure that the seat belt is correctly
positioned and tightened.
For child seats with a support leg, ensure that
the support leg is in firm and steady contact
with the floor.
An incorrectly installed child seat in a vehicle compromises the child's safety in
the event of an accident.
Ensure that there is no seat belt or seat belt
buckle under the child seat, as this could
destabilise it.
Remember to fasten the seat belts or the
child seat harness keeping the slack relative
to the child's body to a minimum, even for
short journeys.
When installing a child seat using the seat
belt, ensure that the seat belt is tightened
correctly on the child seat and that it secures
the child seat firmly on the vehicle seat. If
the passenger seat is adjustable, move it
forwards if necessary.
Remove the head restraint before
installing a child seat with a backrest on a
passenger seat.
Ensure that the head restraint is stored or
attached securely to prevent it from being
thrown around the vehicle in the event of
sharp braking. Refit the head restraint once
the child seat has been removed.
Installing a booster seat
The chest part of the seat belt must be
positioned on the child's shoulder without
touching the neck.
Ensure that the lap part of the seat belt
passes correctly over the child's thighs.
Use a booster seat with a backrest, equipped
with a belt guide at shoulder level.
Additional protections
To prevent accidental opening of the
doors and rear windows, use the "Child lock".
Take care not to open the rear windows by
more than one third.
To protect young children from the sun's rays,
fit side blinds on the rear windows.
As a safety measure, do not leave:
–
A
child alone and unsupervised inside a
vehicle.
–
A
child or an animal in a vehicle which is
exposed to the sun, with the windows closed.
–
The keys within reach of children inside the
vehicle.
Child seat at the rear
Forward-facing or rearward-facing
► Move the vehicle's front seat forward and
straighten the backrest so that the legs of the
child in the forward-facing or rearward-facing
child seat itself do not touch the vehicle's front
seat.
►
Check that the backrest of the forward-facing
child seat is as close as possible to the backrest
of the vehicle's rear seat, and ideally in contact
with it.
Centre rear seat
A child seat with a support leg must never be
installed on the centre rear passenger seat .
Page 140 of 292

138
Driving
Adjusting the audible signal
(With MyCitroën Drive or MyCitroën
Drive Plus)
Pressing this button opens the window
for adjusting the volume of the audible
signal.
Visual assistance
This supplements the audible signal, without
taking account of the vehicle's trajectory, by
displaying bars on the screen that represent the
distance between the obstacle and the vehicle
(white: more distant, orange: close, red: very
close).
When the obstacle is very close, the "Danger"
symbol is displayed on the screen.
Front parking sensors
Supplementing the rear parking sensors, the
front parking sensors are triggered when an
obstacle is detected in front and the speed of the
vehicle is below 6 mph (10
km/h).
Front parking sensor operation is suspended if
the vehicle stops for more than three seconds in
forward gear, if an obstacle is no longer detected
or the vehicle speed exceeds 6 mph (10 km/h).
The sound emitted by the speaker (front or rear) locates the obstacle relative to
the vehicle, in front or behind it.
Side parking sensors
Using four additional sensors located on the
sides of the bumpers, the system records the
position of obstacles during the manoeuvre and
indicates them when they are located alongside
the vehicle.
Only fixed obstacles are indicated
correctly. Moving obstacles detected at
the beginning of the manoeuvre may be
indicated mistakenly, while moving obstacles
that appear alongside the vehicle but were
not previously recorded will not be indicated.
Objects memorised during the
manoeuvre will no longer be stored after
switching off the ignition.
Deactivation/Activation
(Depending on country of sale)
With Touch screen BLUETOOTH audio
system or MyCitroën Play
The settings are changed via the Driving
touch screen menu.
With MyCitroën Drive
The settings are changed via the Vehicle
touch screen menu.
With MyCitroën Drive Plus
The settings are changed via the ADAS
touch screen application.
If the function is deactivated, this indicator
lamp lights up on the instrument panel.
The system status is saved when the ignition is
switched off.
The rear parking sensors are deactivated automatically if a trailer or bicycle carrier
is connected to a towing device installed in
accordance with the Manufacturer's
recommendations.
In this case, the outline of a trailer is displayed
at the rear of the image of the vehicle.
Page 195 of 292
193
In the event of a breakdown
8the booster (or to an earth point on the assisting
vehicle).
►
Connect the other end of the green or black
cable to the (-) terminal of flat battery
A.
►
Start the engine on the assisting vehicle and
leave it running for a few minutes.
►
Operate the starter on the broken down
vehicle and let the engine run.
If the engine does not start immediately
, switch
off the ignition and wait a few moments before
trying again.
►
W
ait for it to return to idle.
►
Disconnect the jump leads in reverse order.
►
Refit the plastic cover to the (+) terminal, if
the vehicle has one.
►
Allow the engine to run for at least
30
minutes, with the vehicle stationary, so that
the battery reaches an adequate state of charge.
Driving immediately without having
reached a sufficient level of charge may
affect some of the vehicle's functions (e.g.
Stop & Start).
Charging the battery using a
battery charger
For optimum service life of the battery, it is
essential to maintain an adequate state of
charge.
In some circumstances, it may be necessary to
charge the battery:
– When using the vehicle mainly for short
journeys.
–
If the vehicle is to be taken off the road for
several weeks.
Contact a CITROËN dealer or a qualified
workshop.
To charge the vehicle's battery yourself, use only a charger compatible with
lead-acid batteries with a nominal voltage of
12
V.
Follow the instructions provided by the
manufacturer of the charger.
Never reverse polarities.
It is not necessary to disconnect the
battery.
►
Switch the ignition off.
►
Switch off all electrical consumers (audio
system, lighting, wipers, etc.).
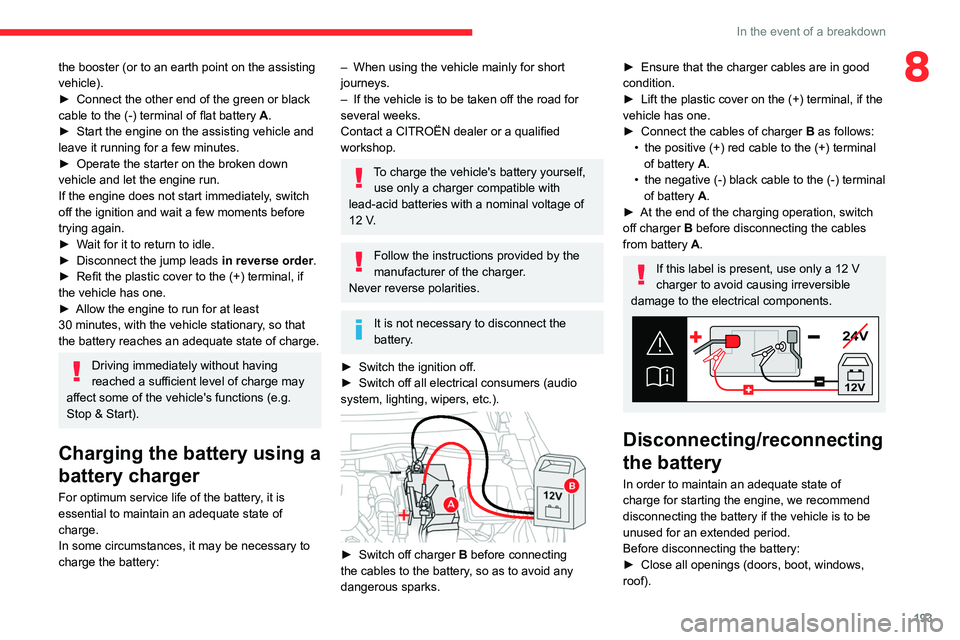
► Switch off charger B before connecting
the cables to the battery, so as to avoid any
dangerous sparks.
► Ensure that the charger cables are in good
condition.
►
Lift the plastic cover on the (+) terminal, if the
vehicle has one.
►
Connect the cables of charger B
as follows:
•
the positive (+) red cable to the (+) terminal
of battery
A.
•
the negative (-) black cable to the (-) terminal
of battery
A.
►
At the end of the charging operation, switch
off charger B
before disconnecting the cables
from battery A.
If this label is present, use only a 12 V
charger to avoid causing irreversible
damage to the electrical components.
24V
12V
Disconnecting/reconnecting
the battery
In order to maintain an adequate state of
charge for starting the engine, we recommend
disconnecting the battery if the vehicle is to be
unused for an extended period.
Before disconnecting the battery:
►
Close all openings (doors, boot, windows,
roof).