gearbox CITROEN C4 2023 Owner's Manual
[x] Cancel search | Manufacturer: CITROEN, Model Year: 2023, Model line: C4, Model: CITROEN C4 2023Pages: 292, PDF Size: 7.79 MB
Page 108 of 292
106
Driving
Malfunction
If the event of a malfunction, these
warning lamps light up on the
instrument panel, accompanied by the display of
a message.
Have it checked by a CITROËN dealer or a
qualified workshop.
Gear shift indicator
(Depending on engine)
This system is designed to reduce fuel
consumption by recommending the most suitable
gear.
Operation
Depending on the driving situation and
the vehicle's equipment, the system may
recommend skipping one or more gears.
Gear engagement recommendations are
not to be considered mandatory. Indeed, the
configuration of the road, the traffic density and
safety remain determining factors when choosing
the best gear. Therefore, the driver remains
responsible for deciding whether or not to follow
the system’s advice.
The system cannot be deactivated.
With an automatic gearbox, the system is
only active in manual operation.
The information appears on the instrument panel, in the form of an arrow
and the recommended gear.
The system adapts the gear change instructions according to the driving
conditions (e.g.
slope, load) and driving style
(e.g.
power demand, acceleration, braking).
The system never suggests:
–
engaging first gear;
–
engaging reverse gear
.
Stop & Start
The Stop & Start function puts the engine temporarily into standby - STOP mode - during
phases when the vehicle is stationary (e.g.
red
lights, traffic jams). The engine automatically
restarts - START mode - as soon as the driver
indicates the intention of moving off again.
Primarily designed for urban use, the function
is intended to reduce fuel consumption and
exhaust emissions as well as the noise level
when stationary.
The function does not affect the functionalities of
the vehicle, in particular the braking.
Deactivation/Reactivation
By default, the function is activated when the
ignition is switched on.
With Touch screen BLUETOOTH audio
system or MyCitroën Play
The settings are changed via the Driving
touch screen menu.
With MyCitroën Drive
The settings are changed via the Vehicle
touch screen menu.
With MyCitroën Drive Plus
The settings are changed via the ADAS
touch screen application or via the
Shortcuts for driving aids .
The display of a message on the instrument
panel confirms the change of state.
If the function is deactivated while the engine is
in STOP mode, it will restart immediately.
Associated indicator lamps
Function activated: engine on standby
(STOP mode)
Function deactivated or malfunction
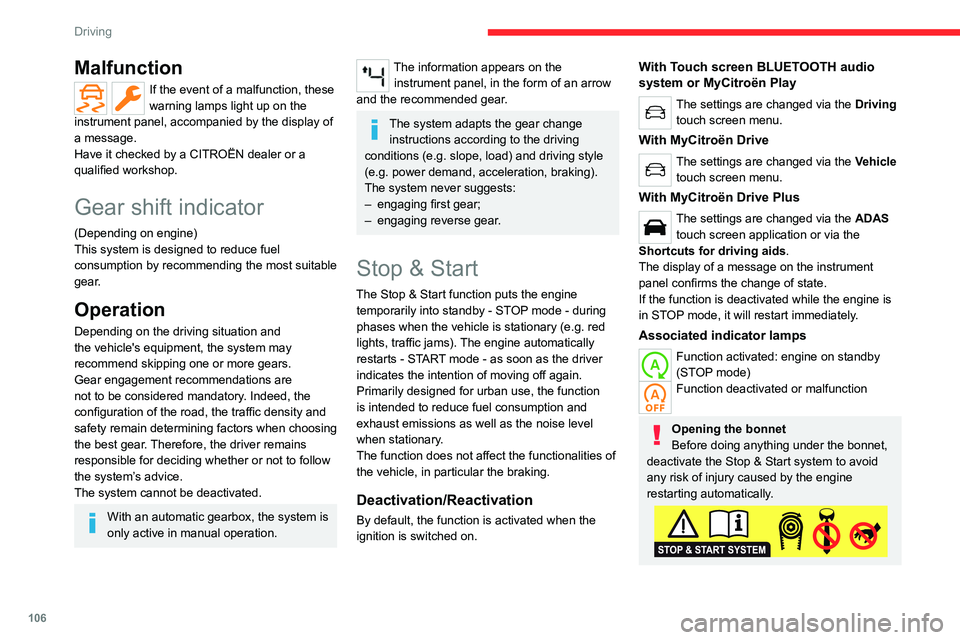
Opening the bonnet
Before doing anything under the bonnet,
deactivate the Stop & Start system to avoid
any risk of injury caused by the engine
restarting automatically.
Page 109 of 292

107
Driving
6Driving on flooded roads
Before entering into a flooded area, it is
strongly recommended that you deactivate
the Stop & Start system.
For more information on Driving
recommendations, particularly on flooded
roads, refer to the corresponding section.
Operation
Main conditions for operation
– The driver ’s door must be closed.
– The driver's seat belt must be fastened.
–
The level of charge in the battery must be
sufficient.
–
The temperature of the engine must be within
its nominal operating range.
–
The outside temperature must be between
0°C and 35°C.
Putting the engine into standby
(STOP mode)
The engine automatically enters standby mode
as soon as the driver indicates their intention to
stop:
–
W
ith a manual gearbox: with the gear lever
in neutral and the clutch pedal released.
–
W
ith an automatic gearbox: with the gear
selector in mode D or M, the brake pedal
depressed until the vehicle stops or the gear
selector in mode N, with the vehicle stationary.
Time counter
A time counter adds up the time spent in standby
during the journey. It is reset to zero every time
the ignition is switched on.
Special cases:
The engine will not go into standby if the
conditions for operation are not met and in the
following cases:
–
Steep slope (ascending or descending).
–
V
ehicle has not exceeded 6 mph (10 km/h)
since the last engine start (with the key or the
START/STOP button).
–
Needed
to maintain a comfortable temperature
in the passenger compartment.
–
Demisting active.
In these cases, this indicator lamp flashes
for a few seconds, then goes off.
After the engine has restarted, STOP mode is not available until the vehicle
has reached a speed of 5 mph (8
km/h).
During parking manoeuvres, STOP mode
is not available for a few seconds after
coming out of reverse gear or turning the
steering wheel.
Restarting the engine (START mode)
The engine automatically restarts as soon as the
driver indicates the intention of moving off again: With a manual gearbox: with the clutch pedal
fully depressed.
With an automatic gearbox:
–
With the selector in mode
D or M: with the
brake pedal released.
–
With the selector in mode
N and the brake
pedal released: with the selector at D or M.
–
With the selector in mode
P and the brake
pedal depressed: with the selector at R, N, D
or M.
–
With reverse gear engaged.
Special cases
The engine will restart automatically if the
conditions for operation are met again and in the
following cases:
–
With a manual gearbox: vehicle speed
exceeds 2.5 mph (4
km/h).
–
With an automatic gearbox, in mode N
, vehicle
speed exceeds 0.6 mph (1
km/h).
In these cases, this indicator lamp flashes
for a few seconds, then goes off.
Malfunctions
In the event of a fault with the system, this
warning lamp flashes for a few moments
on the instrument panel, then remains on,
accompanied by the display of a message.
Have it checked by a CITROËN dealer or a
qualified workshop.
Page 119 of 292
11 7
Driving
6Cruise control
For more information, refer to the
General recommendations on the use
of driving and manoeuvring aids and the
Cruise control - particular
recommendations.
This system automatically maintains the vehicle’s speed at the value programmed
by the driver (speed setting), without the use of
the accelerator pedal.
Cruise control is switched on manually.
It requires a minimum vehicle speed of 25 mph
(40
km/h).
With a manual gearbox, third gear or higher must
be engaged.
With an automatic gearbox, mode
D
or second
gear or higher in mode
M
must be engaged.
With a drive selector, mode
D or B must be
engaged.
Cruise control remains active after
changing gear, regardless of the gearbox
type, on engines fitted with the Stop & Start
function.
Switching off the ignition cancels any
speed setting.
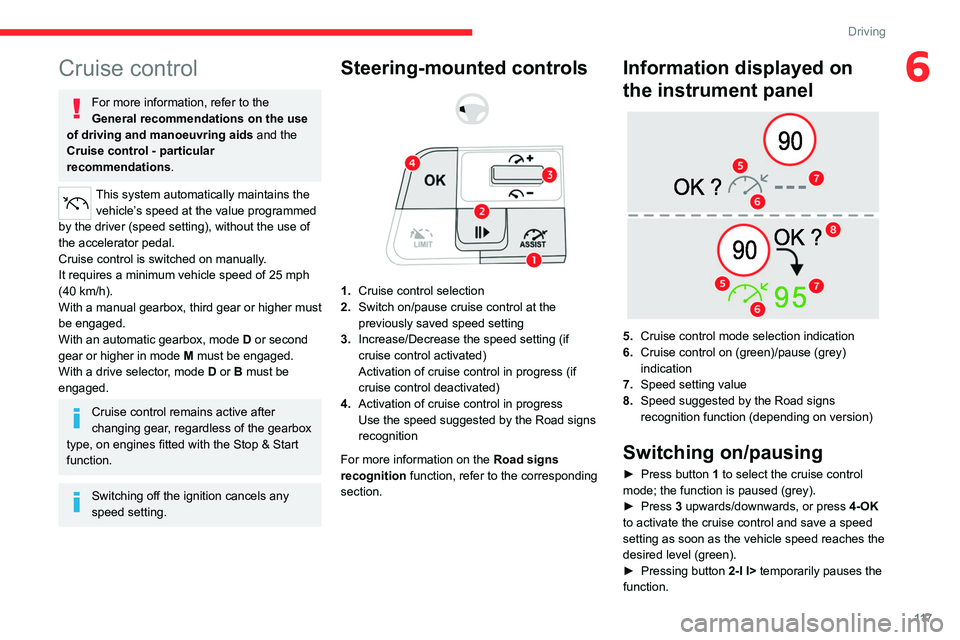
Steering-mounted controls
1. Cruise control selection
2. Switch on/pause cruise control at the
previously saved speed setting
3. Increase/Decrease the speed setting (if
cruise control activated)
Activation of cruise control in progress (if
cruise control deactivated)
4. Activation of cruise control in progress
Use the speed suggested by the Road signs
recognition
For more information on the Road signs
recognition
function, refer to the corresponding
section.
Information displayed on
the instrument panel
5. Cruise control mode selection indication
6. Cruise control on (green)/pause (grey)
indication
7. Speed setting value
8. Speed suggested by the Road signs
recognition function (depending on version)
Switching on/pausing
► Press button 1 to select the cruise control
mode; the function is paused (grey).
►
Press
3 upwards/downwards, or press 4-OK
to activate the cruise control and save a speed
setting as soon as the vehicle speed reaches the
desired level (green).
►
Pressing button 2-I I>
temporarily pauses the
function.
Page 120 of 292
11 8
Driving
► Pressing 2-I I> or 4-OK again will reactivate
cruise control (green).
Cruise control operation is also
temporarily interrupted (pause):
–
by pressing the brake pedal.
–
automatically
, if the electronic stability
control (ESC) system is triggered.
–
by shifting to neutral or engaging reverse
gear
.
–
by using the electric parking brake.
Modifying the speed setting
The cruise control must be active.
To change the speed setting using the vehicle’s
current speed:
►
For steps of +/- 1 mph (1 km/h),
make successive short presses upwards/
downwards
on 3 to increase/decrease.
►
For steps of +/- 5 mph (5
km/h), press and
hold upwards/downwards on 3 to increase/
decrease.
Prolonged pressing and holding
upwards/downwards on 3 causes a very
rapid change in vehicle speed.
As a precaution, we recommend setting a cruise speed fairly close to the current
speed of your vehicle, to avoid any sudden
acceleration or deceleration of the vehicle. To change the speed setting using the speed
suggested by the Road signs recognition
displayed on the instrument panel:
–
When passing the sign:
►
Press
4-OK to save the suggested speed.
This value is then immediately shown as the new
speed setting on the instrument panel.
–
After passing the sign:
►
Press
4-OK. The message “OK?" is
displayed to confirm the request to save.
►
Press
4-OK again to save the suggested
speed. The new speed setting value is displayed
on the instrument panel.
Off
► Press 1: the cruise control information display
disappears.
Malfunction
In the event of a malfunction, dashes are
displayed flashing and then fixed instead of the
speed setting.
Have it checked by a CITROËN dealer or a
qualified workshop.
Highway Driver Assist
Only available on versions with the EAT8
automatic gearbox and drive selector.
This system automatically adjusts the speed
and corrects the trajectory of the vehicle, using
Adaptive cruise control with Stop&Go function in
conjunction with Lane Positioning Assist.
These two functions must be activated and in
operation.
For more information on Adaptive cruise
control and Lane Positioning Assist, refer to
the corresponding sections.
The system assists the driver by acting on the steering, acceleration and braking
within the physical limits
and capacities of the
vehicle. Certain road infrastructure elements
or vehicles in the surroundings may not be
properly seen or may be poorly interpreted by
the camera and radar, resulting in an
unexpected change in direction, a lack of
steering correction and/or inappropriate
management of acceleration or braking.
Primarily designed for driving on main
roads and motorways, this system only
works with moving vehicles driving in the
same direction as your vehicle.
Page 122 of 292
120
Driving
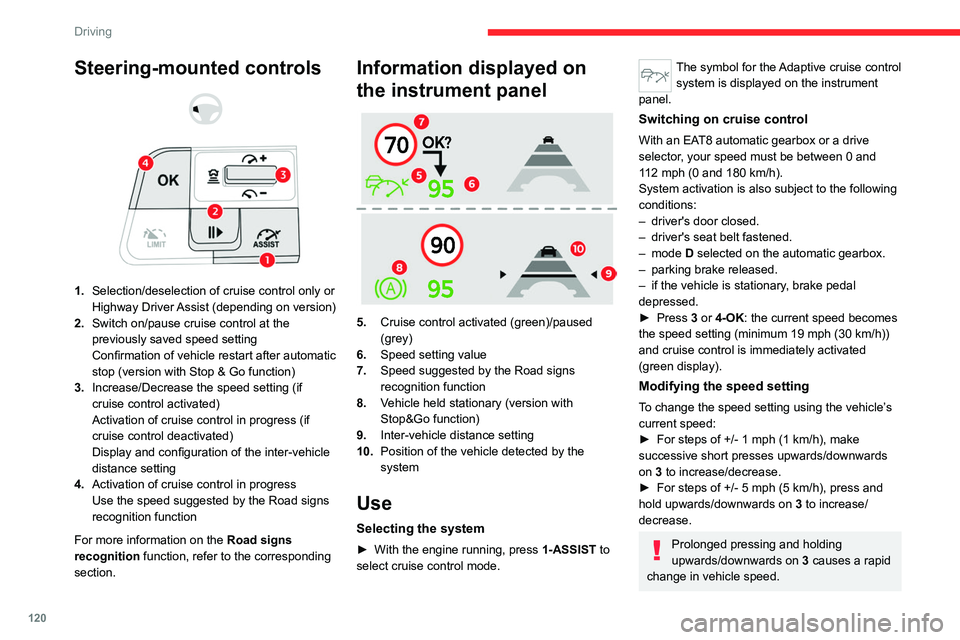
Steering-mounted controls
1. Selection/deselection of cruise control only or
Highway Driver Assist (depending on version)
2. Switch on/pause cruise control at the
previously saved speed setting
Confirmation of vehicle restart after automatic
stop (version with Stop & Go function)
3. Increase/Decrease the speed setting (if
cruise control activated)
Activation of cruise control in progress (if
cruise control deactivated)
Display and configuration of the inter-vehicle
distance setting
4. Activation of cruise control in progress
Use the speed suggested by the Road signs
recognition function
For more information on the Road signs
recognition
function, refer to the corresponding
section.
Information displayed on
the instrument panel
5. Cruise control activated (green)/paused
(grey)
6. Speed setting value
7. Speed suggested by the Road signs
recognition function
8. Vehicle held stationary (version with
Stop&Go function)
9. Inter-vehicle distance setting
10. Position of the vehicle detected by the
system
Use
Selecting the system
► With the engine running, press 1-ASSIST to
select cruise control mode.
The symbol for the Adaptive cruise control system is displayed on the instrument
panel.
Switching on cruise control
With an EAT8 automatic gearbox or a drive
selector, your speed must be between 0 and
112
mph (0 and 180 km/h).
System activation is also subject to the following
conditions:
–
driver's door closed.
–
driver's seat belt fastened.
–
mode D selected on the automatic gearbox.
–
parking brake released.
–
if the vehicle is stationary
, brake pedal
depressed.
►
Press
3 or 4-OK: the current speed becomes
the speed setting (minimum 19 mph (30
km/h))
and cruise control is immediately activated
(green display).
Modifying the speed setting
To change the speed setting using the vehicle’s
current speed:
►
For steps of +/- 1 mph (1 km/h), make
successive short presses upwards/downwards
on
3 to increase/decrease.
►
For steps of +/- 5 mph (5
km/h), press and
hold upwards/downwards on 3 to increase/
decrease.
Prolonged pressing and holding
upwards/downwards on 3 causes a rapid
change in vehicle speed.
Page 123 of 292
121
Driving
6To change the speed setting using the
speed suggested by the Road signs
recognition function and displayed on the
instrument panel:
–
When passing the sign:
►
Press
4-OK to save the suggested speed.
This value is then immediately shown as the new
speed setting on the instrument panel.
–
After passing the sign:
►
Press
4-OK. The message "OK?" is
displayed to confirm the request to save.
►
Press
4-OK again to save the suggested
speed. The new speed setting value is displayed
on the instrument panel.
Pausing/resumption of cruise control
► Press 2-I I> or depress the brake pedal. The
symbol turns grey.
Cruise control may also have been paused:
–
automatically
, if the electronic stability control
(ESC) system is triggered.
–
by shifting to neutral or engaging reverse gear
.
–
by using the electric parking brake.
–
by unfastening the seat belt.
–
by opening the driver's door
.
►
Press
2-I I> or 4-OK to reactivate cruise
control.
With an EAT8 gearbox or a drive selector,
following braking that has brought the vehicle
to a complete stop, if the traffic conditions do
not allow the vehicle to begin moving again
within 3
seconds of stopping, press
2-I I>
or the
accelerator pedal to move off.
Cruise control remains active following a
gear change.
When cruise control is paused and the
driver tries to reactivate it, the message
"Activation refused, conditions unsuitable "
is temporarily displayed if reactivation is
impossible (required conditions not met).
Changing the programmed speed setting
with the Road signs recognition function
► Press 4-OK to accept the speed suggested
by the function on the instrument panel, then
press again to confirm.
If the selected speed is far from the
current vehicle speed, a strong
acceleration or deceleration is felt.
Changing the inter-vehicle distance
► Press 3 to display the distance setting
thresholds (" Distant", "Normal" or "Close"),
then make successive short presses upwards/
downwards to select a threshold.
After a few seconds, the option is accepted and
will be memorised when the ignition is switched
off.
The driver must keep a sufficient safety distance
from the vehicle in front.
Temporarily exceeding the speed setting
► Depress the accelerator pedal. The system
is suspended as long as the acceleration is
maintained. The speed next to the symbol
disappears from the instrument panel.
Deselecting the system
► Press 1-ASSIST until the symbols disappear
from the instrument panel.
Messages and alerts
The actual order of display of the messages or alerts may be different.
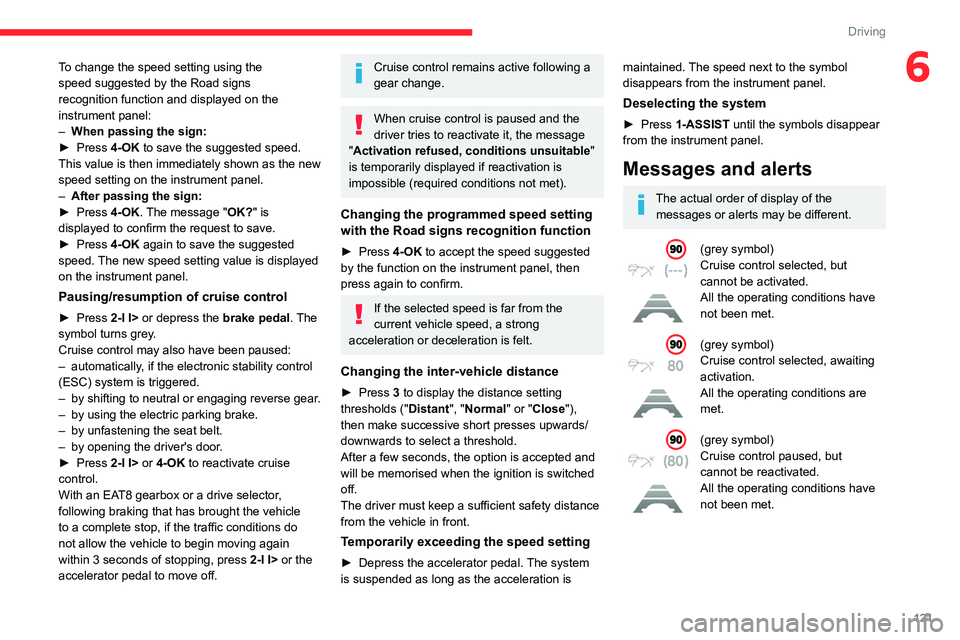
(grey symbol)
Cruise control selected, but
cannot be activated.
All the operating conditions have
not been met.
(grey symbol)
Cruise control selected, awaiting
activation.
All the operating conditions are
met.
(grey symbol)
Cruise control paused, but
cannot be reactivated.
All the operating conditions have
not been met.
Page 137 of 292
135
Driving
6It is possible that collision warnings are
not given, are given too late or seem
unjustified.
The driver must always stay in control of the
vehicle and be prepared to react at any time
to avoid an accident.
If you select "Far" in the touch screen,
then the system warns sooner. This
increases the safety but increases also the
amount of alerts, if the legal safety distance is
not kept.
To reduce the alert occurrence, you can
change the setting to either of the other two.
Intelligent emergency
braking assistance (iEBA)
This function increases vehicle deceleration
if the driver does not brake enough to avoid a
collision.
This assistance is only provided if the driver
presses the brake pedal.
Active Safety Brake
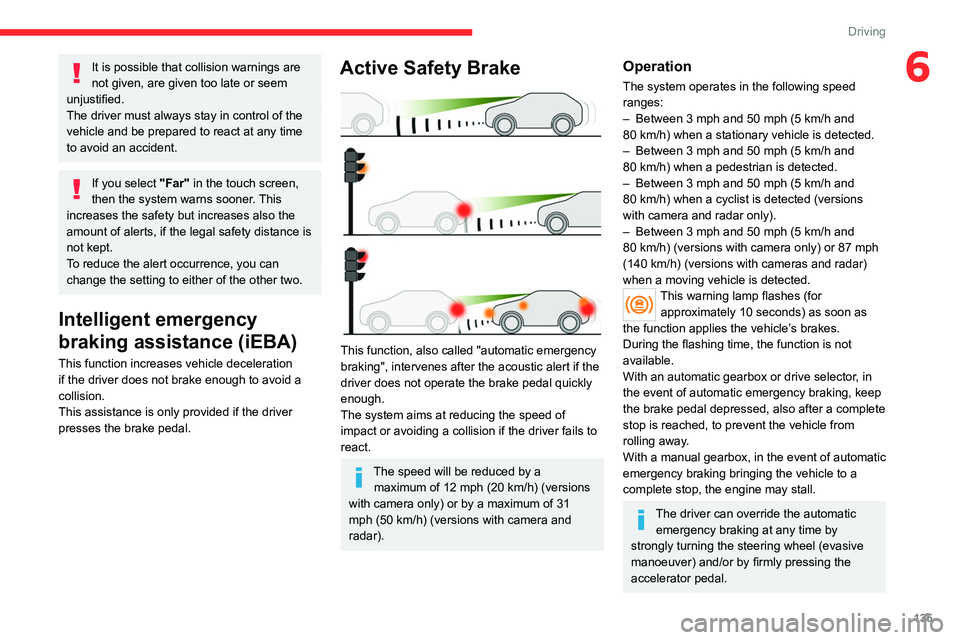
This function, also called "automatic emergency
braking", intervenes after the acoustic alert if the
driver does not operate the brake pedal quickly
enough.
The system aims at reducing the speed of
impact or avoiding a collision if the driver fails to
react.
The speed will be reduced by a maximum of 12 mph (20 km/h) (versions
with camera only) or by a maximum of 31
mph (50
km/h) (versions with camera and
radar).
Operation
The system operates in the following speed
ranges:
–
Between 3 mph and 50 mph (5
km/h and
80
km/h) when a stationary vehicle is detected.
–
Between 3 mph and 50 mph (5
km/h and
80
km/h) when a pedestrian is detected.
–
Between 3 mph and 50 mph (5
km/h and
80
km/h) when a cyclist is detected (versions
with camera and radar only).
–
Between 3 mph and 50 mph (5
km/h and
80
km/h) (versions with camera only) or 87 mph
(140
km/h) (versions with cameras and radar)
when a moving vehicle is detected.
This warning lamp flashes (for approximately 10 seconds) as soon as
the function applies the vehicle’s brakes.
During the flashing time, the function is not
available.
With an automatic gearbox or drive selector, in
the event of automatic emergency braking, keep
the brake pedal depressed, also after a complete
stop is reached, to prevent the vehicle from
rolling away.
With a manual gearbox, in the event of automatic
emergency braking bringing the vehicle to a
complete stop, the engine may stall.
The driver can override the automatic emergency braking at any time by
strongly turning the steering wheel (evasive
manoeuver) and/or by firmly pressing the
accelerator pedal.
Page 144 of 292
142
Driving
offering views from the rear of the vehicle (rear
vision) when reverse gear is engaged and views
from the front of the vehicle (front vision) when
the gearbox is in neutral or a gear is engaged.
Rear vision
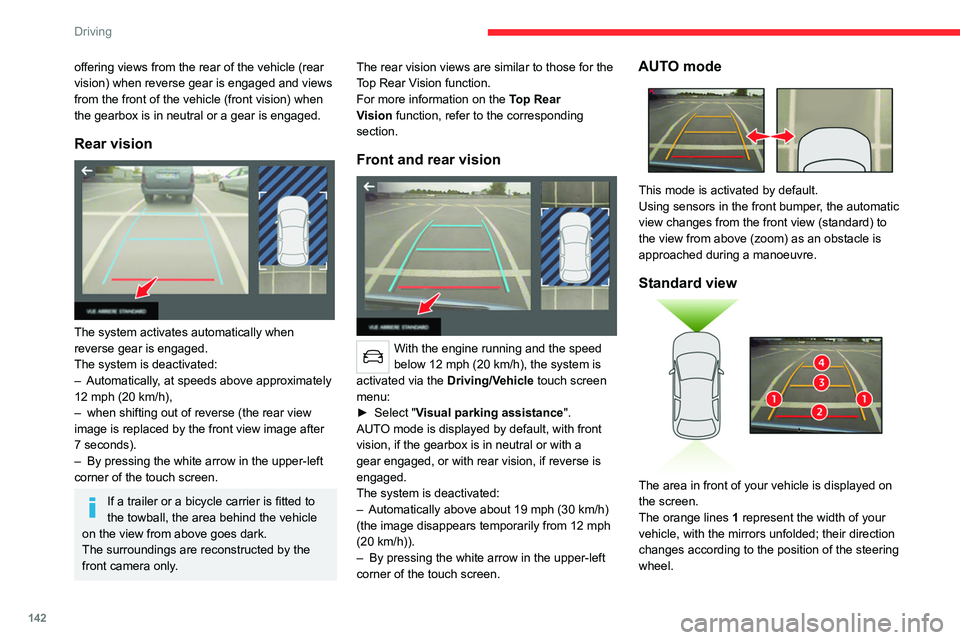
The system activates automatically when
reverse gear is engaged.
The system is deactivated:
–
Automatically
, at speeds above approximately
12 mph (20
km/h),
–
when shifting out of reverse (the rear view
image is replaced by the front view image after
7 seconds).
–
By pressing the white arrow in the upper-left
corner of the touch screen.
If a trailer or a bicycle carrier is fitted to
the towball, the area behind the vehicle
on the view from above goes dark.
The surroundings are reconstructed by the
front camera only. The rear vision views are similar to those for the
Top Rear Vision function.
For more information on the
Top Rear
Vision
function, refer to the corresponding
section.
Front and rear vision
With the engine running and the speed
below 12 mph (20 km/h), the system is
activated via the Driving/Vehicle touch screen
menu:
►
Select "
Visual parking assistance".
AUTO mode is displayed by default, with front
vision, if the gearbox is in neutral or with a
gear engaged, or with rear vision, if reverse is
engaged.
The system is deactivated:
–
Automatically above about 19 mph (30
km/h)
(the image disappears temporarily from 12 mph
(20
km/h)).
–
By pressing the white arrow in the upper-left
corner of the touch screen.
AUTO mode
This mode is activated by default.
Using sensors in the front bumper, the automatic
view changes from the front view (standard) to
the view from above (zoom) as an obstacle is
approached during a manoeuvre.
Standard view
The area in front of your vehicle is displayed on
the screen.
The orange lines 1 represent the width of your
vehicle, with the mirrors unfolded; their direction
changes according to the position of the steering
wheel.
Page 176 of 292
174
Practical information
Following prolonged operation of the
vehicle at very low speed or at idle, you
may, in exceptional circumstances, notice
water vapour coming from the exhaust while
accelerating. These emissions have no
impact on the vehicle’s behaviour and the
environment.
New vehicle
During the first few particle filter
regeneration operations, you may notice a
"burning" smell. This is perfectly normal.
Manual gearbox
The gearbox does not require any maintenance (no oil change).
Automatic gearbox
The gearbox does not require any maintenance (no oil change).
Drive selector
The drive selector does not require any maintenance.
Manual parking brake
If you notice excessive brake lever travel
or decreased effectiveness, the parking
brake must be adjusted, even between two
services.
This system must be checked by a CITROËN
dealer or a qualified workshop.
Electric parking brake
This system does not require any routine servicing. However, in the event of a
problem, do not hesitate to have the system
checked by a CITROËN dealer or a qualified
workshop.
For more information on the Electric
parking brake, refer to the
corresponding section.
Brake pads
Brake wear depends on the style of
driving, particularly in the case of vehicles
used in town, over short distances. It may be
necessary to have the condition of the brakes
checked, even between vehicle services.
Unless there is a leak in the circuit, a drop in the
brake fluid level indicates that the brake pads
are worn.
After washing the vehicle, moisture, or in wintry conditions, ice can form on the
brake discs and pads: braking efficiency may
be reduced. Gently dab the brakes to dry and
defrost them.
Brake disc/drum wear
For any information on checking brake
disc/drum wear, contact a CITROËN
dealer or a qualified workshop.
Wheels and tyres
The inflation pressure of all tyres, including the spare wheel, must be
checked on "cold” tyres.
The pressures indicated on the tyre pressure
label are valid for "cold" tyres. If you have driven
for more than 10 minutes or more than 6 miles
(10 kilometres) at over 31 mph (50
km/h), add
0.3 bar (30 kPa) to the values indicated on the
label.
Under-inflation increases energy
consumption. Non-compliant tyre
pressures cause tyres to wear prematurely
and have an adverse effect on the vehicle's
road holding - risk of accident!
Driving with worn or damaged tyres reduces the
braking and road holding performance of the
vehicle. Regularly check the condition of the
tyres (tread and sidewalls) and rims as well as
the presence of the valve caps.
When the wear indicators no longer appear set
back from the tread, the depth of the grooves is
less than 1.6 mm; replace the tyres as soon as
possible.
Using different size wheels and tyres from those
specified can affect the lifetime of tyres, wheel
rotation, ground clearance, the speedometer
reading and have an adverse effect on road
holding.
Fitting different tyres on the front and rear axles
can cause the ESC to mistime.
Page 179 of 292

177
Practical information
7The system only registers AdBlue®
intermediate top-ups of 5
litres or more.
If the AdBlue® tank is completely empty
– which is confirmed by the message
“Top up AdBlue: Starting impossible ” – it is
essential to add at least 10
litres.
Top-up detection may not be instantaneous
after addition. It may take a few minutes of
driving before the top-up detection is effective.
Changing to free-wheeling
In certain situations, it is necessary to put the
vehicle into free-wheeling mode (e.g. towing, on
a rolling road, automatic car wash (Wash mode),
rail or sea transport).
The procedure varies according to the type of
gearbox and parking brake.
Never leave the vehicle unattended with
the vehicle into free-wheeling mode.
Keyless Entry and Start
You must not depress the brake pedal
while switching the ignition on again, then
switching it off. If you do, the engine will start,
requiring you to restart the procedure.
With a manual gearbox and
electric parking brake
/
To release them
► With the engine running and while depressing
the brake pedal, move the gear selector to the
neutral position.
►
While depressing the brake pedal, switch off
the engine.
►
Release the brake pedal, then switch on the
ignition.
►
While depressing the brake pedal, press the
control to release the parking brake.
►
Release the brake pedal, then switch off the
ignition.
Reverting to normal operation
► While depressing the brake pedal, restart the
engine and apply the parking brake.
With EAT8 automatic
gearbox or drive selector
and electric parking brake
/
Release procedure
► With the vehicle stationary and the engine
running, depress the brake pedal and select
mode
N.
Within 5 seconds:
► Depress and hold the brake pedal, then
observe this order: switch off the engine and
move the push selector forwards or backwards.
►
Release the brake pedal, then switch on the
ignition.
►
Place your foot on the brake and press the
electric parking brake control to release it.
►
Release the brake pedal, then switch off the
ignition.
A message is displayed on the instrument panel to confirm the unlocking
of the wheels for 15
minutes.
After 15 minutes or reverting to normal
operation
► While depressing the brake pedal, restart the
engine and select mode P .
Advice on care and maintenance
General recommendations
Observe the following recommendations to avoid
damaging the vehicle.