roof CITROEN C4 2023 Owners Manual
[x] Cancel search | Manufacturer: CITROEN, Model Year: 2023, Model line: C4, Model: CITROEN C4 2023Pages: 292, PDF Size: 7.79 MB
Page 4 of 292
2
Contents
■
Overview
■
Eco-driving
1Dashboard instrumentsDriver information 10
Instrument panels 10
Head-up display 12
Warning and indicator lamps 13
Indicators 19
Manual test 24
Total distance recorder 25
Lighting dimmer 25
Trip computer 25
5-inch touch screen 27
10-inch touch screen 27
Remotely operable additional functions
(Electric)
30
2AccessElectronic key with remote control function and
built-in key 32
Proximity Keyless Entry and Start 34
Central locking 36
Back-up procedures 37
Doors 39
Boot 40
Alarm 40
Electric windows 42
Sunroof 43
3Ease of use and comfortFront seats 45
Steering wheel adjustment 47
Heated steering wheel 47
Mirrors 48
Rear bench seat 49
Heating and Ventilation 51
Manual air conditioning 52
Dual-zone automatic air conditioning 53
Front demisting - defrosting 57
Heated windscreen 58
Rear screen demisting/defrosting 58
Temperature pre-conditioning (Electric) 58
Interior fittings 59
Courtesy lamps 62
Interior ambient lighting 63
Boot fittings 63
4Lighting and visibilityLighting control stalk 65
Direction indicators 66
Automatic illumination of headlamps 67
Headlamp beam height adjustment 67
Guide-me-home and welcome lighting 67
Automatic lighting systems - General
recommendations
68
Automatic headlamp dipping 69
Cornering lighting 70
Wiper control stalk 70
Intermittent wipers 71
Automatic wipers 72
Changing a wiper blade 73
5SafetyGeneral safety recommendations 74
Hazard warning lamps 74
Horn 75
Pedestrian horn (Electric) 75
Emergency or assistance 75
Electronic stability control (ESC) 77
Seat belts 79
Airbags 82
Child seats 84
Deactivating the front passenger airbag 86
ISOFIX child seats 87
i-Size child seats 89
Installing child seats 90
Child lock 92
6DrivingDriving recommendations 93
Starting / Switching off the engine with the key 95
Starting/Switching off the engine with Keyless
Entry and Start
96
Manual parking brake 98
Electric parking brake 99
6-speed manual gearbox 101
Automatic gearbox 101
Drive selector (Electric) 103
Driving modes 104
Hill start assist 105
Gear shift indicator 106
Stop & Start 106
Tyre under-inflation detection 108
Driving and manoeuvring aids - General
recommendations
109
Shortcuts for driving aids 111
Road signs recognition 111
Speed limiter 11 5
Cruise control - Specific recommendations 11 6
Cruise control 11 7
Highway Driver Assist 11 8
Adaptive cruise control 11 9
Lane positioning assist 123
Lane keeping assist 128
Blind spot monitoring 131
Active Safety Brake with Collision Risk Alert
and Intelligent emergency braking assistance
132
Distraction detection 136
Page 5 of 292
3
Contents
Parking sensors 137
Reversing camera 139
Top Rear Vision - 360 Vision 139
Top Rear Vision - 360 Vision 143
Park Assist 146
7Practical informationCompatibility of fuels 152
Refuelling 152
Misfuel prevention (Diesel) 153
Charging system (Electric) 153
Charging the traction battery (Electric) 160
Towing device 164
Towing device with quickly detachable towball 165
Roof bars 167
Snow chains 168
Energy economy mode 168
Bonnet 169
Engine compartment 170
Checking levels 171
Checks 173
AdBlue® (BlueHDi) 175
Free-wheeling 177
Advice on care and maintenance 177
8In the event of a breakdownWarning triangle 180
Running out of fuel (Diesel) 180
Tool kit 180
Temporary puncture repair kit 181
Spare wheel 184
Changing a bulb 187
Fuses 191
12
V battery
/ Accessory battery 191
Towing the vehicle 194
9Technical dataEngine technical data and towed loads 197
Petrol engines 198
Diesel engines 200
Electric motor 201
Dimensions 202
Identification markings 202
10Touch screen BLUETOOTH audio systemFirst steps 204
Steering mounted controls 204
Menus 205
Radio 206
DAB (Digital Audio Broadcasting) radio 207
Media 207
Telephone 208
Settings 210
Frequently asked questions 2 11
11MyCitroën PlayFirst steps 213
Steering mounted controls 214
Menus 214
Radio 215
DAB (Digital Audio Broadcasting) radio 217
Media 217
Telephone 218
Applications 222
Settings 223
Frequently asked questions 224
12MyCitroën DriveFirst steps 227
Steering mounted controls 228
Menus 228
Voice commands 229
Navigation 233
Connected navigation 236
Applications 238
Radio 241
DAB (Digital Audio Broadcasting) radio 242
Media 242
Telephone 244
Settings 246
Frequently asked questions 248
13MyCitroën Drive PlusFirst steps 252
Customisation 255
Steering mounted controls 256
Applications 257
Voice commands 257
Navigation 258
Connectivity 259
Mirror Screen 261
Media 262
Phone 264
Settings 265
Help 266
14Vehicle data recording and privacy
■
Alphabetical index
■
Appendix
Page 6 of 292
4
Overview
Presentation
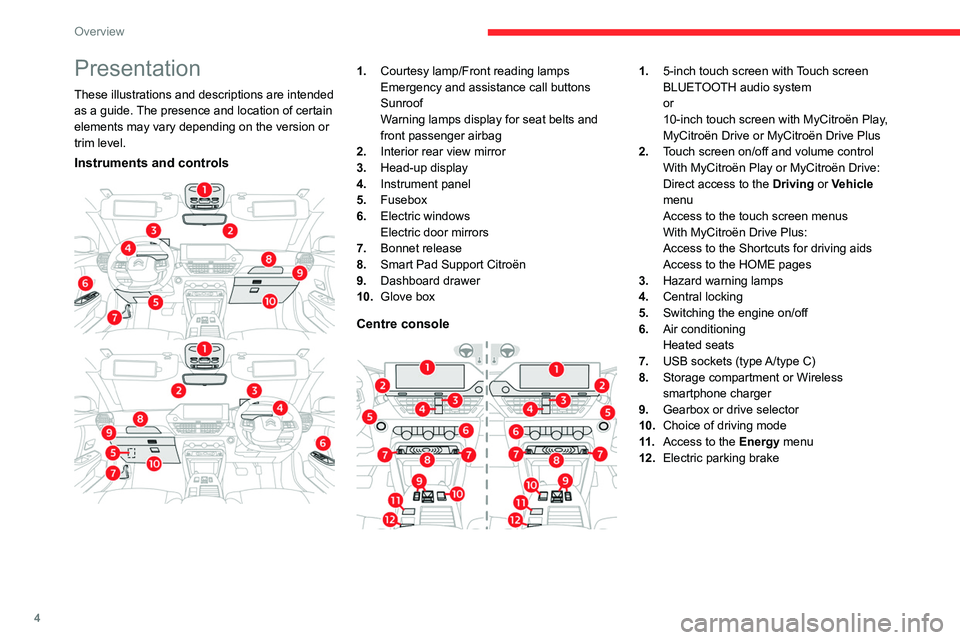
These illustrations and descriptions are intended
as a guide. The presence and location of certain
elements may vary depending on the version or
trim level.
Instruments and controls
1.Courtesy lamp/Front reading lamps
Emergency and assistance call buttons
Sunroof
Warning lamps display for seat belts and
front passenger airbag
2. Interior rear view mirror
3. Head-up display
4. Instrument panel
5. Fusebox
6. Electric windows
Electric door mirrors
7. Bonnet release
8. Smart Pad Support Citroën
9. Dashboard drawer
10. Glove box
Centre console
1.5-inch touch screen with Touch screen
BLUETOOTH audio system
or
10-inch touch screen with MyCitroën Play,
MyCitroën Drive or MyCitroën Drive Plus
2. Touch screen on/off and volume control
With MyCitroën Play or MyCitroën Drive:
Direct access to the Driving or Vehicle
menu
Access to the touch screen menus
With MyCitroën Drive Plus:
Access to the Shortcuts for driving aids
Access to the HOME pages
3. Hazard warning lamps
4. Central locking
5. Switching the engine on/off
6. Air conditioning
Heated seats
7. USB sockets (type A/type C)
8. Storage compartment or Wireless
smartphone charger
9. Gearbox or drive selector
10. Choice of driving mode
11 . Access to the Energy menu
12. Electric parking brake
Page 10 of 292
8
Eco-driving
Eco-driving
Eco-driving refers to a range of everyday
practices that allow the motorist to optimise
the vehicle's energy consumption (fuel and/or
electricity) and CO
2 emissions.
Optimise your use of the gearbox
With a manual gearbox, move off gently and
change up promptly. While accelerating, change
up early.
With an automatic gearbox, favour automatic
mode. Do not depress the accelerator pedal
heavily or suddenly.
The gear shift indicator prompts you to engage
the most suitable gear. Whenever this indication
is displayed on the instrument panel, follow it
straight away.
With an automatic gearbox, this indicator
appears only in manual mode.
Drive smoothly
Maintain a safe distance between vehicles, use
engine braking rather than the brake pedal and
press the accelerator gradually. These practices
help to save on energy consumption, reduce
CO
2 emissions and decrease general traffic
noise.
When the traffic is flowing smoothly, select the
cruise control.
Control the use of electrical equipment
Before moving off, if the passenger compartment
is too warm, ventilate it by opening the windows
and air vents before using the air conditioning.
At speeds above 31
mph (50 km/h), close the
windows and leave the air vents open.
Consider using equipment that can help keep
the temperature in the passenger compartment
down (e.g.
sunroof blind, window blinds).
Unless automatically regulated, switch off the air
conditioning as soon as the desired temperature
has been reached.
Switch off the demisting and defrosting functions,
if they are not managed automatically.
Switch off the heated seat as soon as possible.
Adapt your use of the headlamps and/or
foglamps to the level of visibility, in accordance
with current legislation in the country in which
you are driving.
Avoid running the engine before moving off,
particularly in winter (other than in severe wintry
conditions: temperature below -23°C). The
vehicle will warm up much faster while driving.
As a passenger, avoid connecting your
multimedia devices (e.g.
film, music, video
game) to help reduce the consumption of energy.
Disconnect all portable devices before leaving
the vehicle.
Limit the causes of excess consumption
Spread loads throughout the vehicle. Place the
heaviest items in the boot as close as possible to
the rear seats. Limit the loads carried in the vehicle and
minimise wind resistance (e.g.
roof bars, roof
rack, bicycle carrier, trailer). Preferably, use a
roof box.
Remove roof bars and roof racks after use.
At the end of winter, remove snow tyres and refit
summer tyres.
Comply with the servicing instructions
Check tyre pressures regularly, with the tyres
cold, referring to the label in the door aperture on
the driver's side.
Carry out this check in particular:
–
before a long journey
.
–
at each change of season.
–
after a long period out of use.
Do not forget the spare wheel and, where
applicable, the tyres on your trailer or caravan.
Have your vehicle serviced regularly (e.g.
engine
oil, oil filter, air filter, passenger compartment
filter, etc.). Observe the schedule of operations in
the manufacturer's service schedule.
With a BlueHDi Diesel engine, if the SCR system
has a fault, your vehicle will emit pollution. Visit
a CITROËN dealer or a qualified workshop
as soon as possible to restore your vehicle's
nitrogen oxide emissions to legal levels.
When filling the fuel tank, do not continue after
the third cut-out of the nozzle, to avoid overflow.
You will only see the fuel consumption of your
new vehicle settle down to a consistent average
after the first 1,900 miles (3,000 kilometres).
Page 34 of 292
32
Access
Electronic key with
remote control function
and built-in key
Remote control function
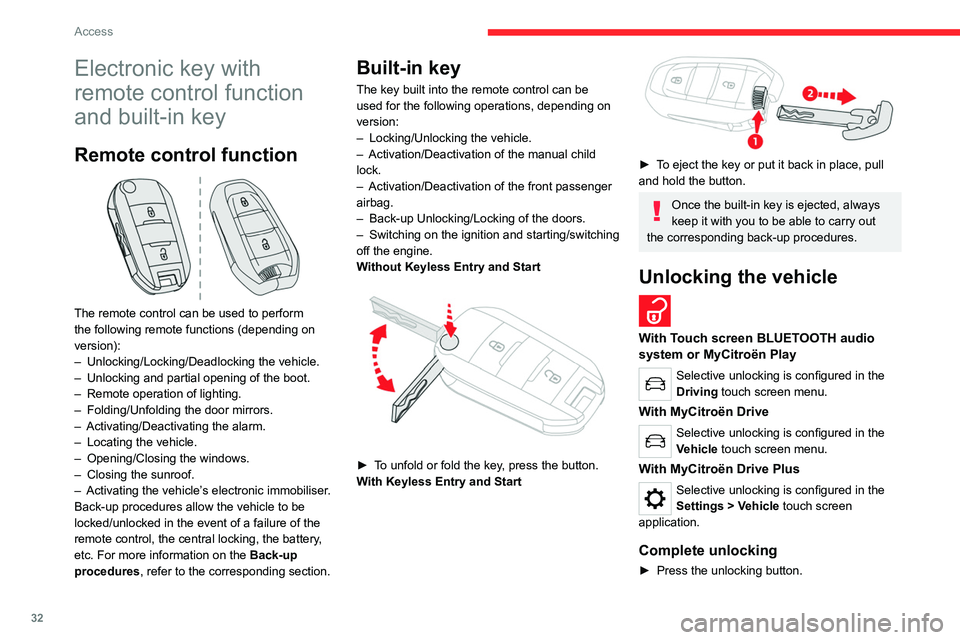
The remote control can be used to perform
the following remote functions (depending on
version):
–
Unlocking/Locking/Deadlocking the vehicle.
–
Unlocking and partial opening of the boot.
–
Remote operation of lighting.
–
Folding/Unfolding the door mirrors.
–
Activating/Deactivating the alarm.
–
Locating the vehicle.
–
Opening/Closing the windows.
–
Closing the sunroof.
–
Activating the vehicle’
s electronic immobiliser.
Back-up procedures allow the vehicle to be
locked/unlocked in the event of a failure of the
remote control, the central locking, the battery,
etc. For more information on the Back-up
procedures, refer to the corresponding section.
Built-in key
The key built into the remote control can be
used for the following operations, depending on
version:
–
Locking/Unlocking the vehicle.
–
Activation/Deactivation of the manual child
lock.
–
Activation/Deactivation of the front passenger
airbag.
–
Back-up Unlocking/Locking of the doors.
–
Switching on the ignition and starting/switching
off the engine.
W
ithout Keyless Entry and Start
► To unfold or fold the key, press the button.
With Keyless Entry and Start
► To eject the key or put it back in place, pull
and hold the button.
Once the built-in key is ejected, always
keep it with you to be able to carry out
the corresponding back-up procedures.
Unlocking the vehicle
With Touch screen BLUETOOTH audio
system or MyCitroën Play
Selective unlocking is configured in the
Driving touch screen menu.
With MyCitroën Drive
Selective unlocking is configured in the
Vehicle touch screen menu.
With MyCitroën Drive Plus
Selective unlocking is configured in the
Settings > Vehicle touch screen
application.
Complete unlocking
► Press the unlocking button.
Page 35 of 292
33
Access
2Selective unlocking
Driver's door
► Press the unlocking button.
The driver's door and the fuel filler flap are
unlocked (Petrol or Diesel).
The driver's door and the charging flap are
unlocked (Electric).
►
Press it
again to unlock the other doors and
the boot.
The charging nozzle can be unplugged on the
second press.
Complete or selective unlocking, and alarm
deactivation (depending on version), is confirmed
by the flashing of the direction indicators.
Depending on version, the door mirrors unfold.
Unlocking and partial opening of the
boot
► Press this button for more than one
second to unlock the boot. The boot
opens slightly.
This action unlocks the vehicle first.
Locking the vehicle
Normal locking
► Press the locking button.
The locking, and the activation of the alarm
depending on version, is confirmed by the
lighting of the direction indicators.
Depending on version, the door mirrors fold.
An access (door or boot) that is not properly closed prevents locking of the
vehicle. However, if the vehicle is fitted with
an alarm, it will be activated after 45
seconds.
If the vehicle is unlocked but the doors or boot
are not subsequently opened,
the vehicle
will automatically lock itself again after about
30
seconds. If the vehicle is fitted with an
alarm, it will be reactivated automatically.
Deadlocking
Deadlocking renders the interior door
controls inoperative. It also disables the
central locking button.
The horn remains operational.
Never leave anyone inside the vehicle
when it is deadlocked.
►
Press the locking button.
►
Press the locking button again within 3
seconds to deadlock the vehicle (confirmed by
the temporary lighting of the direction indicators).
For the vehicles equipped with the Proximity
Keyless Entry and Start system, a double
audible signal indicates that the vehicle is not
deadlocked.
With MyCitroën Drive Plus, depending on
version, the activation/deactivation of the
lock audible signal is configured in the
Settings
> Vehicle touch screen application.
Opening / Closing the
windows
Opening the windows
► Press the unlocking button for more
than 3 seconds.
Depending on version, the windows stop when
the button is released or by pressing the button
a second time.
Closing the windows and sunroof
(depending on version)
► Press the locking button for more than
3 seconds.
Depending on version, the windows and the
sunroof stop when the button is released or by
pressing the button a second time.
Ensure that no person or object could
prevent the correct closing of the
windows and sunroof.
If, on versions with alarm, you want to
leave the windows and/or sunroof partially
open, you must first deactivate the interior
volumetric alarm protection.
For more information on the Alarm, refer to
the corresponding section.
Remote lighting of the
lamps
(Depending on version)
Page 45 of 292

43
Access
2The electric window controls remain operational for approximately 45 seconds
after switching off the ignition.
After that time, the controls are disabled. To
reactivate them, switch the ignition on again.
Anti-pinch
If the window meets an obstacle while rising, it
stops and immediately partially lowers again.
Deactivating the rear
controls for the rear electric
windows
For your children's safety, press control 5 to
deactivate the controls for the rear electric
windows, irrespective of their positions.
The red indicator lamp in the button comes on.
The rear electric windows can still be controlled
using the driver's controls.
In the event of a serious impact, use of
the rear electric window controls is
re-enabled, if they had been deactivated.
Reinitialising the electric
windows
After reconnecting the battery, or in the event
of abnormal window movement, the anti-pinch
function must be reinitialised.
The anti-pinch function is disabled during the
following sequence of operations.
For each window:
►
Lower the window fully
, then raise it; it will
rise in steps of a few centimetres each time the
control is pressed. Repeat the operation until the
window is fully closed.
►
Continue to pull the control for at least one
second after the window reaches the closed
position.
If an electric window meets an obstacle
during operation, the movement of the
window must be reversed. To do this, press
the relevant control.
When the driver operates the passengers’
electric window controls, it is important to
ensure that nothing can prevent the window
from closing properly.
It is important to ensure that passengers use
the electric windows correctly.
Pay particular attention to children when
operating the windows.
Be aware of passengers and/or other persons
present when closing windows using the key
or the "Keyless Entry and Start" system.
Do not put your head or arms through the
open windows when the vehicle is moving -
risk of serious injury!
Sunroof
The sunroof consists of a movable glass panel
that slides over the roof and a blind that can
be opened independently. Opening the sunroof
automatically opens the blind.
►
T
o operate the panoramic sunroof, use the
button in the roof console.
The sunroof can be operated when the ignition
is turned on (if the battery is charged enough),
with the engine running, in STOP mode of Stop
& Start, and up to 45 seconds after turning off
the ignition.
Precautions
Do not put your head or arms through the
sunroof while the vehicle is moving - risk
of serious injury!
Page 46 of 292
44
Access
Ensure that any luggage or accessories
carried on the roof bars do not interfere
with the movement of the sunroof.
Do not place heavy loads on the movable
glass panel of the sunroof.
If the sunroof is wet, following a shower
or washing the vehicle, wait until it is
completely dry before opening.
Do not operate the sunroof if it is covered by
snow or ice - risk of damage!
Use only plastic scrapers to remove snow or
ice from the sunroof.
Regularly check the condition of the
sunroof seals (e.g. presence of dust,
dead leaves).
If using a car wash, check first that the roof is
correctly closed and keep the high-pressure
jet at least 30 centimetres from the seals.
Never leave the vehicle with the sunroof
open.
Operation
When opening the sunroof fully, the movable
glass moves to a partially open position, then
slides over the roof. Any intermediate position is
possible.
Before operating the sunroof control
button, ensure that no object or person
might prevent the movement.
Pay particular attention to children when
operating the sunroof.
If something is trapped when operating the
sunroof, reverse the movement of the sunroof
by pressing the control button in question.
The driver must ensure that passengers use
the sunroof correctly.
Any manual intervention on the position of
the sunroof may disturb the anti-pinch device.
Perform a reinitialisation.
Anti-pinch system
If the sunroof encounters an obstacle when
closing, the movement is automatically reversed.
Opening/closing the sunroof
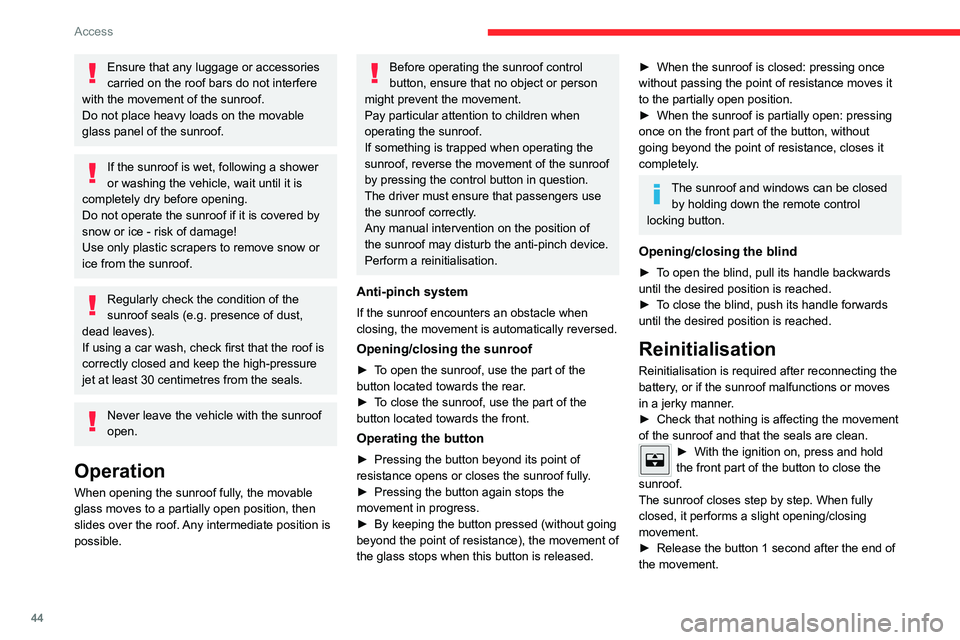
► To open the sunroof, use the part of the
button located towards the rear.
►
T
o close the sunroof, use the part of the
button located towards the front.
Operating the button
► Pressing the button beyond its point of
resistance opens or closes the sunroof fully .
►
Pressing the button again stops the
movement in progress.
►
By keeping the button pressed (without going
beyond the point of resistance), the movement of
the glass stops when this button is released.
► When the sunroof is closed: pressing once
without passing the point of resistance moves it
to the partially open position.
►
When the sunroof is partially open: pressing
once on the front part of the button, without
going beyond the point of resistance, closes it
completely
.
The sunroof and windows can be closed by holding down the remote control
locking button.
Opening/closing the blind
► To open the blind, pull its handle backwards
until the desired position is reached.
►
T
o close the blind, push its handle forwards
until the desired position is reached.
Reinitialisation
Reinitialisation is required after reconnecting the
battery, or if the sunroof malfunctions or moves
in a jerky manner.
►
Check that nothing is affecting the movement
of the sunroof and that the seals are clean.
► With the ignition on, press and hold
the front part of the button to close the
sunroof.
The sunroof closes step by step. When fully
closed, it performs a slight opening/closing
movement.
►
Release the button 1 second after the end of
the movement.
Page 64 of 292
62
Ease of use and comfort
Mats
Fitting
When fitting it on the driver's side, only use
the mountings present on the carpet (a "click"
indicates proper locking).
The other mats are simply laid over the carpet.
Removing/refitting
► To remove it on the driver's side, move the
seat backwards and unclip the fasteners.
►
T
o refit it, position the mat and secure it by
pressing down.
►
Check that the mat is secured correctly
.
To avoid any risk of jamming the pedals:– Only use mats which are suited to the
fixings already present in the vehicle; these
fixings must be used.
–
Never fit one mat on top of another
.
The use of mats not approved by CITROËN
may interfere with access to the pedals and
hinder the operation of the cruise control/
speed limiter.
The approved mats have two fasteners
located underneath the seat.
Shark fin antenna
A ventilation grille is present at the rear of the
roof for cooling the shark fin antenna.
Any ventilation noise produced, with the ignition
on or the engine running, is completely normal.
Courtesy lamps
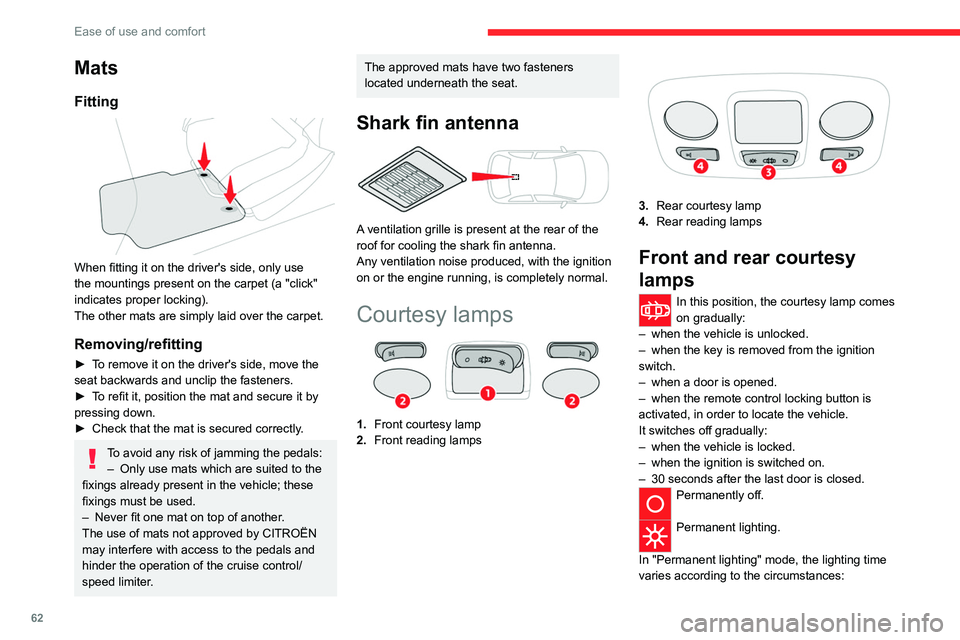
1. Front courtesy lamp
2. Front reading lamps
3.Rear courtesy lamp
4. Rear reading lamps
Front and rear courtesy
lamps
In this position, the courtesy lamp comes
on gradually:
–
when the vehicle is unlocked.
–
when the key is removed from the ignition
switch.
–
when a door is opened.
–
when the remote control locking button is
activated, in order to locate the vehicle.
It switches off gradually:
–
when the vehicle is locked.
–
when the ignition is switched on.
–
30 seconds after the last door is closed.
Permanently off.
Permanent lighting.
In "Permanent lighting" mode, the lighting time
varies according to the circumstances:
Page 71 of 292
69
Lighting and visibility
4Do not allow snow to accumulate on the
bonnet or roof of the vehicle as this could
obstruct the camera.
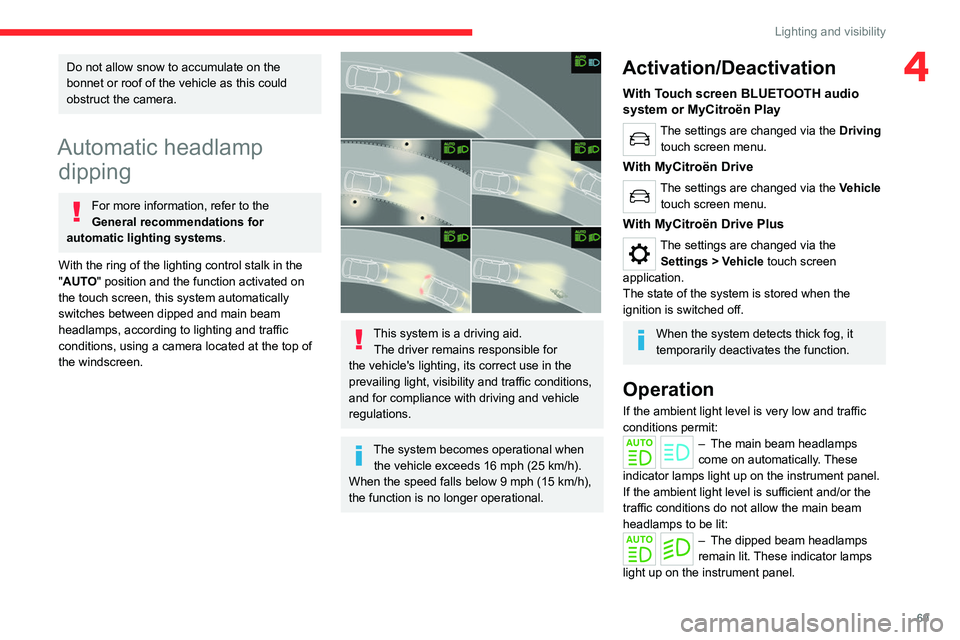
Automatic headlamp dipping
For more information, refer to the
General recommendations for
automatic lighting systems.
With the ring of the lighting control stalk in the
"AUTO" position and the function activated on
the touch screen, this system automatically
switches between dipped and main beam
headlamps, according to lighting and traffic
conditions, using a camera located at the top of
the windscreen.
This system is a driving aid. The driver remains responsible for
the vehicle's lighting, its correct use in the
prevailing light, visibility and traffic conditions,
and for compliance with driving and vehicle
regulations.
The system becomes operational when the vehicle exceeds 16 mph (25 km/h).
When the speed falls below 9 mph (15 km/h),
the function is no longer operational.
Activation/Deactivation
With Touch screen BLUETOOTH audio
system or MyCitroën Play
The settings are changed via the Driving
touch screen menu.
With MyCitroën Drive
The settings are changed via the Vehicle
touch screen menu.
With MyCitroën Drive Plus
The settings are changed via the Settings > Vehicle touch screen
application.
The state of the system is stored when the
ignition is switched off.
When the system detects thick fog, it
temporarily deactivates the function.
Operation
If the ambient light level is very low and traffic
conditions permit:
– The main beam headla mps
come on automatically. These
indicator lamps light up on the instrument panel.
If the ambient light level is sufficient and/or the
traffic conditions do not allow the main beam
headlamps to be lit:
– The dipped beam head lamps
remain lit. These indicator lamps
light up on the instrument panel.