wipers CITROEN C4 AIRCROSS DAG 2021 Handbook (in English)
[x] Cancel search | Manufacturer: CITROEN, Model Year: 2021, Model line: C4 AIRCROSS DAG, Model: CITROEN C4 AIRCROSS DAG 2021Pages: 244, PDF Size: 6.29 MB
Page 4 of 244
2
Contents
■
Overview
■
Eco-driving
1Instruments
Instrument panels 7
Warning and indicator lamps 8
Indicators 13
Distance recorders 16
Equipment configuration for vehicles
without screen
16
Monochrome screen C 17
Touch screen 18
Trip computer 19
Setting the date and time 21
2Access
Remote control 23
Keyless Entry and Starting 24
Emergency procedures 26
Doors 29
Boot 29
Central locking 30
Alarm 30
Panoramic sunroof 32
Electric windows 34
3Ease of use and comfort
Front seats 36
Rear seats 38
Steering wheel adjustment 41
Mirrors 41
Ventilation 42
Heating/Manual air conditioning 43
Automatic air conditioning 44
Front demist - defrost 46
Heated windscreen 46
Rear screen demist - defrost 46
Front fittings 47
Rear fittings 50
Boot fittings 51
Courtesy lamps 53
Interior ambient lighting 53
Boot lighting 54
4Lighting and visibility
Lighting control 55
Direction indicators (flashers) 56
Automatic illumination of headlamps 57
Daytime running lamps / Sidelamps 57
Automatic headlamp dipping 58
Headlamp beam height adjustment 59
Wiper control stalk 60
Changing a wiper blade 62
Automatic wipers 62
5Safety
General safety recommendations 64
Hazard warning lamps 64
Horn 65
Emergency or assistance call 65
Electronic stability control (ESC) 67
Grip control 68
Hill Assist Descent 69
Seat belts 70
Airbags 73
Child seats 75
Deactivating the front passenger airbag 77
ISOFIX child seats 80
i-Size child seats 83
child lock 84
6Driving
Driving recommendations 86
Starting / Switching off the engine
with the key
87
Starting / Switching off the engine
with Keyless Entry and Starting
89
Parking brake 91
5-speed manual gearbox 91
6-speed manual gearbox 91
Automatic gearbox (EAT6) 92
Gear efficiency indicator 94
Hill start assist 94
Stop & Start 95
Under-inflation detection 97
Driving and manoeuvring aids - General
recommendations
98
Head-up display 99
Memorising speeds 101
Speed Limit Recognition
and Recommendation
101
Speed limiter 104
Cruise control -
particular recommendations
106
Cruise control 106
Active Safety Brake with
Collision Risk Alert and Intelligent
emergency braking assistance
108
Distraction detection 111
Lane Departure Warning System 11 2
Page 48 of 244
46
Ease of use and comfort
Front demist - defrost
These markings on the control panels indicate the control positions for rapid
demisting or defrosting of the windscreen and
side windows.
During the winter period, direct the side air
vents towards the side windows to optimise their
demisting and defrosting.
With control panel on the
centre console
On / Off
► Put the temperature and air flow controls to the appropriately marked position.► Press this button to distribute the air to the "Windscreen" position, its indicator
lamp comes on.
► Check that recycling of interior air is deactivated: its indicator lamp must be off.► Put the air flow control to the 0 position.
With touch screen
On / Off
► Press this button, its indicator lamp comes on.
The system automatically manages the air
conditioning, air flow and air intake, and provides
optimum distribution towards the windscreen and
side windows.
► To switch it off, press this button again; its indicator lamp goes off.
With Stop & Start, when demisting
- defrosting has been activated, STOP
mode is not available.
Heated windscreen
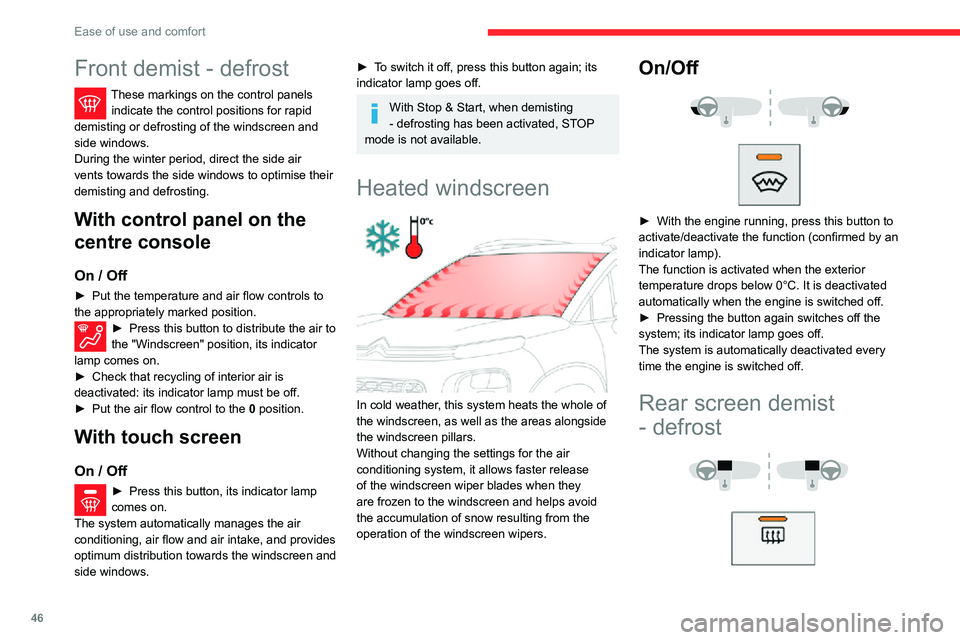
In cold weather, this system heats the whole of
the windscreen, as well as the areas alongside
the windscreen pillars.
Without changing the settings for the air
conditioning system, it allows faster release
of the windscreen wiper blades when they
are frozen to the windscreen and helps avoid
the accumulation of snow resulting from the
operation of the windscreen wipers.
On/Off
► With the engine running, press this button to activate/deactivate the function (confirmed by an
indicator lamp).
The function is activated when the exterior
temperature drops below 0°C. It is deactivated
automatically when the engine is switched off.
► Pressing the button again switches off the system; its indicator lamp goes off.
The system is automatically deactivated every
time the engine is switched off.
Rear screen demist
- defrost
On / Off
► Press this button to demist/defrost the rear screen and, depending on version, the door
mirrors. The button indicator lamp comes on.
Defrosting switches off automatically to prevent
excessive electrical consumption.
► It is possible to stop the demisting / defrosting operation before it is switched off automatically
by pressing this button again. The button
indicator lamp goes off.
Switch off the demisting/defrosting of the rear screen and door mirrors as
soon as appropriate, as lower current
consumption results in reduced fuel
consumption.
Rear screen demisting - defrosting can
only be operated when the engine is
running.
Page 58 of 244

56
Lighting and visibility
the left, moving the lighting control stalk upwards turns on the right-hand sidelamps).
This is confirmed by an audible signal and the
lighting of the corresponding direction indicator
lamp on the instrument panel.
► To switch off the parking lamps, return the lighting control stalk to the central position.
Automatic illumination of
headlamps
When the ring is at the "AUTO" position and
a low level of ambient light is detected by a
sunshine sensor, the number plate lamps, side lamps and dipped beam headlamps are switched
on automatically, without any action on the
part of the driver. They can also come on if
rain is detected, at the same time as automatic
operation of the windscreen wipers.
As soon as the light returns to a sufficient level
or after the windscreen wipers are switched off,
the lamps are switched off automatically.
Operating fault
In the event of a malfunction of the sunshine sensor, the lighting comes on,
this warning lamp is displayed in the instrument
panel accompanied by an audible signal and/or a
message.
Contact a CITROËN dealer or a qualified
workshop.
They operate with the sidelamps or dipped beam headlamps on, in manual or
auto mode.
► Press and rotate the ring:– forwards a 1st time to switch on the front
foglamps.
– forwards a 2nd time to switch on the rear
foglamp.
– backwards a 1st time to switch off the rear
foglamp.
– backwards a 2nd time to switch off the front
foglamps.
When the lamps are switched off automatically
(with AUTO model) or when the dipped beam
headlamps are switched off manually, the
foglamps and sidelamps remain on.
► Rotate the ring backwards to switch the foglamps off; the sidelamps will then switch off.
In good or rainy weather, by day and
night, using the front and rear foglamps
is prohibited. In these situations, the power of
their beams may dazzle other drivers. They
should only be used in fog or falling snow.
In these weather conditions, it is your
responsibility to switch on the foglamps and
dipped beam headlamps manually as the
sunshine sensor may detect sufficient light.
Do not forget to turn off the front and rear
foglamps as soon as they are no longer
necessary.
Switching off of the lamps when the
ignition is switched off
When the ignition is switched off, all of the
lamps turn off immediately, except for dipped
beam headlamps if automatic guide-me-home
lighting is activated.
Switching on the lamps after
switching off the ignition
To reactivate the lighting control, rotate the
ring to the "AUTO" position, then to the
desired position.
If the driver's door is opened, a temporary
audible signal warns the driver that the lamps
are on.
They will go off automatically after a period of
time that depends on the state of charge of
the battery (entering energy economy mode).
Direction indicators
(flashers)
► Left: lower the lighting control stalk passing the point of resistance.► Right: raise the lighting control stalk passing the point of resistance.
Three flashes
► Press briefly upwards or downwards, without going beyond the point of resistance; the
direction indicators will flash 3 times.
Parking lamps
Vehicle side marking by lighting the sidelamps
on the traffic side only.
► Depending on version, within one minute of switching off the ignition, move the lighting
control stalk up or down, depending which side
the traffic is on (for example, when parking on
Page 59 of 244

57
Lighting and visibility
4the left, moving the lighting control stalk upwards
turns on the right-hand sidelamps).
This is confirmed by an audible signal and the
lighting of the corresponding direction indicator
lamp on the instrument panel.
► To switch off the parking lamps, return the lighting control stalk to the central position.
Automatic illumination of headlamps
When the ring is at the "AUTO" position and
a low level of ambient light is detected by a
sunshine sensor, the number plate lamps, side lamps and dipped beam headlamps are switched
on automatically, without any action on the
part of the driver. They can also come on if
rain is detected, at the same time as automatic
operation of the windscreen wipers.
As soon as the light returns to a sufficient level
or after the windscreen wipers are switched off,
the lamps are switched off automatically.
Operating fault
In the event of a malfunction of the sunshine sensor, the lighting comes on,
this warning lamp is displayed in the instrument
panel accompanied by an audible signal and/or a
message.
Contact a CITROËN dealer or a qualified
workshop.
Do not cover the sunshine sensor,
integrated with the rain sensor and
located at the top centre of the windscreen
behind the rear view mirror; the associated
functions would no longer be controlled.
In fog or snow, the sunshine sensor may
detect sufficient light. In this case, the
lighting will not come on automatically.
Daytime running lamps /
Sidelamps
The front and rear lamps light up automatically
when the engine starts.
They provide the following functions:
– Daytime running lamps (lighting control stalk
at position "AUTO" with adequate light level).
– Sidelamps (lighting control stalk in "AUTO"
position with low light level or "Sidelamps only”
or "Dipped/main beam headlamps").
In daytime running lamps mode, the
diodes are brighter.
Guide-me-home lighting
Automatic
With the "Automatic illumination of headlamps"
function activated (lighting control stalk at the
AUTO position), under low ambient light, the
dipped beam headlamps come on automatically
when the ignition is switched off.
Activation, deactivation and the duration of the
guide-me-home lighting are set in the vehicle
parameters menu.
Manual
Page 62 of 244

60
Lighting and visibility
Automatic.
Refer to the corresponding section.
Front screenwash
► Pull the wiper control stalk towards you and hold.
The screenwash then the windscreen wipers
operate for a pre-determined time.
The height of the front screenwash jets
can be adjusted. To change the factory
setting, insert a needle into each of the jets,
then direct them.
To avoid damaging the wiper blades, do not operate the screenwash if the
screenwash reservoir is empty.
Only operate the screenwash if there is no
risk of the fluid freezing on the windscreen
and hindering visibility. During the winter
period, use "very cold climate" rated products.
Never top up with water.
Rear wiper
► Turn the ring to align the desired symbol with the marking.Off
Intermittent wipe
With cornering lighting
Switching on / off
This system starts:– when the corresponding direction indicator is switched on.
or
– from a certain angle of rotation of the steering wheel.
It becomes inactive:
– below a certain angle of rotation of the steering wheel.– above 25 mph (40 km/h).– when reverse gear is engaged.
Programming
The function is activated or deactivated via the
vehicle configuration menu.
This function is activated by default.
Without audio system
► In the "LIGHTING" menu on the instrument
panel display, activate/deactivate "DIR
HEADLAMPS" (directional headlamps).
With audio system
► In the "Personalisation-
configuration " menu, activate/deactivate
"Directional headlamps".
With touch screen
► In the Driving / Vehicle menu, select
the "Vehicle settings" tab, then
"Lighting " and activate/deactivate " Directional
headlamps".
Wiper control stalk
In wintry conditions, remove snow, ice or
frost present on the windscreen, around
the wiper arms and blades and on the
windscreen seal, before operating the wipers.
Do not operate the wipers on a dry
windscreen. Under extremely hot or cold
conditions, ensure that the wiper blades are
not stuck to the windscreen before operating
the wipers.
Without AUTO wiping
With AUTO wiping
Windscreen wipers
► To select the wiping speed: raise or lower the stalk to the desired position.Fast wiping (heavy rain)
Normal wiping (moderate rain)
Intermittent wiping (proportional to the vehicle’s speed)Off
Single wipe (press down and release).
or
Page 63 of 244

61
Lighting and visibility
4Automatic.
Refer to the corresponding section.
Front screenwash
► Pull the wiper control stalk towards you and hold.
The screenwash then the windscreen wipers
operate for a pre-determined time.
The height of the front screenwash jets can be adjusted. To change the factory
setting, insert a needle into each of the jets,
then direct them.
To avoid damaging the wiper blades, do not operate the screenwash if the
screenwash reservoir is empty.
Only operate the screenwash if there is no
risk of the fluid freezing on the windscreen
and hindering visibility. During the winter
period, use "very cold climate" rated products.
Never top up with water.
Rear wiper
► Turn the ring to align the desired symbol with the marking.Off
Intermittent wipe
Wash-wipe
Reverse gear
When reverse gear is engaged, the rear wiper
will come into operation automatically if the front
windscreen wipers are operating.
Activation / Deactivation
The system is activated or deactivated via the
vehicle configuration menu.
This system is activated by default.
Without audio system
► In the "COMFORT" menu on the instrument
panel display, activate/deactivate "REAR WIPE
REV". (automatic wiping in reverse).
With audio system
In the "Personalisation-configuration "
menu, activate/deactivate " Rear wipe in
reverse gear ".
With touch screen
► In the Driving / Vehicle menu, select
the "Vehicle settings" tab, then
"Comfort" and activate/deactivate " Rear wiper
in reverse ".
In the event of accumulation of snow or
hard frost or if a bicycle carrier is fitted to
a towing device, deactivate the automatic rear
wiper via the touch screen's Driving/ Vehicle
menu.
Rear screenwash
► Turn the ring all the way towards the dashboard and hold.
The screenwash and the wiper operate for as
long as the ring remains turned.
A final wiping cycle is performed when
screenwashing ends.
Special position of the
windscreen wipers
This maintenance position is used while cleaning
or replacing the wiper blades. It can also be
useful, in winter (ice, snow), to release the wiper
blades from the windscreen.
To maintain the effectiveness of the flat wiper blades, it is advisable to:
– handle them with care.– clean them regularly using soapy water .– avoid using them to hold cardboard on the windscreen.– replace them at the first signs of wear.
Page 64 of 244
62
Lighting and visibility
Do not cover the rain/sunshine sensor.When using an automatic car wash,
switch off the automatic wipers and the
ignition.
In winter, wait until the windscreen is
completely clear of ice before activating the
automatic wipers.
Switching on
► Give a short downwards push to the control stalk.
A wiping cycle confirms that the instruction has
been accepted.
Depending on version, this indicator lamp appears in the display or comes on in the
instrument panel, accompanied by a message.
Switching off
► Give the control stalk another brief push downwards or place the control stalk in another
position ( Int, 1 or 2).
Depending on version, this indicator lamp
disappears from the display or goes off in
the instrument panel, accompanied by a
message.
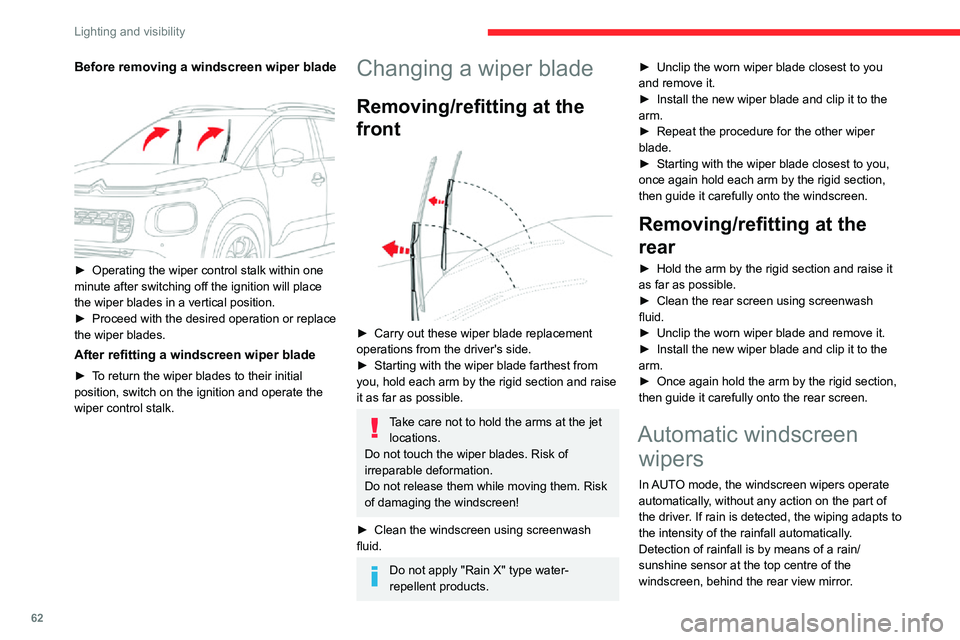
Before removing a windscreen wiper blade
► Operating the wiper control stalk within one minute after switching off the ignition will place
the wiper blades in a vertical position.
► Proceed with the desired operation or replace the wiper blades.
After refitting a windscreen wiper blade
► To return the wiper blades to their initial position, switch on the ignition and operate the
wiper control stalk.
Changing a wiper blade
Removing/refitting at the
front
► Carry out these wiper blade replacement operations from the driver's side.► Starting with the wiper blade farthest from you, hold each arm by the rigid section and raise
it as far as possible.
Take care not to hold the arms at the jet locations.
Do not touch the wiper blades. Risk of
irreparable deformation.
Do not release them while moving them. Risk
of damaging the windscreen!
► Clean the windscreen using screenwash
fluid.
Do not apply "Rain X" type water-
repellent products.
► Unclip the worn wiper blade closest to you and remove it.► Install the new wiper blade and clip it to the arm.► Repeat the procedure for the other wiper blade.► Starting with the wiper blade closest to you, once again hold each arm by the rigid section,
then guide it carefully onto the windscreen.
Removing/refitting at the
rear
► Hold the arm by the rigid section and raise it as far as possible.► Clean the rear screen using screenwash fluid.► Unclip the worn wiper blade and remove it.► Install the new wiper blade and clip it to the arm.► Once again hold the arm by the rigid section, then guide it carefully onto the rear screen.
Automatic windscreen wipers
In AUTO mode, the windscreen wipers operate
automatically, without any action on the part of
the driver. If rain is detected, the wiping adapts to
the intensity of the rainfall automatically.
Detection of rainfall is by means of a rain/
sunshine sensor at the top centre of the
windscreen, behind the rear view mirror.
Page 65 of 244

63
Lighting and visibility
4Do not cover the rain/sunshine sensor.
When using an automatic car wash,
switch off the automatic wipers and the
ignition.
In winter, wait until the windscreen is
completely clear of ice before activating the
automatic wipers.
Switching on
► Give a short downwards push to the control stalk.
A wiping cycle confirms that the instruction has
been accepted.
Depending on version, this indicator lamp appears in the display or comes on in the
instrument panel, accompanied by a message.
Switching off
► Give the control stalk another brief push downwards or place the control stalk in another
position ( Int, 1 or 2).
Depending on version, this indicator lamp
disappears from the display or goes off in
the instrument panel, accompanied by a
message.
If the ignition has been off for more than
one minute, the automatic wipers must
be reactivated by pushing the control stalk
downwards.
Malfunction
If a fault occurs with the automatic wipers, the
wipers operate in intermittent mode.
Have them checked by a CITROËN dealer or a
qualified workshop.
Page 90 of 244
88
Driving
automatically to preserve the remaining battery
charge.
Starting the engine
With the parking brake applied:► With a manual gearbox, place the gear lever
in neutral then fully depress the clutch pedal.
► With an automatic gearbox, place the gear
selector in mode N or P then fully depress the
brake pedal.
► Insert the key into the ignition switch; the system recognises the code.► Unlock the steering column by simultaneously turning the steering wheel and the key.
In certain cases, you may have to apply
significant force to move the steering
wheel (wheels on full lock, for example).
► With a petrol engine , operate the starter
motor by turning the key to position 3 without
pressing the accelerator pedal, until the engine
starts. Once the engine starts, release the key.
With petrol engines , after a cold start,
preheating the catalytic converter can
cause noticeable engine vibrations for anything up to 2 minutes while stationary with
the engine running (accelerated idle speed).
► With a Diesel engine, turn the key to position
2, ignition on, to operate the engine preheating
system.
Wait until this warning lamp goes off in the instrument panel, then operate the starter
motor by turning the key to position 3 without
pressing the accelerator pedal, until the engine
starts. Once the engine starts, release the key.
In wintry conditions, the warning lamp
may stay on for a longer period. When
the engine is hot, the warning lamp does not
come on.
If the engine does not start straight away,
switch off the ignition. Wait a few
seconds before operating the starter motor
again. If the engine does not start after a few
attempts, do not keep trying - risk of
damaging the starter motor and the engine.
Contact a CITROËN dealer or a qualified
workshop.
In mild conditions, do not leave the
engine at idle to warm up but move off
straight away and drive at moderate speed.
Switching off the engine
► Immobilise the vehicle.► With the engine at idle, turn the key to position 1.► Remove the key from the ignition switch.► To lock the steering column, turn the steering wheel until it locks.
To facilitate unlocking of the steering
column, it is recommended that the
wheels be returned to the straight ahead
position before switching off the engine.
Never switch off the ignition before the
complete immobilisation of the vehicle.
With the engine off, the braking and steering
assistance systems are also cut off - risk of
loss of control of the vehicle!
Check that the parking brake is correctly
applied, particularly on sloping ground.
When leaving the vehicle, keep the key in
your possession and lock the vehicle.
Energy economy mode
After the engine has stopped (position 1. Stop),
for a maximum combined duration of about thirty
minutes, you can still use functions such as the
audio and telematics system, courtesy lamps,
windscreen wipers, dipped beam headlamps,
etc.
For more information on Energy
economy mode, refer to the
corresponding section.
Key left in
When opening the driver's door, an alert
message is displayed, accompanied by an
audible signal, to remind you that the key is still in the ignition switch at position 1 (Stop).
If the key has been left in the ignition switch
at position 2 (Ignition on) , the ignition will be
switched off automatically after one hour.
To switch the ignition back on, turn the key
to position 1 (Stop), then back to position 2
(Ignition on) .
Starting / Switching off the
engine with Keyless Entry
and Starting
The electronic key must be present in the
passenger compartment.
If it is not detected, a message is displayed.
Move the electronic key so that the engine
can be started or switched off.
If there is still a problem, refer to the "Key
not detected - Back-up starting or Back-up
switch-off" section.
Page 130 of 244
128
Practical information
► Refit protective plug 2 to carrier 1.► Carefully stow the towball in its bag away from knocks and dirt.
Maintenance
Correct operation is only possible if the towball
and its carrier are kept clean.
Before cleaning the vehicle with a high-pressure
jet wash, the towball must be removed and the
protective plug fitted to the carrier.
Apply the label provided to a clearly visible area, close to the carrier or in the
boot.
Go to a CITROËN dealer or a qualified
workshop for any work on the towbar system.
Towing device
Load distribution► Distribute the load in the trailer so that the heaviest items are as close as possible to the
axle, and the nose weight approaches the
maximum permitted without exceeding it.
Air density decreases with altitude, thus reducing
engine performance. The maximum load which
can be towed must be reduced by 10% per
1,000 metres of altitude.
Use towing devices and their genuine
wiring harnesses approved by CITROËN.
It is recommended that the installation be
performed by a CITROËN dealer or a
qualified workshop.
If not fitted by a CITROËN dealer, it
must still be fitted in accordance with the
manufacturer's instructions.
Certain driving or manoeuvring aid functions
are automatically deactivated if an approved
towing system is used.
Observe the maximum authorised
towable weight, indicated on the vehicle's
registration certificate, the manufacturer's
label as well as in the Technical data section
of this guide.
Complying with the maximum authorised
nose weight (towball) also includes the
use of accessories (bicycle carriers, tow
boxes, etc.).
Observe the legislation in force in the
country where you are driving.
Load reduction mode
System which manages the use of certain
functions according to the level of charge
remaining in the battery.
When the vehicle is being driven, the load
reduction function temporarily deactivates certain
functions, such as air conditioning, heated rear
screen, etc.
The deactivated functions are reactivated
automatically as soon as conditions permit.
Energy economy mode
This system manages the duration of use of
certain functions, in order to conserve a sufficient
level of charge in the battery with the ignition off.
After switching off the engine, you can still
use functions such as the audio and telematic
system, the wipers and the dipped beam
headlamps or courtesy lamps, for a combined
duration of approximately 40 minutes.
Switching to this mode
A message appears in the instrument panel
screen indicating that the vehicle has switched to
economy mode and the active functions are put
on standby.
If a telephone call is being made at this
time, it will be maintained for around 10
minutes with the Bluetooth hands-free system
of your audio system.
Exiting the mode
These functions are automatically reactivated the
next time the vehicle is used.
To restore the use of these functions
immediately, start the engine and let it run:
– For less than 10 minutes, to use the equipment for approximately 5 minutes.
– For more than 10 minutes, to use the equipment for approximately 30 minutes.
Let the engine run for the specified duration to
ensure that the battery charge is sufficient.
To recharge the battery, avoid repeatedly or
continuously restarting the engine.
A flat battery prevents the engine from
starting.
For more information on the
12 V battery,
refer to the corresponding section.
Roof bars
For safety reasons and to avoid
damaging the roof, it is essential to use
the transverse bars approved for your vehicle.
Observe the fitting instructions and the
conditions of use in the guide supplied
with the roof bars.