engine Citroen C4 AIRCROSS RHD 2017 1.G Owner's Guide
[x] Cancel search | Manufacturer: CITROEN, Model Year: 2017, Model line: C4 AIRCROSS RHD, Model: Citroen C4 AIRCROSS RHD 2017 1.GPages: 368, PDF Size: 11.44 MB
Page 74 of 368
72
Front seats
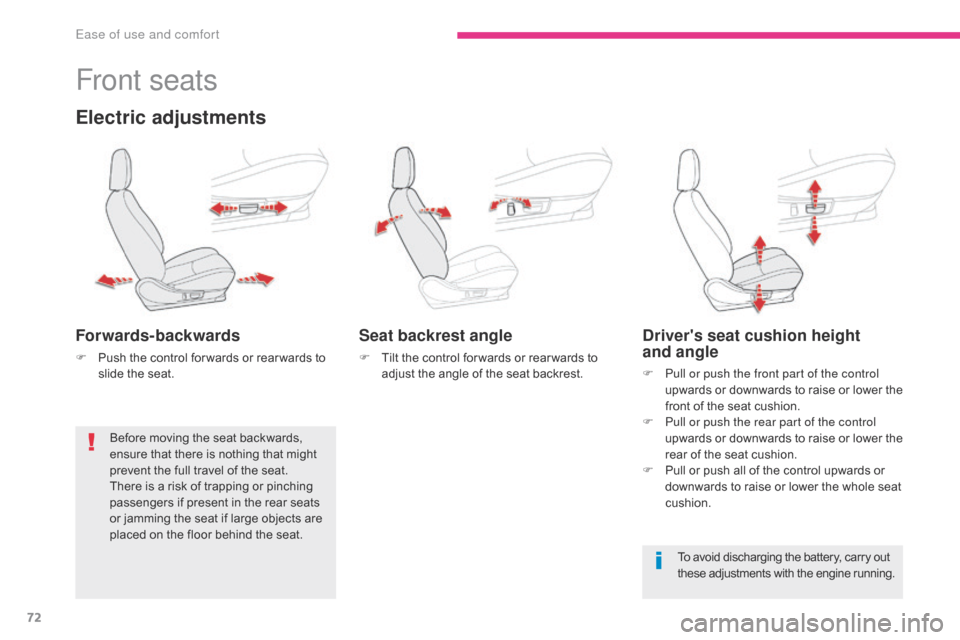
Electric adjustments
Forwards-backwards
F Push the control for wards or rear wards to slide the seat.
Seat backrest angle
F Tilt the control for wards or rear wards to adjust the angle of the seat backrest.
Driver's seat cushion height
and angle
F Pull or push the front part of the control upwards or downwards to raise or lower the
front of the seat cushion.
F
P
ull or push the rear part of the control
upwards or downwards to raise or lower the
rear of the seat cushion.
F
P
ull or push all of the control upwards or
downwards to raise or lower the whole seat
cushion.
To avoid discharging the battery, carry out
these adjustments with the engine running.
Before moving the seat backwards,
ensure that there is nothing that might
prevent the full travel of the seat.
There is a risk of trapping or pinching
passengers if present in the rear seats
or jamming the seat if large objects are
placed on the floor behind the seat.
Ease of use and comfort
Page 75 of 368
73
Additional adjustments
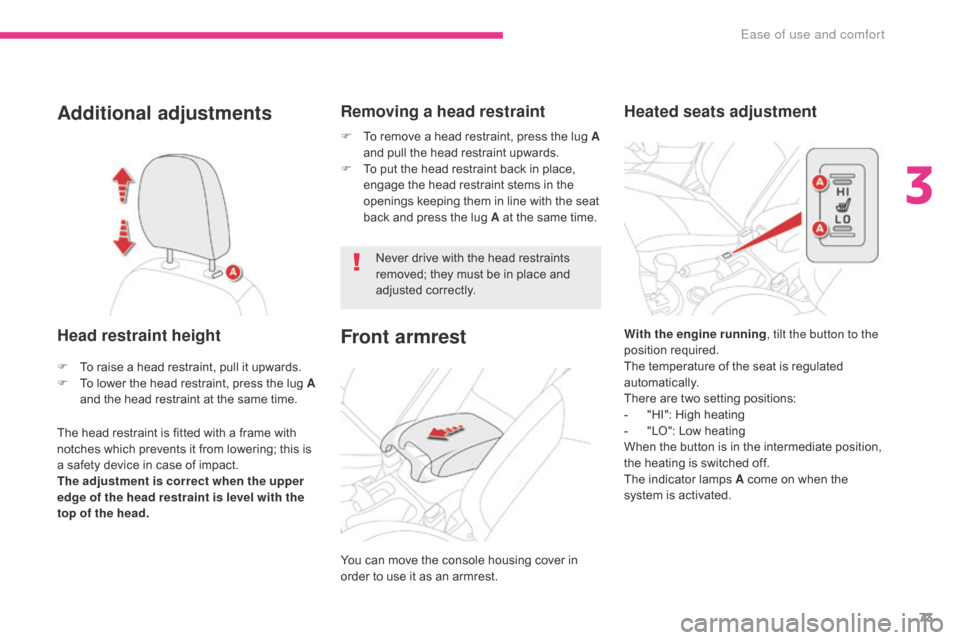
Head restraint height
The head restraint is fitted with a frame with
notches which prevents it from lowering; this is
a safety device in case of impact.
The adjustment is correct when the upper
edge of the head restraint is level with the
top of the head.Never drive with the head restraints
removed; they must be in place and
adjusted correctly.
F
T
o raise a head restraint, pull it upwards.
F
T
o lower the head restraint, press the lug A
and the head restraint at the same time. F
T
o remove a head restraint, press the lug A
and pull the head restraint upwards.
F
T
o put the head restraint back in place,
engage the head restraint stems in the
openings keeping them in line with the seat
back and press the lug A at the same time.
Removing a head restraint
You can move the console housing cover in
order to use it as an armrest.
Front armrestWith the engine running , tilt the button to the
position required.
The temperature of the seat is regulated
automatically.
There are two setting positions:
-
"
HI": High heating
-
"
LO": Low heating
When the button is in the intermediate position,
the heating is switched off.
The indicator lamps A come on when the
system is activated.
Heated seats adjustment
3
Ease of use and comfort
Page 78 of 368
76
Mirrors
Adjustment
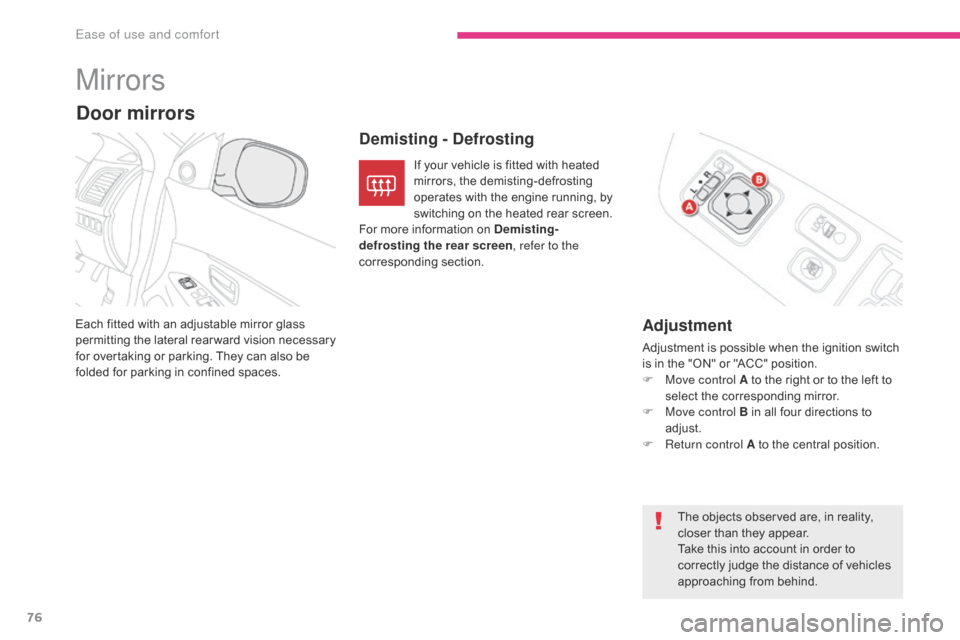
Adjustment is possible when the ignition switch
is in the "ON" or "ACC" position.
F
M
ove control A to the right or to the left to
select the corresponding mirror.
F
M
ove control B in all four directions to
adjust.
F
R
eturn control A to the central position.
Each fitted with an adjustable mirror glass
permitting the lateral rearward vision necessary
for overtaking or parking. They can also be
folded for parking in confined spaces.
Demisting - Defrosting
Door mirrors
If your vehicle is fitted with heated
mirrors, the demisting-defrosting
operates with the engine running, by
switching on the heated rear screen.
For more information on Demisting-
defrosting the rear screen , refer to the
corresponding section.
The objects observed are, in reality,
closer than they appear.
Take this into account in order to
correctly judge the distance of vehicles
approaching from behind.
Ease of use and comfort
Page 82 of 368
80
In order for these systems to be fully effective, follow the operation and maintenance
guidelines below:
F
T
o obtain an even air distribution, take care not to obstruct the exterior air intake grilles
located at the base of the windscreen, the nozzles, the vents and the air outlets, as well
as the air extractor located in the boot.
F
D
o not cover the sunshine sensor, located on the dashboard; this is used for regulation
of the air conditioning system.
F
O
perate the air conditioning system for at least 5 to 10 minutes, once or twice a month
to keep it in per fect working order.
F
E
nsure that the passenger compartment filter is in good condition and have the filter
elements replaced regularly.
W
e recommend the use of a combined passenger compartment filter. Thanks to its
special active additive, it contributes to the purification of the air breathed by the
occupants and the cleanliness of the passenger compartment (reduction of allergic
symptoms, bad odours and greasy deposits).
F
T
o ensure correct operation of the air conditioning system, you are also advised to have
it checked regularly as recommended in the maintenance and warranty guide.
F
I
f the system does not produce cold air, switch it off and contact a CITROËN dealer or a
qualified workshop.
Recommendations for ventilation and air conditioning
If after an extended stop in sunshine,
the interior temperature is very high, first
ventilate the passenger compartment for
a few moments.
Put the air flow control at a setting high
enough to quickly change the air in the
passenger compartment.
Humid air cooled quickly by the
vehicle's air conditioning system may
produce condensation at the vent
outlets.
This phenomenon disappears after a
few seconds.
When towing the maximum load on a steep gradient in high temperatures, switching off the
air conditioning increases the available engine power and so improves the towing ability. The condensation created by the air
conditioning results in a discharge
of water under the vehicle which is
per fectly normal.
E
Page 83 of 368
81
Manual heating / air conditioning
The system operates with the engine running.
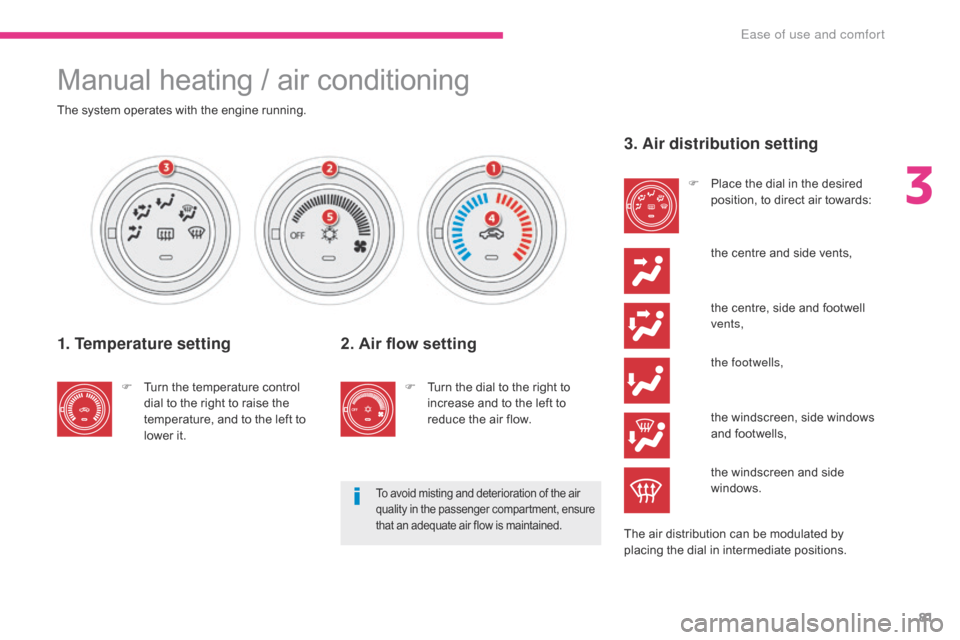
1. Temperature setting
F Turn the temperature control dial to the right to raise the
temperature, and to the left to
lower it.
To avoid misting and deterioration of the air
quality in the passenger compartment, ensure
that an adequate air flow is maintained.
3. Air distribution setting
F Place the dial in the desired position, to direct air towards:
t
he centre and side vents,
The air distribution can be modulated by
placing the dial in intermediate positions.
2. Air flow setting
F Turn the dial to the right to increase and to the left to
reduce the air flow.
t
he centre, side and footwell
vents,
t
he footwells,
t
he windscreen, side windows
and footwells,
t
he windscreen and side
windows.
3
Ease of use and comfort
Page 85 of 368
83
Automatic air conditioning
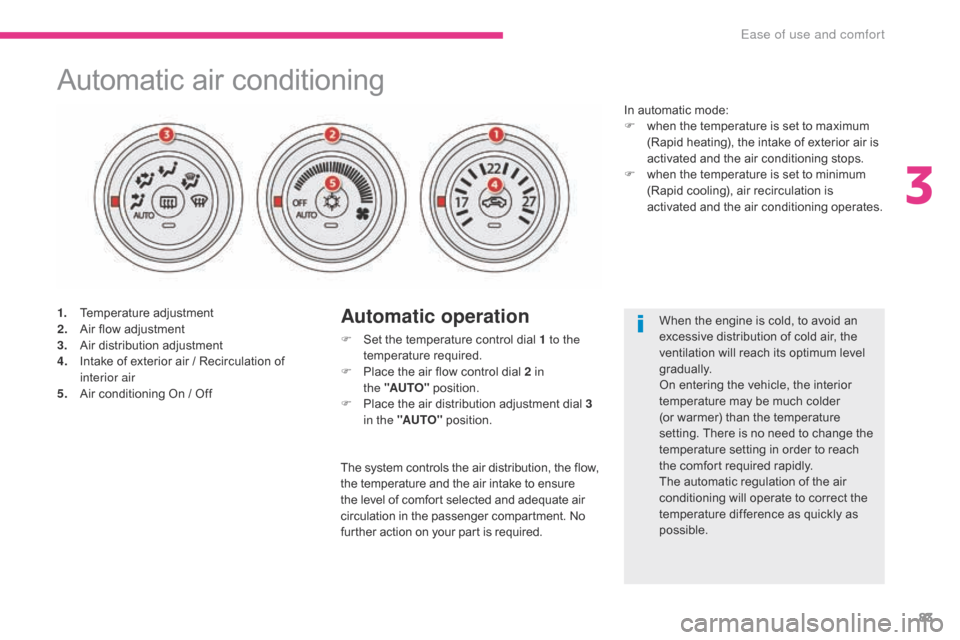
1. Temperature adjustment
2. Air flow adjustment
3.
A
ir distribution adjustment
4.
I
ntake of exterior air / Recirculation of
interior air
5.
A
ir conditioning On / OffAutomatic operation
F Set the temperature control dial 1 to the temperature required.
F
P
lace the air flow control dial 2 in
the
"AUTO" position.
F
P
lace the air distribution adjustment dial 3
in the "AUTO" position. When the engine is cold, to avoid an
excessive distribution of cold air, the
ventilation will reach its optimum level
gradually.
On entering the vehicle, the interior
temperature may be much colder
(or warmer) than the temperature
setting. There is no need to change the
temperature setting in order to reach
the comfort required rapidly.
The automatic regulation of the air
conditioning will operate to correct the
temperature difference as quickly as
possible.
In automatic mode:
F
w
hen the temperature is set to maximum
(Rapid heating), the intake of exterior air is
activated and the air conditioning stops.
F
w
hen the temperature is set to minimum
(Rapid cooling), air recirculation is
activated and the air conditioning operates.
The system controls the air distribution, the flow,
the temperature and the air intake to ensure
the level of comfort selected and adequate air
circulation in the passenger compartment. No
further action on your part is required.
3
Ease of use and comfort
Page 90 of 368
88
Rear screen demist - defrost
Switching on
The rear screen demisting/defrosting can only
operate when the engine is running.
Switching off
The demisting/defrosting switches off
automatically to prevent an excessive
consumption of current.
F
I
t is possible to stop the demisting/
defrosting operation before it is switched
off automatically by pressing the button
again. The indicator lamp associated with
the button goes off.
F
S
witch off the demisting/defrosting of the
rear screen and door mirrors as soon as
appropriate, as lower current consumption
results in reduced fuel consumption.
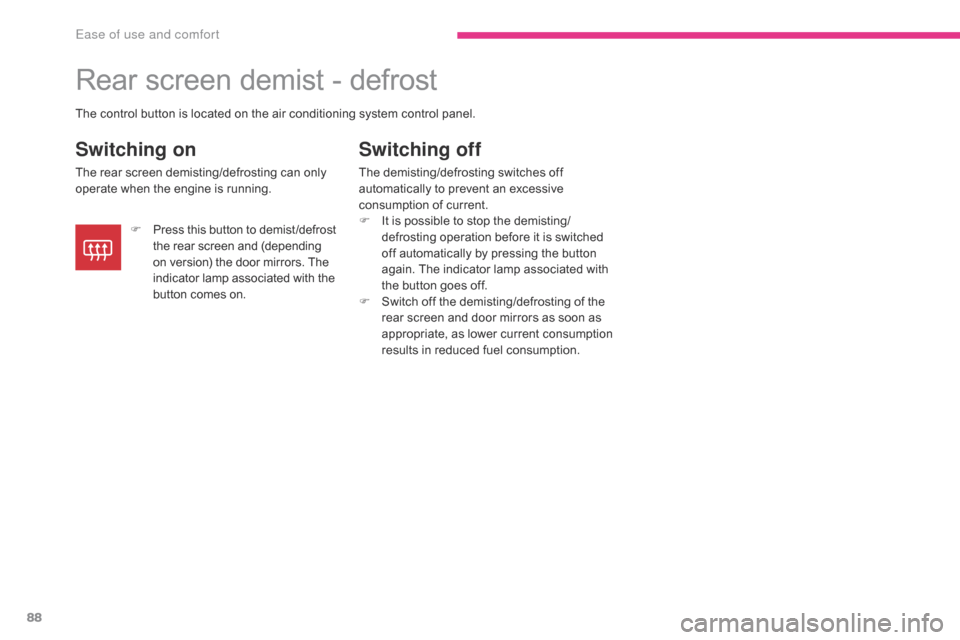
The control button is located on the air conditioning system control panel.
F
P
ress this button to demist /defrost
the rear screen and (depending
on version) the door mirrors. The
indicator lamp associated with the
button comes
on.
Ease of use and comfort
Page 94 of 368
92
Front armrest
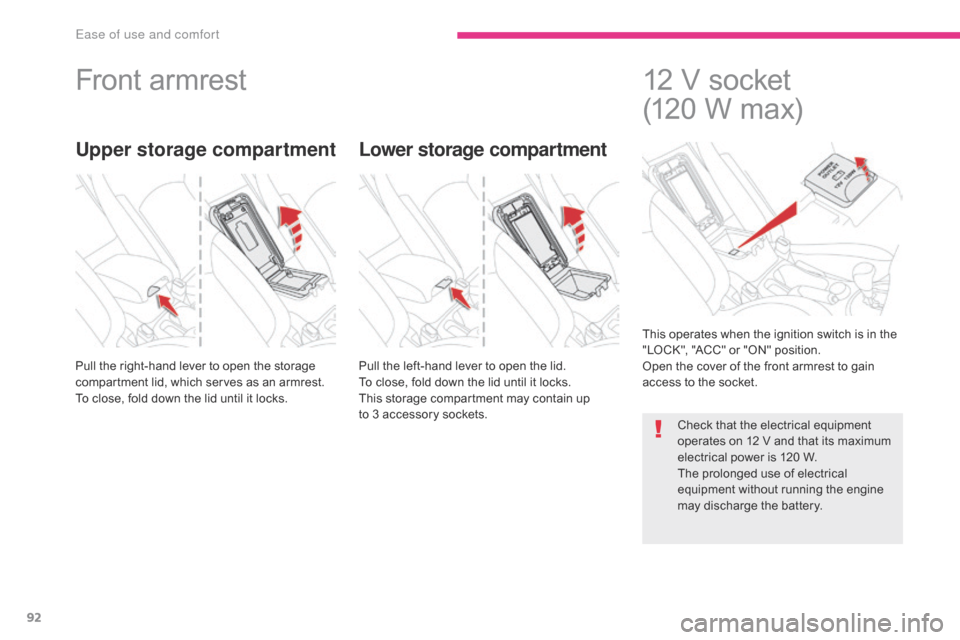
Pull the right-hand lever to open the storage
compartment lid, which serves as an armrest.
To close, fold down the lid until it locks.Pull the left-hand lever to open the lid.
To close, fold down the lid until it locks.
This storage compartment may contain up
to 3 accessory sockets.This operates when the ignition switch is in the
"LOCK", "ACC" or "ON" position.
Open the cover of the front armrest to gain
access to the socket.
Upper storage compartment
Lower storage compartment
Check that the electrical equipment
operates on 12 V and that its maximum
electrical power is 120 W.
The prolonged use of electrical
equipment without running the engine
may discharge the battery.
12 V socket
(120 W max)
Ease of use and comfort
Page 99 of 368
97
Driving recommendations
Observe the driving regulations and remain
vigilant whatever the traffic conditions.
Pay close attention to the traffic and keep your
hands on the wheel so that you are ready to
react at any time to any eventuality.
On a long journey, a break every two hours is
strongly recommended.
In difficult weather, drive smoothly, anticipate
the need to brake and increase the distance
from other vehicles.Never drive with the parking brake
applied - Risk of overheating and
damage to the braking system!
Risk of fire!
As the exhaust system of your vehicle
is very hot, even several minutes after
switching off the engine, do not park
or run the engine over areas where
inflammable substances and materials
are present: grass, leaves, etc.
Never leave a vehicle unsupervised
with the engine running. If you have
to leave your vehicle with the engine
running, apply the parking brake
and put the gearbox into neutral or
position
N or P, depending on the type
of gearbox.
Driving on flooded roads
We strongly advise against driving on flooded
roads, as this could cause serious damage
to the engine or gearbox, as well as to the
electrical systems of your vehicle.
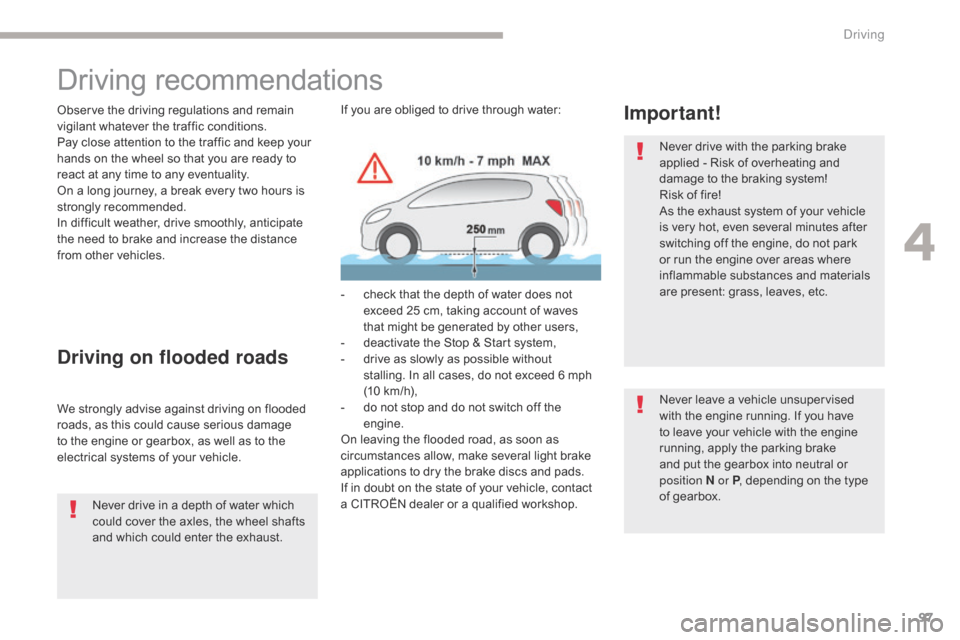
Important!If you are obliged to drive through water:
-
c
heck that the depth of water does not
exceed 25 cm, taking account of waves
that might be generated by other users,
-
d
eactivate the Stop & Start system,
-
d
rive as slowly as possible without
stalling. In all cases, do not exceed 6 mph
(10
km/h),
-
d
o not stop and do not switch off the
engine.
On leaving the flooded road, as soon as
circumstances allow, make several light brake
applications to dry the brake discs and pads.
If in doubt on the state of your vehicle, contact
a CITROËN dealer or a qualified workshop.
Never drive in a depth of water which
could cover the axles, the wheel shafts
and which could enter the exhaust.
4
Driving
Page 100 of 368
98
Starting - switching off the engine with the key
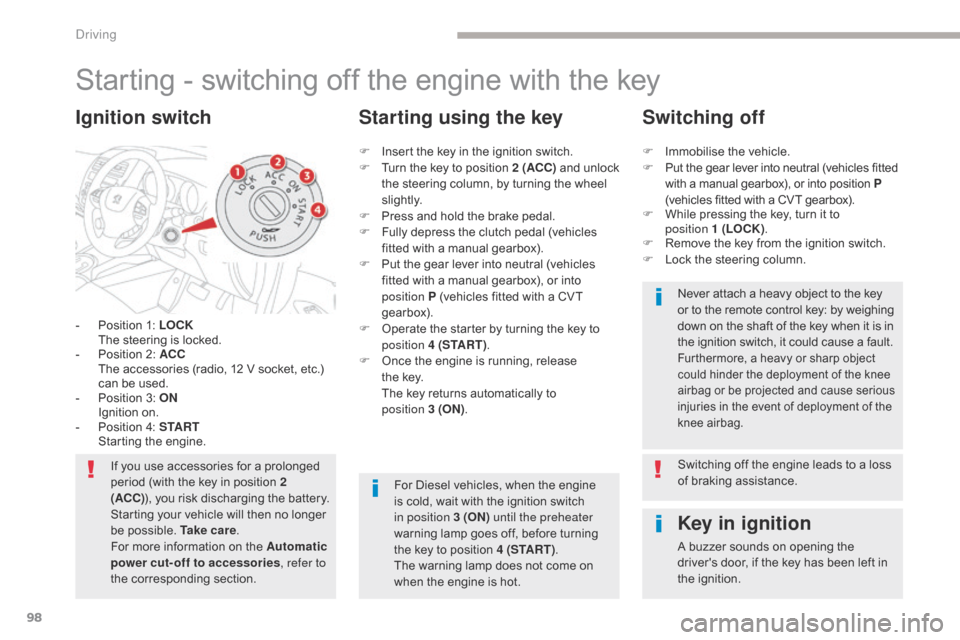
- Position 1: LOCK The steering is locked.
-
P
osition 2: ACC
T
he accessories (radio, 12 V socket, etc.)
can be used.
-
P
osition 3: ON
I
gnition on.
-
P
osition 4: S TA R T
S
tarting the engine.
Ignition switch
If you use accessories for a prolonged
period (with the key in position 2
(ACC) ), you risk discharging the battery.
Starting your vehicle will then no longer
be possible. Ta k e c a r e .
For more information on the Automatic
power cut-off to accessories , refer to
the corresponding section.
Key in ignition
A buzzer sounds on opening the
driver's door, if the key has been left in
the ignition.
F
I
nsert the key in the ignition switch.
F
T
urn the key to position
2 (ACC) and unlock
the steering column, by turning the wheel
s li g ht l y.
F
P
ress and hold the brake pedal.
F
F
ully depress the clutch pedal (vehicles
fitted with a manual gearbox).
F
P
ut the gear lever into neutral (vehicles
fitted with a manual gearbox), or into
position P (vehicles fitted with a CVT
gearbox).
F
O
perate the starter by turning the key to
position 4 (S TA R T ) .
F
O
nce the engine is running, release
the
key.
T
he key returns automatically to
position
3
(ON)
.
Starting using the key Switching off
F Immobilise the vehicle.
F
P ut the gear lever into neutral (vehicles fitted
with a manual gearbox), or into position P
(vehicles fitted with a CVT gearbox).
F
W
hile pressing the key, turn it to
position
1 (LOCK).
F
R
emove the key from the ignition switch.
F
L
ock the steering column.Never attach a heavy object to the key
or to the remote control key: by weighing
down on the shaft of the key when it is in
the ignition switch, it could cause a fault.
Furthermore, a heavy or sharp object
could hinder the deployment of the knee
airbag or be projected and cause serious
injuries in the event of deployment of the
knee airbag.
For Diesel vehicles, when the engine
is cold, wait with the ignition switch
in position 3 (ON) until the preheater
warning lamp goes off, before turning
the key to position 4 (S TA R T ) .
The warning lamp does not come on
when the engine is hot. Switching off the engine leads to a loss
of braking assistance.
Driving