ECO mode CITROEN C4 CACTUS 2023 Owner's Manual
[x] Cancel search | Manufacturer: CITROEN, Model Year: 2023, Model line: C4 CACTUS, Model: CITROEN C4 CACTUS 2023Pages: 196, PDF Size: 6.12 MB
Page 77 of 196
75
Driving
6The system adapts its gear shift recommendation according to the driving
conditions (slope, load, etc.) and the driver’s
requirements (request for power, acceleration,
braking, etc.).
The system never suggests:
–
engaging first gear
.
–
engaging a lower gear
.
–
engaging reverse.
With a manual gearbox, the arrow may
be accompanied by the recommended
gear. The system always suggests changing
to a higher gear when this is necessary.
Hill start assist
This system keeps your vehicle briefly stationary
(for approximately 2 seconds) when making a hill
start, while you transfer your foot from the brake
pedal to the accelerator pedal.
This system is only active when:
–
the vehicle is completely stationary
, with your
foot on the brake pedal,
–
certain slope conditions are met,
–
the driver
’s door is closed.
Do not leave the vehicle while it is being
held temporarily by hill start assist.
If someone needs to get out of the vehicle
with the engine running, apply the parking
brake manually. After that, ensure that the
parking brake indicator lamp and the indicator
lamp P in the electric parking brake control
lever are on fixed.
The hill start assist function cannot be deactivated. However, use of the parking
brake to immobilise the vehicle interrupts its
operation.
Operation
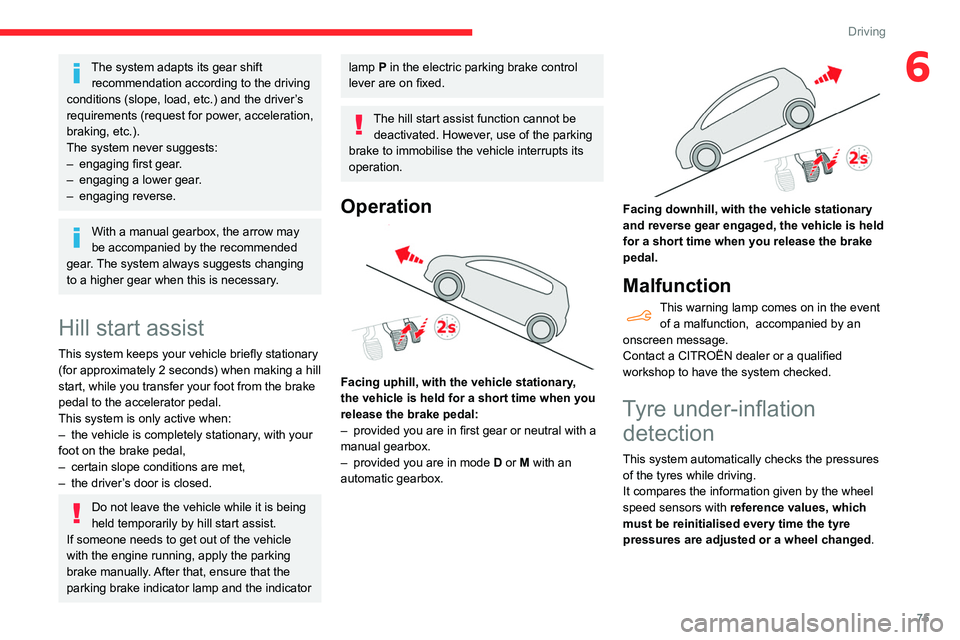
Facing uphill, with the vehicle stationary,
the vehicle is held for a short time when you
release the brake pedal:
–
provided you are in first gear or neutral with a
manual gearbox.
–
provided you are in mode D
or M with an
automatic gearbox.
Facing downhill, with the vehicle stationary
and reverse gear engaged, the vehicle is held
for a short time when you release the brake
pedal.
Malfunction
This warning lamp comes on in the event of a malfunction, accompanied by an
onscreen message.
Contact a CITROËN dealer or a qualified
workshop to have the system checked.
Tyre under-inflation detection
This system automatically checks the pressures
of the tyres while driving.
It compares the information given by the wheel
speed sensors with reference values, which
must be reinitialised every time the tyre
pressures are adjusted or a wheel changed.
Page 79 of 196
77
Driving
6Stop & Start
The Stop & Start function puts the engine temporarily into standby - STOP mode - during
phases when the vehicle is stopped (red lights,
queues, etc.). The engine restarts automatically
- START mode - as soon as the driver wishes to
move off again.
Primarily designed for urban use, the function
is intended to reduce fuel consumption and
exhaust emissions as well as the noise level
when stationary.
The function does not affect the functionalities of
the vehicle, in particular the braking.
Deactivation/Reactivation
The function is activated by default when the
ignition is switched on.
It is set via the Driving / Vehicle touch
screen menu.
A message in the instrument panel confirms the
change of status.
When the function is deactivated, if the engine
was in standby, it restarts immediately.
Associated indicator lamp
Function activated.
Opening the bonnet
Before doing anything under the bonnet,
deactivate the Stop & Start system to avoid
any risk of injury caused by the engine
restarting automatically.
Driving on flooded roads
Before entering into a flooded area, it is
strongly recommended that you deactivate
the Stop & Start system.
For more information on Driving
recommendations, particularly on flooded
roads, refer to the corresponding section.
Operation
Main conditions for operation
– The driver ’s door must be closed.
– The driver's seat belt must be fastened.
–
The state of charge of the battery must be
sufficient.
–
The temperature of the engine must be within
its nominal operating range.
–
The outside temperature must be between
0°C and 35°C.
Putting the engine into standby
(STOP mode)
The engine automatically goes into standby
as soon as the driver indicates the intention of
stopping.
– With a manual gearbox: at a speed below
2 mph (3 km/h) or with the vehicle stationary
(depending on version), with the gear lever in
neutral and the clutch pedal released,
–
W
ith an automatic gearbox: at a speed
below 2 mph (3
km/h) or with the vehicle
stationary (depending on version), with the
gear selector in position, N or the brake pedal
depressed.
Time counter
A time counter adds up the time spent in standby
during the journey. It is reset to zero every time
the ignition is switched on.
Special cases:
The engine will not go into standby if all of the
conditions for operation are not met and in the
following cases.
–
Steep slope (ascending or descending).
–
V
ehicle has not exceeded 6 mph (10 km/h)
since the last engine start (with the key or the
“START/STOP” button).
–
Needed
to maintain a comfortable temperature
in the passenger compartment.
–
Demisting active.
–
Braking assistance is being used.
In these cases, this indicator lamp flashes
for a few seconds, then goes off.
After the engine has restarted, STOP mode is not available until the vehicle
has reached a speed of 5 mph (8
km/h).
Page 80 of 196
78
Driving
certain types of paint could interfere with the
operation of the radar.
Driving aids camera
This camera and its associated functions
may be impaired or not work if the windscreen
area in front of the camera is dirty, misty,
frosty, covered with snow, damaged or
masked by a sticker.
On versions with camera alone, this message
indicates to you that the camera is obstructed:
"Driving aids camera: visibility limited, see
user guide".
In humid and cold weather, demist the
windscreen regularly.
Poor visibility (inadequate street lighting,
heavy rain, thick fog, snowfall), dazzle
(headlamps of an oncoming vehicle, low sun,
reflections on a damp road, leaving a tunnel,
alternating shade and light) can also impair
detection performance.
In the event of a windscreen replacement,
contact a CITROËN dealer or a qualified
workshop to recalibrate the camera;
otherwise, the operation of the associated
driving aids may be disrupted.
During parking manoeuvres, STOP mode
is not available for a few seconds after
coming out of reverse gear or turning the
steering wheel.
Restarting the engine (START mode)
The engine automatically restarts as soon as the
driver indicates the intention of moving off again.
–
W
ith a manual gearbox: with the clutch pedal
fully depressed.
–
W
ith an automatic gearbox:
•
With the selector in position D
or M: with the
brake pedal released.
•
With the selector in position N
and the brake
pedal released: with the selector at D or M.
•
With the selector in position P
and the brake
pedal depressed: with the selector at R, N,
D or M.
Special cases
The engine will restart automatically if all
conditions for operation are met again and in the
following case.
–
Some specific conditions (braking assistance,
air conditioning setting, etc.).
In this case, this indicator lamp flashes for
a few seconds, then goes off.
Malfunctions
In the event of a system malfunction, this
warning lamp flashes on the instrument
panel.
Have the vehicle checked by a CITROËN dealer
or a qualified workshop.
The vehicle stalls in STOP mode
All of the instrument panel warning lamps come
on if there is a fault.
Depending on version, a warning message
may also be displayed, prompting you to place
the gear selector in position N and depress the
brake pedal.
►
Switch off the ignition then start the engine
again with the key or the " ST
ART/STOP" button.
The Stop & Start system requires a 12 V
battery of specific technology and
specification.
All work concerning the battery must be
carried out only by a CITROËN dealer or a
qualified workshop.
Driving and manoeuvring
aids - General
recommendations
Driving and manoeuvring aids cannot, in
any circumstances, replace the need for
vigilance on the part of the driver.
The driver must comply with the Highway
Code, must remain in control of the vehicle in
all circumstances and must be able to retake
control of it at all times. The driver must adapt
the speed to climactic conditions, traffic and
the state of the road.
It is the driver's responsibility to constantly
check the traffic, to assess the relative
distances and speeds of other vehicles and to
anticipate their movements before indicating
and changing lane.
The systems cannot exceed the limits of the
laws of physics.
Driving aids
You should hold the steering wheel
with both hands, always use the interior and
exterior rear view mirrors, always keep the
feet close to the pedals and take a break
every two hours.
Manoeuvring aids
The driver must always check the
surroundings of the vehicle before and during
the whole manoeuvre, in particular using the
mirrors.
Radar
The operation of the radar as well as the
associated functions may be impaired through
the accumulation of dirt (mud, frost, etc.), in
certain difficult weather conditions (very heavy
rain, snow) or if the bumper is damaged.
If the front bumper is to be repainted, contact
a CITROËN dealer or a qualified workshop;
Page 83 of 196
81
Driving
6
On detection of speed limit information, the
system displays the value.
The driver can adjust the vehicle’s speed
according to the information given by the system.
Operating limits
The system does not take account of reduced
speed limits, especially those imposed in the
following cases:
–
poor weather (rain, snow),
–
atmospheric pollution,
–
when towing,
–
driving with a space-saver type spare wheel or
snow chains fitted,
–
T
yre repaired using the temporary puncture
repair kit,
–
young drivers.
It is possible for the system to not display the
speed limit if it does not detect a speed limit
sign within a preset period and in the following
situations:
–
road signs that are obstructed, do not comply
with the standard, are damaged or distorted,
–
obsolete or incorrect maps.
Memorising the speed
setting
In addition to Speed Limit Recognition and
Recommendation, the driver can select the
speed displayed as a speed setting for the speed
limiter or cruise control using the speed limiter or
cruise control memorisation button.
For more information on the Speed
limiter or Cruise control, refer to the
corresponding sections.
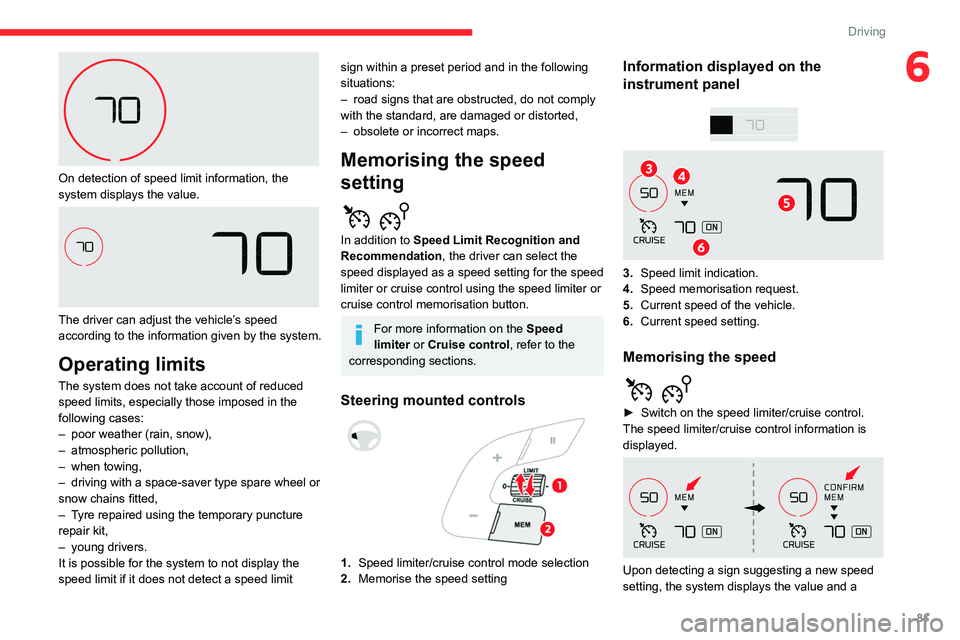
Steering mounted controls
1. Speed limiter/cruise control mode selection
2. Memorise the speed setting
Information displayed on the
instrument panel
3.Speed limit indication.
4. Speed
memorisation request.
5. Current speed of the vehicle.
6. Current speed setting.
Memorising the speed
► Switch on the speed limiter/cruise control.
The speed limiter/cruise control information is
displayed.
Upon detecting a sign suggesting a new speed
setting, the system displays the value and a
Page 84 of 196

82
Driving
Adjusting the limit speed setting
You do not have to switch the speed limiter on in
order to set the speed.
To modify the limit speed setting based on the
vehicle’s current speed:
► Briefly press button 2 or 3 to change the
value in steps of + or - 1 mph (1.6 km/h).
► Press and hold button 2 or 3 to change the
value in steps of + or - 5 mph (8 km/h).
To modify the cruise speed setting based on the speed suggested by the Speed Limit Recognition
and Recommendation, as shown on the
instrument panel:
► Press button 5 once; a message is displayed
to confirm the memorisation request.
► Press button 5 again to save the suggested
speed.
The speed is immediately shown on the
instrument panel as the new speed setting.
Temporarily exceeding the
speed setting
► Press the accelerator pedal down fully.
The speed limiter is deactivated temporarily and
the displayed speed setting flashes.
Release the accelerator pedal to return to below
the programmed speed.
When the limit speed is exceeded but this is not
due to action by the driver (in case of a steep
slope, for example), an audible signal triggers
immediately.
message prompting you to save it as the new
speed setting. "MEM" flashes for a few seconds
on the display.
If there is a difference of less than 6 mph
(9 km/h) between the speed setting and
the speed displayed by the Speed Limit
Recognition and Recommendation, the
"MEM" symbol is not displayed.
►
Press button
2once to save the suggested
speed value.
A message is displayed to confirm the request.
►
Press button
2again to confirm and save the
new speed setting.
The display then reverts to its previous state.
Speed limiter
Refer to the General recommendations on the
use of driving and manoeuvring aids .
This system prevents the vehicle from
exceeding the speed programmed by the
driver (speed setting).
The speed limiter is switched on manually.
The minimum speed setting is 19 mph (30
km/h).
The speed setting remains in the system
memory when the ignition is switched off.
Steering mounted control
1. ON (LIMIT position) / OFF (position 0)
2. Reduce the speed setting
3. Increase the speed setting
4. Pause / resume speed limiter with the speed
setting previously stored
5. Use the speed suggested by the Speed Limit
Recognition and Recommendation (MEM
display)
For more information on the Speed Limit
Recognition and Recommendation , refer to
the corresponding section.
Information displayed on
the instrument panel
6. Speed limiter on/pause indication.
7. Programmed speed setting value.
8. Speed limiter mode selection indication.
Switching on/pausing
► Turn thumbwheel 1 to the "LIMIT" position to
select the speed limiter; the function is paused.
►
If you are satisfied with the limit speed setting
(most recent speed setting programmed in the
system), press button
4 to switch the speed
limiter on.
►
Pressing button 4
again temporarily pauses
the function.
An audible warning will sound if the vehicle's speed exceeds the speed
setting for an extended period.
Page 99 of 196
97
Practical information
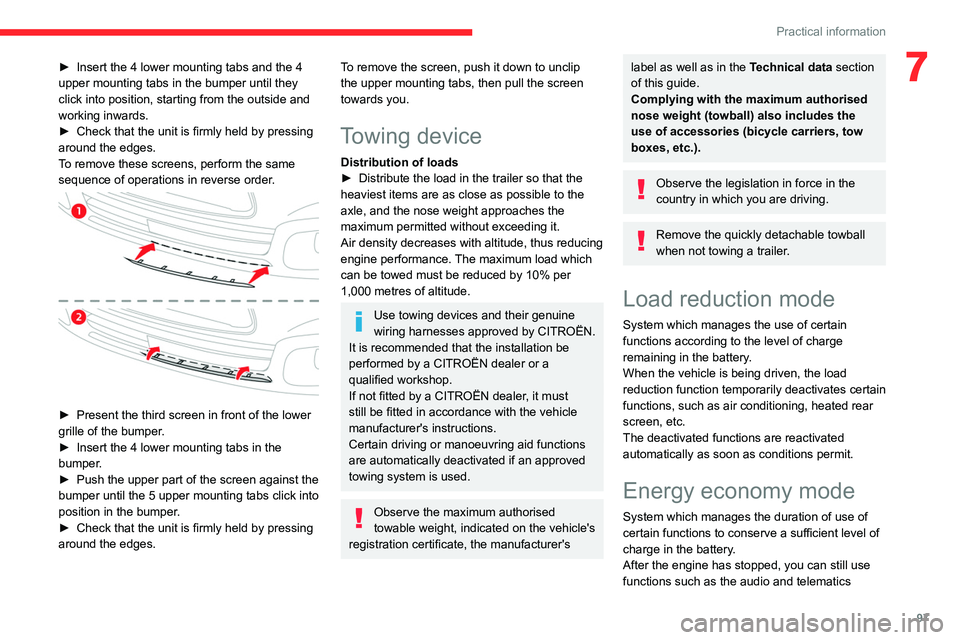
7► Insert the 4 lower mounting tabs and the 4
upper mounting tabs in the bumper until they
click into position, starting from the outside and
working inwards.
►
Check that the unit is firmly held by pressing
around the edges.
T
o remove these screens, perform the same
sequence of operations in reverse order.
► Present the third screen in front of the lower
grille of the bumper .
►
Insert the 4 lower mounting tabs in the
bumper
.
►
Push the upper part of the screen against the
bumper until the 5 upper mounting tabs click into
position in the bumper
.
►
Check that the unit is firmly held by pressing
around the edges.
To remove the screen, push it down to unclip
the upper mounting tabs, then pull the screen
towards you.
Towing device
Distribution of loads
► Distribute the load in the trailer so that the
heaviest items are as close as possible to the
axle, and the nose weight approaches the
maximum permitted without exceeding it.
Air density decreases with altitude, thus reducing
engine performance.
The maximum load which
can be towed must be reduced by 10% per
1,000
metres of altitude.
Use towing devices and their genuine
wiring harnesses approved by CITROËN.
It is recommended that the installation be
performed by a CITROËN dealer or a
qualified workshop.
If not fitted by a CITROËN dealer, it must
still be fitted in accordance with the vehicle
manufacturer's instructions.
Certain driving or manoeuvring aid functions
are automatically deactivated if an approved
towing system is used.
Observe the maximum authorised
towable weight, indicated on the vehicle's
registration certificate, the manufacturer's
label as well as in the Technical data section
of this guide.
Complying with the maximum authorised
nose weight (towball) also includes the
use of accessories (bicycle carriers, tow
boxes, etc.).
Observe the legislation in force in the
country in which you are driving.
Remove the quickly detachable towball
when not towing a trailer.
Load reduction mode
System which manages the use of certain
functions according to the level of charge
remaining in the battery.
When the vehicle is being driven, the load
reduction function temporarily deactivates certain
functions, such as air conditioning, heated rear
screen, etc.
The deactivated functions are reactivated
automatically as soon as conditions permit.
Energy economy mode
System which manages the duration of use of
certain functions to conserve a sufficient level of
charge in the battery.
After the engine has stopped, you can still use
functions such as the audio and telematics
Page 100 of 196
98
Practical information
Recommendations
► Distribute the load uniformly, taking
care to avoid overloading one of the sides.
► Arrange the heaviest part of the load as
close as possible to the roof.
► Lash the load down securely and fit a
warning flag if it overhangs the vehicle.
► Drive gently: the vehicle will be more
susceptible to the effects of side winds
(stability may be affected).
► Remove the roof bars once they are no
longer needed.
Maximum load, distributed over the roof
bars, for a loading height not exceeding
40 cm: 80 kg.
As this value may change, please verify the
maximum load quoted on the note supplied
with the roof bars.
If the height exceeds 40 cm, adapt the
speed of the vehicle to the profile of the road
to avoid damaging the roof bars and the
mountings on the vehicle.
Be sure to refer to national legislation in order
to comply with the regulations for transporting
objects which are longer than the vehicle.
Bonnet
Stop & Start
Before doing anything under the bonnet,
you must switch off the ignition to avoid any
systemI windscreen wipers, dipped beam
headlamps, courtesy lamps, etc. for a maximum
combined duration of about forty minutesK
Switching to the mode
A message indicating that the vehicle has
switched to economy mode is displayed on the
touch screen and the active functions are put on
standby.
If a telephone call is in progress at the
time, it will be maintained for around 10
minutes using your audio system’s hands-free
system.
Exiting the mode
These functions will be automatically restored
the next time the vehicle is used.
In order to restore the use of these functions
immediately, start the engine and let it run:
–
for less than ten minutes, to use the
equipment for approximately five minutes,
–
for more than ten minutes, to use the
equipment for up to approximately thirty minutes.
Let the engine run for the duration specified to
ensure that the battery charge is sufficient.
Do not repeatedly and continuously restart the
engine in order to charge the battery
.
A flat battery prevents the engine from starting.
For more information on the 12 V battery,
refer to the corresponding section.
Roof bars
For safety reasons and to avoid
damaging the roof, it is essential to use
the transverse bars approved for your vehicle.
Observe the fitting instructions and the
conditions of use in the guide supplied
with the roof bars.
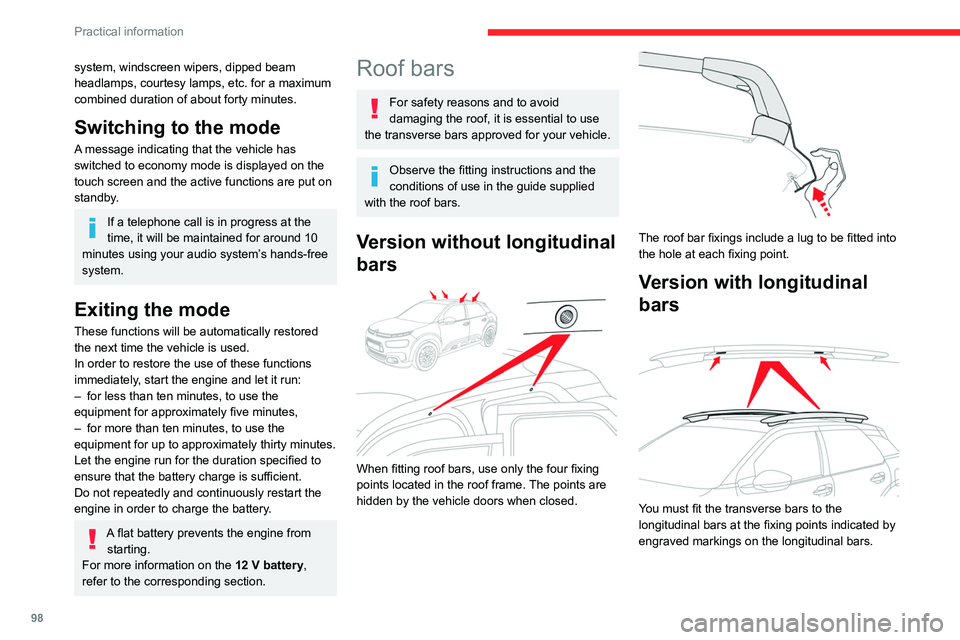
Version without longitudinal
bars
When fitting roof bars, use only the four fixing
points located in the roof frame. The points are
hidden by the vehicle doors when closed.
The roof bar fixings include a lug to be fitted into
the hole at each fixing point.
Version with longitudinal
bars
You must fit the transverse bars to the
longitudinal bars at the fixing points indicated by
engraved markings on the longitudinal bars.
Page 101 of 196
99
Practical information
7Recommendations
► Distribute the load uniformly , taking
care to avoid overloading one of the sides.
►
Arrange the heaviest part of the load as
close as possible to the roof.
►
Lash the load down securely and fit a
warning flag if it overhangs the vehicle.
►
Drive gently: the vehicle will be more
susceptible to the effects of side winds
(stability may be affected).
►
Remove the roof bars once they are no
longer needed.
Maximum load, distributed over the roof
bars, for a loading height not exceeding
40 cm: 80 kg.
As this value may change, please verify the
maximum load quoted on the note supplied
with the roof bars.
If the height exceeds 40 cm, adapt the
speed of the vehicle to the profile of the road
to avoid damaging the roof bars and the
mountings on the vehicle.
Be sure to refer to national legislation in order
to comply with the regulations for transporting
objects which are longer than the vehicle.
Bonnet
Stop & Start
Before doing anything under the bonnet,
you must switch off the ignition to avoid any
risk of injury resulting from an automatic
change to START mode.
The location of the interior bonnet release lever prevents opening the
bonnet when the left-hand front door is
closed.
When the engine is hot, handle the
exterior safety catch and the bonnet stay
with care (risk of burns), using the protected
area.
When the bonnet is open, take care not to
damage the safety catch.
Do not open the bonnet under very windy
conditions.
Cooling of the engine when stopped
The engine cooling fan may start after
the engine has been switched off.
Take care with objects or clothing that
could be caught in the blades of the fan!
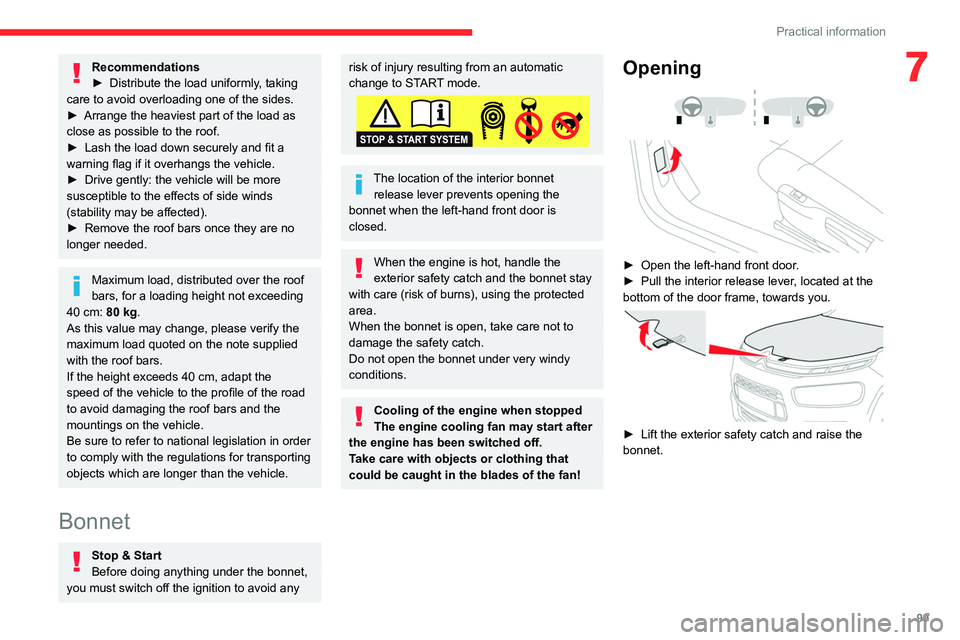
Opening
► Open the left-hand front door .
► Pull the interior release lever , located at the
bottom of the door frame, towards you.
► Lift the exterior safety catch and raise the
bonnet.
Page 134 of 196
132
CITROËN Connect Radio
CITROËN Connect Radio
Multimedia audio system -
Applications - Bluetooth
®
telephone
The functions and settings described
vary according to the vehicle version and
configuration.
For safety reasons and because they
require sustained attention by the driver,
the following operations must be carried out
with the vehicle stationary and the ignition
on:
–
Pairing the smartphone with the system in
Bluetooth mode.
–
Using the smartphone.
–
Connection to the CarPlay®, MirrorLinkTM
or Android Auto applications (certain
applications interrupt their display while the
vehicle is moving).
–
Changing the system settings and
configuration.
The system is protected in such a way that it will only operate in the vehicle.
The Energy Economy Mode message is
displayed when the system is about to enter
the corresponding mode.
The system’s Open Source Software (OSS) source codes are available at the
following addresses:
https://www.groupe-psa.com/fr/oss/
https://www.groupe-psa.com/en/oss/
First steps
With the engine running, a press mutes
the sound.
With the ignition off, a press turns the system on.
Increase or decrease the volume using
the wheel or the "plus" or "minus" buttons
(depending on the equipment).
Use the buttons on either side of or below the
touch screen for access to the menus, then
press the virtual buttons in the touch screen.
Depending on the model, use the "Source" or
"Menu" buttons on the left of the touch screen
for access to the menus, then press the virtual
buttons in the touch screen.
At all times it is possible to display the rolling
menus by pressing the screen briefly with three
fingers.
All of the touch areas of the screen are white.
For pages with multiple tabs at the bottom of the
screen, it is possible to switch between pages
either by tapping the tab for the desired page, or
by using a finger, sliding the pages to the left or
to the right.
Press in the grey zone to go back up a level or
to confirm.
Press the back arrow to go back a level or
confirm.
The touch screen is of the "capacitive" type.
To clean the screen, use a soft, non-abrasive
cloth (e.g. spectacles cloth) with no additional
product.
Do not use sharp objects on the screen.
Do not touch the screen with wet hands.
Certain information is displayed permanently in
the upper bar of the touch screen:
–
Air conditioning status information (depending
on version), and direct access to the
corresponding menu.
–
Radio Media and
Telephone menu status
information.
–
Privacy status information.
–
Access to the touch screen and digital
instrument panel settings.
Audio source selection (depending on
equipment):
Page 138 of 196

136
CITROËN Connect Radio
Enter the FM and AM waveband values
using the virtual keypad.
Press "OK" to confirm.
Radio reception may be affected by the
use of electrical equipment not approved
by the Brand, such as a USB charger
connected to the 12 V socket.
The exterior environment (hills, buildings,
tunnels, basement car parks, etc.) may
block reception, including in RDS mode.
This phenomenon is perfectly normal in the
context of radio wave transmission, and
in no way indicative of an audio system
malfunction.
Changing the waveband
Press Radio Media to display the main
page.
Press the "OPTIONS " button to access the
secondary page.
Press "Band" to change waveband.
Press in the shaded area to confirm.
Presetting a station
Select a radio station or frequency.Make a short press on the star outline. If
the star is solid, the radio station is
already preset.
Or
Select a radio station or frequency.
Press "Preset ".
Make a long press on one of the buttons
to preset the station.
Activating/Deactivating RDS
RDS, if activated, allows you to continue
listening to the same station by automatically
retuning to alternative frequencies.
Press Radio Media to display the main
page.
Press the "OPTIONS " button to access the
secondary page.
Activate/deactivate "RDS".
Press in the shaded area to confirm.
RDS station tracking may not be
available nationwide, as many radio
stations do not cover 100
% of the country.
This explains the loss of reception of the
station during a journey.
Displaying text information
The "Radio Text" function displays information
transmitted by the radio station relating to the
station or the currently playing song.
Press Radio Media to display the main
page. Press the "OPTIONS
" button to access the
secondary page.
Activate/deactivate "News".
Press in the shaded area to confirm.
Playing TA messages
The TA (Traffic Announcement) function gives
priority to TA alert messages. To operate, this
function needs good reception of a radio station
that transmits this type of message. While traffic
information is being broadcast, the current
media is automatically interrupted so that the
TA message can be heard. Normal play of the
previously playing media resumes at the end of
the message.
Press Radio Media to display the main
page.
Press the "OPTIONS " button to access the
secondary page.
Activate/deactivate "TA ".
Press in the shaded area to confirm.
Audio settings
Press Radio Media to display the main
page.
Press the "OPTIONS " button to access the
secondary page.
Press "Audio settings ".