ESP CITROEN C4 CACTUS 2023 Owner's Manual
[x] Cancel search | Manufacturer: CITROEN, Model Year: 2023, Model line: C4 CACTUS, Model: CITROEN C4 CACTUS 2023Pages: 196, PDF Size: 6.12 MB
Page 57 of 196
55
Safety
5– must be pulled in front of you with a smooth
movement, ensuring that it is not twisted;
–
must only be used to secure one person;
–
must not show signs of tearing or fraying;
–
must not be changed or modified, in order
to avoid affecting its performance.
Recommendations for children
Use a suitable child seat if the passenger
is less than 12 years old or shorter than one
and a half metres.
Never use the same seat belt to secure more
than one child.
Never carry a child on your lap.
For more information on Child seats, refer to
the corresponding section.
Maintenance
In accordance with current safety
regulations, for all repairs on your vehicle's
seat belts, go to a qualified workshop with
the skills and equipment needed, which a
CITROËN dealer is able to provide.
Have the seat belts checked regularly by a
CITROËN dealer or a qualified workshop,
particularly if the straps show signs of
damage.
Clean the seat belt straps with soapy water or
a textile cleaning product, sold by CITROËN
dealers.
Airbags
General information
System designed to help improve the safety
of the occupants sitting in the front seats and
the rear outer seats, in the event of a violent
collision. The airbags supplement the action
of the seat belts equipped with a force limiting
system.
Electronic detectors record and analyse the
front and side impacts sustained in the impact
detection zones:
–
In the event of violent impact, the airbags
deploy instantly and help better protect the
occupants of the vehicle; immediately after the
impact, the airbags deflate rapidly in order not
to hinder the visibility or the possible exit of the
occupants.
–
In the event of a slight impact, a rear impact
and under certain rollover conditions, the airbags
may not deploy; only the seat belt helps to
protect you in these situations.
The seriousness of the impact depends on the
nature of the obstacle and the speed of the
vehicle at the moment of collision.
The airbags do not operate when the
ignition is switched off.
This equipment will only deploy once. If a
second impact occurs (during the same or a
subsequent accident), the airbag will not be
deployed again.
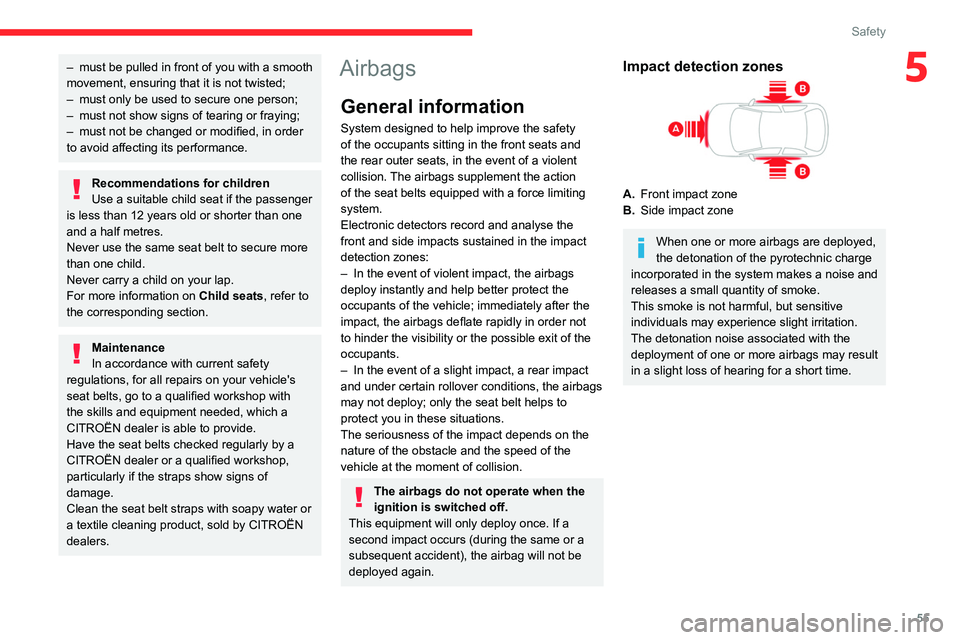
Impact detection zones
A. Front impact zone
B. Side impact zone
When one or more airbags are deployed,
the detonation of the pyrotechnic charge
incorporated in the system makes a noise and
releases a small quantity of smoke.
This smoke is not harmful, but sensitive
individuals may experience slight irritation.
The detonation noise associated with the
deployment of one or more airbags may result
in a slight loss of hearing for a short time.
Page 58 of 196
56
Safety
In the event of a minor impact or bump at
the side of the vehicle or if the vehicle
rolls over, the airbags may not be deployed.
In the event of a rear or front collision, none of
the lateral airbags are deployed.
Advice
For the airbags to be fully effective,
observe the safety recommendations
below.
Adopt a normal upright sitting position.
Fasten the seat belt ensuring it is correctly
positioned and adjusted.
Do not leave anything between the occupants
and the airbags (a child, pet, object, etc.), nor
fix or attach anything close to or in the way of
the airbag release trajectory; this could cause
injuries during their deployment.
Never modify the original definition of your
vehicle, particularly in the area directly around
the airbags.
After an accident or if the vehicle has been
stolen, have the airbag systems checked.
All work on the airbag systems must only
be performed by a CITROËN dealer or a
qualified workshop.
Even if all of the precautions mentioned
are observed, a risk of injury or of minor
burns to the head, chest or arms cannot be
ruled out when an airbag is deployed. The
airbag inflates almost instantly (within a few
milliseconds) then deflates within the same
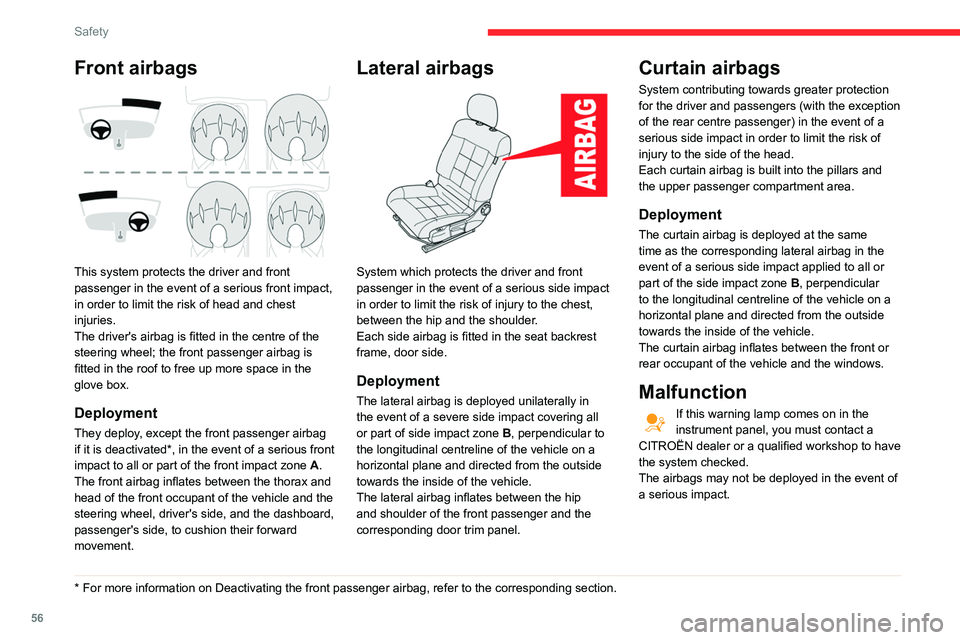
Front airbags
This system protects the driver and front
passenger in the event of a serious front impact,
in order to limit the risk of head and chest
injuries.
The driver's airbag is fitted in the centre of the
steering wheel; the front passenger airbag is
fitted in the roof to free up more space in the
glove box.
Deployment
They deploy, except the front passenger airbag
if it is deactivated*, in the event of a serious front
impact to all or part of the front impact zone A.
The front airbag inflates between the thorax and
head of the front occupant of the vehicle and the
steering wheel, driver's side, and the dashboard,
passenger's side, to cushion their forward
movement.
* For more information on Deactivating the front passenger airbag, refer t\
o the corresponding section.
Lateral airbags
System which protects the driver and front
passenger in the event of a serious side impact
in order to limit the risk of injury to the chest,
between the hip and the shoulder.
Each side airbag is fitted in the seat backrest
frame, door side.
Deployment
The lateral airbag is deployed unilaterally in
the event of a severe side impact covering all
or part of side impact zone B, perpendicular to
the longitudinal centreline of the vehicle on a
horizontal plane and directed from the outside
towards the inside of the vehicle.
The lateral airbag inflates between the hip
and shoulder of the front passenger and the
corresponding door trim panel.
Curtain airbags
System contributing towards greater protection
for the driver and passengers (with the exception
of the rear centre passenger) in the event of a
serious side impact in order to limit the risk of
injury to the side of the head.
Each curtain airbag is built into the pillars and
the upper passenger compartment area.
Deployment
The curtain airbag is deployed at the same
time as the corresponding lateral airbag in the
event of a serious side impact applied to all or
part of the side impact zone B, perpendicular
to the longitudinal centreline of the vehicle on a
horizontal plane and directed from the outside
towards the inside of the vehicle.
The curtain airbag inflates between the front or
rear occupant of the vehicle and the windows.
Malfunction
If this warning lamp comes on in the
instrument panel, you must contact a
CITROËN dealer or a qualified workshop to have
the system checked.
The airbags may not be deployed in the event of
a serious impact.
Page 66 of 196
64
Safety
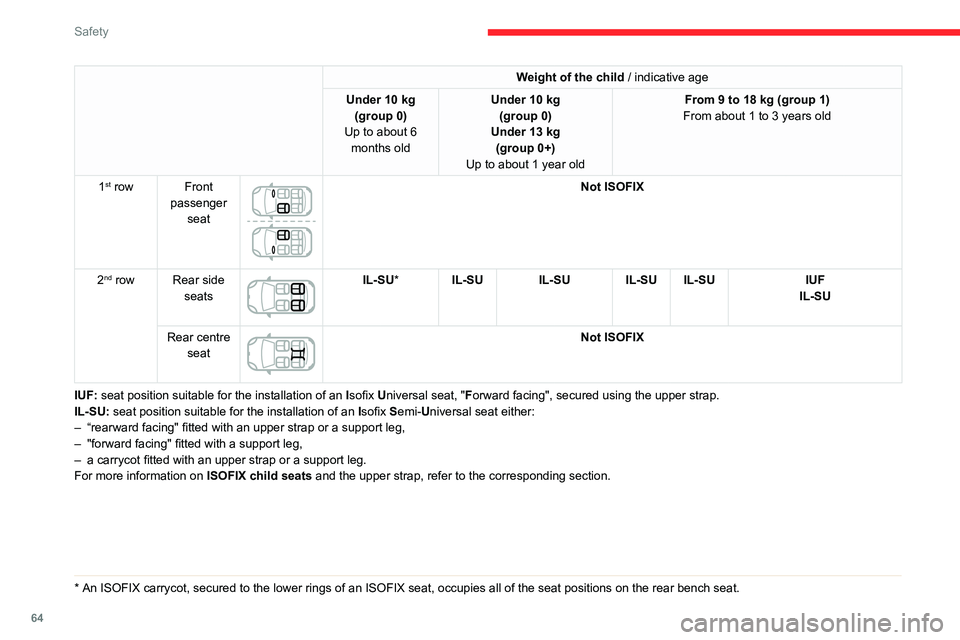
i-Size child seats
i-Size child seats have two latches that engage on the two rings A.
These i-Size child seats also have:
– either an upper strap that is attached to ring B.
– or a support leg that rests on the vehicle floor, compatible with the approved i-Size seat position.
Their role is to prevent the child seat from tipping forward in the even\
t of a collision.
For more information on the ISOFIX mountings, refer to the corresponding section.
In accordance with the new European regulations, this table indicates the options for installing i-Size child seats on the vehicle seats fitted with ISOFIX
mountings approved for i-Size.
i-Size child seat
Row 1 Front passenger seat
Not i-Size
Row 2 Rear side seats (a)
i-U
Rear centre seat
Not i-Size
i-U Suitable for i-Size restraint systems in the "Universal" category, "forward facing" and "rearward facing".
(a) To install a "rearward facing" or "forward facing" child seat at the rear\
, move the front seat forwards, then straighten the backrest to allow en\
ough room for the child seat and the child's legs.
Manual child lock
Weight of the child / indicative age
Under 10 kg (group 0)
Up to about 6 months old Under 10 kg
(group 0)
Under 13 kg (group 0+)
Up to about 1 year old From 9 to 18 kg (group 1)
From about 1 to 3 years old
1
st row Front passenger seat
Not ISOFIX
2
nd row Rear side seats
IL-SU* IL-SU IL-SU IL-SU IL-SU IUF
IL-SU
Rear centre seat
Not ISOFIX
IUF: seat position suitable for the installation of an Isofix Universal seat, "Forward facing", secured using the upper strap.
IL-SU: seat position suitable for the installation of an Isofix Semi-Universal seat either:
–
“rearward facing" fitted with an upper strap or a support leg,
–
"forward facing" fitted with a support leg,
–
a carrycot fitted with an upper strap or a support leg.
For more information on ISOFIX child seats and the upper strap, refer to the corresponding section.
* An ISOFIX carrycot, secured to the lower rings of an ISOFIX seat, occupies all \
of the seat positions on the rear bench seat.
Page 67 of 196
65
Safety
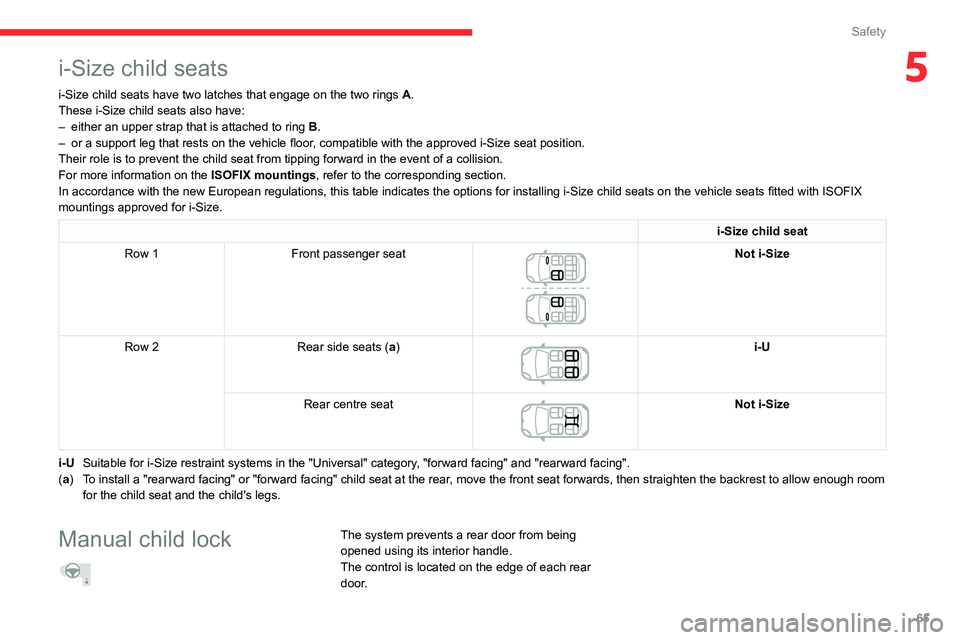
5i-Size child seats
i-Size child seats have two latches that engage on the two rings A.
These i-Size child seats also have:
–
either an upper strap that is attached to ring B
.
–
or a support leg that rests on the vehicle floor
, compatible with the approved i-Size seat position.
Their role is to prevent the child seat from tipping forward in the even\
t of a collision.
For more information on the ISOFIX mountings, refer to the corresponding section.
In accordance with the new European regulations, this table indicates the options for installing i-Size child seats on the vehicle
seats fitted with ISOFIX
mountings approved for i-Size.
i-Size child seat
Row 1 Front passenger seat
Not i-Size
Row 2 Rear side seats (a)
i-U
Rear centre seat
Not i-Size
i-U Suitable for i-Size restraint systems in the "Universal" category, "forward facing" and "rearward facing".
(a) To install a "rearward facing" or "forward facing" child seat at the rear\
, move the front seat forwards, then straighten the backrest to allow en\
ough room for the child seat and the child's legs.
Manual child lock
The system prevents a rear door from being
opened using its interior handle.
The control is located on the edge of each rear
door.
Page 69 of 196
67
Driving
6Driving recommendations
► Observe the driving regulations and remain
vigilant whatever the traffic conditions.
►
Monitor your environment and keep your
hands on the wheel to be able to react to
anything that may happen any time.
►
Drive smoothly
, anticipate the need for
braking and maintain a longer safety distance,
especially in bad weather.
►
Stop the vehicle to carry out operations that
require close attention (such as adjustments).
►
During long trips, take a break every two
hours.
Important!
Never leave the engine running in a
closed space without sufficient
ventilation. Internal combustion engines emit
toxic exhaust gases such as carbon
monoxide. Danger of poisoning and death!
In severe wintry conditions (temperature
below -23°C), let the engine run for 4
minutes before moving off, to ensure the
correct operation and durability of the
mechanical components of your vehicle
(engine and gearbox).
Never drive with the parking brake
applied . Risk of overheating and
damage to the braking system!
Do not park the vehicle or leave the
engine running on a flammable
surface (dry grass, dead leaves, etc.). The
exhaust system of your vehicle is very hot,
even several minutes after the engine stops.
Risk of fire!
Never leave a vehicle unattended with
the engine running. If you have to leave
your vehicle with the engine running, apply
the parking brake and put the gearbox into
neutral or position N or P (depending on the
type of gearbox).
Never leave children inside the vehicle
unsupervised.
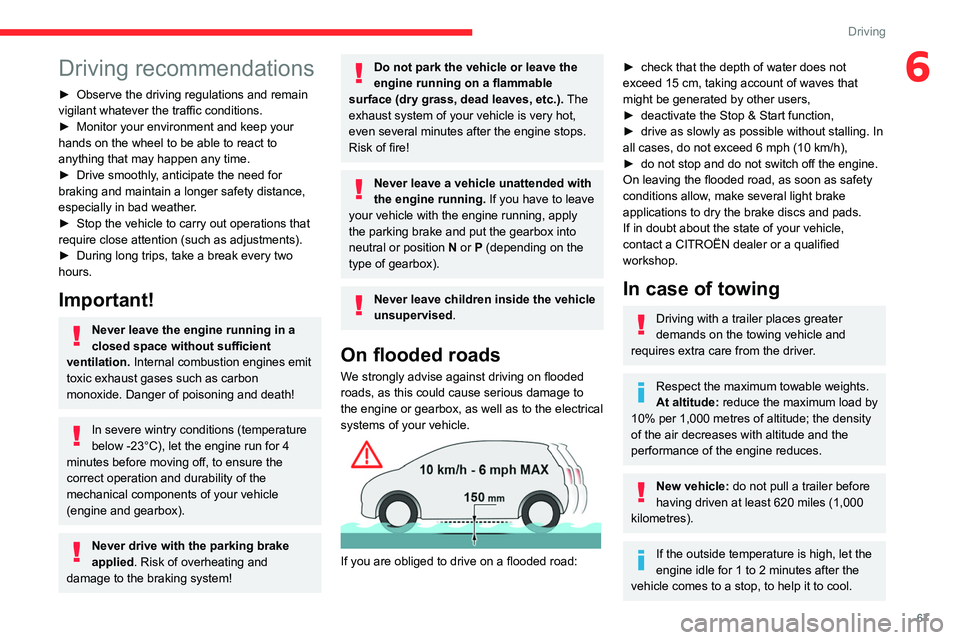
On flooded roads
We strongly advise against driving on flooded
roads, as this could cause serious damage to
the engine or gearbox, as well as to the electrical
systems of your vehicle.
If you are obliged to drive on a flooded road:
► check that the depth of water does not
exceed 15 cm, taking account of waves that
might be generated by other users,
►
deactivate the Stop & Start function,
►
drive as slowly as possible without stalling. In
all cases, do not exceed 6 mph (10
km/h),
►
do not stop and do not switch off the engine.
On leaving the flooded road, as soon as safety
conditions allow
, make several light brake
applications to dry the brake discs and pads.
If in doubt about the state of your vehicle,
contact a CITROËN dealer or a qualified
workshop.
In case of towing
Driving with a trailer places greater
demands on the towing vehicle and
requires extra care from the driver.
Respect the maximum towable weights.
At altitude: reduce the maximum load by
10% per 1,000 metres of altitude; the density
of the air decreases with altitude and the
performance of the engine reduces.
New vehicle: do not pull a trailer before
having driven at least 620 miles (1,000
kilometres).
If the outside temperature is high, let the
engine idle for 1 to 2 minutes after the
vehicle comes to a stop, to help it to cool.
Page 71 of 196
69
Driving
6automatically to preserve the remaining battery
charge.
Starting the engine
With the parking brake applied:
► With a manual gearbox, place the gear lever
in neutral then fully depress the clutch pedal.
►
With an
automatic gearbox, place the gear
selector in mode N or P then fully depress the
brake pedal.
►
Insert the key into the ignition switch; the
system recognises the code.
►
Unlock
the steering column by simultaneously
turning the steering wheel and the key.
In certain cases, you may have to apply
significant force to move the steering
wheel (wheels on full lock, for example).
►
With a
petrol engine , operate the starter
motor by turning the key to position 3 without
pressing the accelerator pedal, until the engine
starts. Once the engine starts, release the key.
With petrol engines , after a cold start,
preheating the catalytic converter can
cause
noticeable engine vibrations for
anything up to 2 minutes while stationary with
the engine running (accelerated idle speed).
►
With a
Diesel engine, turn the key to position
2, ignition on, to operate the engine preheating
system.
Wait until this warning lamp goes off in the
instrument panel, then operate the starter
motor by turning the key to position 3 without
pressing the accelerator pedal, until the engine
starts. Once the engine starts, release the key.
In wintry conditions, the warning lamp
may stay on for a longer period. When
the engine is hot, the warning lamp does not
come on.
If the engine does not start straight away,
switch off the ignition. Wait a few
seconds before operating the starter motor
again. If the engine does not start after a few
attempts, do not keep trying - risk of
damaging the starter motor and the engine.
Contact a CITROËN dealer or a qualified
workshop.
In mild conditions, do not leave the
engine at idle to warm up but move off
straight away and drive at moderate speed.
Switching off the engine
► Immobilise the vehicle.
► With the engine at idle, turn the key to
position 1
.
►
Remove the key from the ignition switch.
►
T
o lock the steering column, turn the steering
wheel until it locks.
To facilitate unlocking of the steering column, it is recommended that the
wheels be returned to the straight ahead
position before switching off the engine.
Never switch off the ignition before the
complete immobilisation of the vehicle.
With the engine off, the braking and steering
assistance systems are also cut off - risk of
loss of control of the vehicle!
Check that the parking brake is correctly
applied, particularly on sloping ground.
When leaving the vehicle, keep the key in
your possession and lock the vehicle.
Energy economy mode
After the engine has stopped (position 1. Stop),
for a maximum combined duration of about thirty
minutes, you can still use functions such as the
audio and telematics system, courtesy lamps,
windscreen wipers, dipped beam headlamps,
etc.
For more information on Energy
economy mode, refer to the
corresponding section.
Key left in
When opening the driver's door, an alert
message is displayed, accompanied by an
Page 74 of 196
72
Driving
N.Neutral
– Vehicle immobilised, parking brake
applied.
– Starting the engine.
D. Automatic operation
M. + / - Manual operation
► To move up / down through the
gears, move backwards / forwards.
Information displayed on
the instrument panel
When a position is selected in the grate with the
gear selector, the corresponding indicator lamp
lights up on the instrument panel.
P. Park
R. Reverse
N. Neutral
D. Drive (automatic operation)
S. Sport programme
1...6. Gear engaged during manual operation
-. Instruction not processed in manual
operation
Foot on the brake
► Depress the brake pedal when this
warning lamp is displayed on the
instrument panel (e.g. when starting the engine).
Starting the vehicle
► With your foot on the brake pedal,
select position P or N.
Parking brake
Release
► Pull the parking brake lever up slightly , press
the release button, then lower the lever fully.
When driving the vehicle, if this warning
lamp and the STOP warning lamp come
on, accompanied by an audible signal and the
display of a message, this means that the
parking brake is still applied or has not been fully
released.
Application
► Pull the parking brake lever up to immobilise
the vehicle.
When parking on a slope, turn the
wheels against the kerb, apply the
parking brake, engage a gear and switch off
the ignition.
6-speed manual gearbox
Engaging 5th or 6th gear
► Move the lever fully to the right to engage 5th
or 6th gear.
Failure to follow this advice may cause
permanent damage to the gearbox
(engagement of 3
rd or 4th gear by mistake).
Engaging reverse gear
► Raise the ring under the knob and move the
gear lever to the left then forwards.
Only engage reverse gear when the
vehicle is stationary with the engine at
idle.
As a safety precaution and to facilitate starting the engine:
–
always select neutral,
– press the clutch pedal.
Automatic gearbox (EAT6)
6-speed automatic gearbox which offers a choice
between the comfort of automatic operation or
manual gear changing.
Two driving modes are available:
–
Automatic
operation for electronic
management of the gears by the gearbox: •
With the
Sport programme for a more
dynamic driving style.
–
Manual
operation for sequential changing of
the gears by the driver.
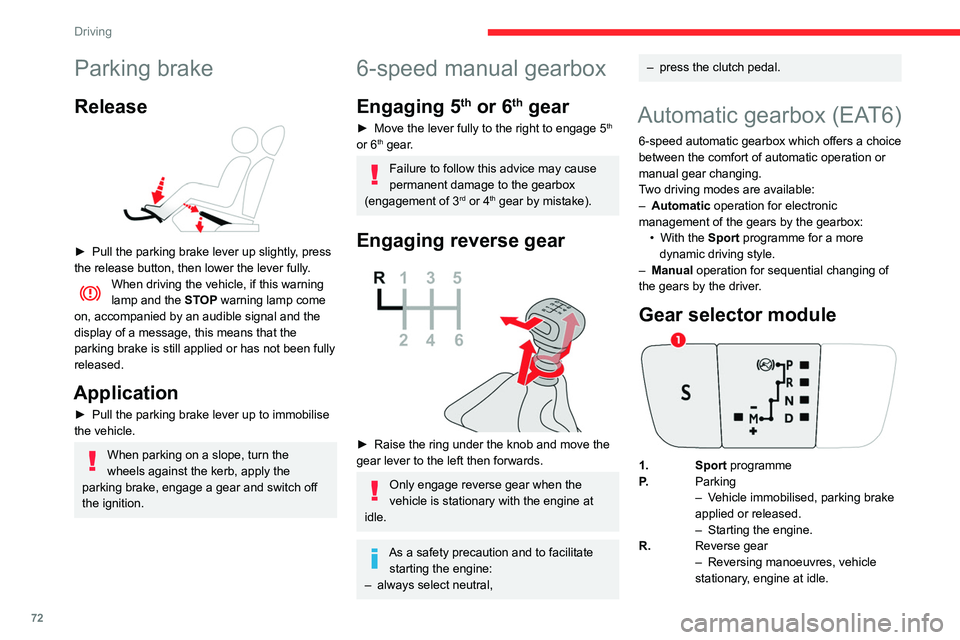
Gear selector module
1. Sport programme
P. Parking
–
V
ehicle immobilised, parking brake
applied or released.
–
Starting the engine.
R. Reverse gear
–
Reversing manoeuvres, vehicle
stationary
, engine at idle.
Page 75 of 196

73
Driving
6N.Neutral
–
V ehicle immobilised, parking brake
applied.
–
Starting the engine.
D. Automatic operation
M. + / - Manual operation
►
T
o move up / down through the
gears, move backwards / forwards.
Information displayed on
the instrument panel
When a position is selected in the grate with the
gear selector, the corresponding indicator lamp
lights up on the instrument panel.
P. Park
R. Reverse
N. Neutral
D. Drive (automatic operation)
S. Sport programme
1...6. Gear engaged during manual operation
-. Instruction not processed in manual
operation
Foot on the brake
► Depress the brake pedal when this
warning lamp is displayed on the
instrument panel (e.g. when starting the engine).
Starting the vehicle
► With your foot on the brake pedal,
select position P
or N.
► Start the engine.
If the conditions are not met, you will hear an
audible signal, accompanied by the display of a
message.
►
With the engine running, press the brake
pedal.
►
Release the parking brake.
►
Select position R
, D or M.
►
Gradually release the brake pedal.
The vehicle moves off immediately
.
If position N is selected inadvertently
while driving, allow the engine to return
to idle, then select position D to accelerate.
When the engine is running at idle with
the brakes released, if position R, D or M
is selected, the vehicle moves off even
without the accelerator being pressed.
Never leave children unattended in the
vehicle when the engine is running.
When carrying out maintenance with the
engine running, apply the parking brake and
select position P.
Automatic operation
► Select position D for automatic changing of
the six gears.
The gearbox then operates in auto-adaptive
mode, without any intervention on the part of the
driver. It continuously selects the most suitable
gear according to the driving style, the road
profile and the load in the vehicle.
For maximum acceleration without touching the
selector, press the accelerator fully down (kick-
down). The gearbox changes down automatically
or holds the gear selected until the maximum
engine speed is reached.
When braking, the gearbox changes down
automatically to provide effective engine braking.
If you release the accelerator sharply, the
gearbox will not shift to a higher gear for safety
reasons.
Never select position N while the vehicle
is moving.
Never select positions P or R unless the
vehicle is completely stationary.
"Sport" programme
This special programme supplements the
automatic operation in specific conditions of use.
"Sport"
► Press this button, once the engine has
started.
"
S" appears on the instrument panel.
The gearbox automatically favours a dynamic
style of driving.
Return to automatic operation
► At any time, press the selected button again
to quit the activated programme and return to
auto-adaptive mode.
Page 76 of 196
74
Driving
The system adapts its gear shift recommendation according to the driving
conditions (slope, load, etc.) and the driver’s
requirements (request for power, acceleration,
braking, etc.).
The system never suggests:
– engaging first gear.
– engaging a lower gear.
– engaging reverse.
With a manual gearbox, the arrow may
be accompanied by the recommended
gear. The system always suggests changing
to a higher gear when this is necessary.
Hill start assist
This system keeps your vehicle briefly stationary
(for approximately 2 seconds) when making a hill
start, while you transfer your foot from the brake
pedal to the accelerator pedal.
This system is only active when:
– the vehicle is completely stationary, with your
foot on the brake pedal,
– certain slope conditions are met,
– the driver’s door is closed.
Do not leave the vehicle while it is being
held temporarily by hill start assist.
If someone needs to get out of the vehicle
with the engine running, apply the parking
brake manually. After that, ensure that the
parking brake indicator lamp and the indicator
Manual operation
To limit fuel consumption during an extended standstill with the engine
running (for example, in a traffic jam), set the
gear selector to N and apply the parking
brake.
►
Selecting position
M
enables sequential
shifting between the six gears.
►
Push backwards to shift up a gear
.
►
Push forwards to shift down a gear
.
The gearbox only changes gear if the road
speed and engine speed permit; apart from
this condition, the rules for automatic operation
temporarily apply.
D disappears, and the gears engaged appear in
succession on the instrument panel.
If the engine speed is too low or too high, the
selected gear flashes for a few seconds, then the
gearactually activated is displayed.
It is possible to change from position D to
position M
at any time.
When the vehicle is stationary or moving
very slowly, the gearbox selects gear M1
automatically.
The Sport programme is inactive in manual
operation.
This symbol is displayed if a gear is not engaged correctly (gear selector between
two positions).
Switching off the vehicle
Before switching off the engine, it is possible to
engage position P or N to place the gearbox in
neutral.
In both cases, apply the parking brake to
immobilise the vehicle.
If the gear selector is not in position P,
when the driver's door is opened or
approximately 45 seconds after the ignition is
switched off, an audible signal sounds and a
message appears.
►
Return the gear selector to P
; the audible
signal stops and the message disappears.
Malfunction
In the event of a malfunction, this warning
lamp comes on and a message is
displayed, when the ignition is switched on.
In this case, the gearbox goes into back-up
mode and is locked in 3
rd gear. You may feel a
significant jolt (without risk for the gearbox) while
changing from
P
to R and from N to R.
Do not exceed 62 mph (100
km/h), local speed
restrictions permitting.
Have the system checked by a CITROËN dealer
or a qualified workshop.
There is a risk of damaging the gearbox: – If the accelerator and brake pedals are
pressed simultaneously
.
–
In the event of a battery failure, forcing the
selector from position P
to another position.
With an automatic gearbox, never try to
start the engine by pushing the vehicle.
Gear efficiency indicator
(Depending on engine.)
This system helps reduce fuel consumption by
recommending the most appropriate gear.
Operation
Depending on the driving situation and the
vehicle's equipment, the system may advise to
skip one or more gears.
Gear shift recommendations should not be
considered compulsory. In fact, the road layout,
the traffic density and safety remain the deciding
factors when choosing the best gear. The driver
therefore remains responsible for deciding
whether or not to follow the indications issued by
the system.
This function cannot be deactivated.
On certain BlueHDi Diesel versions with
manual gearbox, the system may suggest
changing into neutral ( N is displayed in the
instrument panel) so that the engine can go into
standby (STOP mode with Stop & Start), in
certain driving conditions.
The system is only active on vehicles fitted with a manual gearbox.
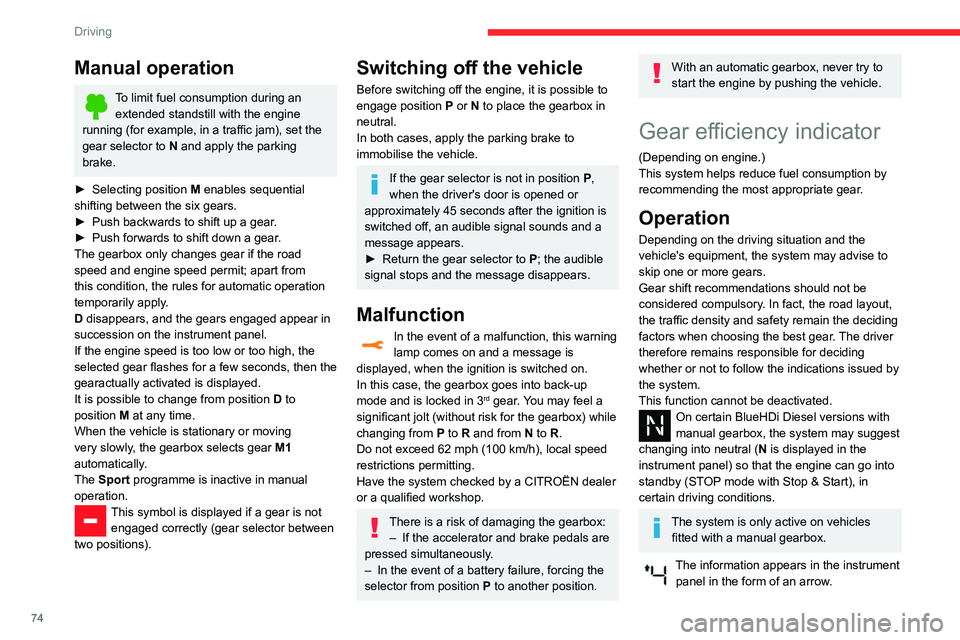
The information appears in the instrument panel in the form of an arrow.
Page 78 of 196
76
Driving
Stop & Start
The Stop & Start function puts the engine temporarily into standby - STOP mode - during
phases when the vehicle is stopped (red lights,
queues, etc.). The engine restarts automatically
- START mode - as soon as the driver wishes to
move off again.
Primarily designed for urban use, the function
is intended to reduce fuel consumption and
exhaust emissions as well as the noise level
when stationary.
The function does not affect the functionalities of
the vehicle, in particular the braking.
Deactivation/Reactivation
The function is activated by default when the
ignition is switched on.
It is set via the Driving / Vehicle touch
screen menu.
A message in the instrument panel confirms the
change of status.
When the function is deactivated, if the engine
was in standby, it restarts immediately.
Associated indicator lamp
Function activated.
Opening the bonnet
Before doing anything under the bonnet,
deactivate the Stop & Start system to avoid
The system triggers an alert as soon as it
detects a drop in the inflation pressure of one or
more tyres.
Under-inflation detection does not
replace the need for vigilance on the part
of the driver.
This system does not avoid the need to
regularly check the tyre pressures (including
the spare wheel) as well as before a long
journey.
Driving with under-inflated tyres, particularly
in adverse conditions (heavy load, high
speed, long journey):
–
worsens road-holding.
–
lengthens braking distances.
–
causes premature wear of the tyres.
–
increases fuel consumption.
The inflation pressures defined for the vehicle can be found on the tyre pressure
label.
For more information on the Identification
markings, refer to the corresponding section.
Checking tyre pressures
This check should be done when the
tyres are "cold" (vehicle stopped for 1 hour or
after a journey of less than 6 miles (10
km) at
moderate speeds).
Otherwise, add 0.3 bar to the pressures
shown on the label.
Snow chains
The system does not have to be
reinitialised after fitting or removing snow
chains.
Spare wheel
The steel spare wheel does not have an
under-inflation detection sensor.
Under-inflation alert
This is signalled by the fixed illumination of this warning lamp, accompanied by an
audible signal and the display of a message.
►
Reduce speed immediately
, avoid excessive
steering movements and avoid sudden braking.
►
Stop the vehicle as soon as it is safe to do
so.
The loss of pressure detected does not always cause visible bulging of the tyre.
Do not rely on just a visual check.
►
Using a compressor
, such as the one in
the temporary puncture repair kit, check the
pressures of the four tyres when cold.
►
If it is not possible to make this check
immediately
, drive carefully at reduced speed.
►
In the event of a puncture, use the
temporary puncture repair kit or the spare wheel
(depending on equipment).
The alert is kept active until the system is reinitialised.
Reinitialisation
Reinitialise the system after adjusting one or
more tyre pressures and after changing one or
more wheels.
Before reinitialising the system, make
sure that the pressures of the four tyres
are correct for the conditions of use of the
vehicle and conform to the values written on
the tyre pressure label.
Check the pressures of the four tyres before
performing the reinitialisation.
The system does not advise if a pressure is
incorrect at the time of reinitialisation.
With the vehicle stationary, the system is
reinitialised via the Driving /
V
ehicle touch screen menu.
Malfunction
These warning lamps come on in the event of a malfunction.
In this case, the tyre under-inflation monitoring
function is no longer performed.
Have the system checked by a CITROËN dealer
or a qualified workshop.