ESP CITROEN C4 CACTUS 2023 Workshop Manual
[x] Cancel search | Manufacturer: CITROEN, Model Year: 2023, Model line: C4 CACTUS, Model: CITROEN C4 CACTUS 2023Pages: 196, PDF Size: 6.12 MB
Page 120 of 196
11 8
In the event of a breakdown
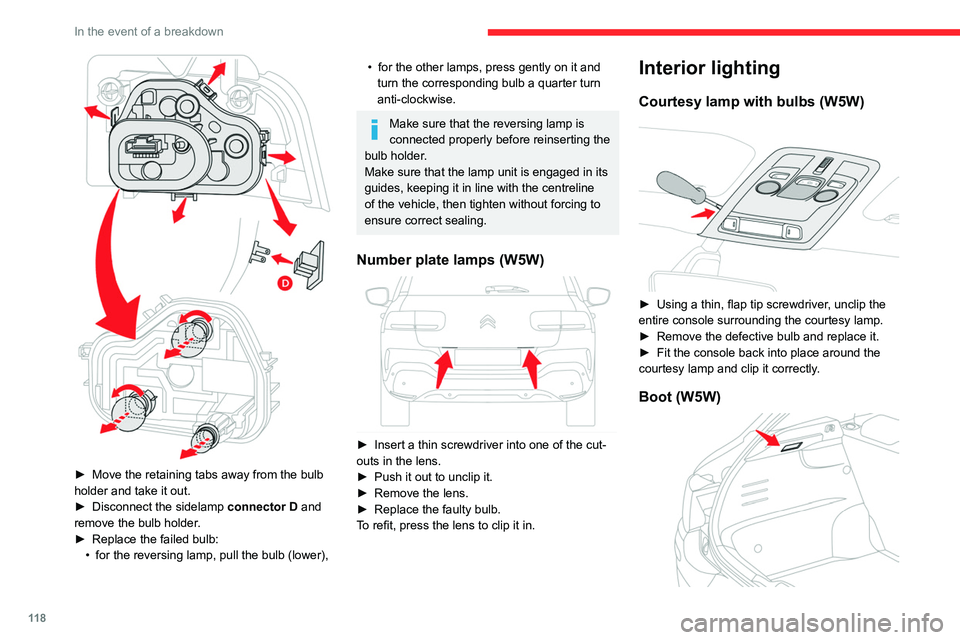
► Move the retaining tabs away from the bulb
holder and take it out.
►
Disconnect the sidelamp connector
D and
remove the bulb holder.
►
Replace the failed bulb:
•
for the reversing lamp, pull the bulb (lower),
• for the other lamps, press gently on it and
turn the corresponding bulb a quarter turn
anti-clockwise.
Make sure that the reversing lamp is
connected properly before reinserting the
bulb holder.
Make sure that the lamp unit is engaged in its
guides, keeping it in line with the centreline
of the vehicle, then tighten without forcing to
ensure correct sealing.
Number plate lamps (W5W)
► Insert a thin screwdriver into one of the cut-
outs in the lens.
►
Push it out to unclip it.
►
Remove the lens.
►
Replace the faulty bulb.
T
o refit, press the lens to clip it in.
Interior lighting
Courtesy lamp with bulbs (W5W)
► Using a thin, flap tip screwdriver , unclip the
entire console surrounding the courtesy lamp.
►
Remove the defective bulb and replace it.
►
Fit the console back into place around the
courtesy lamp and clip it correctly
.
Boot (W5W)
► Unclip the unit by pushing the base from
behind.
► Remove the bulb t and change it.
► Put the unit back in place.
Changing a fuse
Access to tooling
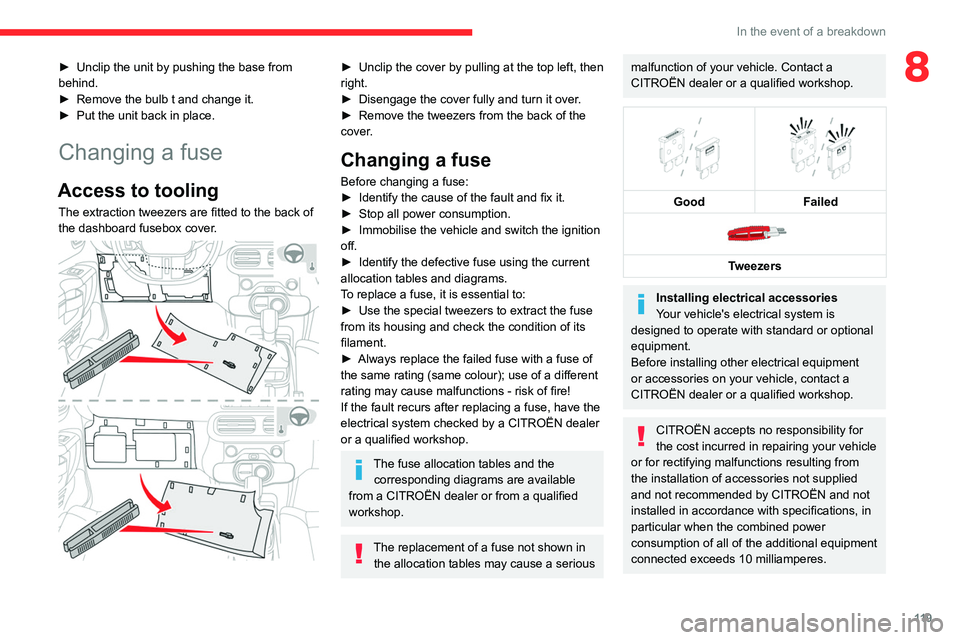
The extraction tweezers are fitted to the back of
the dashboard fusebox cover.
Page 121 of 196
11 9
In the event of a breakdown
8► Unclip the unit by pushing the base from
behind.
►
Remove the bulb t and change it.
►
Put the unit back in place.
Changing a fuse
Access to tooling
The extraction tweezers are fitted to the back of
the dashboard fusebox cover.
► Unclip the cover by pulling at the top left, then
right.
►
Disengage the cover fully and turn it over
.
►
Remove the tweezers from the back of the
cover
.
Changing a fuse
Before changing a fuse:
► Identify the cause of the fault and fix it.
►
Stop all power consumption.
►
Immobilise the vehicle and switch the ignition
off.
►
Identify the defective fuse using the current
allocation tables and diagrams.
T
o replace a fuse, it is essential to:
►
Use the special tweezers to extract the fuse
from its housing and check the condition of its
filament.
►
Always replace the failed fuse with a fuse of
the same rating (same colour); use of a different
rating may cause malfunctions - risk of fire!
If the fault recurs after replacing a fuse, have the
electrical system checked by a CITROËN dealer
or a qualified workshop.
The fuse allocation tables and the corresponding diagrams are available
from a CITROËN dealer or from a qualified
workshop.
The replacement of a fuse not shown in the allocation tables may cause a serious
malfunction of your vehicle. Contact a
CITROËN dealer or a qualified workshop.
Good
Failed
Tweezers
Installing electrical accessories
Your vehicle's electrical system is
designed to operate with standard or optional
equipment.
Before installing other electrical equipment
or accessories on your vehicle, contact a
CITROËN dealer or a qualified workshop.
CITROËN accepts no responsibility for
the cost incurred in repairing your vehicle
or for rectifying malfunctions resulting from
the installation of accessories not supplied
and not recommended by CITROËN and not
installed in accordance with specifications, in
particular when the combined power
consumption of all of the additional equipment
connected exceeds 10 milliamperes.
Page 122 of 196
120
In the event of a breakdown
Fuses in the dashboard
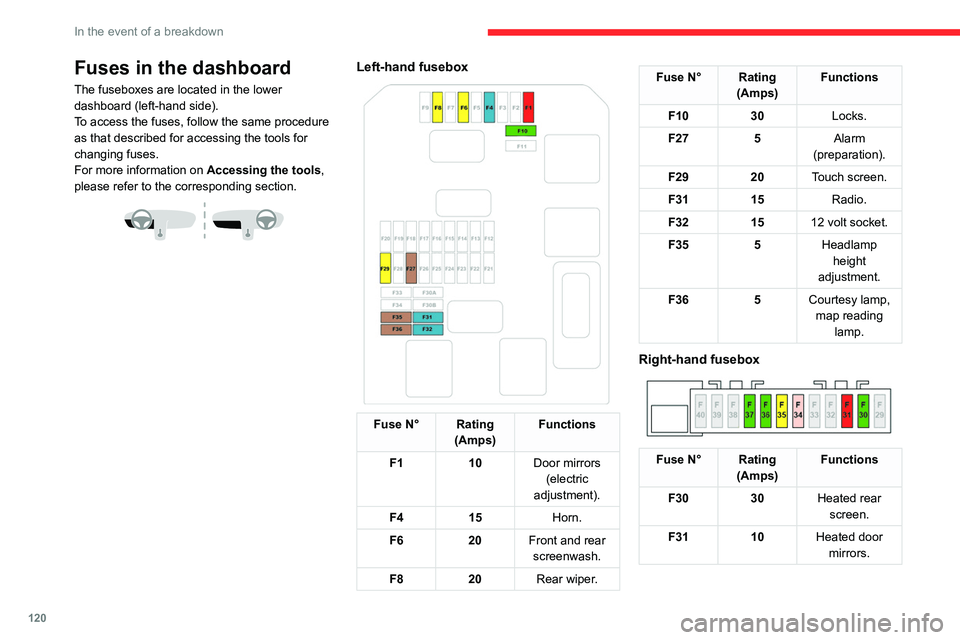
The fuseboxes are located in the lower
dashboard (left-hand side).
To access the fuses, follow the same procedure
as that described for accessing the tools for
changing fuses.
For more information on Accessing the tools,
please refer to the corresponding section.
Left-hand fusebox
Fuse N° Rating (Amps) Functions
F1 10Door mirrors
(electric
adjustment).
F4 15 Horn.
F6 20Front and rear
screenwash.
F8 20Rear wiper.
Fuse N° Rating
(Amps) Functions
F10 30Locks.
F27 5Alarm
(preparation).
F29 20Touch screen.
F31 15Radio.
F32 1512 volt socket.
F35 5Headlamp
height
adjustment.
F36 5Courtesy lamp,
map reading lamp.
Right-hand fusebox
Fuse N° Rating (Amps) Functions
F30 30Heated rear
screen.
F31 10Heated door
mirrors.
Fuse N° Rating (Amps) Functions
F34 25Trailer interface
unit.
F35 20Trailer interface
unit.
F36 30Front one-
touch electric windows.
F37 30Front heated
seats.
Fuses in the engine
compartment
The fusebox is located in the engine
compartment near the battery.
Page 126 of 196
124
In the event of a breakdown
Quick-release terminal clamp
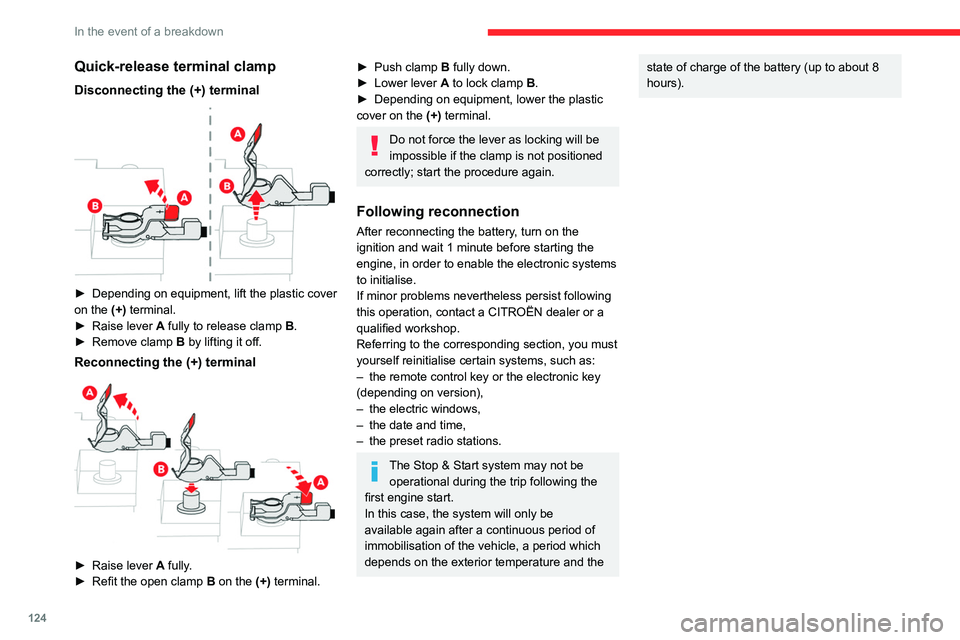
Disconnecting the (+) terminal
► Depending on equipment, lift the plastic cover
on the (+) terminal.
►
Raise lever
A
fully to release clamp
B
.
►
Remove clamp
B
by lifting it off.
Reconnecting the (+) terminal
► Raise lever A fully.
► Refit the open clamp B on the (+) terminal.
► Push clamp B fully down.
► Lower lever A to lock clamp B.
►
Depending on equipment, lower the plastic
cover on the
(+) terminal.
Do not force the lever as locking will be
impossible if the clamp is not positioned
correctly; start the procedure again.
Following reconnection
After reconnecting the battery, turn on the
ignition and wait 1 minute before starting the
engine, in order to enable the electronic systems
to initialise.
If minor problems nevertheless persist following
this operation, contact a CITROËN dealer or a
qualified workshop.
Referring to the corresponding section, you must
yourself reinitialise certain systems, such as:
–
the remote control key or the electronic key
(depending on version),
–
the electric windows,
–
the date and time,
–
the preset radio stations.
The Stop & Start system may not be operational during the trip following the
first engine start.
In this case, the system will only be
available again after a continuous period of
immobilisation of the vehicle, a period which
depends on the exterior temperature and the
state of charge of the battery (up to about 8
hours).Towing
Procedure for having your vehicle towed or for towing another vehicle us\
ing the towing eye.
General recommendations
Observe the legislation in force in the country where you are driving.
Ensure that the weight of the towing vehicle is higher than that of the \
towed vehicle.
The driver must remain at the wheel of the towed vehicle and must have a\
valid driving licence.
When towing a vehicle with all four wheels on the ground, always use an \
approved towbar; ropes and straps are prohibited.
The towing vehicle must move off gently.
When the vehicle is towed with its engine off, there is no longer braking and steering assistance.
A professional recovery service must be called if:
– broken down on a motorway or main road;
– not possible to put the gearbox into neutral, unlock the steering, or re\
lease the parking brake;
– not possible to tow a vehicle with an automatic gearbox, with the engine\
running;
– towing with only two wheels on the ground;
– four-wheel drive vehicle;
– no approved towbar available.
Towing constraints
Type of vehicle
(engine / gearbox)gearbox Font wheels on the
groundRear wheels on the
groundFlatbed
4 wheels on the ground
with towbar
Internal combustion /
Manual
Internal combustion /
Automatic
In case of battery failure, it is essential to call a professional using flatbed
recovery vehicles (excluding manual gearbox).
Page 129 of 196
127
Technical data
9Engine technical data and
towed loads
Engines
The engine characteristics are given in the
vehicle's registration document, as well as in
sales brochures.
The maximum power corresponds to the value type-approved on a test bed, under
conditions defined in European legislation
(Directive 1999/99/EC).
For more information, contact a CITROËN dealer
or a qualified workshop.
Weights and towed loads
The weights and towed loads relating to
the vehicle are indicated on the registration
document, as well as in sales brochures.
These values are also indicated on the
manufacturer's plate or label.
For more information, contact a CITROËN dealer
or a qualified workshop.
The GTW (Gross Train Weight) values and the
towable loads listed are valid for a maximum
altitude of 1,000
metres. The towable load must
be reduced by steps of 10% for each additional
1,000 metres.
The maximum authorised nose weight
corresponds to the weight permitted on the
towball.
When exterior temperatures are high, the
vehicle performance may be limited in
order to protect the engine. When the exterior
temperature is higher than 37°C, reduce the
towed weight.
Towing even with a lightly loaded vehicle can adversely affect its road holding.
Braking distances are increased when towing
a trailer.
When using a vehicle to tow, never exceed
a speed of 62 mph (100
km/h) (observe the
local legislation in force).
Page 130 of 196
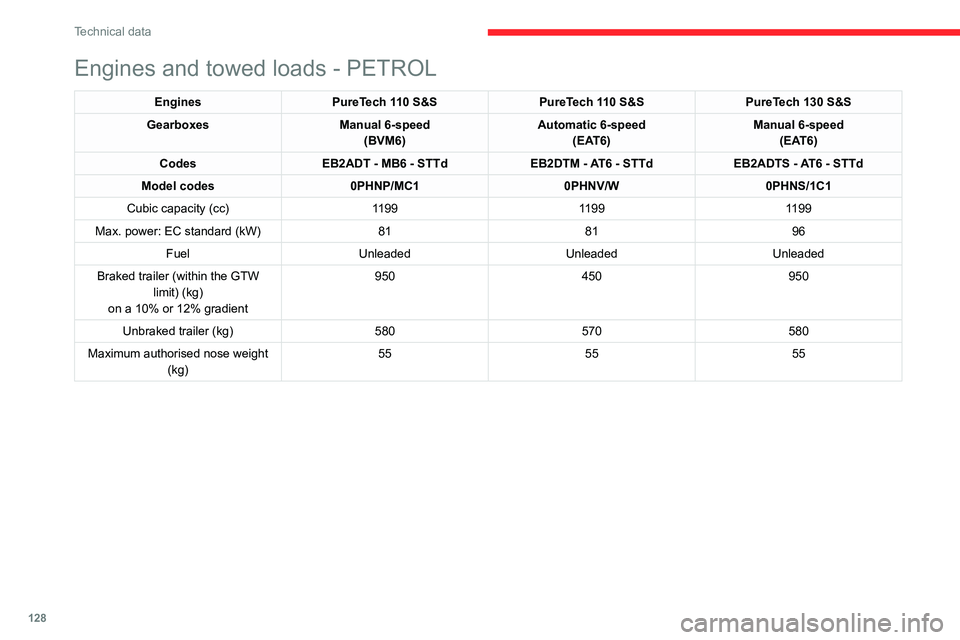
128
Technical data
Engines and towed loads - DIESEL
EnginesBlueHDi 100 S&S BlueHDi 120 S&S
Gearboxes Manual 6-speed
(BVM6) Automatic 6-speed
(EAT6)
Codes DV5RD - MB6 - STTd DV5RCD - AT6 - STTd
Model codes 0BYHYJ/C2A 0BYHXX/C2A
Cubic capacity (cc) 14991499
Max. power: EC standard (kW) 7588
Fuel Diesel Diesel
Braked trailer (within the GTW limit) (kg) on a 10% or 12% gradient (kg) 950
950
Unbraked trailer (kg) 580625
Maximum authorised nose weight (kg) 5555
Engines and towed loads - PETROL
EnginesPureTech 110 S&S PureTech 110 S&SPureTech 130 S&S
Gearboxes Manual 6-speed
(BVM6) Automatic 6-speed
(EAT6) Manual 6-speed
(EAT6)
Codes EB2ADT - MB6 - STTd EB2DTM - AT6 - STTdEB2ADTS - AT6 - STTd
Model codes 0PHNP/MC1 0PHNV/W0PHNS/1C1
Cubic capacity (cc) 119911991199
Max. power: EC standard (kW) 818196
Fuel Unleaded UnleadedUnleaded
Braked trailer (within the GTW limit) (kg)
on a 10% or 12% gradient 950
450950
Unbraked trailer (kg) 580570580
Maximum authorised nose weight (kg) 55
5555
Page 134 of 196
132
CITROËN Connect Radio
CITROËN Connect Radio
Multimedia audio system -
Applications - Bluetooth
®
telephone
The functions and settings described
vary according to the vehicle version and
configuration.
For safety reasons and because they
require sustained attention by the driver,
the following operations must be carried out
with the vehicle stationary and the ignition
on:
–
Pairing the smartphone with the system in
Bluetooth mode.
–
Using the smartphone.
–
Connection to the CarPlay®, MirrorLinkTM
or Android Auto applications (certain
applications interrupt their display while the
vehicle is moving).
–
Changing the system settings and
configuration.
The system is protected in such a way that it will only operate in the vehicle.
The Energy Economy Mode message is
displayed when the system is about to enter
the corresponding mode.
The system’s Open Source Software (OSS) source codes are available at the
following addresses:
https://www.groupe-psa.com/fr/oss/
https://www.groupe-psa.com/en/oss/
First steps
With the engine running, a press mutes
the sound.
With the ignition off, a press turns the system on.
Increase or decrease the volume using
the wheel or the "plus" or "minus" buttons
(depending on the equipment).
Use the buttons on either side of or below the
touch screen for access to the menus, then
press the virtual buttons in the touch screen.
Depending on the model, use the "Source" or
"Menu" buttons on the left of the touch screen
for access to the menus, then press the virtual
buttons in the touch screen.
At all times it is possible to display the rolling
menus by pressing the screen briefly with three
fingers.
All of the touch areas of the screen are white.
For pages with multiple tabs at the bottom of the
screen, it is possible to switch between pages
either by tapping the tab for the desired page, or
by using a finger, sliding the pages to the left or
to the right.
Press in the grey zone to go back up a level or
to confirm.
Press the back arrow to go back a level or
confirm.
The touch screen is of the "capacitive" type.
To clean the screen, use a soft, non-abrasive
cloth (e.g. spectacles cloth) with no additional
product.
Do not use sharp objects on the screen.
Do not touch the screen with wet hands.
Certain information is displayed permanently in
the upper bar of the touch screen:
–
Air conditioning status information (depending
on version), and direct access to the
corresponding menu.
–
Radio Media and
Telephone menu status
information.
–
Privacy status information.
–
Access to the touch screen and digital
instrument panel settings.
Audio source selection (depending on
equipment):
Page 139 of 196
137
CITROËN Connect Radio
10Select the "Tone", "Balance", "Sound",
"Voice" or "Ringtones" tab to configure
the sound settings.
Press the back arrow to confirm.
In the "Tone" tab, the Ambience, Bass ,
Medium and Treble sound settings are
different and independent for each audio
source.
In the "Balance” tab, the All passengers,
Driver and Front only settings are common
to all sources.
In the "Sound ” tab, activate or deactivate
"Volume linked to speed ", "Auxiliary input"
and "Touch tones ".
The balance/distribution (or spatialisation
with the Arkamys© system) uses audio
processing to adjust the sound quality
according to the number of passengers in the
vehicle.
Onboard audio: Arkamys Sound Staging©
optimises the sound distribution inside
the passenger compartment.
DAB (Digital Audio
Broadcasting) radio
Terrestrial Digital Radio
Digital radio provides higher quality sound.
The various "multiplexes/ensembles" offer a
choice of radio stations organised in alphabetical
order.
Press Radio Media to display the main
page.
Press the "OPTIONS " button to access the
secondary page.
Press "Band" to select "DAB band".
Press in the shaded area to confirm.
FM-DAB Follow-up
"DAB" does not cover 100 % of the country.
When the digital radio signal is poor , the
"FM-DAB Follow-up" enables you to continue
listening to the same station by automatically
switching to the corresponding "FM" analogue
station (if there is one).
Press Radio Media to display the main
page.
Press the "OPTIONS " button to access the
secondary page.
Activate/deactivate "FM-DAB Follow-up ".
Press in the shaded area to confirm.
If "FM-DAB Follow-up" is activated, there
may be a time offset of a few seconds
when the system switches to "FM" analogue
radio, and in some cases a change in volume.
When the digital signal quality is restored, the
system automatically changes back to "DAB".
If the "DAB" station being listened to is
not available on "FM", or if "FM-DAB
Follow-up" is not activated, the sound will cut
out while the digital signal is too weak.
Media
USB port
Insert the USB memory stick into the USB
port or connect the USB device to the
USB port using a suitable cable (not supplied).
To protect the system, do not use a USB hub.
The system builds playlists (in temporary
memory); this operation can take from a
few seconds to several minutes at the first
connection.
Reduce the number of non-music files and the
number of folders to reduce the waiting time.
Page 148 of 196
146
CITROËN Connect Nav
CITROËN Connect Nav
GPS navigation -
Applications - Multimedia
audio system - Bluetooth
®
telephone
The functions and settings described
vary according to the vehicle version and
configuration.
For safety reasons and because they
require sustained attention by the driver,
the following operations must be carried out
with the vehicle stationary and the ignition
on:
–
Pairing the smartphone with the system in
Bluetooth mode.
–
Using the smartphone.
–
Connection to the CarPlay®, MirrorLinkTM
or Android Auto applications (certain
applications interrupt their display while the
vehicle is moving).
–
W
atching a video (the video stops when the
vehicle starts to move again).
–
Changing the system settings and
configuration.
The system is protected in such a way that it will only operate in the vehicle.
The Energy Economy Mode message is
displayed when the system is about to enter
the corresponding mode.
System and map updates can be
downloaded from the Brand’s website.
The update procedure is also available on the
website.
The system’s Open Source Software (OSS) source codes are available at the
following addresses:
https://www.groupe-psa.com/fr/oss/
https://www.groupe-psa.com/en/oss/
First steps
With the engine running, a press mutes
the sound.
With the ignition off, a press turns the system on.
Increase or decrease the volume using
the wheel or the "plus" or "minus" buttons
(depending on the equipment).
Use the menu buttons on either side of or below
the touch screen for access to the menus, then
press the virtual buttons in the touch screen.
Depending on the model, use the "Source" or
"Menu" buttons to access the rolling menus, then
press the virtual buttons in the touch screen.
Display the rolling menus at any time by pressing
the screen briefly with three fingers.
All of the touch areas of the screen are white.
Press the back arrow to go back a level.
Press "OK" to confirm.
The touch screen is of the "capacitive" type.
To clean the screen, use a soft, non-abrasive
cloth (e.g. spectacles cloth) with no additional
product.
Do not use sharp objects on the screen.
Do not touch the screen with wet hands.
Certain information is displayed permanently
in the side bars or in the upper bar of the touch
screen (depending on equipment):
–
Reminder of the air conditioning information
(depending on version), and direct access to the
corresponding menu.
–
Go directly to the selection of the audio
source, to the list of radio stations (or list of titles
depending on the source).
–
Go to the "Notifications" of messages, emails,
map updates and, depending on the services,
the navigation notifications.
–
Go to the settings for the touch screen and the
digital instrument panel.
Page 154 of 196
152
CITROËN Connect Nav
Voice commands
Call David Miller*
Call voicemail*
Display calls*
Help messages
To make a phone call, say "call" followed by
the contact name, for example: "Call David
Miller". You can also include the phone type, for
example: "Call David Miller at home". To make
a call by number, say "dial" followed by the
phone number, for example, "Dial 107776 835
417". You can check your voicemail by saying
"call voicemail". To send a text, say "send quick
message to", followed by the contact, and then
the name of the quick message you'd like to
send. For example, "send quick message to
David Miller, I'll be late". To display the list of
calls, say "display calls". For more information on
SMS, you can say "help with texting".
To choose a contact, say something like "select
line three". To move around the list say "next
page" or "previous page". You can undo your last
action and start over by saying "undo", or say
"cancel" to cancel the current action.
* This function is av ailable only if the telephone connected to the system supports downloadi\
ng of contacts and recent calls and the corresponding
download has been performed.
**
This function is a
vailable only if the telephone connected to the system supports download\
ing of contacts and recent calls and the corresponding
download has been performed.
"Text message" voice
commands
If there is no telephone connected by
Bluetooth, a voice message announces:
"Please first connect a telephone", and the
voice session is closed.
The "Text messages" voice commands function allows you to dictate and send
an SMS.
Dictate the text, taking care to pause briefly
between each word.
When you have finished, the voice recognition
system will automatically generate an SMS.
Voice commands
Send quick message to Bill Carter, I'll be late
Help messages
From the list of quick messages, say the name of
the one you'd like to send. To move around the
list you can say "go to start", "go to end", "next
page" or "previous page". You can undo your last
action and start over by saying "undo", or say
"cancel" to cancel the current action.
Voice commands
Send SMS to John Miller, I'm just arriving
Send SMS to David Miller at the office, don't
wait for me
Help messages
Please say "call" or "send quick message to",
and then select a line from the list. To move
around a list shown on the display, you can
say "go to start", "go to end", "next page" or
"previous page". You can undo your last action
and start over by saying "undo", or say "cancel"
to cancel the current action.
Voice commands
Listen to most recent message**
Help messages
To hear your last message, you can say "listen to
most recent message". When you want to send
a text, there's a set of quick messages ready for
you to use. Just use the quick message name
and say something like "send quick message to
Bill Carter, I'll be late". Check the phone menu
for the names of the supported messages.
The system only sends pre-recorded "Quick messages".
Navigation
Choice of a destination
To a new destination
Press Navigation to display the primary
page.
Press the "MENU" button to go to the secondary
page.
Select "Enter address".
Select the "Country".
Enter the "City", the "Street" and the
"Number" and confirm by pressing on the
suggestions displayed.
Press "OK" to select the "Guidance
criteria".
And/or
Select "See on map" to select the
"Guidance criteria".
Press "OK" to start navigation.
Zoom out/in using the touch buttons or
with two fingers on the screen.