clock CITROEN C4 CACTUS 2023 Owners Manual
[x] Cancel search | Manufacturer: CITROEN, Model Year: 2023, Model line: C4 CACTUS, Model: CITROEN C4 CACTUS 2023Pages: 196, PDF Size: 6.12 MB
Page 107 of 196

105
Practical information
7Storage recommendations
AdBlue® freezes at about -11°C and deteriorates
above +25°C. Containers should be stored in a
cool area and protected from direct sunlight.
Under these conditions, the fluid can be kept for
at least a year.
If the fluid has frozen, it can be used once it has
completely thawed out in the ambient air.
Never store AdBlue® containers in your
vehicle.
Precautions for use
AdBlue® is a urea-based solution. This fluid is
non-flammable, colourless and odourless (when
kept in a cool place).
In the event of contact with the skin, wash the
affected area with soap and running water. In the
event of contact with the eyes, immediately rinse
the eyes with large amounts of water or with an
eye wash solution for at least 15 minutes. Seek
medical attention if you feel a persistent burning
sensation or irritation.
If swallowed, immediately wash out the mouth
with clean water and then drink plenty of water.
In certain conditions (high temperature, for
example), the risk of release of ammonia cannot
be excluded: do not inhale the fluid. Ammonia
vapours have an irritant effect on mucous
membranes (eyes, nose and throat).
Store AdBlue® out of the reach of
children, in its original container.
Procedure
Before starting the top-up procedure, ensure that
the vehicle is parked on a flat and level surface.
In wintry conditions, ensure that the temperature
of the vehicle is above -11
°C. Otherwise, the
AdBlue
® may be frozen and therefore cannot
be poured into its tank. Park your vehicle in a
warmer area for a few hours to allow the top-up
to be carried out.
Never pour AdBlue® into the Diesel fuel
tank.
If any AdBlue® is splashed, or if there are
any spillages on the bodywork, rinse
immediately with cold water or wipe with a
damp cloth.
If the fluid has crystallised, clean it off using a
sponge and hot water.
Important: in the event of a top-up after
a breakdown because of a lack of
AdBlue, it is essential to wait around 5
minutes before switching on the ignition,
without opening the driver’s door,
unlocking the vehicle, introducing the key
into the ignition switch, or introducing the
key of the “Keyless Entry and Starting
”
system into the passenger compartment
.
Switch on the ignition, then wait for 10
seconds before starting the engine.
► Switch off the ignition and remove the key
from the switch to switch off the engine.
or
►
With Keyless Entry and Starting, press the
"
START/STOP" button to switch off the engine.
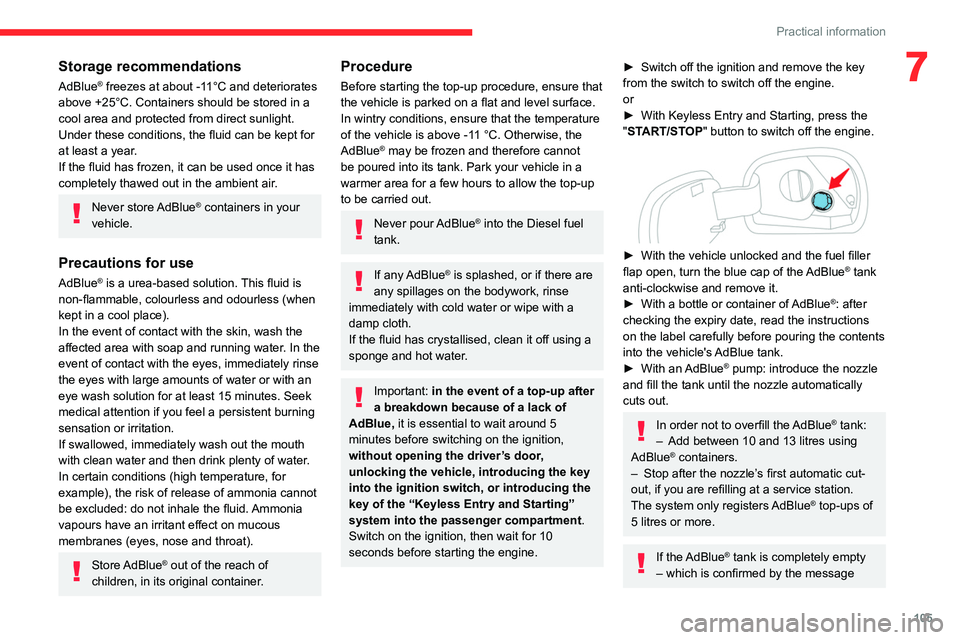
► With the vehicle unlocked and the fuel filler
flap open, turn the blue cap of the AdBlue® tank
anti-clockwise and remove it.
►
With a bottle or container of
AdBlue
®: after
checking the expiry date, read the instructions
on the label carefully before pouring the contents
into the vehicle's AdBlue tank.
►
With an
AdBlue® pump: introduce the nozzle
and fill the tank until the nozzle automatically
cuts out.
In order not to overfill the AdBlue® tank:
–
Add between 10 and 13 litres using
AdBlue® containers.
–
Stop after the nozzle’ s first automatic cut-
out, if you are refilling at a service station.
The system only registers AdBlue
® top-ups of
5
litres or more.
If the AdBlue® tank is completely empty
– which is confirmed by the message
Page 108 of 196

106
Practical information
For the care of the stickers in the rear
door windows (quarter panels), we
recommend the following:
– Use a wide jet at a temperature of between
25°C and 40°C.
– Where possible, direct the jet at right
angles to the stickers."Top up AdBlue: Starting impossible" – it is
essential to add at least 5 litres.
After refilling
► Refit the blue cap to the tank filler and turn it
clockwise, as far as it will go.
►
Close the fuel filler flap.
Do not dispose of AdBlue® bottles or
containers in the household waste.
Place them in a container reserved for this
purpose or take them back to where you
purchased them.
Advice on care and maintenance
General recommendations
Observe the following recommendations to avoid
damaging your vehicle.
Exterior
Never use a high-pressure jet wash in
the engine compartment, due to the risk
of damaging electrical components.
Do not wash the vehicle in strong sunshine or
extremely cold conditions.
When washing the vehicle at an
automatic roller-brush car wash, be sure
to lock the doors and, depending on version,
remove the electronic key.
When using a pressure washer, hold the
lance at least 30 cm from the vehicle
(particularly when cleaning areas containing
chipped paint, sensors or seals).
Promptly clean up any stains containing
chemicals liable to damage the vehicle's paint
(including tree resin, bird droppings, insect
secretions, pollen and tar).
If justified by the environment, clean the
vehicle more frequently to remove salty
deposits (in coastal areas), soot (in industrial
estates) and mud (in wet or cold areas).
These substances can be highly corrosive.
Contact a CITROËN dealer or a qualified
workshop if you require advice on removing
stubborn stains requiring special products
(such as tar or insect removers).
Preferably, have paint touch-ups performed
by a CITROËN dealer or a qualified
workshop.
Interior
When washing the vehicle, never use a
water hose or high-pressure washer to
clean the interior.
Liquids carried in cups or other open
containers can spill, presenting a risk of
damage if they come into contact with the
controls in the dashboard and centre console.
Take care!
Bodywork
High-gloss paint
Do not use abrasive products or
solvents, petrol or oil to clean the
bodywork.
Never use an abrasive sponge to clean
stubborn stains. Risk of scratching the
paintwork!
Do not apply polish in strong sunshine, or to
plastic or rubber parts.
Use a soft sponge and soapy water or a
pH neutral product.
Gently wipe the bodywork with a clean
microfibre cloth.
Apply polish with the vehicle clean and dry.
Comply with the instructions for use stated on
the product.
Care of the stickers
These styling stickers are treated to give good
resistance to ageing and tearing.
They have been designed to allow you to
customise your vehicle's bodywork.
When washing your vehicle, keep the high-
pressure lance tip at least 30 cm away from the
stickers.
Page 118 of 196

11 6
In the event of a breakdown
– Daytime running lamps / sidelamps.
– Third brake lamp.
–
Rear sidelamps.
–
Rear foglamp(s).
For the replacement of this type of bulb,
you must contact a CITROËN dealer or a
qualified workshop.
Front lamps
1. Daytime running lamps / Sidelamps (LED).
2. Dipped beam headlamps (H7).
3. Main beam headlamps (H1).
4. Direction indicators (PY21W)..
5. Foglamps (PS24W).
Dipped beam headlamps
► Remove the protective cover by pulling the
tab.
►
T
ake the connector and bulb holder, then lift
the assembly upwards to unclip it.
►
Remove the assembly of connector and bulb
holder
.
► Disconnect the bulb connector .
► Remove the bulb and replace it.
Main beam headlamps
► Remove the protective cover by pulling the
tab.
►
Disconnect the bulb connector (do not
remove the earth connector located below).
►
Push on the spring, then move it towards the
middle of the vehicle to release the bulb.
►
Remove the bulb and replace it.
Direction indicators
Rapid flashing of a direction indicator
lamp (left or right) indicates that one of
the bulbs on the corresponding side has
failed.
► Turn the bulb holder a eighth of a turn anti-
clockwise and remove it.
► Remove the bulb and replace it.
Amber coloured bulbs must be replaced
by bulbs with identical specifications and
colour.
Front foglamps
► Below the front bumper, unscrew the 3 mud
guard fixing screws.
► Move the mud guard aside to allow access to
the front foglamp.
► Disconnect the bulb holder connector by
pressing the tab, located at the top.
Page 119 of 196

11 7
In the event of a breakdown
8Rapid flashing of a direction indicator
lamp (left or right) indicates that one of
the bulbs on the corresponding side has
failed.
►
T
urn the bulb holder a eighth of a turn anti-
clockwise and remove it.
►
Remove the bulb and replace it.
Amber coloured bulbs must be replaced by bulbs with identical specifications and
colour.
Front foglamps
► Below the front bumper , unscrew the 3 mud
guard fixing screws.
►
Move the mud guard aside to allow access to
the front foglamp.
►
Disconnect the bulb holder connector by
pressing the tab, located at the top.
► Remove the bulb holder by squeezing the
two clips (top and bottom) using a thumb and
forefinger
.
►
Change the module (bulb holder and bulb).
To replace this type of bulb, you can also contact a CITROËN dealer or a qualified
workshop.
Rear lamps
1. Brake lamps (P21W).
2. Foglamp(s) (LED).
3. Sidelamps
(LED). 4.
Reversing lamps (W16W).
5. Direction indicators (PY21W).
Replacing lamp units
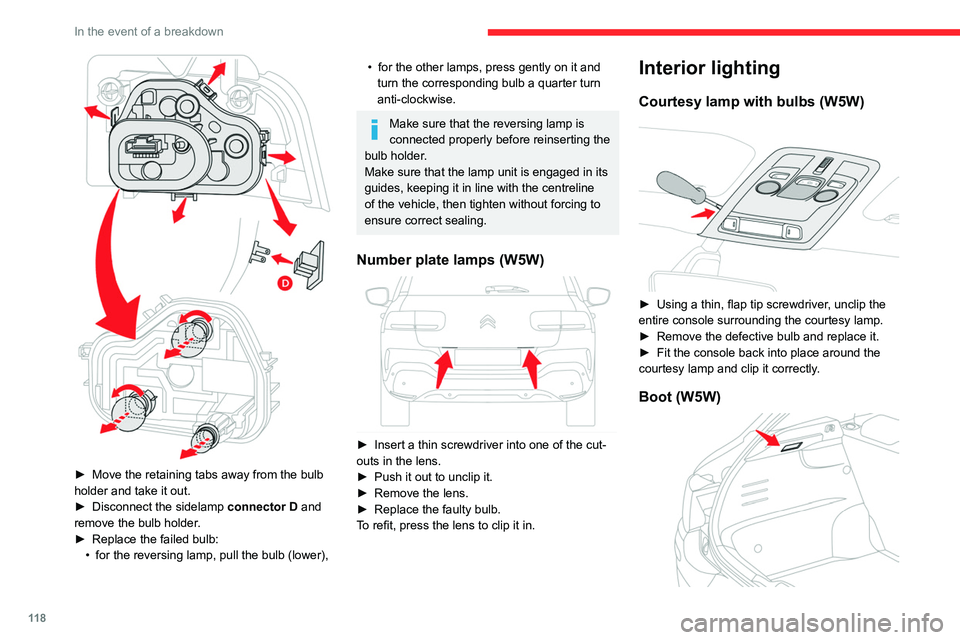
► Open the boot.
► Remove the side trim to access the lamp unit
fixings.
►
Disconnect the lamp unit connector A
by
pressing the release button (located under the
connector for the right-hand side and above the
connector for the left-hand side).
►
Unscrew the nut
B and remove it (ensure it
does not fall inside the wing ).
►
Press down on the lamp unit
retaining tab
C
,
then carefully remove it towards the outside.
Page 120 of 196

11 8
In the event of a breakdown
► Move the retaining tabs away from the bulb
holder and take it out.
►
Disconnect the sidelamp connector
D and
remove the bulb holder.
►
Replace the failed bulb:
•
for the reversing lamp, pull the bulb (lower),
• for the other lamps, press gently on it and
turn the corresponding bulb a quarter turn
anti-clockwise.
Make sure that the reversing lamp is
connected properly before reinserting the
bulb holder.
Make sure that the lamp unit is engaged in its
guides, keeping it in line with the centreline
of the vehicle, then tighten without forcing to
ensure correct sealing.
Number plate lamps (W5W)
► Insert a thin screwdriver into one of the cut-
outs in the lens.
►
Push it out to unclip it.
►
Remove the lens.
►
Replace the faulty bulb.
T
o refit, press the lens to clip it in.
Interior lighting
Courtesy lamp with bulbs (W5W)
► Using a thin, flap tip screwdriver , unclip the
entire console surrounding the courtesy lamp.
►
Remove the defective bulb and replace it.
►
Fit the console back into place around the
courtesy lamp and clip it correctly
.
Boot (W5W)
► Unclip the unit by pushing the base from
behind.
► Remove the bulb t and change it.
► Put the unit back in place.
Changing a fuse
Access to tooling
The extraction tweezers are fitted to the back of
the dashboard fusebox cover.