ESP Citroen C4 CACTUS RHD 2014 1.G Owner's Guide
[x] Cancel search | Manufacturer: CITROEN, Model Year: 2014, Model line: C4 CACTUS RHD, Model: Citroen C4 CACTUS RHD 2014 1.GPages: 331, PDF Size: 8.56 MB
Page 152 of 331
150
AR
BGНИКОГА НЕ инсталирайте детско столче на седалка с АКТИВИРАНА предна ВЪЗДУШНА ВЪЗГЛАВНИЦ А. Това можеда причини СМЪРТ или
СЕРИОЗНО НАРАНЯВАНЕ на детето.
CS NIKDY neumisťujte dětské zádržné zařízení orientované směrem dozadu na sedadlo chráněné AKTIVOVANÝM čelním AIRBAGEM. Hrozí nebezpečí
SMRTI DÍTĚTE nebo VÁ ŽNÉHO ZR ANĚNÍ.
DA Brug aldrig en bagudvendt barnestol på et sæde der er beskyttet af en aktiv airbag. Død eller alvorlig skade på barnet kan forekomme.
DE Ver wenden Sie NIEMALS einen Kindersitz oder Babyschale gegen die Fahr trichtung bei AKTIVIERTEM Airbag, TOD oder ERNSTHAFTE
VERLETZUNGEN können die Folge sein.
EL Μη χρησιμοποιείτε ΠΟΤΕ παιδικό κάθισμα με την πλάτη του προς το εμπρός μέρος του αυτοκινήτου, σε μια θέση που προστατεύεται από ΜΕΤΩΠΙΚΟ
αερόσακο που είναι ΕΝΕΡΓΟΣ. Αυτό μπορεί να έχει σαν συνέπεια το ΘΑΝΑΤΟ ή το ΣΟΒΑΡΟ ΤΡΑΥΜΑΤΙΣΜΟ του ΠΑΙΔΙΟΥ
EN NEVER use a rear ward facing child restraint on a seat protected by an ACTIVE AIRBAG in front of it, DEATH or SERIOUS INJURY to the CHILD can
occur
ES NO INSTALAR NUNCA EL SISTEMA DE RETENCIÓN PAR A NIÑOS DE ESPALDAS AL SENTIDO DE LA CIRCULACIÓN SOBRE UN ASIENTO
PROTEGIDO CON UN COJÍN INFLABLE FRONTAL ( AIRBAG ) ACTIVADO. ESTO PUEDE CAUSAR LA MUERTE DEL BEBE O HERIRLO
GRAVEMENTE.
ET Ärge kasutage kunagi lapse tur vatooli seljaga sõidusuunas sõiduki istmel mis on kaitstud AKTIVEERITUD TURVAPADJAGA. See võib põhjustada lapsele
R ASKEID VIGASTUSI või SURMA.
FI ÄLÄ KOSK A AN aseta lapsen tur vaistuinta selkä ajosuuntaan istuimelle, jonka edessä suojana on käyttöön aktivoitu TURVAT Y YNY. Sen laukeaminen voi
aiheuttaa LAPSEN KUOLEMAN tai VAK AVAN LOUKK A ANTUMISEN.
FR NE JAMAIS installer de système de retenue pour enfants faisant face vers l’arrière sur un siège protégé par un COUSSIN GONFLABLE frontal ACTIVÉ.
Cela peut provoquer la MORT de l’ENFANT ou le BLESSER GR AVEMENT
HR NIK ADA ne postavljati dječju sjedalicu leđima u smjeru vožnje na sjedalo zaštićeno UKLJUČENIM prednjim ZR AČNIM JASTUKOM. To bi moglo
uzrokovati SMRT ili TEŠKU OZLJEDU djeteta.
HU SOHA ne használjon menetiránynak háttal beszerelt gyermekülést olyan ülésen, amely AKTIVÁLT ÁLLAPOTÚ (BEK APCSOLT) FRONTLÉGZSÁKK AL
van védve. Ez a gyermek halálát vagy súlyos sérülését okozhatja.
IT NON installare MAI seggiolini per bambini posizionati in senso contrario a quello di marcia su un sedile protetto da un AIRBAG frontale ATTIVATO. Ciò
potrebbe provocare la MORTE o FERITE GR AVI al bambino.
LT NIEK ADA neįrenkite vaiko prilaikymo priemonės su atgal atgręžtu vaiku ant sėdynės, kuri saugoma VEIKIANČIOS priekinės ORO PAGALVĖS.
Išsiskleidus oro pagalvei vaikas gali būti MIRTINAI arba SUNKIAI TR AUMUOTAS.
LV NAV PIEĻAUJAMS uzstādīt uz aizmuguri vērstu bērnu sēdeklīti priekšējā pasažiera vietā, kurā ir AKTIVIZĒTS priekšējais DROŠĪBAS GAISA SPILVENS.
Tas var izraisīt BĒRNA NĀVI vai radīt NOPIETNUS IEVAINOJUMUS.
Child safety
Page 168 of 331
166
AdBlue® additive and SCR system
for BlueHDi Diesel engines
To assure respect for the environment and
conformity with the new Euro 6 emissions
standard, without adversely affecting the
per formance or fuel consumption of Diesel
engines, CITROËN has taken the decision to
equip its vehicles with an effective system that
associates SCR (Selective Catalytic Reduction)
with a particle filter (FAP) for the treatment of
exhaust gases.
Presentation of the SCR system
Using an additive called AdBlue® containing urea,
a catalytic converter turns up to 85% of nitrous
oxides (NOx) into nitrogen and water, which are
harmless to health and the environment. Once the AdBlue
® tank is empty, a
s
ystem required by regulations prevents
starting of the engine.
If the SCR is faulty, the level of
emissions from your vehicle will no
longer meet the Euro 6 standard: you
vehicle becomes polluting.
In the event of a confirmed fault
with the SCR system, you must go
to a CITROËN dealer or a qualified
workshop as soon as possible: after a
running distance of 650 miles
(1 100 km), a system will be triggered
automatically to prevent engine starting.
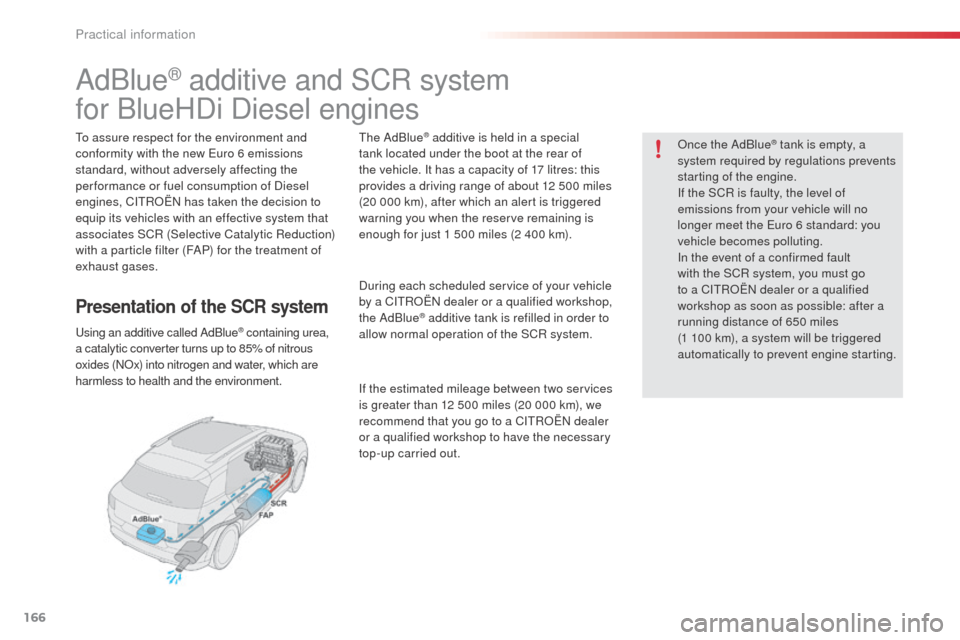
The AdBlue® additive is held in a special
tank located under the boot at the rear of
the vehicle. It has a capacity of 17 litres: this
provides a driving range of about 12 500 miles
(20 000 km), after which an alert is triggered
warning you when the reserve remaining is
enough for just 1 500 miles (2 400 km).
During each scheduled service of your vehicle
by a CITROËN dealer or a qualified workshop,
the AdBlue
® additive tank is refilled in order to
allow normal operation of the SCR system.
If the estimated mileage between two services
is greater than 12 500 miles (20 000 km), we
recommend that you go to a CITROËN dealer
or a qualified workshop to have the necessary
top-up carried out.
Practical information
Page 195 of 331
193
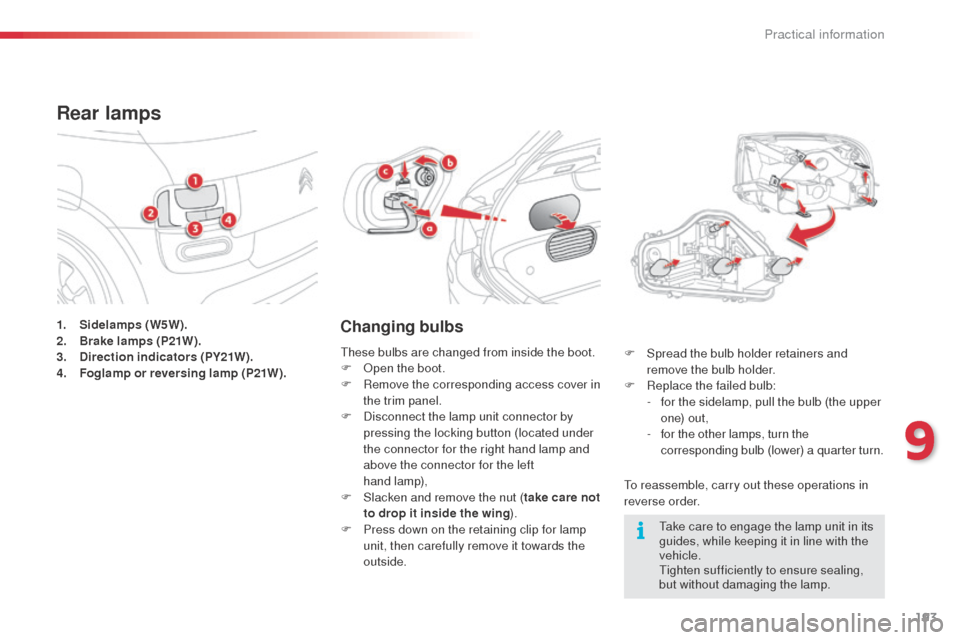
1. Sidelamps (W5W).
2. Brake lamps (P21W).
3.
D
irection indicators (PY21W).
4.
F
oglamp or reversing lamp (P21W).
Rear lamps
Changing bulbs
To reassemble, carry out these operations in
reverse order. F
S
pread the bulb holder retainers and
remove the bulb holder.
F
R
eplace the failed bulb:
-
f
or the sidelamp, pull the bulb (the upper
o n e) o u t ,
-
f
or the other lamps, turn the
corresponding bulb (lower) a quarter turn.
These bulbs are changed from inside the boot.
F
O
pen the boot.
F
R
emove the corresponding access cover in
the trim panel.
F
D
isconnect the lamp unit connector by
pressing the locking button (located under
the connector for the right hand lamp and
above the connector for the left
hand lamp),
F
S
lacken and remove the nut ( take care not
to drop it inside the wing ).
F
P
ress down on the retaining clip for lamp
unit, then carefully remove it towards the
outside. Take care to engage the lamp unit in its
guides, while keeping it in line with the
vehicle.
Tighten sufficiently to ensure sealing,
but without damaging the lamp.
9
Practical information
Page 199 of 331
197
CITROËN will not accept responsibility
for the cost incurred in repairing your
vehicle or for rectifying malfunctions
resulting from the installation of
accessories not supplied and not
recommended by CITROËN and
not installed in accordance with its
instructions, in particular when the
combined consumption of all of the
additional equipment connected
exceeds 10 milliamperes.
Installing electrical
accessories
Your vehicle's electrical system is
designed to operate with standard or
optional equipment.
Before installing other electrical
equipment or accessories on your
vehicle, contact a CITROËN dealer or a
qualified workshop.
9
Practical information
Page 203 of 331
201
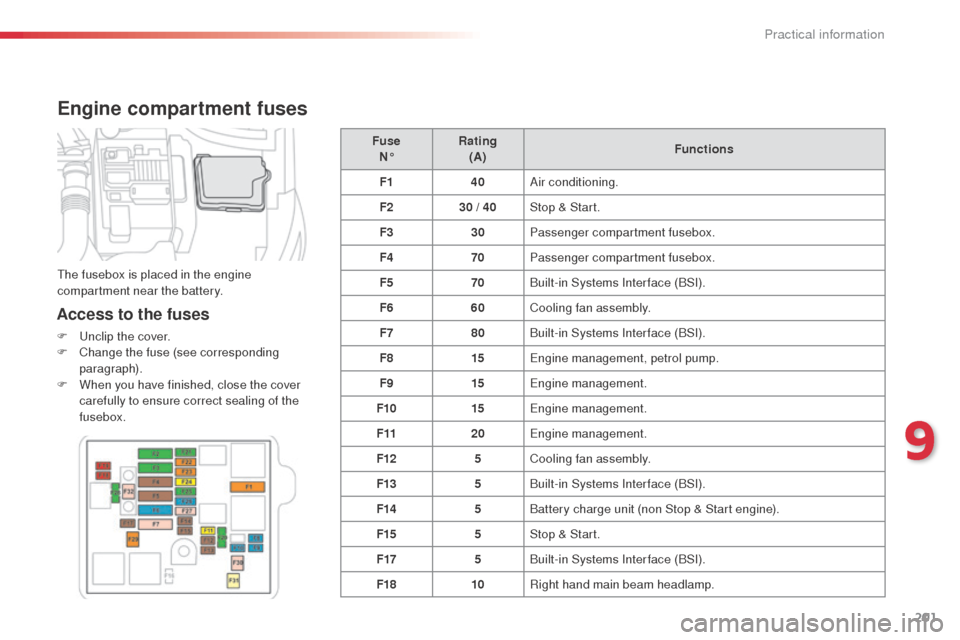
Engine compartment fuses
Access to the fuses
F Unclip the cover.
F C hange the fuse (see corresponding
paragraph).
F
W
hen you have finished, close the cover
carefully to ensure correct sealing of the
fusebox. Fuse
N° Rating
(A) Functions
F1 40Air conditioning.
F2 30 / 40Stop & Start.
F3 30Passenger compartment fusebox.
F4 70Passenger compartment fusebox.
F5 70Built-in Systems Interface (BSI).
F6 60Cooling fan assembly.
F7 80Built-in Systems Interface (BSI).
F8 15Engine management, petrol pump.
F9 15Engine management.
F10 15Engine management.
F11 20Engine management.
F12 5Cooling fan assembly.
F13 5Built-in Systems Interface (BSI).
F14 5Battery charge unit (non Stop & Start engine).
F15 5Stop & Start.
F17 5Built-in Systems Interface (BSI).
F18 10Right hand main beam headlamp.
The fusebox is placed in the engine
compartment near the battery.
9
Practical information
Page 207 of 331
205
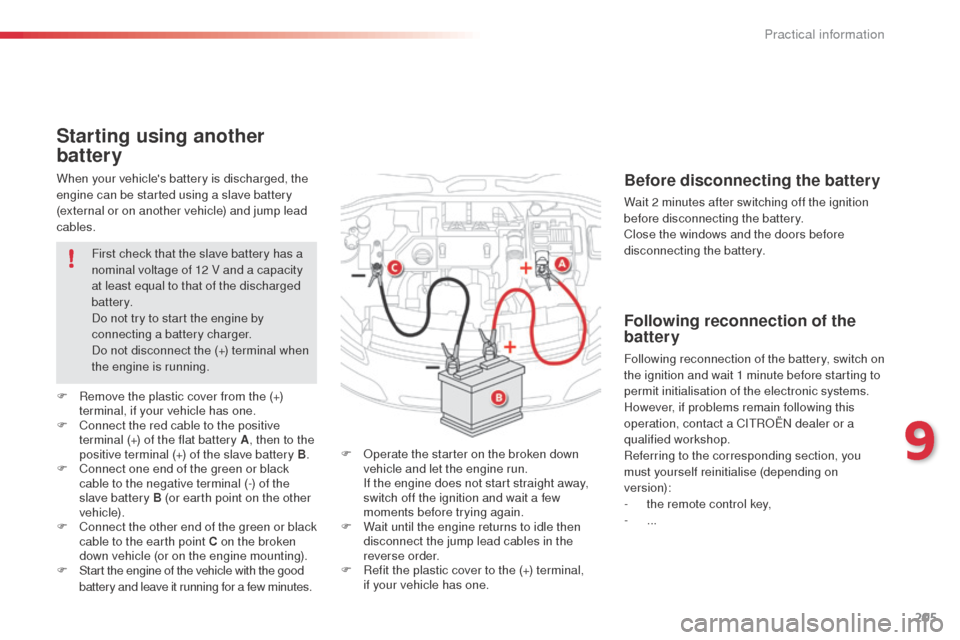
When your vehicle's battery is discharged, the
engine can be started using a slave battery
(external or on another vehicle) and jump lead
cables.
Starting using another
battery
F Operate the starter on the broken down vehicle and let the engine run.
I
f the engine does not start straight away,
switch off the ignition and wait a few
moments before trying again.
F
W
ait until the engine returns to idle then
disconnect the jump lead cables in the
reverse order.
F
R
efit the plastic cover to the (+) terminal,
if your vehicle has one.
F
R
emove the plastic cover from the (+)
terminal, if your vehicle has one.
F
C
onnect the red cable to the positive
terminal (+) of the flat battery A , then to the
positive terminal (+) of the slave battery B.
F
C
onnect one end of the green or black
cable to the negative terminal (-) of the
slave battery B (or earth point on the other
vehicle).
F
C
onnect the other end of the green or black
cable to the earth point C on the broken
down vehicle (or on the engine mounting).
F
S
tart the engine of the vehicle with the good
battery and leave it running for a few minutes. First check that the slave battery has a
nominal voltage of 12 V and a capacity
at least equal to that of the discharged
battery.
Do not try to start the engine by
connecting a battery charger.
Do not disconnect the (+) terminal when
the engine is running.
Before disconnecting the battery
Wait 2 minutes after switching off the ignition
before disconnecting the battery.
Close the windows and the doors before
disconnecting the battery.
Following reconnection of the
battery
Following reconnection of the battery, switch on
the ignition and wait 1 minute before starting to
permit initialisation of the electronic systems.
However, if problems remain following this
operation, contact a CITROËN dealer or a
qualified workshop.
Referring to the corresponding section, you
must yourself reinitialise (depending on
version):
-
t
he remote control key,
-
...
9
Practical information
Page 210 of 331
208
Changing a wiper blade
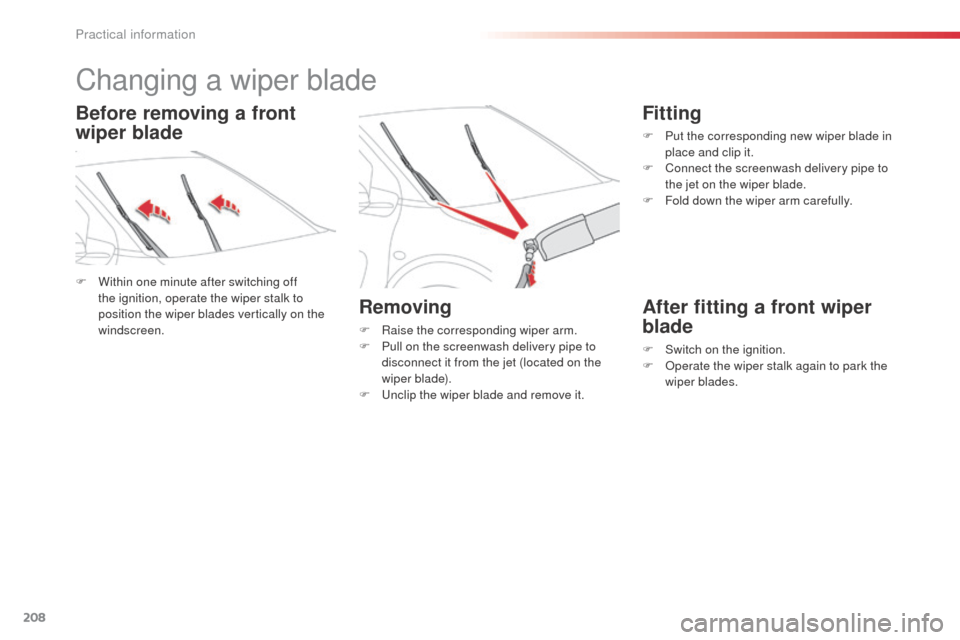
F Within one minute after switching off the ignition, operate the wiper stalk to
position the wiper blades vertically on the
windscreen.
Removing
F Raise the corresponding wiper arm.
F P ull on the screenwash delivery pipe to
disconnect it from the jet (located on the
wiper blade).
F
U
nclip the wiper blade and remove it.
Fitting
F Put the corresponding new wiper blade in place and clip it.
F
C
onnect the screenwash delivery pipe to
the jet on the wiper blade.
F
F
old down the wiper arm carefully.
After fitting a front wiper
blade
F Switch on the ignition.
F O perate the wiper stalk again to park the
wiper blades.
Before removing a front
wiper blade
Practical information
Page 217 of 331
215
Very cold climate screens
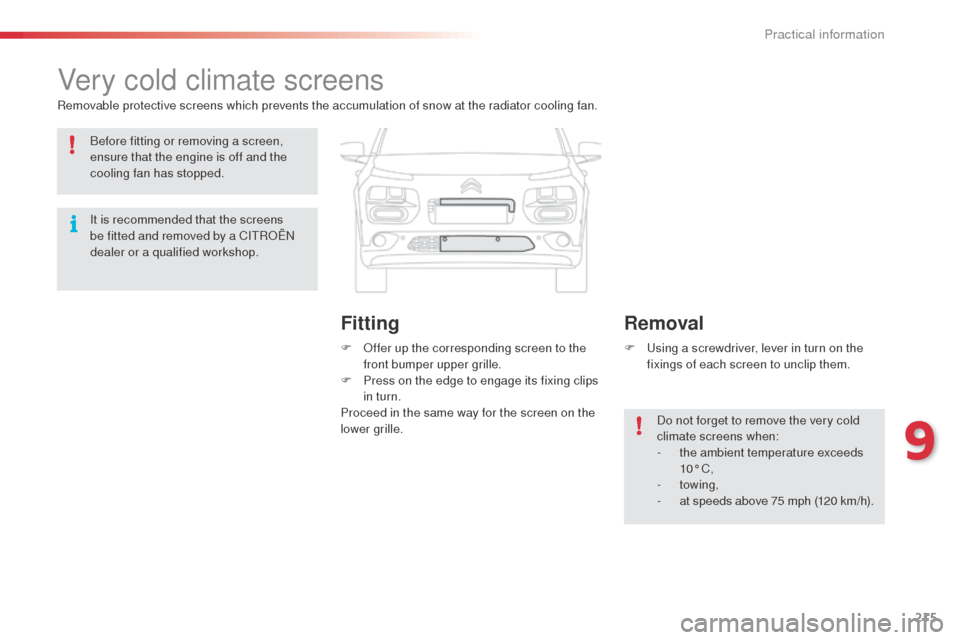
Removable protective screens which prevents the accumulation of snow at the radiator cooling fan.F
O
ffer up the corresponding screen to the
front bumper upper grille.
F
P
ress on the edge to engage its fixing clips
in turn.
Proceed in the same way for the screen on the
lower grille. F
U
sing a screwdriver, lever in turn on the
fixings of each screen to unclip them.
Do not forget to remove the very cold
climate screens when:
-
t
he ambient temperature exceeds
10° C,
-
towing,
-
a
t speeds above 75 mph (120 km/h).
Removal
Fitting
Before fitting or removing a screen,
ensure that the engine is off and the
cooling fan has stopped.
It is recommended that the screens
be fitted and removed by a CITROËN
dealer or a qualified workshop.
9
Practical information
Page 225 of 331

223
Checking levels
Take care when working under the bonnet, as certain areas of the engine may be extremely
hot (risk of burns) and the cooling fan could start at any time (even with the ignition off).
Oil level
The check is carried out either when
the ignition is switched on using the
oil level indicator in the instrument
panel, or using the dipstick.Engine oil change
Refer to the maintenance and warranty guide
for details of the interval for this operation.
In order to maintain the reliability of the engine
and emission control system, the use of
additives in the engine oil is prohibited.
Oil specification
The oil must be the correct grade for your
engine and conform to the manufacturer's
recommendations.
Check all of these levels regularly, in line with the maintenance and warranty guide. Top them up if necessary, unless other wise indicated.
If a level drops significantly, have the corresponding system checked by a CITROËN dealer or a qualified workshop.
Dipstick
There are two marks on the dipstick:
A = maximum
If the level is above this
mark, contact a CITROËN
dealer or a qualified
workshop.
B = minimum
Top up the level through the
oil filler orifice, using the
correct grade of oil for your
engine. The level must never
be below this mark.
It will only be correct if the vehicle is on level
ground and the engine has been off for more
than 30 minutes.
It is normal to top up the oil level
between two services (or oil changes).
CITROËN recommends that you check
the level, and top up if necessary, every
3 000 miles (5 000 kms).
After topping up the oil, the check when
switching on the ignition with the oil
level indicator in the instrument panel
is not valid during the 30 minutes after
topping up.
10
Checks
Page 230 of 331
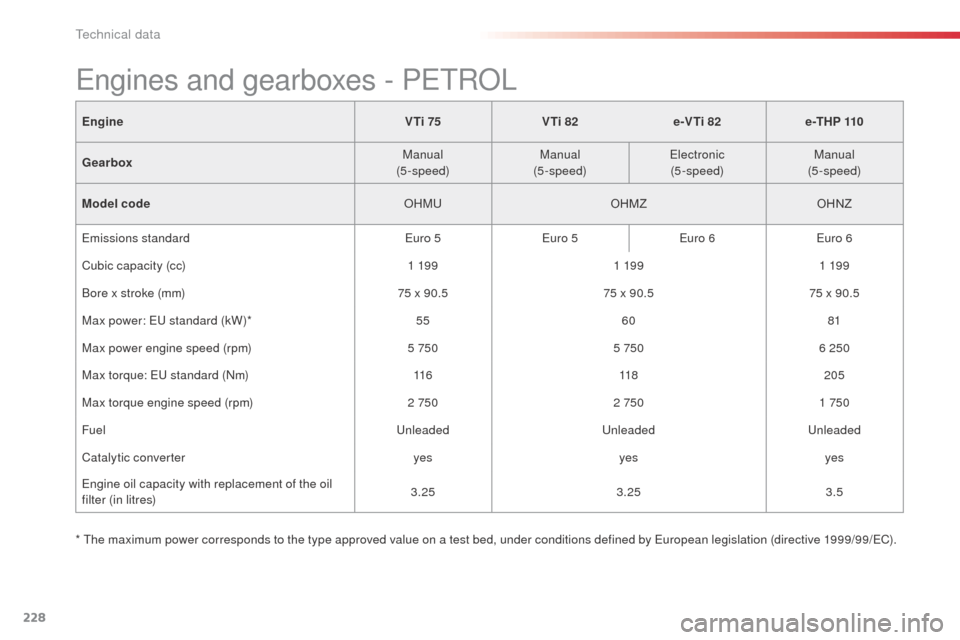
228
EngineV Ti 75VTi 82e-VTi 82 e -T H P 110
Gearbox Manual
(5-speed) Manual
(5-speed) Electronic
(5-speed) Manual
(5-speed)
Model code OHMUOHMZOHNZ
Emissions standard Euro 5Euro 5Euro 6Euro 6
Cubic capacity (cc) 1 19 91 19 91 19 9
Bore x stroke (mm) 75 x 90.575 x 90.575 x 90.5
Max power: EU standard (kW)* 5560 81
Max power engine speed (rpm) 5 7505 7506 250
Max torque: EU standard (Nm) 11 6118205
Max torque engine speed (rpm) 2 7502 7501 750
Fuel UnleadedUnleadedUnleaded
Catalytic converter yesyesyes
Engine oil capacity with replacement of the oil
filter (in litres) 3.25
3.25 3.5
* The maximum power corresponds to the type approved value on a test bed, under conditions defined by European legislation (directive 1999/99/EC).
Engines and gearboxes - PETROL
Technical data