tow Citroen C4 CACTUS RHD 2015 1.G Owner's Guide
[x] Cancel search | Manufacturer: CITROEN, Model Year: 2015, Model line: C4 CACTUS RHD, Model: Citroen C4 CACTUS RHD 2015 1.GPages: 326, PDF Size: 8.56 MB
Page 176 of 326
174
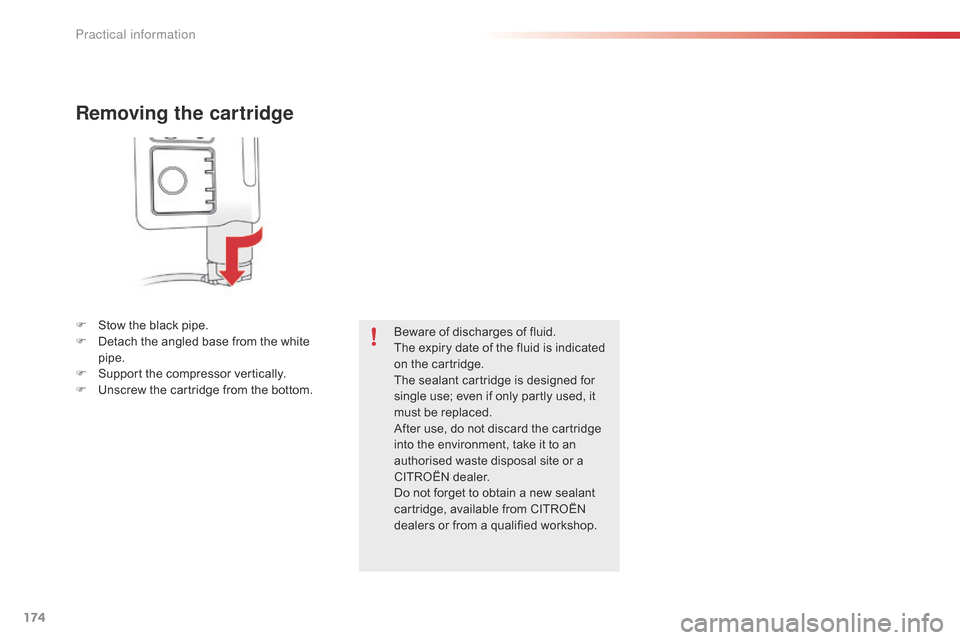
Removing the cartridge
F Stow the black pipe.
F D etach the angled base from the white
p
ipe.
F
S
upport the compressor vertically.
F
U
nscrew the cartridge from the bottom.Beware
of discharges of fluid.
The
expiry date of the fluid is indicated
o
n the cartridge.
The
sealant cartridge is designed for
s
ingle use; even if only partly used, it
m
ust be replaced.
After
use, do not discard the cartridge
i
nto the environment, take it to an
a
uthorised waste disposal site or a
C
ITROËN dealer.
Do
not forget to obtain a new sealant
c
artridge, available from CITROËN
d
ealers or from a qualified workshop.
Practical information
Page 177 of 326
175
Checking tyre pressures /
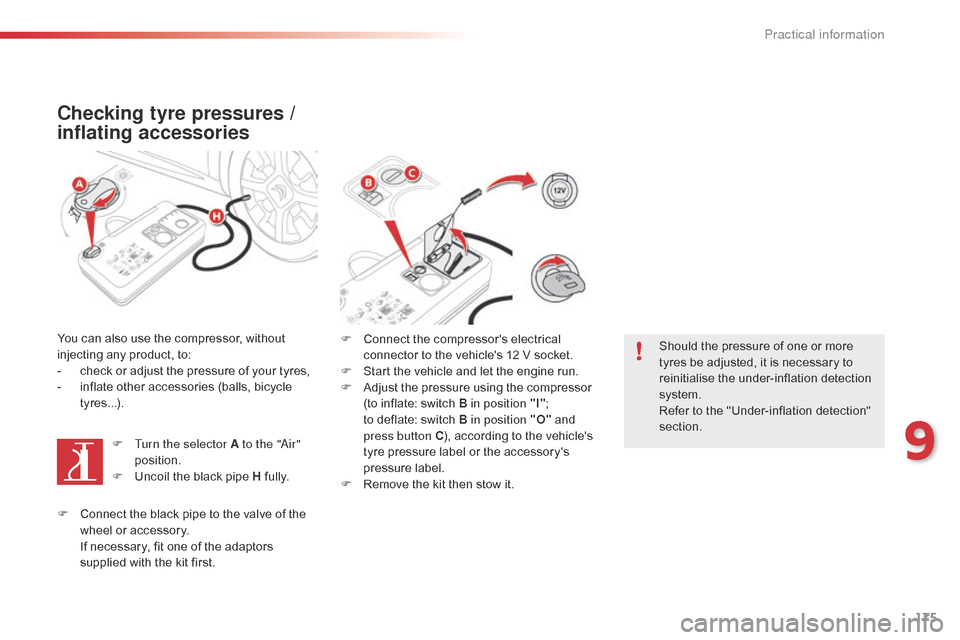
i nflating accessories
You can also use the compressor, without i
njecting any product, to:
-
c
heck or adjust the pressure of your tyres,
-
i
nflate other accessories (balls, bicycle
t
yres...). F
T
urn the selector A to the "
ai
r"
position.
F
U
ncoil the black pipe H
f
ully.F
C onnect the compressor's electrical
c
onnector to the vehicle's 12 V socket.
F
S
tart the vehicle and let the engine run.
F
A
djust the pressure using the compressor
(
to inflate: switch B in position "I";
t
o deflate: switch B in position "O"
and
p
ress button C),
according to the vehicle's
t
yre pressure label or the accessory's
p
ressure label.
F
R
emove the kit then stow it.Should
the pressure of one or more
t
yres be adjusted, it is necessary to
r
einitialise the under-inflation detection
s
ystem.
Refer
to the "Under-inflation detection"
s
ection.
F
C
onnect the black pipe to the valve of the
w
heel or accessory.
I
f necessary, fit one of the adaptors
s
upplied with the kit first.
9
Practical information
Page 178 of 326
176
Changing a wheel
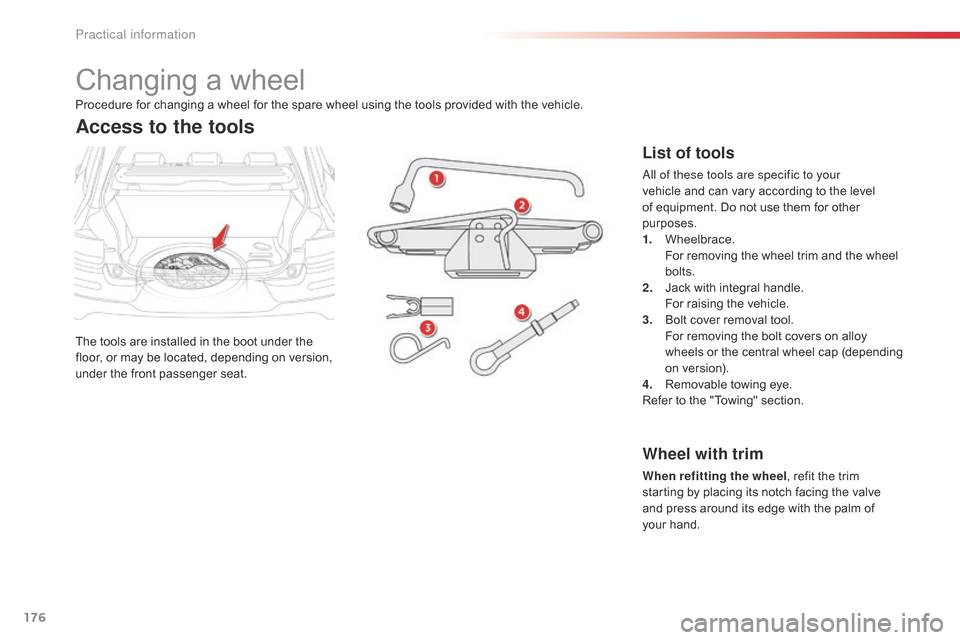
The tools are installed in the boot under the floor, or may be located, depending on version,
u
nder
t
he
f
ront
p
assenger
sea
t.
Access to the tools
List of tools
all of these tools are specific to your
vehicle and can vary according to the level
o
f equipment. Do not use them for other
p
urposes.
1.
W
heelbrace.
F
or removing the wheel trim and the wheel
bol
ts.
2.
J
ack with integral handle.
F
or raising the vehicle.
3.
B
olt cover removal tool.
F
or removing the bolt covers on alloy
w
heels
o
r
t
he
c
entral
w
heel
c
ap
(
depending
o
n version).
4.
R
emovable towing eye.
Refer
to the "Towing" section.
Procedure
for
changing
a
wheel
for
the
spare
wheel
using
the
tools
provided
with
the
vehicle.
Wheel with trim
When refitting the wheel
, refit the trim s
tarting by placing its notch facing the valve
a
nd press around its edge with the palm of
y
our hand.
Practical information
Page 179 of 326
177
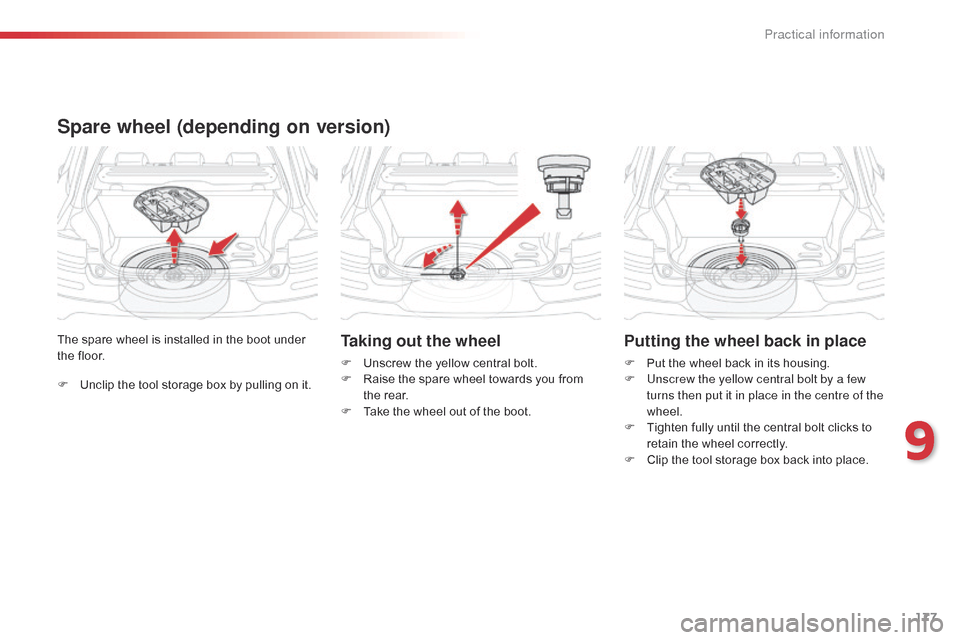
F Unclip the tool storage box by pulling on it.
The spare wheel is installed in the boot under
t
he floor.
Spare wheel (depending on version)
Taking out the wheel
F Unscrew
the yellow central bolt.
F R aise the spare wheel towards you from
t
he rear.
F
T
ake the wheel out of the boot.
Putting the wheel back in place
F Put the wheel back in its housing.
F U nscrew the yellow central bolt by a few
turns then put it in place in the centre of the
wheel.
F
T
ighten fully until the central bolt clicks to
r
etain the wheel correctly.
F
C
lip the tool storage box back into place.
9
Practical information
Page 185 of 326
183
Changing a bulb
Front lamps
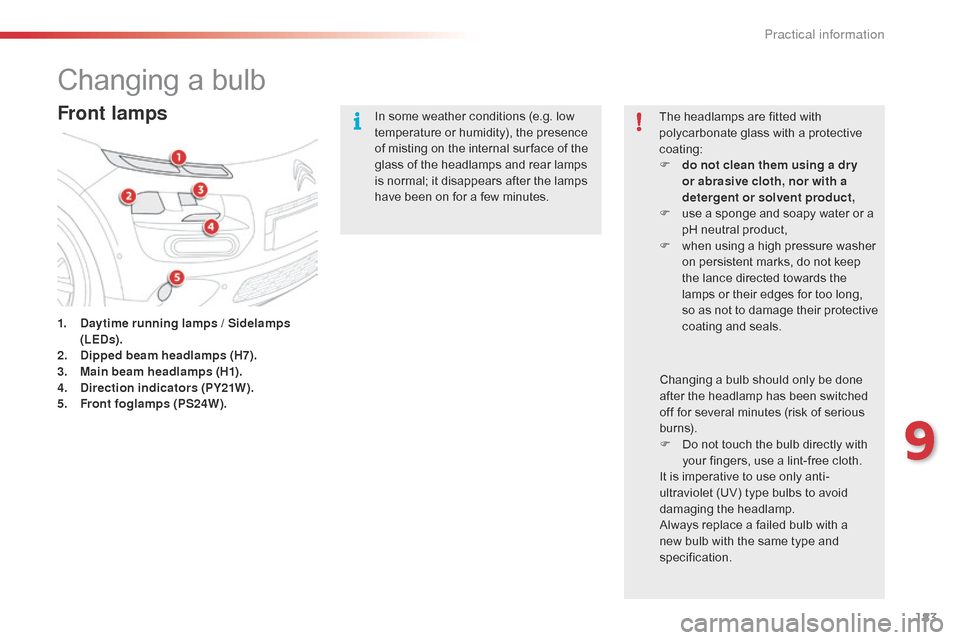
1. Daytime running lamps / Sidelamps (LEDs).
2.
D
ipped beam headlamps (H7).
3.
M
ain beam headlamps (H1).
4.
D
irection indicators (PY21W).
5.
F
ront foglamps (PS24W). In
some weather conditions (e.g. low
t
emperature or humidity), the presence
o
f misting on the internal sur face of the
g
lass of the headlamps and rear lamps
i
s normal; it disappears after the lamps
h
ave been on for a few minutes.
The headlamps are fitted with
p
olycarbonate glass with a protective
c
oating:
F
d
o not clean them using a dr y
or abrasive cloth, nor with a
detergent or solvent product,
F
u
se a sponge and soapy water or a
p
H neutral product,
F
w
hen using a high pressure washer
o
n persistent marks, do not keep
t
he lance directed towards the
l
amps or their edges for too long, s
o as not to damage their protective c
oating a nd sea ls.
Changing
a bulb should only be done
a
fter the headlamp has been switched
o
ff for several minutes (risk of serious
b
urns).
F
D
o not touch the bulb directly with
y
our fingers, use a lint-free cloth.
It
is imperative to use only anti-
ultraviolet
(UV) type bulbs to avoid
d
amaging
t
he
h
eadlamp.
Always
replace a failed bulb with a
n
ew bulb with the same type and
s
pecification.
9
Practical information
Page 187 of 326

185
Main beam headlamps
F Remove the protective cover by pulling t
he tab.
F
D
isconnect the bulb connector (do not
r
emove
t
he
e
arth
c
onnector
lo
cated
belo
w).
F
P
ush on the spring, then move it towards
t
he middle of the vehicle to release the
b
ulb.
F
R
emove the bulb and change it.
Direction indicators
Amber coloured bulbs, such as the direction indicators, must be replaced
w
ith bulbs of identical specifications
a
nd colour.
Rapid
flashing
of
the
direction
indicator
w
arning
lamp
(right
or
left)
indicates
the
f
ailure
of
a
bulb
on
that
side.
F
T
urn
the
bulb
holder
an
eighth
of
a
turn
a
nti-clockwise
and
extract
it.
F
R
emove
the
bulb
and
change
it.
To
reassemble,
carry
out
these
operations
in
r
everse
o
rder. To
reassemble,
carry
out
these
operations
in
r
everse
o
rder.
9
Practical information
Page 190 of 326
188
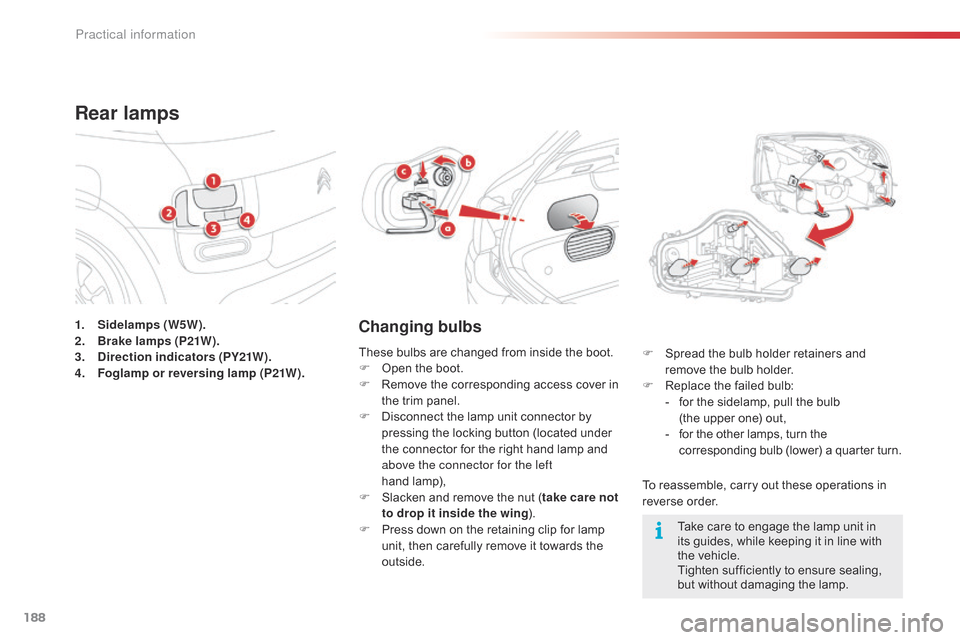
1. Sidelamps (W5W).
2. Brake lamps (P21W).
3.
D
irection indicators (PY21W).
4.
F
oglamp or reversing lamp (P21W).
Rear lamps
Changing bulbs
To reassemble, carry out these operations in reverse o rder.
F
S
pread the bulb holder retainers and
r
emove the bulb holder.
F
R
eplace the failed bulb:
-
f
or the sidelamp, pull the bulb
(
the upper one) out,
-
f
or the other lamps, turn the
c
orresponding bulb (lower) a quarter turn.
These
bulbs
are
changed
from
inside
the
boot.
F
O
pen
the
boot.
F
R
emove
the
corresponding
access
cover
in
t
he
trim
panel.
F
D
isconnect
the
lamp
unit
connector
by
p
ressing
the
locking
button
(located
under
t
he
connector
for
the
right
hand
lamp
and
a
bove the connector for the left
hand lam
p),
F
S
lacken
and
remove
the
nut
( take care not
to drop it inside the wing ).
F
P
ress
down
on
the
retaining
clip
for
lamp
u
nit,
then
carefully
remove
it
towards
the
o
utside. Take
care to engage the lamp unit in
i
ts guides, while keeping it in line with
t
he vehicle.
Tighten
sufficiently to ensure sealing,
b
ut without damaging the lamp.
Practical information
Page 206 of 326
204
To w i n g
General recommendations
Observe the legislation in force in your country.
E nsure that the weight of the towing vehicle is higher than that of the towed vehicle.
The
driver must remain at the wheel of the towed vehicle and must have a valid driving licence.
When
towing a vehicle with all four wheels on the ground, always use an approved towing arm;
r
ope and straps are prohibited.
The
towing vehicle must move off gently.
When
towing a vehicle with the engine off, there is no longer any power assistance for braking
o
r steering.
In
the following cases, you must always call on a professional recovery service:
-
v
ehicle broken down on a motor way or fast road,
-
f
our-wheel drive vehicle,
-
w
hen it is not possible to put the gearbox into neutral, unlock the steering, or release the
par
king
b
rake,
-
t
owing with only two wheels on the ground,
-
w
here there is no approved towing arm available...
Procedure
for
having
your
vehicle
towed
or
for
towing
another vehicle using a removable towing eye.
The towing eye
is
stowed
under
the
boot
floor,
o
r
may
be
located
under
the
front
passenger
sea
t, d
epending o
n v
ersion.
Practical information
Page 207 of 326
205
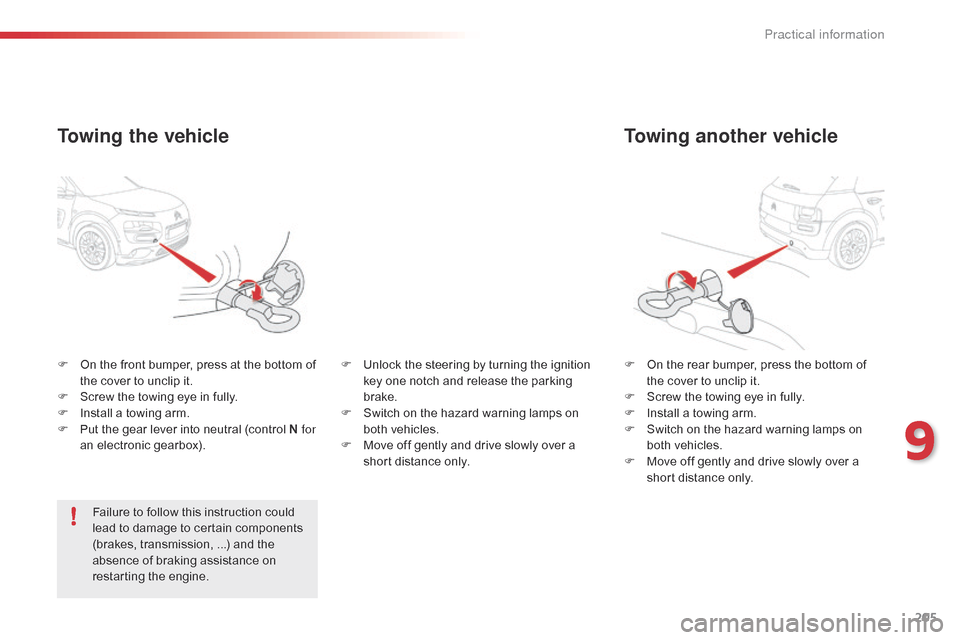
Towing another vehicle
F On the rear bumper, press the bottom of t
he cover to unclip it.
F
S
crew the towing eye in fully.
F
I
nstall a towing arm.
F
S
witch on the hazard warning lamps on
b
oth vehicles.
F
M
ove off gently and drive slowly over a
s
hort distance only.
F
O
n
the
front
bumper,
press
at
the
bottom
of
t
he
cover
to
unclip
it.
F
S
crew
the
towing
eye
in
fully.
F
I
nstall
a
towing
arm.
F
P
ut
the
gear
lever
into
neutral
(control
N for
an
electronic
gearbox).
Towing the vehicle
Failure to follow this instruction could l ead to damage to certain components
(
brakes, transmission, ...) and the
a
bsence of braking assistance on
r
estarting the engine. F
U
nlock the steering by turning the ignition
k
ey one notch and release the parking
b
rake.
F
S
witch on the hazard warning lamps on
b
oth vehicles.
F
M
ove off gently and drive slowly over a
s
hort distance only.
9
Practical information
Page 208 of 326

206
Towing a trailer
We recommend the use of genuine CITROËN towbars and their harnesses
t
hat have been tested and approved
f
rom the design stage of your vehicle,
a
nd that the fitting of the towbar is
e
ntrusted to a CITROËN dealer or a
q
ualified
w
orkshop.
If
the towbar is not fitted by a
C
ITROËN dealer, it must still be
f
itted in accordance with the vehicle
m
anufacturer's
i
nstructions.
Your
vehicle
is
primarily
designed
for
t
ransporting
people
and
luggage,
but
it
may
a
lso
be
used
for
towing
a
trailer. Driving
with a trailer places greater d
emands on the towing vehicle and the
d
river must take particular care.
Pr