warning light Citroen C4 CACTUS RHD 2015 1.G Owner's Manual
[x] Cancel search | Manufacturer: CITROEN, Model Year: 2015, Model line: C4 CACTUS RHD, Model: Citroen C4 CACTUS RHD 2015 1.GPages: 326, PDF Size: 8.56 MB
Page 4 of 326
.
.
Lighting control 108
Automatic illumination of headlamps
1
12
Daytime
running lamps / Sidelamps (LEDs)
1
13
Headlamp
adj
ustment
1
15
Cornering
lighting
1
16
Wiper
control stalk
1
17
Automatic
rain sensitive wipers
1
19
Panoramic
sunroof
1
21
Courtesy
lamp
1
22
Brightness
of instruments and controls
1
23
Boot
lamp
1
23
Visibility
Instrument panel 1 1
Indicator and warning lamps
1
2
Indicators
2
4
7-inch
touch screen tablet
2
8
Trip
computer
3
5
Distance
recorders
3
7
Setting
the date and time
3
8
Monitoring
ove
r view
Remote control key 3
9
Central locking
4
4
Doors
4
5
Boot
4
7
Front
electric window controls
4
8
Rear
door windows
4
9
access
Front seats 50
Rear seats
5
2
Mirrors
5
4
Steering
wheel adjustment
5
6
Ventilation
5
7
Heating
5
9
Manual
a
ir
c
onditioning
6
1
Automatic
air conditioning
6
3
Front
demist - defrost
6
7
Rear
screen demist - defrost
6
8
Comfort
Interior fittings 69
Boot fittings
7
5
Fittings
Driving recommendations 78
Starting-switching off the engine
7
9
Parking
brake
8
2
5 -speed
manual gearbox
8
3
Gear
ef ficiency indicator
8
4
ETG
electronic gearbox
8
5
Hill
start assist
8
9
Stop
& Start
9
0
Speed
limiter
9
3
Cruise
control
9
6
Memorising
speeds
9
9
Parking
sensors
1
00
Reversing
camera
1
02
Park
Assist
1
03
Driving
Eco-driving
Contents
Page 9 of 326
7
Headlamp beam adjustment 115
Lighting
control
stalk
1
08 -114
Automatic
illumination
of
headlamps
1
12
Direction
indicators
1
24
Electronic gearbox
8
5 - 88
Wiper control stalk
1
17-120
Trip computer
3
5 -36
Speed
limiter
9
3 -95
Cruise
control
9
6 -98
Memorising
speeds
9
9
Front
demist
/
defrost
6
7
Rear
screen
demist
/
defrost
6
8
Central
locking
4
4
Park
Assist
1
03 -107
ESC
1
29 -131
Hazard
warning
lamps
1
24 Instrument
panels
1
1
Warning
lam
ps
1
2-23
Service
indicator
2
4-26
Engine
oil
level
indicator
2
7
Gear
efficiency
indicator
8
4
Distance
recorders
3
7
Steering
wheel
adjustment
5
6
H or n
12
5
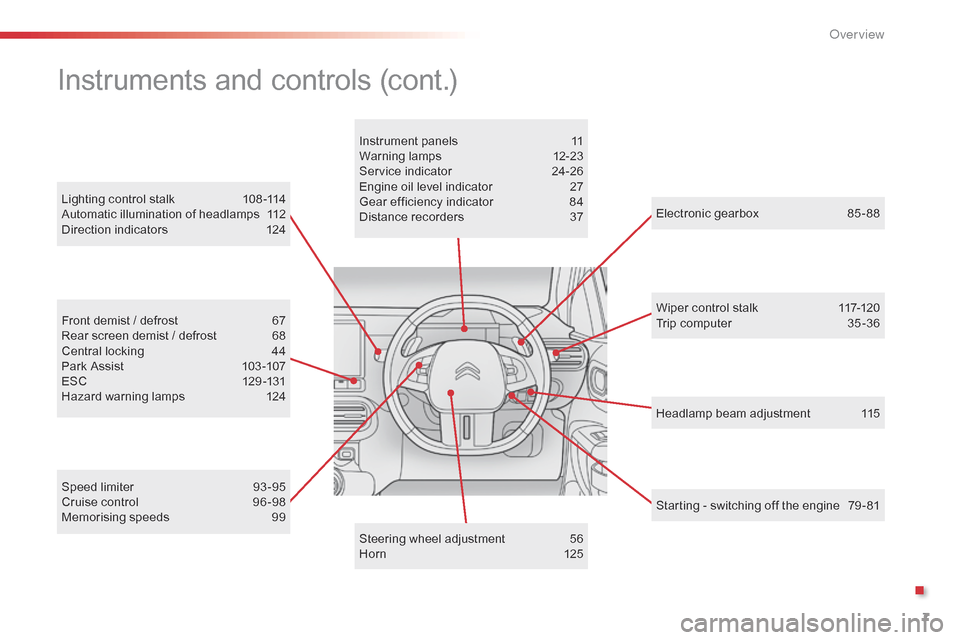
Instruments and controls (cont.)
Starting - switching off the engine 7 9 - 81
.
O
Page 15 of 326
13
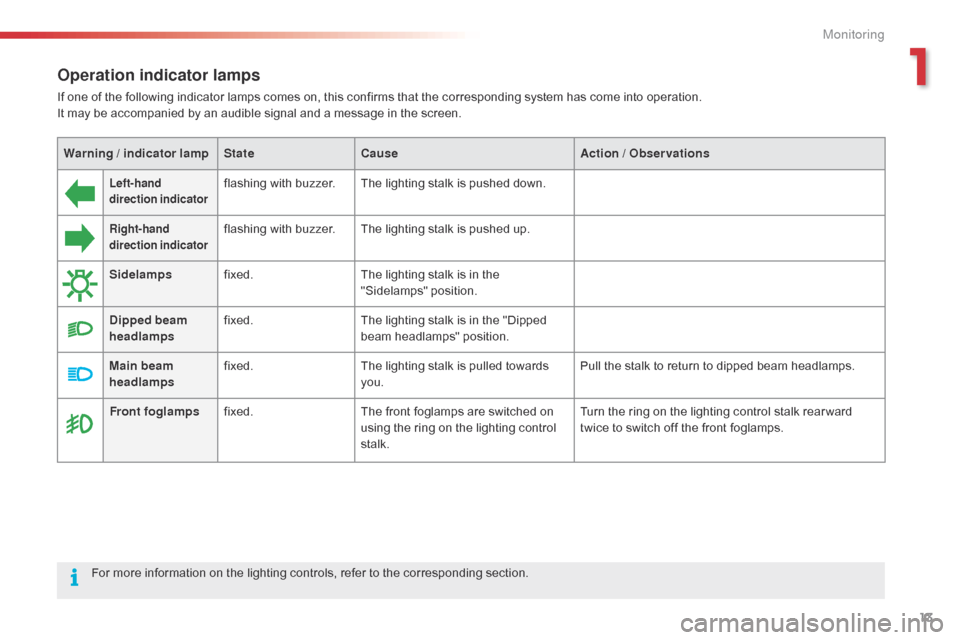
Operation indicator lamps
If one of the following indicator lamps comes on, this confirms that the corresponding system has come into operation.
I t may be accompanied by an audible signal and a message in the screen.
Left-hand
direction indicatorflashing with buzzer.The lighting stalk is pushed down.
Right-hand
direction indicatorflashing with buzzer.The lighting stalk is pushed up.
Sidelamps fixed. The
lighting stalk is in the
"
Sidelamps"
p
osition.
Dipped beam
headlamps fixed.
The
lighting stalk is in the "Dipped
b
eam headlamps" position.
Main beam
headlamps fixed.
The
lighting stalk is pulled towards
yo
u. Pull
the stalk to return to dipped beam headlamps.
Front foglamps fixed. The
front foglamps are switched on
u
sing the ring on the lighting control
st
alk. Turn
the ring on the lighting control stalk rear ward
t
wice to switch off the front foglamps.
For
more
information
on
the lighting controls, refer to the corresponding section.
Warning / indicator lamp
StateCause Action / Observations
1
Monitoring
Page 16 of 326
14
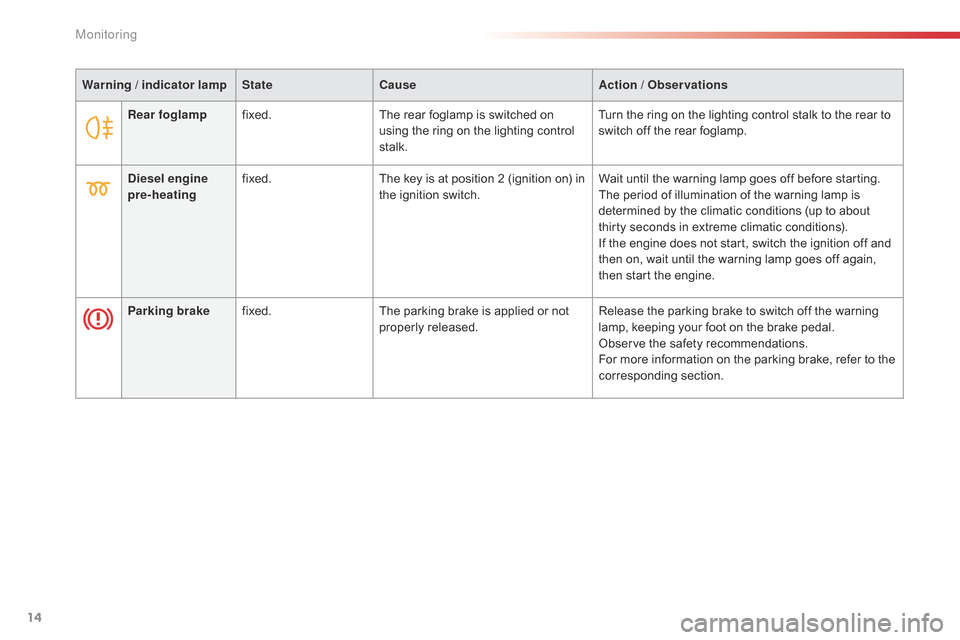
Rear foglampfixed. The rear foglamp is switched on u
sing the ring on the lighting control
st
alk.Turn
the ring on the lighting control stalk to the rear to s
witch off the rear foglamp.
Diesel engine
pre-heating fixed.
The
key is at position 2 (ignition on) in
t
he ignition switch.Wait
until the warning lamp goes off before starting.
The
period of illumination of the warning lamp is
d
etermined by the climatic conditions (up to about
t
hirty seconds in extreme climatic conditions).
If
the engine does not start, switch the ignition off and
t
hen on, wait until the warning lamp goes off again,
t
hen start the engine.
Parking brake fixed. The
parking brake is applied or not
p
roperly
r
eleased.Release
the parking brake to switch off the warning
l
amp, keeping your foot on the brake pedal.
Observe
the safety recommendations.
For
more information on the parking brake, refer to the
c
orresponding
s
ection.
Warning / indicator lamp
StateCause Action / Observations
Monitoring
Page 17 of 326

15
Automatic
wipingfixed.
The wiper control is pushed d
ownwards.Automatic
front wiping is activated.
To deactivate automatic wiping, operate the control
s
talk downwards or put the stalk into another position.
Stop & Star t fixed. When
the vehicle stops (red lights,
t
raffic jams, ...) the Stop & Start system
h
as put the engine into STOP mode.The
warning lamp goes off and the engine restarts
a
utomatically in START mode, as soon as you want to
m
ove off.
flashes for a
few seconds,
then
goes
off.STOP
mode is temporarily
u
navailable.
or
START
mode is invoked
au
tomatically.For
more information on special cases with STOP
m
ode and START mode, refer to the "Stop & Start"
s
ection.
Warning / indicator lamp
StateCause Action / Observations
Passenger's
front airbag fixed.
The
control switch, located in the
g
love box, is in the "ON "
position.
The
passenger's front airbag is
a
ctivated.
In
this case, do not install a rear ward
f
acing child seat.Turn the control switch to the "
OFF" position to
deactivate
the front passenger's airbag.
You
can install a rear ward facing child seat, unless
t
here is an airbag fault (Airbag warning lamp on).
1
Monitoring
Page 78 of 326
76
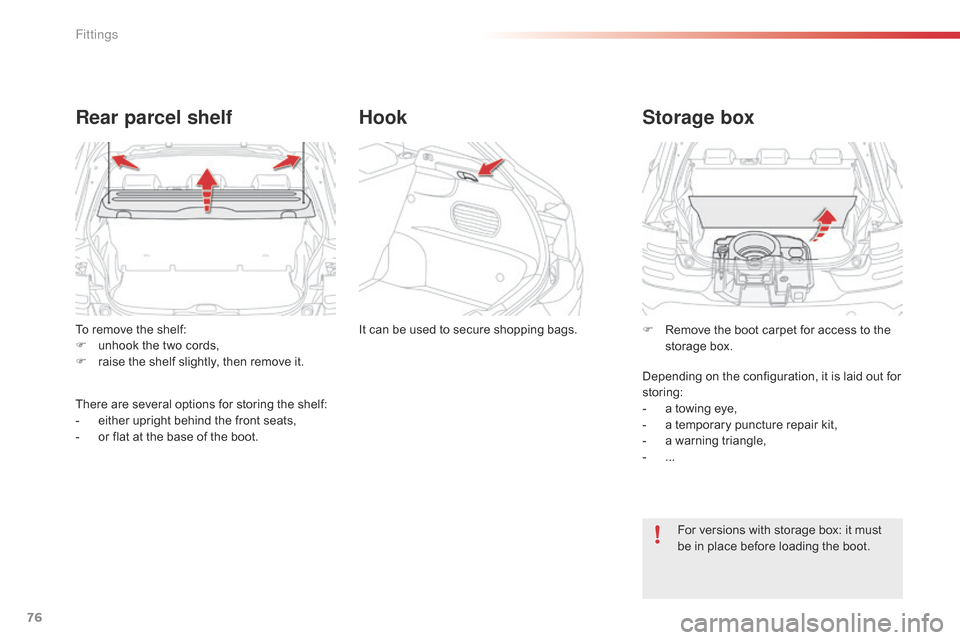
To remove the shelf:
F u nhook the two cords,
F
r
aise the shelf slightly, then remove it.
Rear parcel shelf
There are several options for storing the shelf:
- e ither upright behind the front seats,
-
o
r flat at the base of the boot.It
can be used to secure shopping bags.
Hook
Storage box
For versions with storage box: it must b
e in place before loading the boot.
F
R
emove the boot carpet for access to the
s
torage box.
Depending on the configuration, it is laid out for
s
toring:
-
a
towing eye,
-
a
temporary puncture repair kit,
-
a
warning triangle,
-
...
Fittings
Page 84 of 326
82
Parking brake
ApplicationRelease
When parking on a slope, direct your w
heels against the kerb, apply the
p
arking brake, engage a gear and
s
witch off the ignition.
When the vehicle is being driven, if this warning lamp and the STOP w arning lam p c
ome on, accompanied by an audible
s
ignal and a message in the screen, this
i
ndicates that the parking brake is still on or
h
as not been fully released.
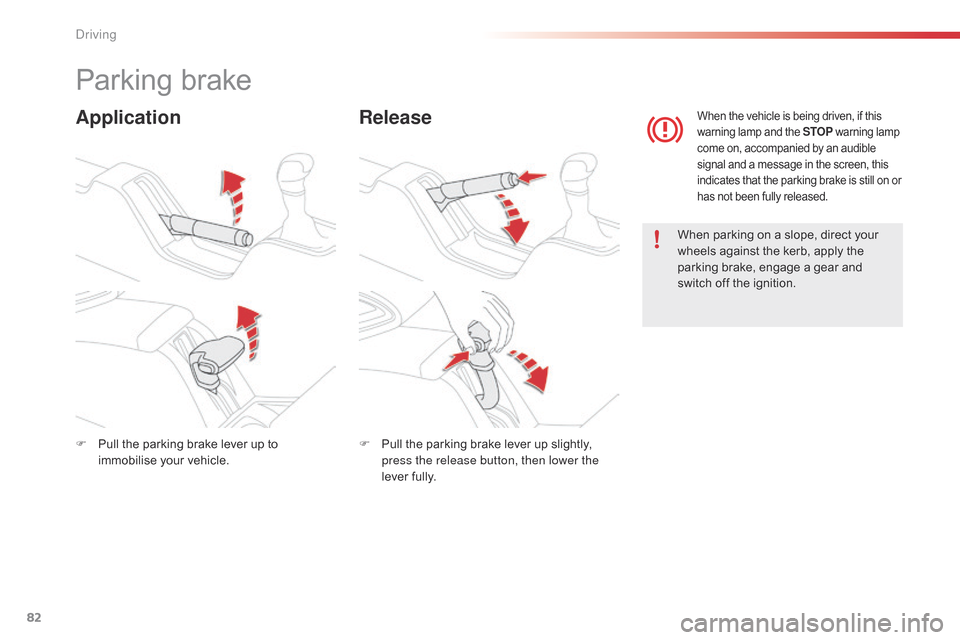
F Pull the parking brake lever up to i
mmobilise your vehicle. F
P ull the parking brake lever up slightly, p
ress the release button, then lower the
lever
f
ully.
Driving
Page 92 of 326
90
Stop & Start
Operation
Going into engine STOP mode
The "ECO" warning lamp comes on i
n the instrument panel and the engine g
oes into standby automatically:
-
w
ith a manual gearbox , when stationary,
in
neutral, and you release the clutch
ped
al.
-
w
ith an electronic gearbox , when
stationary
or at speeds below 5 mph
(
8 km/h) (depending on version), in neutral
(
control on N)
or when you press the brake
ped
al. Never
refuel with the engine in STOP
m
ode; you must switch off the ignition
w
ith the button.
For
your comfort, during parking
m
anoeuvres, STOP mode is not
a
vailable for a few seconds after
c
oming out of reverse gear.
STOP
mode does not affect the the
v
ehicle's systems, such as for example,
b
raking, power steering...
Special cases: STOP mode not
available
STOP mode is not invoked principally when:
- t he vehicle is on a steep slope (rising or
f
alling),
-
t
he driver's door is open,
-
t
he driver's seat belt is not fastened,
-
t
he vehicle has not exceeded 6 mph
(
10 km/h) since the last engine start by the
d
river,
-
t
he engine is needed to maintain a
c
omfortable temperature in the passenger
c
ompartment,
-
d
emisting is active,
-
s
ome special conditions (battery charge,
e
ngine temperature, braking assistance,
a
mbient temperature...) where the engine is
n
eeded to assure control of a system.
In this case, the "ECO"
warning
l
amp flashes for a few seconds then
g
oes off.
This operation is perfectly normal.
The
Stop
&
Start system
puts
the
engine
temporarily
into
standby
-
STOP
mode
-
during
stops
in
the
traffic (red lights, traffic jams,
or
other...).
The engine
restarts
automatically
-
START
mode
-
as
soon
as
you
want
to
move
off.
The
restart takes place instantly, quickly
and
silently.
Per fect
for
urban
use,
the
Stop
&
Start
system
reduces
fuel
consumption
and
exhaust
emissions
as
well
as the noise level when
stationary.
Stop & Start time counter
A cumulative time counter for periods i n STOP mode during a journey.
It
is
displayed in the trip computer (accessible
v
ia the " Driving assistance "
menu of the
t
ouch
screen tablet).
It resets to zero every time the ignition is switched on.
driving
Page 114 of 326
112
Automatic illumination
of headlamps
Activation
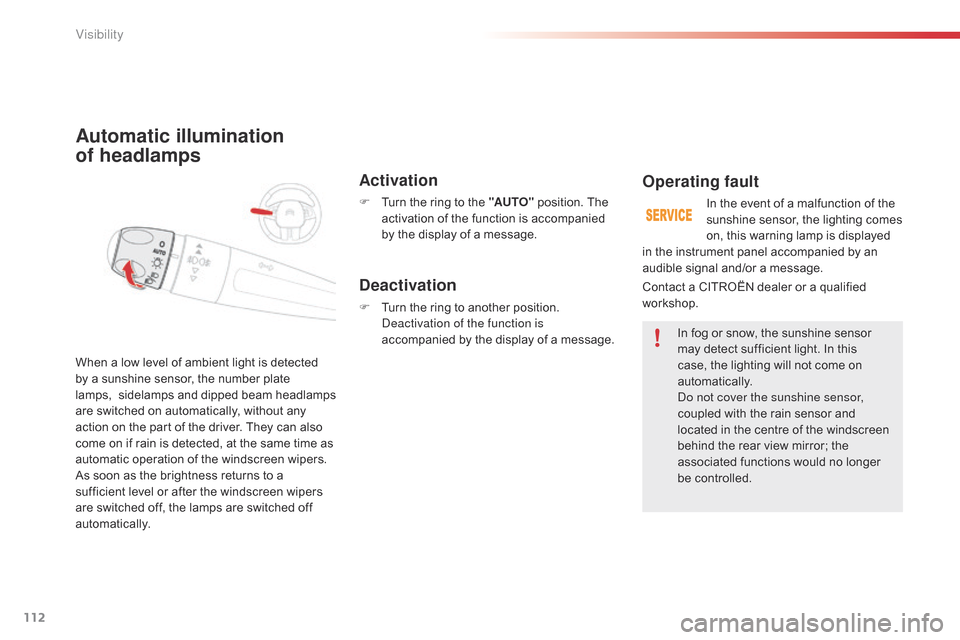
F Turn the ring to the "AUTO" position. The a
ctivation of the function is accompanied
b
y the display of a message.
When
a
low
level
of
ambient
light
is
detected
b
y
a
sunshine
sensor,
the
number
plate
lam
ps,
sidelamps
an
d
d
ipped
b
eam
h
eadlamps
a
re
switched
on
automatically,
without
any
a
ction
on
the
part
of
the
driver.
They
can
also
c
ome
on
if
rain
is
detected,
at
the
same
time
as
a
utomatic
operation
of
the
windscreen
wipers.
As
soon
as
the
brightness
returns
to
a
s
ufficient
level
or
after
the
windscreen
wipers
a
re
switched
off,
the
lamps
are
switched
off
au
tomatically.
Deactivation
F Turn the ring to another position.
de activation of the function is
accompanied
by the display of a message.
Operating fault
In the event of a malfunction of the sunshine sensor, the lighting comes
o
n, this warning lamp is displayed
I
n
fog or snow, the sunshine sensor
m
ay
detect sufficient light. In this
c
ase, the lighting will not come on
au
tomatically.
do n
ot cover the sunshine sensor,
coupled
with the rain sensor and
l
ocated in the centre of the windscreen
b
ehind the rear view mirror; the
a
ssociated functions would no longer
be c
ontrolled.
Contact
a
CITROËN dealer or a qualified
w
orkshop.
in
the
instrument panel accompanied by an
a
udible
signal and/or a message.
Visibility
Page 116 of 326
114
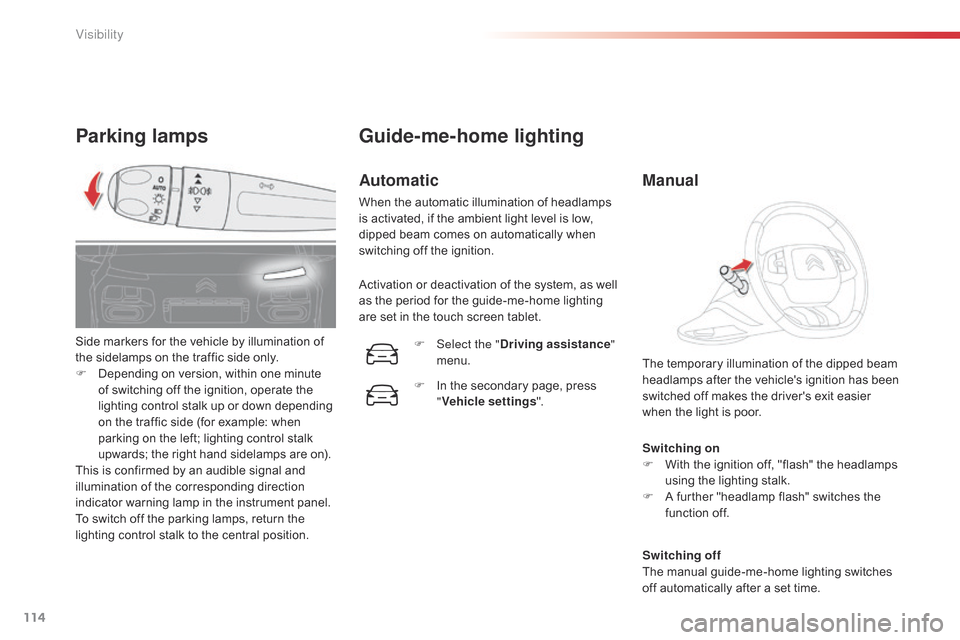
Parking lamps
Switching on
F W ith the ignition off, "flash" the headlamps
u
sing the lighting stalk.
F
A
further "headlamp flash" switches the
f
unction off.
Switching off
The
manual guide-me-home lighting switches
o
ff automatically after a set time.
The
temporary illumination of the dipped beam
h
eadlamps after the vehicle's ignition has been
s
witched off makes the driver's exit easier
w
hen the light is poor.
Side
markers
for
the
vehicle
by
illumination
of
t
he
sidelamps
on
the
traffic
side
only.
F
D
epending
on
version,
within
one
minute
o
f
switching
off
the
ignition,
operate
the
l
ighting
control
stalk
up
or
down
depending
o
n
the
traffic
side
(for
example:
when
p
arking
on
the
left;
lighting
control
stalk
u
pwards;
the
right
hand
sidelamps
are
on).
This
is
confirmed
by
an
audible
signal
and
i
llumination
of
the
corresponding
direction
i
ndicator
warning
lamp
in
the
instrument
panel.
To
switch
off
the
parking
lamps,
return
the
l
ighting
control
stalk
to
the
central
position.
Guide-me-home lighting
Automatic
When the automatic illumination of headlamps i s activated, if the ambient light level is low,
d
ipped beam comes on automatically when
s
witching off the ignition.
Activation
or deactivation of the system, as well
a
s the period for the guide-me-home lighting
a
re set in the touch screen tablet.
F
Sel
ect the "Driving assistance "
menu.
F
I
n the secondary page, press
"V
ehicle settings".
Manual
Visibility