turn signal Citroen C4 DAG 2013.5 2.G Owner's Manual
[x] Cancel search | Manufacturer: CITROEN, Model Year: 2013.5, Model line: C4 DAG, Model: Citroen C4 DAG 2013.5 2.GPages: 340, PDF Size: 28.95 MB
Page 40 of 340
1
MONITORING
38
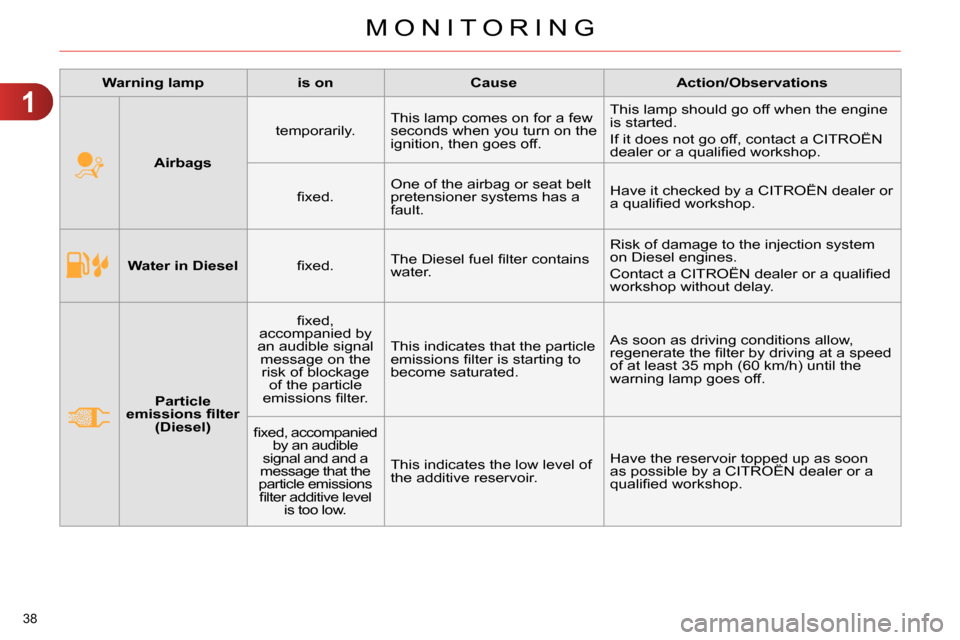
Water in Diesel
fi xed. The Diesel fuel fi lter contains
water. Risk of damage to the injection system
on Diesel engines.
Contact a CITROËN dealer or a qualifi ed
workshop without delay.
Particle
emissions fi lter
(Diesel)
fi xed,
accompanied by
an audible signal
message on the
risk of blockage
of the particle
emissions fi lter. This indicates that the particle
emissions fi lter is starting to
become saturated. As soon as driving conditions allow,
regenerate the fi lter by driving at a speed
of at least 35 mph (60 km/h) until the
warning lamp goes off.
fi xed, accompanied
by an audible
signal and and a
message that the
particle emissions
fi lter additive level
is too low. This indicates the low level of
the additive reservoir. Have the reservoir topped up as soon
as possible by a CITROËN dealer or a
qualifi ed workshop.
Warning lamp
is on
Cause
Action/Observations
Airbags
temporarily. This lamp comes on for a few
seconds when you turn on the
ignition, then goes off. This lamp should go off when the engine
is started.
If it does not go off, contact a CITROËN
dealer or a qualifi ed workshop.
fi xed. One of the airbag or seat belt
pretensioner systems has a
fault. Have it checked by a CITROËN dealer or
a qualifi ed workshop.
Page 41 of 340
1
MONITORING
39
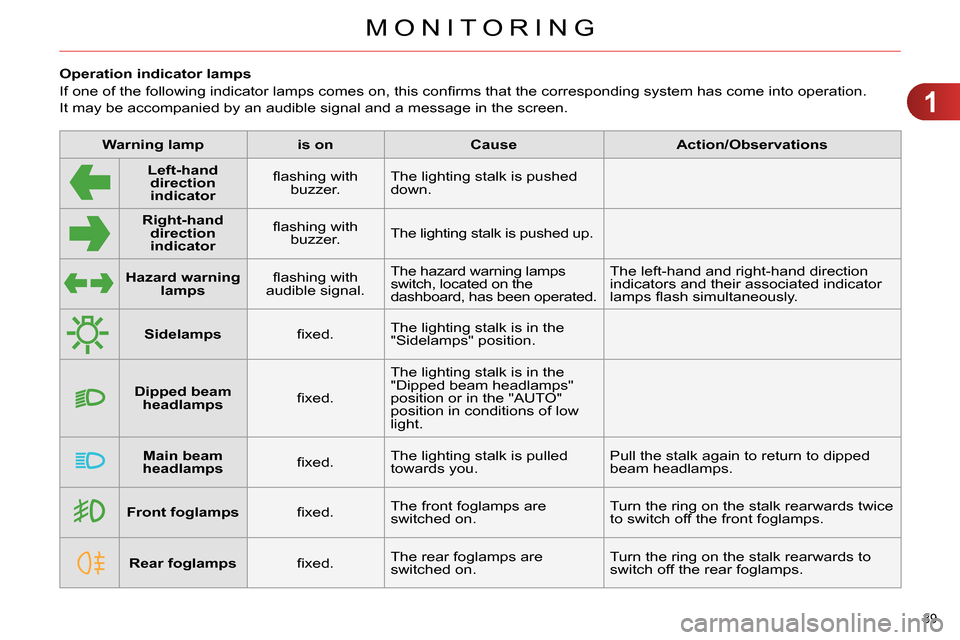
Operation indicator lamps
If one of the following indicator lamps comes on, this confi rms that the corresponding system has come into operation.
It may be accompanied by an audible signal and a message in the screen.
Warning lamp
is on
Cause
Action/Observations
Left-hand
direction
indicato
r
fl ashing with
buzzer. The lighting stalk is pushed
down.
Right-hand
direction
indicator
fl ashing with
buzzer. The lighting stalk is pushed up.
Hazard warning
lamps
fl ashing with
audible signal. The hazard warning lamps
switch, located on the
dashboard, has been operated. The left-hand and right-hand direction
indicators and their associated indicator
lamps fl ash simultaneously.
Sidelamps
fi xed. The lighting stalk is in the
"Sidelamps" position.
Dipped beam
headlamps
fi xed. The lighting stalk is in the
"Dipped beam headlamps"
position or in the "AUTO"
position in conditions of low
light.
Main beam
headlamps
fi xed. The lighting stalk is pulled
towards you. Pull the stalk again to return to dipped
beam headlamps.
Front foglamps
fi xed. The front foglamps are
switched on. Turn the ring on the stalk rearwards twice
to switch off the front foglamps.
Rear foglamps
fi xed. The rear foglamps are
switched on. Turn the ring on the stalk rearwards to
switch off the rear foglamps.
Page 84 of 340
4
ACCESS
82
Anti-theft protection
Electronic engine immobiliser
The key contains an electronic chip
which has a special code. When the
ignition is switched on, this code must
be recognised in order for starting to be
possible.
This electronic engine immobiliser locks
the engine management system a few
minutes after the ignition is switched off
and prevents starting of the engine by
anyone who does not have the key.
In the event of a fault, you
are informed by illumina-
tion of this warning lamp,
an audible signal and a message in the
screen.
In this case, your vehicle will not start;
contact a CITROËN dealer as soon as
possible.
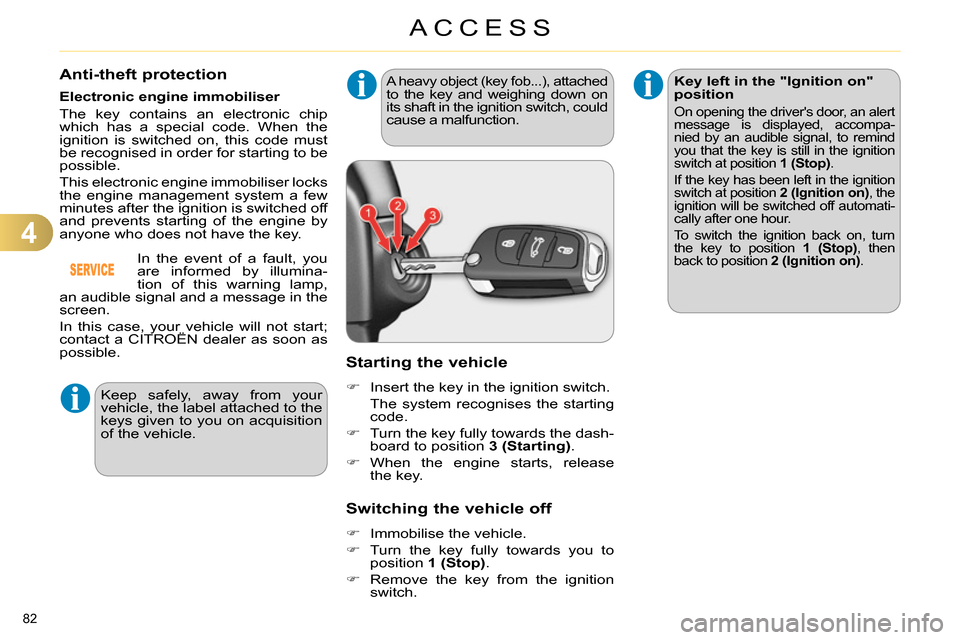
Starting the vehicle
Insert the key in the ignition switch.
The system recognises the starting
code.
Turn the key fully towards the dash-
board to position 3 (Starting)
.
When the engine starts, release
the key.
A heavy object (key fob...), attached to the key and weighing down on
its shaft in the ignition switch, could
cause a malfunction.
Switching the vehicle off
Immobilise the vehicle.
Turn the key fully towards you to
position 1 (Stop)
.
Remove the key from the ignition
switch.
Key left in the "Ignition on"
position
On opening the driver's door, an alert
message is displayed, accompa-
nied by an audible signal, to remind
you that the key is still in the ignition
switch at position 1 (Stop)
.
If the key has been left in the ignition
switch at position 2 (Ignition on)
, the
ignition will be switched off automati-
cally after one hour.
To switch the ignition back on, turn
the key to position 1 (Stop)
, then
back to position 2 (Ignition on)
.
Keep safely, away from your
vehicle, the label attached to the
keys given to you on acquisition
of the vehicle.
Page 85 of 340
4
ACCESS
83
Operating fault with the
2-button remote control
Following disconnection of the vehicle
battery, replacement of the remote con-
trol battery or in the event of malfunction
of the remote control, you can no longer
unlock, lock or locate your vehicle.
First of all, use the key in the lock to
unlock or lock your vehicle.
Then, reinitialise the remote control.
Reinitialisation
Switch off the ignition.
Turn the key to position 2 (Ignition on)
.
Press the closed padlock immedi-
ately for a few seconds.
Switch off the ignition and remove
the key from the ignition switch.
The remote control is fully operational
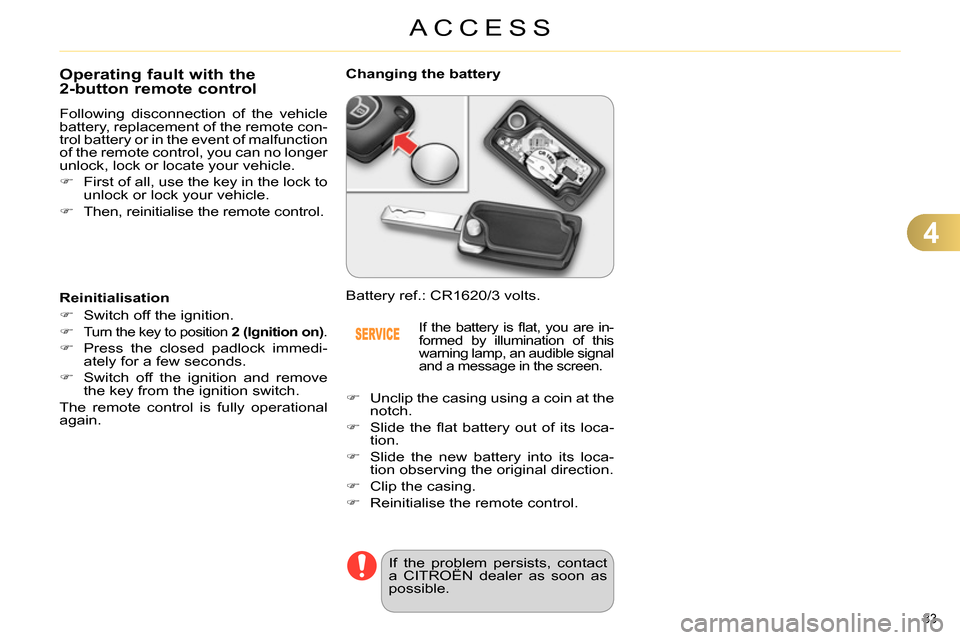
again. Battery ref.: CR1620/3 volts.
Changing the battery
If the battery is fl at, you are in-
formed by illumination of this
warning lamp, an audible signal
and a message in the screen.
Unclip the casing using a coin at the
notch.
Slide the fl at battery out of its loca-
tion.
Slide the new battery into its loca-
tion observing the original direction.
Clip the casing.
Reinitialise the remote control.
If the problem persists, contact
a CITROËN dealer as soon as
possible.
Page 86 of 340
4
ACCESS
84
Operating fault with the
3-button remote control
In the event of a malfunction with the
remote control, you can no longer un-
lock, lock or locate your vehicle.
First of all, use the key in the lock to
unlock or lock your vehicle.
Then, reinitialise the remote control.
Reinitialisation
Switch off the ignition and remove
the ignition key.
Press the closed padlock immedi-
ately for a few seconds.
Turn the key to position 2 (Ignition
on)
.
Switch off the ignition and remove
the key from the ignition switch.
The remote control is fully operational
again. Battery ref.: CR2032/3 volts.
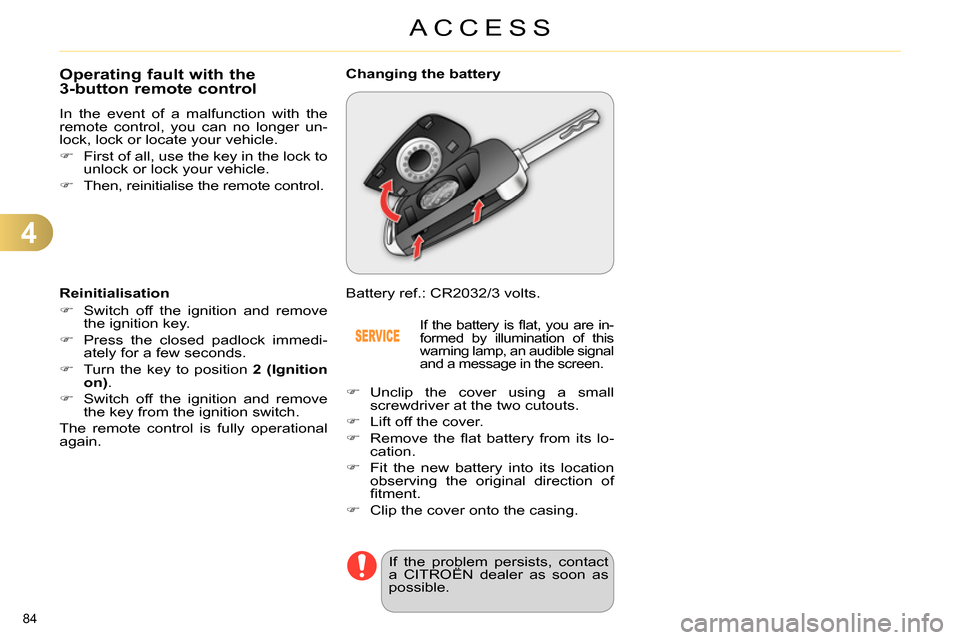
Changing the battery
If the battery is fl at, you are in-
formed by illumination of this
warning lamp, an audible signal
and a message in the screen.
Unclip the cover using a small
screwdriver at the two cutouts.
Lift off the cover.
Remove the fl at battery from its lo-
cation.
Fit the new battery into its location
observing the original direction of
fi tment.
Clip the cover onto the casing.
If the problem persists, contact
a CITROËN dealer as soon as
possible.
Page 89 of 340
4
ACCESS
87
Emergency control
System allowing the doors to be locked
and unlocked manually in the event of
a malfunction of the central locking sys-
tem or battery failure.
Locking the driver's door
Insert the key in the door lock, then
turn it to the rear.
You can also apply the procedure de-
scribed for the passenger doors.
Unlocking the driver's door
Insert the key in the door lock, then
turn it to the front.
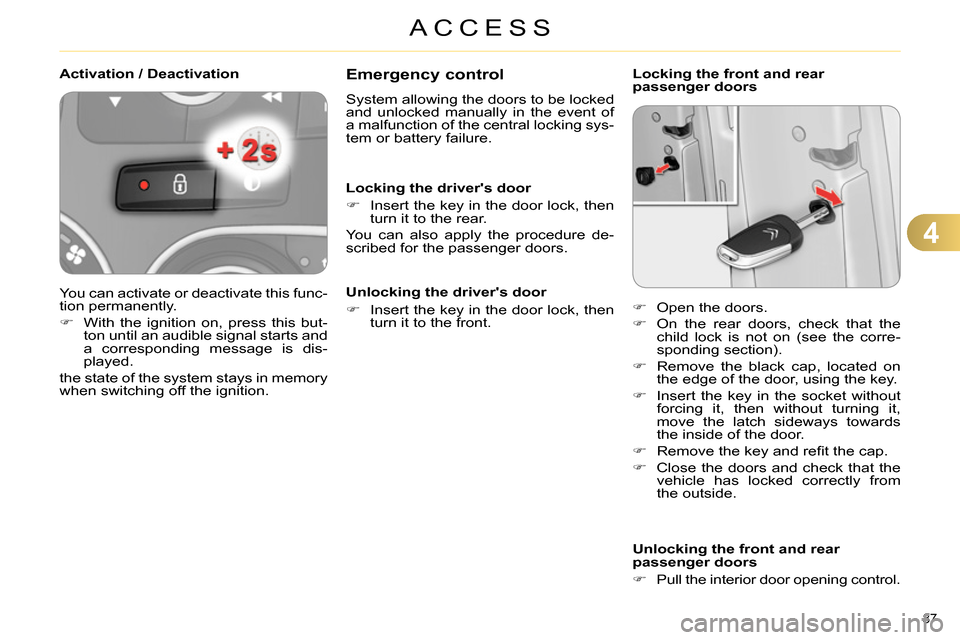
Locking the front and rear
passenger doors
Unlocking the front and rear
passenger doors
Pull the interior door opening control.
Open the doors.
On the rear doors, check that the
child lock is not on (see the corre-
sponding section).
Remove the black cap, located on
the edge of the door, using the key.
Insert the key in the socket without
forcing it, then without turning it,
move the latch sideways towards
the inside of the door.
Remove the key and refi t the cap.
Close the doors and check that the
vehicle has locked correctly from
the outside.
Activation / Deactivation
You can activate or deactivate this func-
tion permanently.
With the ignition on, press this but-
ton until an audible signal starts and
a corresponding message is dis-
played.
the state of the system stays in memory
when switching off the ignition.
Page 97 of 340
4
ACCESS
95
FUEL TANK
Capacity of the tank: approximately
60 litres.
When the low fuel level in the
tank is reached, this warning
lamp comes on in the instru-
ment panel, accompanied by an
audible warning and the display
of an alert message. When it
fi rst comes on, around 6 litres
of fuel remain in the tank.
Until suffi cient fuel has been added,
every time the ignition is switched on,
this warning lamp appears, accompa-
nied by an audible signal and an alert
message. When driving, this audible
signal and the display of this alert mes-
sage are repeated with increasing fre-
quency, as the level drops towards 0
.
You must refuel as soon as possible to
avoid running out.
If you run out of fuel (Diesel), refer also
to "Checks".
Low fuel level
Refuelling
Additions of fuel must be of at least
5 litres to be registered by the fuel
gauge.
Opening the fi ller cap may result in an
inrush of air. This vacuum is entirely
normal and results from the sealing of
the fuel system.
If you have put in the wrong
fuel for your vehicle, you must
have
the tank drained and re-
fi lled with the correct fuel be-
fore you start the engine.
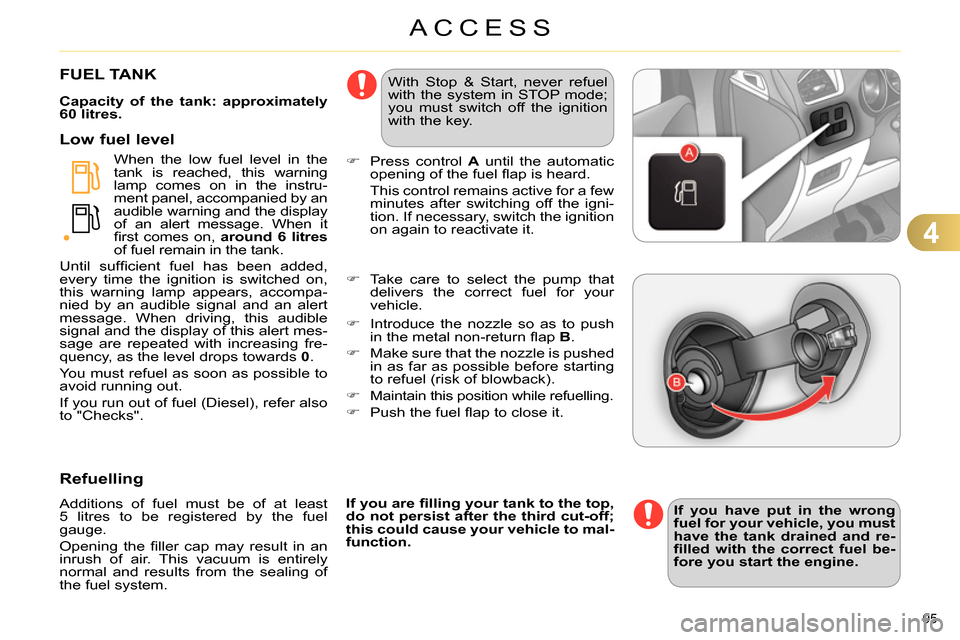
Press control A
until the automatic
opening of the fuel fl ap is heard.
This control remains active for a few
minutes after switching off the igni-
tion. If necessary, switch the ignition
on again to reactivate it.
If you are fi lling your tank to the top,
do not persist after the third cut-off;
this could cause your vehicle to mal-
function.
Take care to select the pump that
delivers the correct fuel for your
vehicle.
With Stop & Start, never refuel
with the system in STOP mode;
you must switch off the ignition
with the key.
Introduce the nozzle so as to push
in the metal non-return fl ap B.
Make sure that the nozzle is pushed
in as far as possible before starting
to refuel (risk of blowback).
Maintain this position while refuelling.
Push the fuel fl ap to close it.
Page 103 of 340
5
VISIBILITY
101
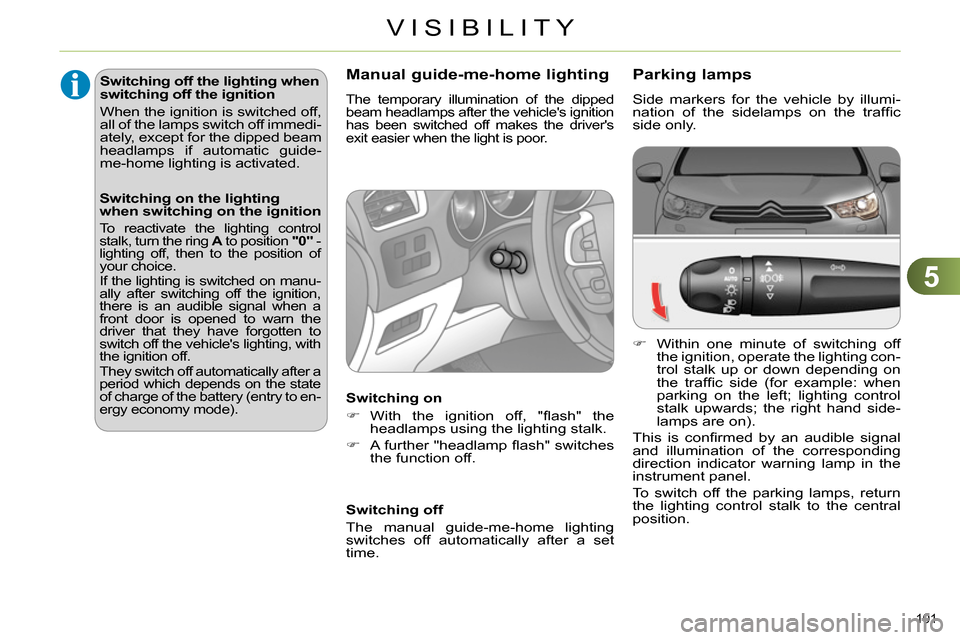
Parking lamps
Side markers for the vehicle by illumi-
nation of the sidelamps on the traffi c
side only.
Within one minute of switching off
the ignition, operate the lighting con-
trol stalk up or down depending on
the traffi c side (for example: when
parking on the left; lighting control
stalk upwards; the right hand side-
lamps are on).
This is confi rmed by an audible signal
and illumination of the corresponding
direction indicator warning lamp in the
instrument panel.
To switch off the parking lamps, return
the lighting control stalk to the central
position.
Switching off the lighting when
switching off the ignition
When the ignition is switched off,
all of the lamps switch off immedi-
ately, except for the dipped beam
headlamps if automatic guide-
me-home lighting is activated.
Manual guide-me-home lighting
The temporary illumination of the dipped
beam headlamps after the vehicle's ignition
has been switched off makes the driver's
exit easier when the light is poor.
Switching on
With the ignition off, "fl ash" the
headlamps using the lighting stalk.
A further "headlamp fl ash" switches
the function off.
Switching off
The manual guide-me-home lighting
switches off automatically after a set
time.
Switching on the lighting
when switching on the ignition
To reactivate the lighting control stalk, turn the ring A
to position "0"
- lighting off, then to the position of
your choice.
If the lighting is switched on manu-
ally after switching off the ignition,
there is an audible signal when a
front door is opened to warn the
driver that they have forgotten to
switch off the vehicle's lighting, with
the ignition off.
They switch off automatically after a
period which depends on the state
of charge of the battery (entry to en-
ergy economy mode).
Page 104 of 340
5
VISIBILITY
102
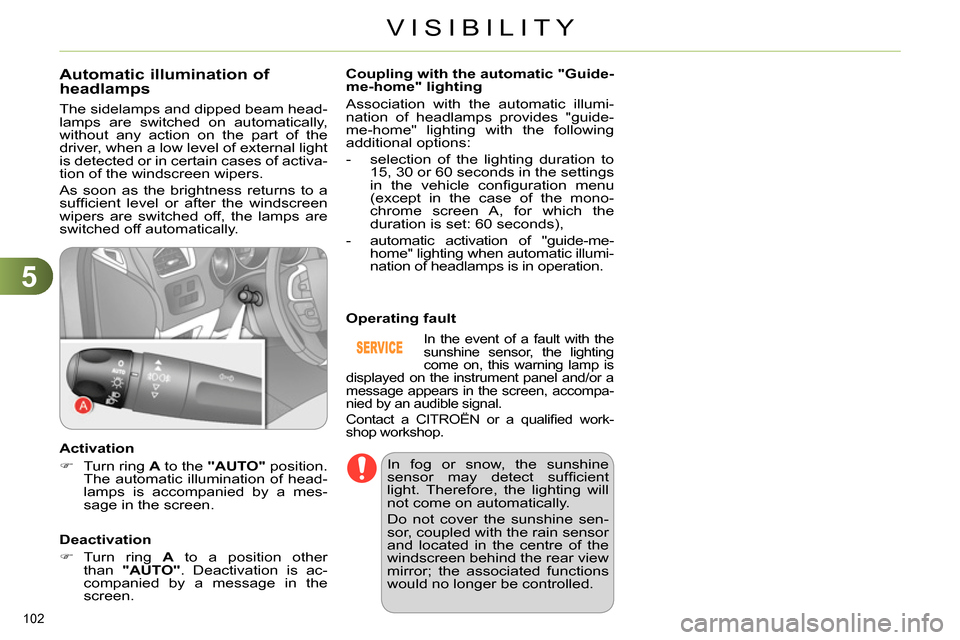
Automatic illumination of
headlamps
The sidelamps and dipped beam head-
lamps are switched on automatically,
without any action on the part of the
driver, when a low level of external light
is detected or in certain cases of activa-
tion of the windscreen wipers.
As soon as the brightness returns to a
suffi cient level or after the windscreen
wipers are switched off, the lamps are
switched off automatically.
Activation
Turn ring A
to the "AUTO"
position.
The automatic illumination of head-
lamps is accompanied by a mes-
sage in the screen.
Deactivation
Turn ring A
to a position other
than "AUTO"
. Deactivation is ac-
companied by a message in the
screen.
Coupling with the automatic "Guide-
me-home" lighting
Association with the automatic illumi-
nation of headlamps provides "guide-
me-home" lighting with the following
additional options:
- selection of the lighting duration to
15, 30 or 60 seconds in the settings
in the vehicle confi guration menu
(except in the case of the mono-
chrome screen A, for which the
duration is set: 60 seconds),
- automatic activation of "guide-me-
home" lighting when automatic illumi-
nation of headlamps is in operation.
In the event of a fault with the
sunshine sensor, the lighting
come on, this warning lamp is
displayed on the instrument panel and/or a
message appears in the screen, accompa-
nied by an audible signal.
Contact a CITROËN or a qualifi ed work-
shop workshop.
Operating fault
In fog or snow, the sunshine
sensor may detect suffi cient
light. Therefore, the lighting will
not come on automatically.
Do not cover the sunshine sen-
sor, coupled with the rain sensor
and located in the centre of the
windscreen behind the rear view
mirror; the associated functions
would no longer be controlled.
Page 164 of 340
9
DRIVING
162
Moving off
With your foot on the brake, select
position P
or N
.
Start the engine.
If this procedure is not followed, there
is an audible signal, accompanied by a
message in the multifunction screen.
With the engine running, press the
brake pedal.
Release the parking brake, unless it
is programmed to automatic mode.
Select position R
, D
or M
,
Gradually release the brake pedal.
The vehicle moves off immediately.
If position N
is engaged inad-
vertently while driving, allow the
engine to return to idle then en-
gage position D
to accelerate.
When the engine is running at
idle, with the brakes released,
if position R
, D
or M
is selected,
the vehicle moves even without
the accelerator being pressed.
When the engine is running,
never leave children in the ve-
hicle without supervision.
When carrying out maintenance
with the engine running, apply
the parking brake and select po-
sition P
.
Automatic operation
Select position D
for automatic
changing of the six gears.
The gearbox then operates in auto-
adaptive mode, without any intervention
on the part of the driver. It continuously
selects the most suitable gear accord-
ing to the style of driving, the profi le of
the road and the load in the vehicle.
For maximum acceleration without
touching the lever, press the accelera-
tor pedal down fully (kick down). The
gearbox changes down automatically
or maintains the gear selected until the
maximum engine speed is reached.
On braking, the gearbox changes down
automatically to provide effi cient engine
braking.
If you release the accelerator sharply,
the gearbox will not change to a higher
gear for safety reasons.
Never select position N
while the
vehicle is moving.
Never select positions P
or R
unless the vehicle is completely
stationary.
Sport and snow programmes
These two special programmes supple-
ment the automatic operation in very
specifi c conditions of use.
Sport programme "S"
Press button "S"
, after starting the
engine.
The gearbox automatically favours a
dynamic style of driving.
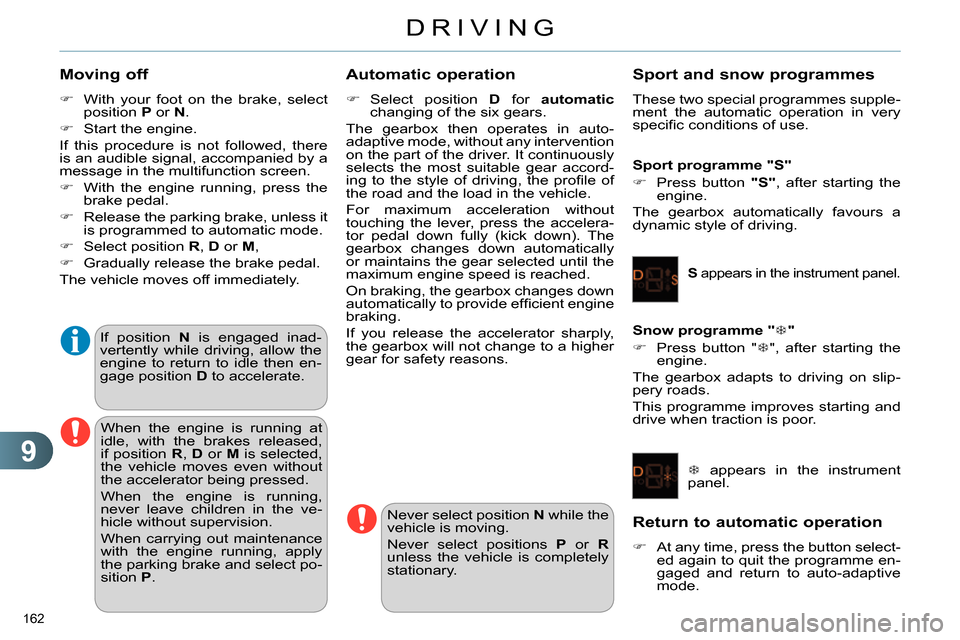
S
appears in the instrument panel.
Snow programme "
"
Press button "
", after starting the
engine.
The gearbox adapts to driving on slip-
pery roads.
This programme improves starting and
drive when traction is poor.
appears in the instrument
panel.
Return to automatic operation
At any time, press the button select-
ed again to quit the programme en-
gaged and return to auto-adaptive
mode.