headlamp Citroen C4 DAG 2014.5 2.G Owner's Guide
[x] Cancel search | Manufacturer: CITROEN, Model Year: 2014.5, Model line: C4 DAG, Model: Citroen C4 DAG 2014.5 2.GPages: 340, PDF Size: 12.89 MB
Page 178 of 340
1010
176
C4-2_en_Chap10_verification_ed01-2014
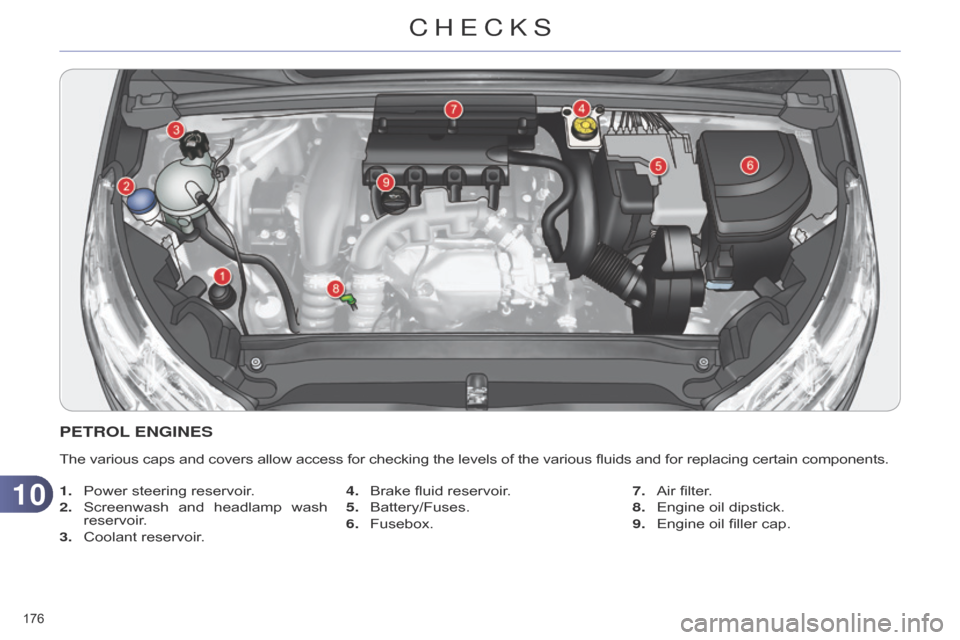
PETROL ENGINES
The various caps and covers allow access for checking the levels of the various fluids and for replacing certain components.
1.
Power
steering reservoir.
2.
Screenwash
and
headlamp
wash
reservoir
.
3.
Coolant
reservoir. 4.
Brake
fluid reservoir.
5.
Battery/Fuses.
6.
Fusebox.7.
Air
filter.
8.
Engine
oil dipstick.
9.
Engine
oil filler cap.
CHECKS
Page 179 of 340
1010
177
C4-2_en_Chap10_verification_ed01-2014
* According to engine.
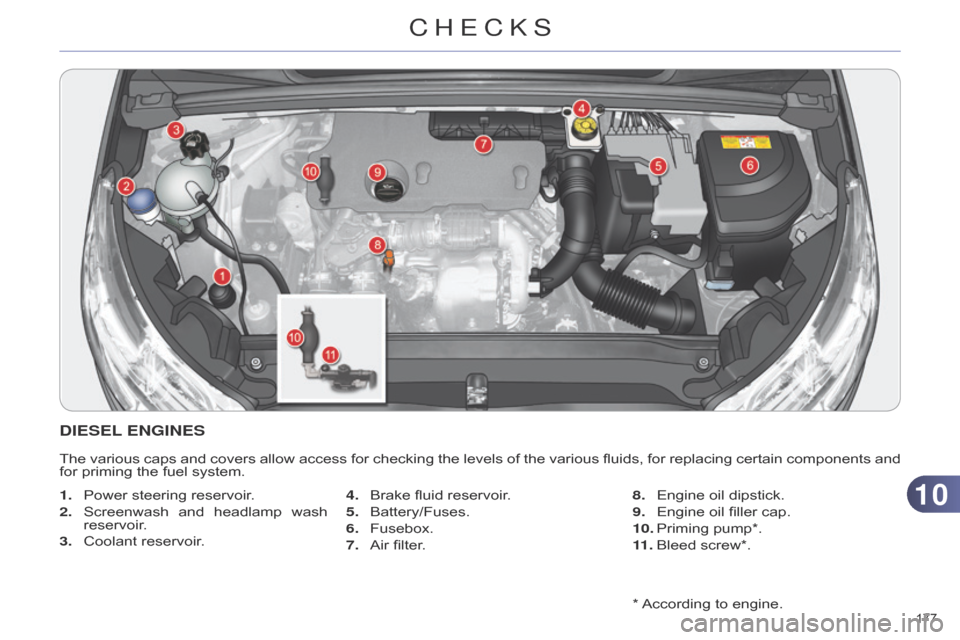
DIESEL ENGINES
The various caps and covers allow access for checking the levels of the various fluids, for replacing certain components and for
priming the fuel system.
1.
Power
steering reservoir.
2.
Screenwash
and
headlamp
wash
reservoir
.
3.
Coolant
reservoir. 4.
Brake
fluid reservoir.
5.
Battery/Fuses.
6.
Fusebox.
7.
Air
filter.8.
Engine
oil dipstick.
9.
Engine
oil filler cap.
10.
Priming
pump*.
11 .
Bleed
screw*.
CHECKS
Page 182 of 340
1010
180
C4-2_en_Chap10_verification_ed01-2014
Used products
Avoid prolonged contact of used oil
or fluids with the skin.
Most
of
these
fluids
are
harmful
to
health
or
indeed
very
corro
-
sive.
Do
not
discard
used
oil
or
fluids
into
sewers or onto the ground.
Take
used
oil
to
a
CITROËN
dealer
or
a
qualified
workshop
(France)
or
to
an
authorised
waste
disposal site.
Additive level (Diesel with
particle emissions filter)
The additive reservoir low level is indi -
cated by:
Topping up
The
reservoir
must
be
topped
up
with
-
out
delay
by
a
CITROËN
dealer
or
a
qualified
workshop.
-
fixed
illumination
of
the
par
-
ticle
emissions
filter
warning lamp,
accompanied
by
an
au
-
dible
signal
and
a
message that
the
particle
emissions filter
additive level is too low.
Screenwash / headlamp wash
fluid levelSpecification of the fluid
To
ensure
optimum
cleaning
and
to avoid
freezing,
the
fluid
should
never
be topped
up or replaced by plain water.
In
wintry
conditions,
the
use
of
a
fluid
with
an
ethyl
alcohol
or
methanol
base
is
recommended.
To
check
the
level
or
top
up
the
fluid
on
vehicle
fitted
with
headlamp
washers,
immobilise
the
vehicle
and
switch
of
the
engine.
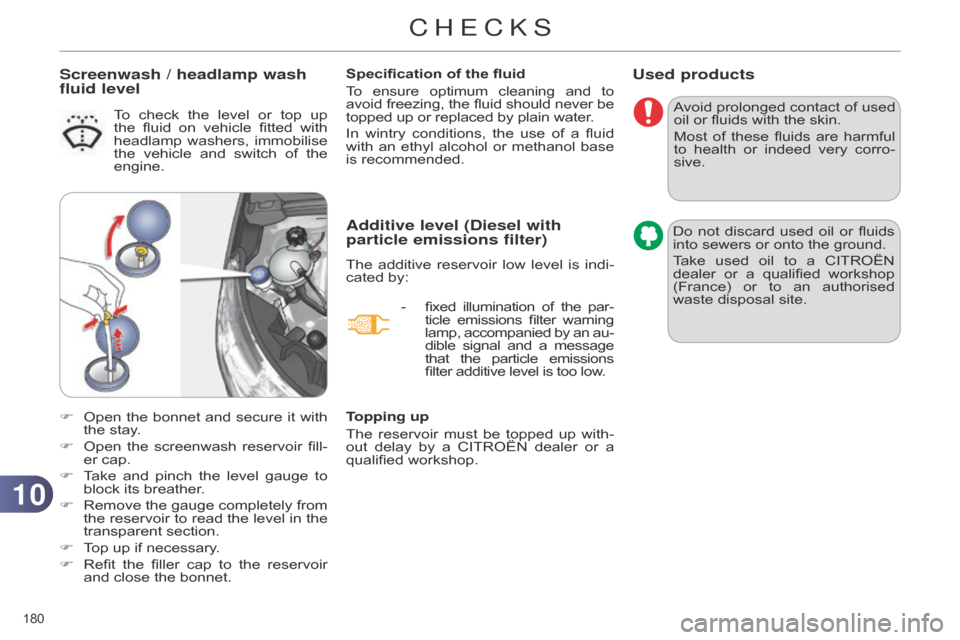
F
Open
the
bonnet
and
secure
it
with
the
stay.
F
Open
the
screenwash
reservoir
fill
-
er
cap.
F
T
ake
and
pinch
the
level
gauge
to
block
its
breather.
F
Remove
the
gauge
completely
from
the
reservoir
to
read
the
level
in
the
transparent
section.
F
T
op
up
if
necessary.
F
Refit
the
filler
cap
to
the
reservoir
and
close
the
bonnet.
CHECKS
Page 204 of 340
1111
202
C4-2_en_Chap11_info-pratique_ed01-2014
CHANGING A BULB
The headlamps are fitted with polycarbonate
glass with a pro -
tective
coating:
F
do not clean them using a
dry or abrasive cloth,
nor
with a detergent or solvent
product,
F
use
a
sponge
and
soapy
wa
-
ter
or a pH neutral product,
F
when
using
a
high
pressure
washer
on
persistent
marks,
do
not
keep
the
lance
direct
-
ed
towards
the
lamps
or
their
edges
for
too
long,
so
as
not
to
damage
their
protective
coating
and seals.
Changing
a
bulb
should
only
be
done
after
the
headlamp
has
been
switched
of
f
for
several
minutes
(risk of serious burns).
F
Do
not
touch
the
bulb
directly
with
your
fingers,
use
a
lint-
free
cloth.
It
is
imperative
to
use
only
anti-
ultraviolet
(UV)
type
bulbs
to
avoid
damaging the headlamp.
Always
replace
a
failed
bulb
with
a
new
bulb
with
the
same
type
and
specification. Risk of electrocution
Xenon
bulbs
(D1S-35W)
must
be replaced
by
a
CITROËN
dealer or
a qualified workshop.
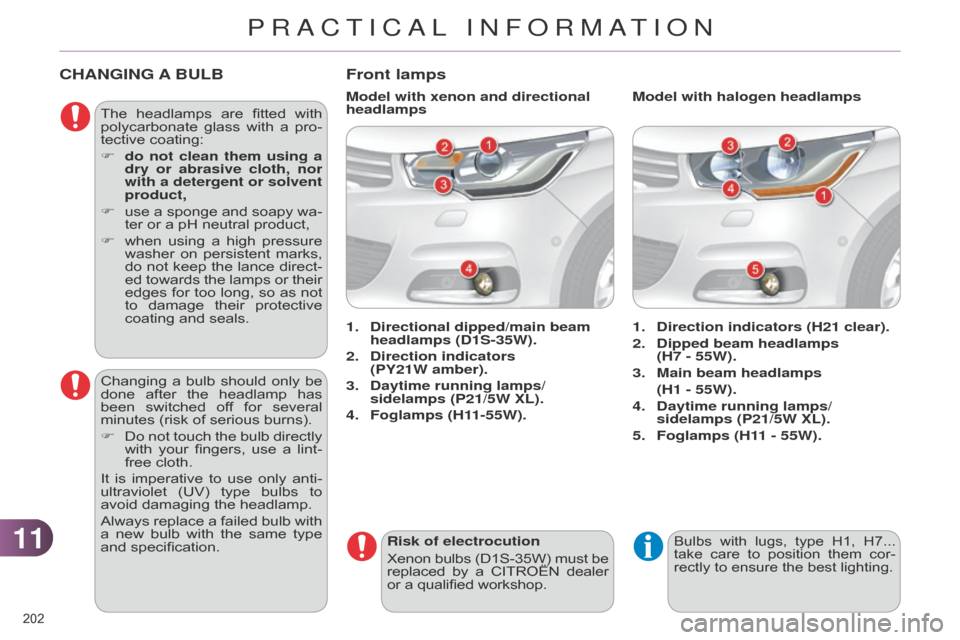
Front lamps
1. Direction indicators (H21 clear).
2.
Dipped beam headlamps
(H7 - 55W).
3.
Main beam headlamps
(H1 - 55W).
4.
Daytime running lamps/
sidelamps (P21/5W XL).
5.
Foglamps (H1
1 - 55W).
1.
Directional dipped/main beam
headlamps (D1S-35W).
2.
Direction indicators
(PY21W
amber).
3.
Daytime running lamps/
sidelamps (P21/5W XL).
4.
Foglamps (H1
1-55W). Model with halogen headlamps
Model with xenon and directional
headlamps
Bulbs with lugs, type H1, H7... take
care to position them cor -
rectly
to ensure the best lighting.
PRACTICAL INFORMATION
Page 205 of 340
1111
203
C4-2_en_Chap11_info-pratique_ed01-2014
Amber coloured bulbs, such as the
direction indicators, must be
replaced
with
bulbs
of
identical
specifications
and colour.
When
refitting,
close
the
protec
-
tive cover carefully to preserve
the
sealing of the headlamp.
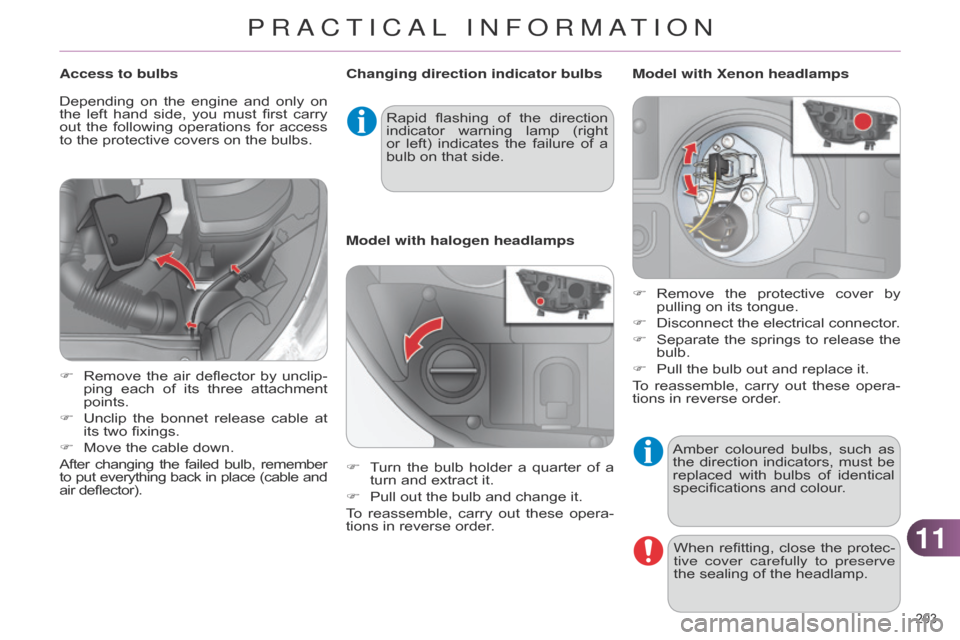
Changing direction indicator bulbs
Model with halogen headlamps
Rapid
flashing
of
the
direction
indicator
warning
lamp
(right
or
left)
indicates
the
failure
of
a
bulb
on
that
side.
Access to bulbs
F
Remove
the
air
deflector
by
unclip
-
ping
each
of
its
three
attachment
points.
F
Unclip
the
bonnet
release
cable
at
its
two
fixings.
F
Move
the
cable
down.
After
changing
the
failed
bulb,
remember to
put
everything
back
in
place
(cable
and air
deflector).
Depending
on
the
engine
and
only
on
the
left
hand
side,
you
must
first
carry
out
the
following
operations
for
access
to
the
protective
covers
on
the
bulbs.
F
T
urn
the
bulb
holder
a
quarter
of
a
turn
and
extract
it.
F
Pull
out
the
bulb
and
change
it.
To
reassemble,
carry
out
these
opera
-
tions
in
reverse
order. Model with Xenon headlamps
F
Remove
the
protective
cover
by
pullin
g on its tongue.
F
Disconnect
the electrical connector.
F
Separate
the
springs
to
release
the
bulb.
F
Pull
the bulb out and replace it.
To
reassemble,
carry
out
these
opera
-
tions
in reverse order.
PRACTICAL INFORMATION
Page 206 of 340

1111
204
C4-2_en_Chap11_info-pratique_ed01-2014
Changing dipped beam headlamp
bulbs (only on models with halogen
headlamps)Changing daytime running lamp/
sidelamp bulbs
F
Remove
the
protective
cover
by
pullin
g on the tab.
F
Disconnect
the bulb connector.
F
T
urn
the
bulb
holder
a
quarter
of
a
turn
and extract it.
F
Pull
the bulb and change it.
To
refit,
carry
out
these
operations
in
reverse
order.
F
Remove
the
protective
cover
by
pullin
g on the tab.
F
Disconnect
the bulb connector.
F
Spread
the
springs
to
release
the
bulb.
F
Extract
the bulb and change it.
To
reassemble,
carry
out
these
operations in
reverse order. Changing main beam headlamp
bulbs (only on models with halogen
headlamps)
F
Remove
the
protective
cover
by
pullin
g on the tab.
F
Disconnect
the bulb connector.
F
Squeeze
the
springs
to
release
the
bulb.
F
Pull
out the bulb and replace it.
To
reassemble,
carry
out
these
operations in
reverse order.
PRACTICAL INFORMATION
Page 213 of 340

1111
211
C4-2_en_Chap11_info-pratique_ed01-2014
Fuse N° RatingFunctions
F19 30 AWindscreen
wipers slow / fast speed.
F20 15 AFront
and rear screenwash pump.
F21 20 AHeadlamp
wash pump.
F22 15 AHorn.
F23 15 ARight-hand
main beam headlamp.
F24 15 ALeft-hand
main beam headlamp.
F27 5 ALeft-hand
dipped headlamp.
F28 5 ARight-hand
dipped headlamp.
Engine compartment fuses
The fusebox is placed in the engine compartment
near the battery (left-
hand
side).
Access to the fuses
F
Unclip
the cover.
F
Change
the
fuse
(see
correspond
-
ing
paragraph).
F
When
you
have
finished,
close
the
cover
carefully
to
ensure
sealing
of
the
fusebox. Fuse table
PRACTICAL INFORMATION
Page 217 of 340
1111
215
C4-2_en_Chap11_info-pratique_ed01-2014
LOAD REDUCTION MODE
System which manages the use of cer -
tain functions according to the level of
charge
remaining in the battery.
When the vehicle is being driven, the load
reduction function temporarily de -
activates certain functions, such as the
air
conditioning,
the
heated
rear
screen...
The deactivated functions are reactivat -
ed automatically as soon as conditions
permit.
ENERGY ECONOMY MODE
System which manages the period of use of certain functions to conserve a
sufficient
level of charge in the battery.
After
the
engine
has
stopped,
you
can
still
use
functions
such
as
the
audio
equipment,
windscreen
wipers,
dipped
beam
headlamps,
courtesy
lamps,
etc.
for
a
maximum
combined
period
of
thirty minutes.
Switching to economy mode
Once this period has elapsed, a message appears
in the screen indicating that the vehicle
has
switched
to
economy
mode and
the
active
functions
are
put
on
standby
.
If the telephone is being used at the
same time on the navigation
system,
it
will
be
interrupted
after 10
minutes.
A
flat
battery
prevents
the
en
-
gine
from
starting
(refer
to
the
corresponding
paragraph).
Exiting economy mode
These functions are reactivated auto -
matically the next time the vehicle is
driven.
F
In
order
to
resume
the
use
of
these functions
immediately
,
start
the
engine and
let it run for a few minutes.
The
time
available
to
you
will
then
be double
the
period
for
which
the
engine is left running. However , this period will
always be between five and thirty minutes.
This period may be greatly re -
duced if the battery is not fully
charged.
CHANGING A WIPER BLADE
Before removing a front wiper
blade
F Within one minute after switching of
f the ignition, operate the wiper
stalk
to
position
the
wiper
blades
vertically
on the windscreen.
Removing
F Raise the corresponding wiper arm.
F
Unclip
the wiper blade and remove it.
Fitting
F Put the corresponding new wiper blade
in place and clip it.
F
Fold
down the wiper arm carefully.
After fitting a front wiper blade
F Switch on the ignition.
F
Operate
the
wiper
stalk
again
to
park
the wiper blades.
PRACTICAL INFORMATION
Page 283 of 340

10
281
C4-2_en_Chap13b_RT6_ed01-2014
CONFIGURATION
Press SETUP to display the "Configuration "
menu. Select "Choose colour"
and confirm to
select
the screen colour harmony and
the
map presentation mode:
- day mode,
- night mode,
-
automatic
day/night mode,
according
to whether the
headlamps
are on.
Select "Adjust luminosity "
and confirm
to
adjust the screen brightness.
Press "OK"
to save the changes.
The
settings for day and night are
independent.
Select "
Display configuration "
and
confirm.
Display configuration
Page 329 of 340
327
C4-2_en_Chap14_index-alpha_ed01-2014
ABS and EBFD
systems .................................. 123a
ccessories
............................... 221
Accessory
socket, 12V
......... 97,
98,
101,
105
AdBlue
® ..................................... 183
Additive, AdBlue .......... 23, 183, 186
Adjusting
headlamps
................... 87
Adjusting
head
restraints
................................... 59
Adjusting
seat belt
height
.............................. 126,
127
Adjusting
the steering
wheel
........................................ 65
Advice
on
driving
..................................... 133
Airbags
................................ 22,
129
Airbags,
curtain.................. 131, 132
Airbags,
front
..................... 129,
132
Airbags,
lateral................... 131, 132
Air
conditioning
............................ 10
Air
conditioning,
automatic
...................... 48,
49, 52
Air
conditioning,
manual
................................. 48-50
Air
filter
...................................... 181
Air
flow
......................................... 10a
ir vents....................................... 47
Alarm
........................................... 74
Anti-lock
braking
system
(ABS)
.......................... 123
Anti-pinch..................................... 78
Anti-theft
.................................... 134
Armrest,
front
....................... 99,
100
Armrest,
rear
.............................. 103a
ssistance call
.......................... 125,
235,
236Audible
warning
......................... 122
Audio
streaming
( b luetooth)
.............. 278,
308, 310
Audio system
................. 35,
37, 293
Automatic illumination
of headlamps ...................... 82, 85
Automatic operation
of
hazard warning lamps
........ 122
Automatic
rain sensitive
windscreen
wipers
.............. 90,
91
Auxiliary
socket.................. 279, 307
Auxiliary
sockets
.......................... 97
A
Backup
starting
.......................... 212b
attery
........................ 181,
212-214
Battery,
charging
........................ 214
Battery
, remote
control
.................................. 69-71
Black
panel
.................................. 33
Blind
spot
sensors
................................... 158b
lue H d i
............................ 174,
183
b
luetooth (hands-free)
.................... 260,
309
b
luetooth (telephone)
............................. 260b
onnet
....................................... 175b
onnet stay................................ 175
b
oot
............................................. 77
Boot
lamp
............................ 94,
106
Brake
discs
................................ 182
Brake
lamps............................... 206
Brake
pads
................................ 182
Brakes
....................................... 182
Braking
assistance
system
.................................... 123
B
C
Capacity
, fuel tank
..................... 171
C
d
............................................. 302
CD
MP3
............................. 303,
304
Central locking
....................... 68,
72
Centre console ............................ 98
Changing a bulb ................ 202, 206
Changing a fuse ........................ 208
Changing
a wheel
...................... 195
Changing
a wiper blade
....... 92,
215
Changing
the date
........... 35,
37, 42
Changing
the remote
control battery
..................... 69,
70
Changing
the time
..... 32,
35, 37, 42
Checking
levels
.................. 178-180
Checking
the engine
oil level...................................... 29
Checking
tyre pressures
(using
the kit)
.......................... 190
Checks.............................. 176,
177,
181,
182
Child
lock
................................... 121
Children
...................... 1
15, 118, 119
Child
seats
....................... 108,
109,
113-115,
120
Child
seats, conventional............11 4
C
ITR o Ë n Localised
a
ssistance Call
....................... 236
C
ITR o Ë n Localised
Emergency
Call
...................... 236
Clock
............................................ 32
Closing
the boot..................... 68, 77
Closing
the doors................... 68, 76
Cold
climate screen
................... 216
Colour screen
.............................. 41
Connectors,
audio
....... 97,
305, 307
Coolant level
.............................. 179
Courtesy
lamps...................... 86, 93
aLPHabETICaL IndEx