heating Citroen C4 DAG 2014.5 2.G Owner's Manual
[x] Cancel search | Manufacturer: CITROEN, Model Year: 2014.5, Model line: C4 DAG, Model: Citroen C4 DAG 2014.5 2.GPages: 340, PDF Size: 12.89 MB
Page 28 of 340

26
C4-2_en_Chap01_controle-de-marche_ed01-2014
Warning/indicator lampis onCause Action/Observations
Parking brake fixed.The
parking
brake
is
applied
or
not properly released.Release
the parking brake to switch off
the
warning lamp, keeping your foot on
the
brake pedal.
Observe
the safety recommendations.
For
more information on the parking
brake,
refer to the "Parking brake" and
"Electric
parking brake" sections.
Electric
parking brake fixed.The
electric parking brake is
applied.Release
the electric parking brake to
switch
off the warning lamp: with your
foot
on the brake pedal, pull the electric
brake
control.
Observe
the safety recommendations.
For
more information on the electric
parking
brake, refer to the "Driving"
section.
Deactivation of the automatic functions of the electric
parking brake fixed.The
"automatic application"
(on
switching off the engine)
and
"automatic release"
functions
are deactivated or
faulty
.Activate
the function (according to
country)
via the vehicle configuration
menu
or contact a CITROËN dealer or a
qualified
workshop.
Diesel engine pre-heating fixed.The
key is at position 2
(ignition
on) in the ignition
switch.W
ait until the warning lamp goes off
before
starting.
The
period of illumination of the warning
lamp
is determined by the climatic
conditions
(up to about thirty seconds in
extreme
climatic conditions).
If
the engine does not start, switch the
ignition
off and then on, wait until the
warning
lamp goes off again, then start
the
engine.
1
MONITORING
Page 49 of 340
33
47
C4-2_en_Chap03_confort_ed01-2014
VENTILATION
Air intake
The air circulating in the passenger compartment
is filtered and originates
either
from
the
outside
via
the
grille lo
-
cated
at
the
base
of
the
windscreen
or
from
the
inside
in
air
recirculation
mode.
Air treatment
The incoming air follows various routes depending
on the controls selected by
the
driver:
-
direct
arrival
in
the
passenger
com
-
partment
(air intake),
-
passage
through
a
heating
circuit
(heating),
-
passage
through
a
cooling
circuit
(air
conditioning).
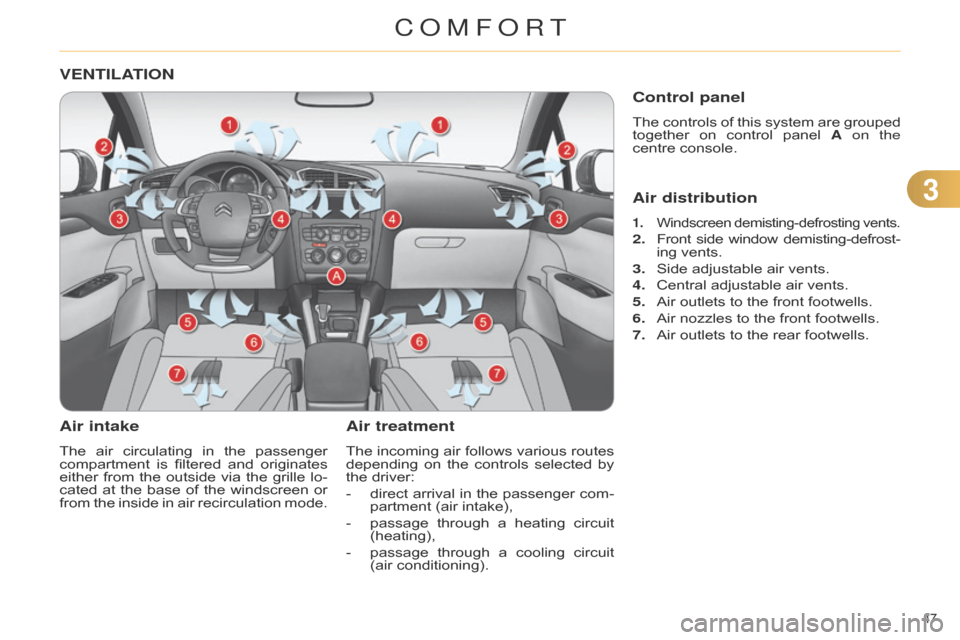
Control panel
The controls of this system are grouped together
on control panel A on the
centre
console.
Air distribution
1. Windscreen demisting-defrosting vents.
2. Front side window demisting-defrost -
ing vents.
3.
Side
adjustable air vents.
4.
Central
adjustable air vents.
5.
Air
outlets to the front footwells.
6.
Air
nozzles to the front footwells.
7.
Air
outlets to the rear footwells.
COMFORT
Page 50 of 340

33
48
C4-2_en_Chap03_confort_ed01-2014
RECOMMENDATIONS FOR VENTILA TION AND AIR CONDITIONING
In order for these systems to be fully ef fective, follow the operation and maintenance
guidelines below:
F
T
o
obtain
an
even
air
distribution,
take
care
not
to
obstruct
the
exterior
air
intake
grille
s
located
at
the
base
of
the
windscreen,
the
nozzles,
the
vents
and
the
air
outlets,
as
well
as
the
air
extractor
located
in
the
boot.
F
Do
not
cover
the
sunshine
sensor
,
located
on
the
dashboard;
this
is
used
for regulation of the air conditioning system.
F
Operate
the
air
conditioning
system
for
at
least
5
to
10
minutes,
once
or
twice
a month to keep it in perfect working order.
F
Ensure
that
the
passenger
compartment
filter
is
in
good
condition
and
have
the filter elements replaced regularly.
W
e
recommend
the
use
of
a
combined
passenger
compartment
filter
.
Thanks
to
its
special
active
additive,
it
contributes
to
the
purification
of
the
air
breathed
by
the
occupants
and
the
cleanliness
of
the
passenger
compartment
(reduction
of
allergic
symptoms,
bad
odours
and
greasy
deposits).
F
T
o
ensure
correct
operation
of
the
air
conditioning
system,
you
are
also
advised
to
have
it
checked
regularly
as
recommended
in
the
mainte
-
nance
and warranty guide.
F
If
the
system
does
not
produce
cold
air
,
switch
it
of
f
and
contact
a
CITROËN
dealer or a qualified workshop.
When
towing
the
maximum
load
on
a
steep
gradient
in
high
temperatures,
switching
of
f
the
air
conditioning
increases
the
available
engine
power
and
so
improves the towing ability. If
after
an
extended
stop
in
sun
-
shine,
the
interior
temperature
is
very
high, first ventilate the pas -
senger compartment for a few moments.
Put
the
air
flow
control
at
a
set
-
ting
high
enough
to
quickly
change
the
air
in
the
passenger
compartment.
The
air
conditioning
system
does
not
contain
chlorine
and
does
not
present
any
danger
to
the
ozone layer.
The
condensation
created
by
the
air
conditioning
results
in
a
discharge
of
water
under
the
ve
-
hicle
which is perfectly normal.
Stop & Start
The
heating
and
air
conditioning
systems
only
work
when
the
engine
is
running.
T
o
maintain
a
comfortable
temperature
in
the
passenger
compart
-
ment,
you
can
temporarily
deactivate
the
Stop
&
Start
system
(see
the
corresponding
section).
COMFORT
Page 51 of 340
33
49
C4-2_en_Chap03_confort_ed01-2014
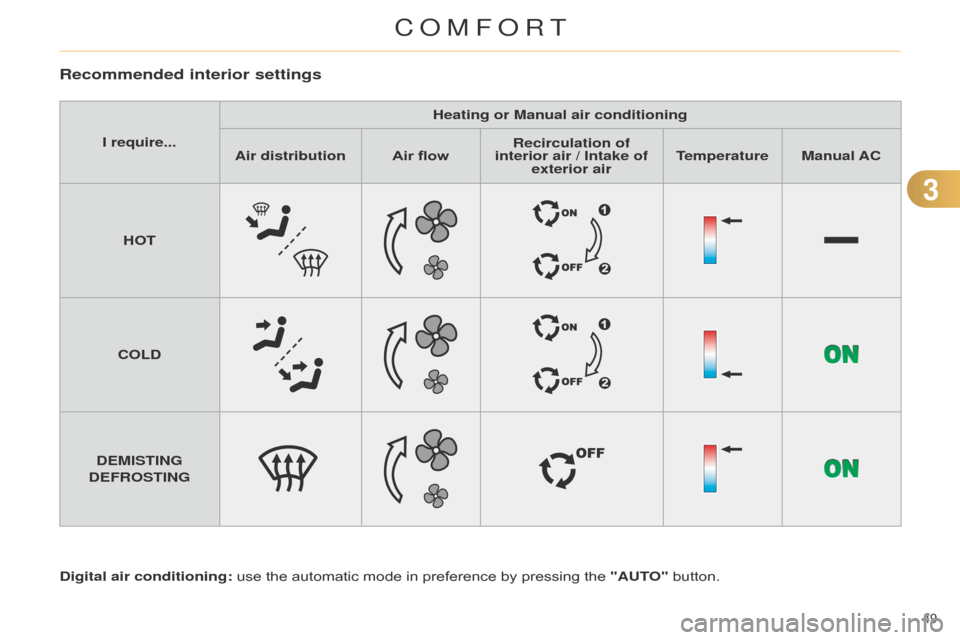
Recommended interior settings
Digital air conditioning: use the automatic mode in preference by pressing the "AUTO" button.
I require...
Heating or Manual air conditioning
Air distribution Air flowRecirculation of
interior air / Intake of exterior air T emperature
Manual AC
HOT
COLD
DEMISTING
DEFROSTING
COMFORT
Page 55 of 340
33
53
C4-2_en_Chap03_confort_ed01-2014
For maximum cooling or heating of
the passenger compartment,
it
is
possible
to
exceed
the
mini
-
mum
value
14
or
the
maximum
value
28.
F
T
urn control 2 or 3 to the left
until "LO"
is
displayed
or
to
the
right
until
"HI"
is
dis
-
played.
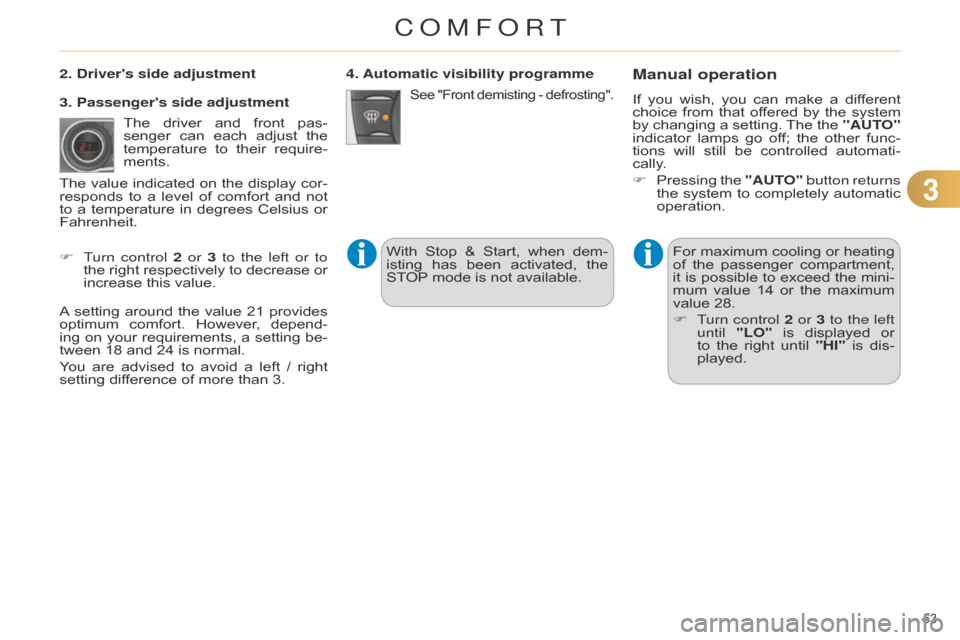
See "Front demisting - defrosting".
4. Automatic visibility programmeManual operation
If you wish, you can make a dif ferent choice
from that of fered by the system
by
changing
a
setting.
The
the
"AUT
O"
indicator
lamps
go
of
f;
the
other
func
-
tions
will
still
be
controlled
automati
-
cally.
F
Pressing
the
"AUT
O" button returns
the
system
to
completely
automatic
operation.
2. Driver's side adjustment
The
driver
and
front
pas
-
senger
can
each
adjust
the
temperature
to
their
require
-
ments.
F
T
urn control 2 or 3 to the left or to
the
right
respectively
to
decrease
or
increase
this
value.
A
setting
around
the
value
21
provides
optimum
comfort.
However
,
depend
-
ing
on
your
requirements,
a
setting
be
-
tween
18
and
24
is
normal.
You
are
advised
to
avoid
a
left
/
right
setting
difference
of
more
than
3.
3. Passenger's side adjustment
The
value
indicated
on
the
display
cor
-
responds
to
a
level
of
comfort
and
not
to
a
temperature
in
degrees
Celsius
or
Fahrenheit. With
Stop
&
Start,
when
dem
-
isting
has
been
activated,
the
ST
OP
mode
is
not
available.
COMFORT
Page 61 of 340
33
59
C4-2_en_Chap03_confort_ed01-2014
Additional adjustments
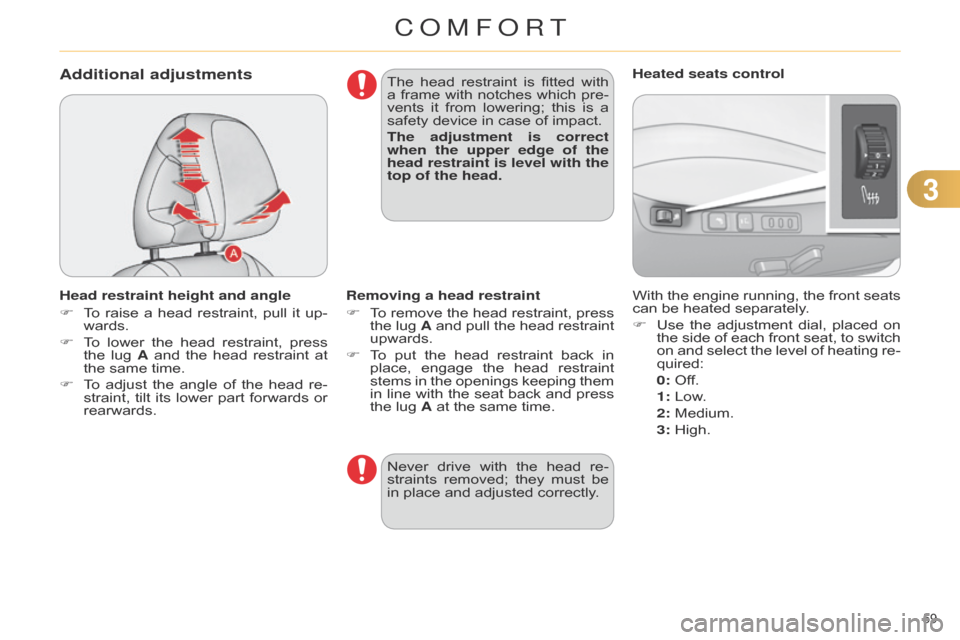
Head restraint height and angle
F
T
o
raise
a
head
restraint,
pull
it
up
-
wards.
F
T
o
lower
the
head
restraint,
press
the
lug
A
and
the
head
restraint
at
the
same time.
F
T
o
adjust
the
angle
of
the
head
re
-
straint,
tilt
its
lower
part
forwards
or
rearwards. The
head
restraint
is
fitted
with
a
frame
with
notches
which
pre
-
vents
it
from
lowering;
this
is
a
safety
device in case of impact.
The adjustment is correct
when the upper edge of the
head restraint is level with the
top of the head.
With the engine running, the front seats can
be heated separately.
F
Use
the
adjustment
dial,
placed
on
the
side
of
each
front
seat,
to
switch
on
and
select
the
level
of
heating
re
-
quired:
0:
Off.
1
: Low.
2
: Medium.
3
: High.
Heated seats control
Removing a head restraint
F
T
o
remove
the
head
restraint,
press
the
lug
A
and
pull
the
head
restraint
upwards.
F
T
o
put
the
head
restraint
back
in
place,
engage
the
head
restraint
stems
in
the
openings
keeping
them
in
line
with
the
seat
back
and
press
the
lug A at the same time.
Never
drive
with
the
head
re
-
straints
removed;
they
must
be
in
place and adjusted correctly.
COMFORT
Page 136 of 340
99
134
C4-2_en_Chap09_conduite_ed01-2014
Anti-theft protection
Electronic engine immobiliser
The
key
contains
an
electronic
chip
which
has
a
special
code.
When
the
ignition
is
switched
on,
this
code
must
be
recognised
for
engine
starting
to
be
authorised.
This
electronic
engine
immobiliser
locks
the
engine
management
system
a
few
minutes
after
the
ignition
is
switched
of
f
and
prevents
starting
of
the
engine
by
anyone
who does not have the key.
In the event of a fault, you
are
informed
by
illu
mina-
tion
of
this
warning
lamp,
an
audible
signal
and
a
message
in
the
screen.
In this case, your vehicle will not start;
contact
a
CITROËN
dealer
as
soon
as
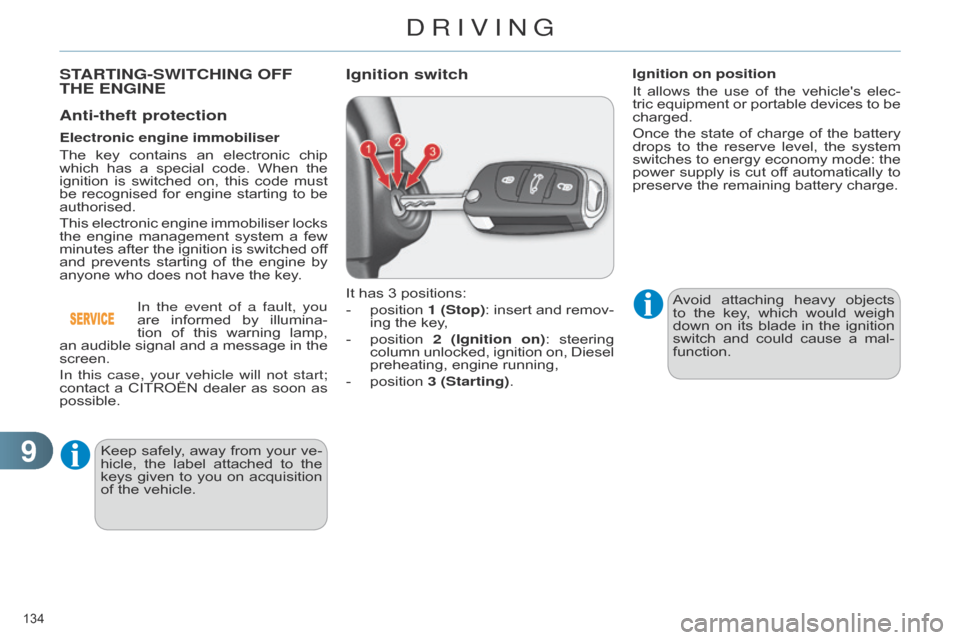
possible. It
has 3 positions:
-
position
1
(Stop):
insert
and
remov
-
ing
the key,
-
position
2 (Ignition on)
:
steering
column
unlocked,
ignition
on,
Diesel
preheating,
engine running,
-
position
3 (Starting).Avoid
attaching
heavy
objects
to
the
key
,
which
would
weigh
down
on
its
blade
in
the
ignition
switch
and
could
cause
a
mal
-
function.
Ignition on position
It
allows
the
use
of
the
vehicle's
elec
-
tric
equipment
or
portable
devices
to
be
charged.
Once
the state of charge of the battery drops
to the reserve level, the system
switches
to
energy
economy
mode:
the
power
supply
is
cut
of
f
automatically
to
preserve
the remaining battery charge.
Keep
safely
,
away
from
your
ve
-
hicle,
the
label
attached
to
the
keys
given
to
you
on
acquisition
of
the vehicle.
STARTING-SWITCHING OFF THE ENGINEIgnition switch
DRIVING
Page 137 of 340
99
135
C4-2_en_Chap09_conduite_ed01-2014
Starting the engine
With the parking brake applied and the gearbox
in neutral or position N or P:
F
depress
the
clutch
pedal
fully
(man
-
ual
gearbox),
or
F
press
the
brake
pedal
firmly
(elec
-
tronic
or automatic gearbox),
F
insert
the
key
into
the
ignition
switch;
the
system recognises the code,
F
unlock
the
steering
column
by
si
-
multaneously
turning
the
steering
and
the key.
In
certain
cases,
you
may
have
to
apply more force to the steer-
ing
(wheels
on
full
lock,
for
ex
-
ample).
F
With
a
petrol
engine,
operate
the
starter
motor
by
turning
the
key
to
position 3
without
pressing
the
ac
-
celerator
pedal,
until
the
engine
starts.
Once
the
engine
is
running,
release
the key. F
With
a
Diesel
engine,
turn
the
key
to position
2, ignition on, to operate the
engine pre-heating system.
Wait
until
this
warning
lamp
goes
of
f
in
the
instrument
panel
then
operate
the
starter
motor
by
turning
the
key
to
position 3
without
pressing
the
accel
-
erator
pedal,
until
the
engine
starts.
Once
the
engine
is
run
-
ning,
release the key.
In
wintry
conditions,
the
warning
lamp
can
stay
on
for
a
longer
pe
-
riod.
When
the
engine
is
hot,
the
warning
lamp
does
not
come
on.
If
the
engine
does
not
start
straight
away
,
switch
of
f
the
ig
-
nition.
W
ait
a
few
moments
be
-
fore
operating
the
starter
motor
again.
If
the
engine
does
not
start
after
several
attempts,
do
not
keep
trying:
you
risk
dam
-
aging
the
starter
motor
or
the
engine.
Contact
a
CITROËN
dealer
or a qualified workshop.In
temperate
conditions,
do
not
leave
the engine at idle to warm up
but move of f straight away
and
drive at moderate speed.
Never
leave
the
engine
running
in
an
enclosed
area
without
adequate
ventilation:
internal
combustion
engines
emit
toxic
exhaust
gases,
such
as
carbon
monoxide.
Danger
of
intoxica
-
tion
and death.
In
very
severe
wintry
conditions
(temperatures
below
-23°C),
to ensure the correct operation
and
durability
of
the
mechani
-
cal
components
of
your
vehicle,
engine
and
gearbox,
it
is
neces
-
sary
to
leave
the
engine
running
for
4 minutes before moving off.
DRIVING
Page 221 of 340
1111
219
C4-2_en_Chap11_info-pratique_ed01-2014
TOWING A TRAILER
We recommend the use of genu -
ine CITROËN towbars and their
harnesses
that
have
been
tested
and
approved
from
the
design
stage
of
your
vehicle,
and
that
the
fitting
of
the
towbar
is
en
-
trusted
to
a
CITROËN
dealer
or
a
qualified workshop.
If
the
towbar
is
not
fitted
by
a
CITROËN
dealer
,
it
must
still
be
fitted
in
accordance
with
the
vehicle
manufacturer's
instruc
-
tions.
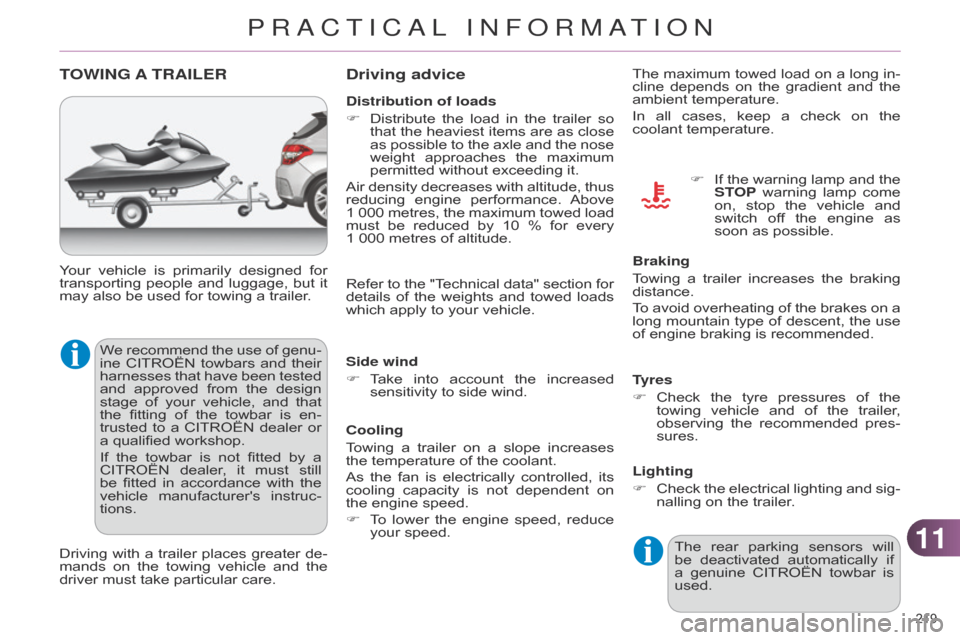
Your
vehicle
is
primarily
designed
for
transporting
people
and
luggage,
but
it
may
also be used for towing a trailer.
Driving
with
a
trailer
places
greater
de
-
mands
on
the
towing
vehicle
and
the
driver
must take particular care.
Driving advice
Distribution of loads
F
Distribute
the
load
in
the
trailer
so
that
the
heaviest
items
are
as
close
as
possible
to
the
axle
and
the
nose
weight
approaches
the
maximum
permitted
without exceeding it.
Air
density
decreases
with
altitude,
thus
reducing
engine
performance.
Above
1
000
metres,
the
maximum
towed
load
must
be
reduced
by
10
%
for
every
1 000
metres of altitude.
Side wind
F
T
ake
into
account
the
increased
sensitivity
to side wind.
Cooling
Towing
a
trailer
on
a
slope
increases
the
temperature of the coolant.
As
the
fan
is
electrically
controlled,
its
cooling
capacity
is
not
dependent
on
the
engine speed.
F
T
o
lower
the
engine
speed,
reduce
your
speed. The
maximum
towed
load
on
a
long
in
-
cline depends on the gradient and the ambient
temperature.
In all cases, keep a check on the
coolant
temperature.
F
If
the
warning
lamp
and
the
ST
OP
warning
lamp
come
on,
stop
the
vehicle
and
switch
of
f
the
engine
as
soon
as possible.
Braking
Towing
a
trailer
increases
the
braking
distance.
T
o
avoid
overheating
of
the
brakes
on
a
long
mountain
type
of
descent,
the
use
of
engine braking is recommended.
Tyres
F
Check
the
tyre
pressures
of
the
towing
vehicle
and
of
the
trailer
,
observing
the
recommended
pres
-
sures.
Lighting
F
Check
the
electrical
lighting
and
sig
-
nalling
on the trailer.
Refer
to
the
"T
echnical
data"
section
for
details
of
the
weights
and
towed
loads
which
apply to your vehicle.
The
rear
parking
sensors
will
be
deactivated
automatically
if
a
genuine
CITROËN
towbar
is
used.
PRACTICAL INFORMATION
Page 222 of 340
1111
220
C4-2_en_Chap11_info-pratique_ed01-2014
AUDIO PRE-EqUIPMENT
Your vehicle is equipped with certain factory-fitted
audio equipment:
-
a
dual-function
aerial
at
the
rear
of
the roof,
-
a
coaxial aerial cable,
-
basic
interference suppression,
-
cabling
for
speakers
in
the
front
doors and
tweeters in the dashboard,
-
cabling
for
speakers
in
the
rear
doors,
-
two
8-way connectors.
Before
installin
g
a
radio
unit
or
speakers
in
your
vehicle,
contact
a
CITROËN
dealer
or
a
qualified
workshop
to
obtain
a
suitable
wiring
harness.
n
ever use a separate wire to
connect
the
(+)
of
your
audio
equipment
(risk
of
discharging
of
the
battery).
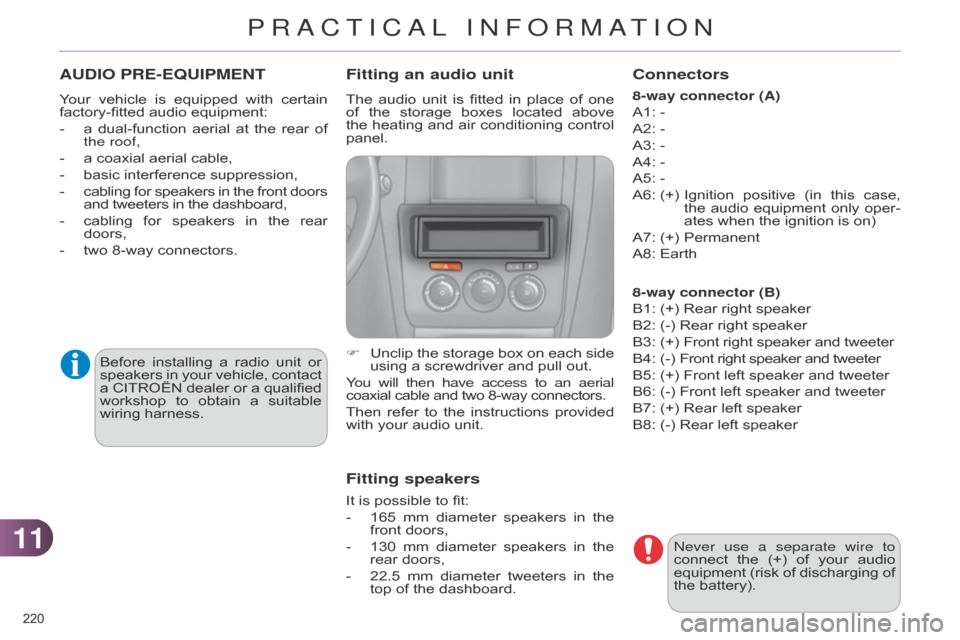
Fitting an audio unit
The audio unit is fitted in place of one of
the storage boxes located above
the
heating
and
air
conditioning
control
panel.
F
Unclip
the
storage
box
on
each
side
using
a screwdriver and pull out.
You will then have access to an aerial
coaxial
cable and two 8-way connectors.
Then
refer
to
the
instructions
provided
with
your audio unit.
Fitting speakers
It is possible to fit:
-
165
mm
diameter
speakers
in
the
front
doors,
-
130
mm
diameter
speakers
in
the
rear
doors,
-
22.5
mm
diameter
tweeters
in
the
top
of the dashboard.
Connectors
8-way connector (A)
A1: -
A2:
-
A3:
-
A4:
-
A5:
-
A6:
(+)
Ignition
positive
(in
this
case,
the
audio
equipment
only
oper
-
ates
when the ignition is on)
A7:
(+)
Permanent
A8:
Earth
8-way connector (B)
B1:
(+) Rear right speaker
B2:
(-) Rear right speaker
B3:
(
+)
Front
right speaker and tweeter
B4:
(
-)
Front
right speaker and tweeter
B5:
(+) Front left speaker and tweeter
B6:
(-) Front left speaker and tweeter
B7:
(+) Rear left speaker
B8:
(-) Rear left speaker
PRACTICAL INFORMATION