Citroen C4 PICASSO 2007.5 1.G Owner's Manual
Manufacturer: CITROEN, Model Year: 2007.5, Model line: C4 PICASSO, Model: Citroen C4 PICASSO 2007.5 1.GPages: 256, PDF Size: 4.55 MB
Page 121 of 256
C
D
A
BB
III
121
R E A R C E N T R A L S E AT B E LT -
C 4 P i C A S S o A N d G R A N d C 4 P i C A S S o
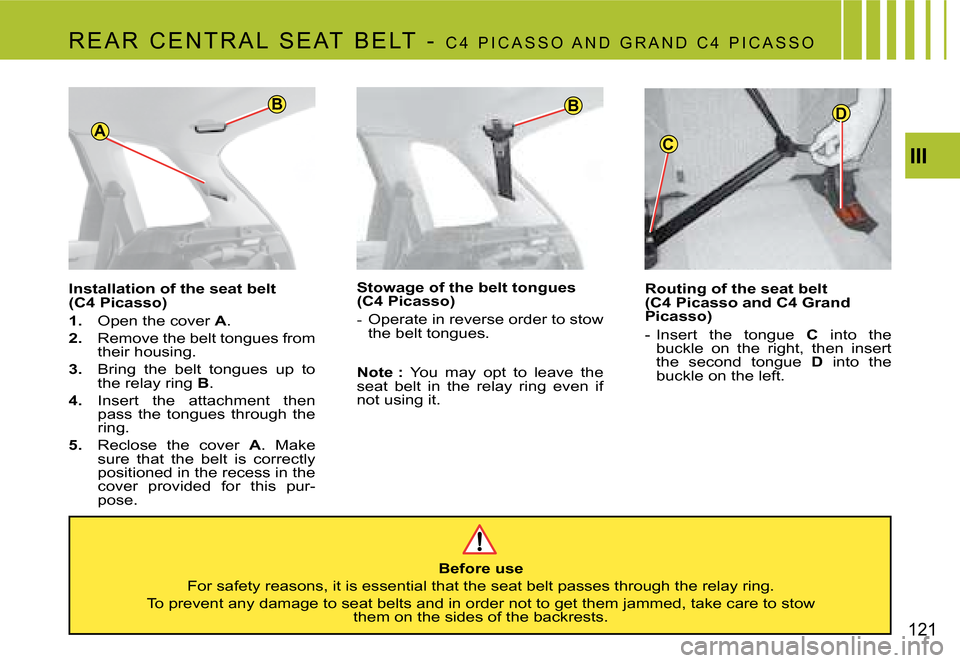
Routing of the seat belt
(C4 Picasso and C4 Grand
Picasso)
- insert the tongue
C into the
buckle on the right, then insert
the second tongue D into the
buckle on the left.
Before use
For safety reasons, it is essential that the seat belt passes th rough the relay ring.
To prevent any damage to seat belts and in order not to get them jammed, take care to stow
them on the sides of the backrests.
Installation of the seat belt
(C4 Picasso)
1.
open the cover
A.
2. Remove the belt tongues from
their housing.
3. Bring the belt tongues up to
the relay ring
B.
4. insert the attachment then
pass the tongues through the
ring.
5. Reclose the cover
A. Make
sure that the belt is correctly
positioned in the recess in the
cover provided for this pur-
pose. Stowage of the belt tongues
(C4 Picasso) -
operate in reverse order to stow
the belt tongues.
Note : You may opt to leave the
seat belt in the relay ring even if
not using it.
Page 122 of 256
122III
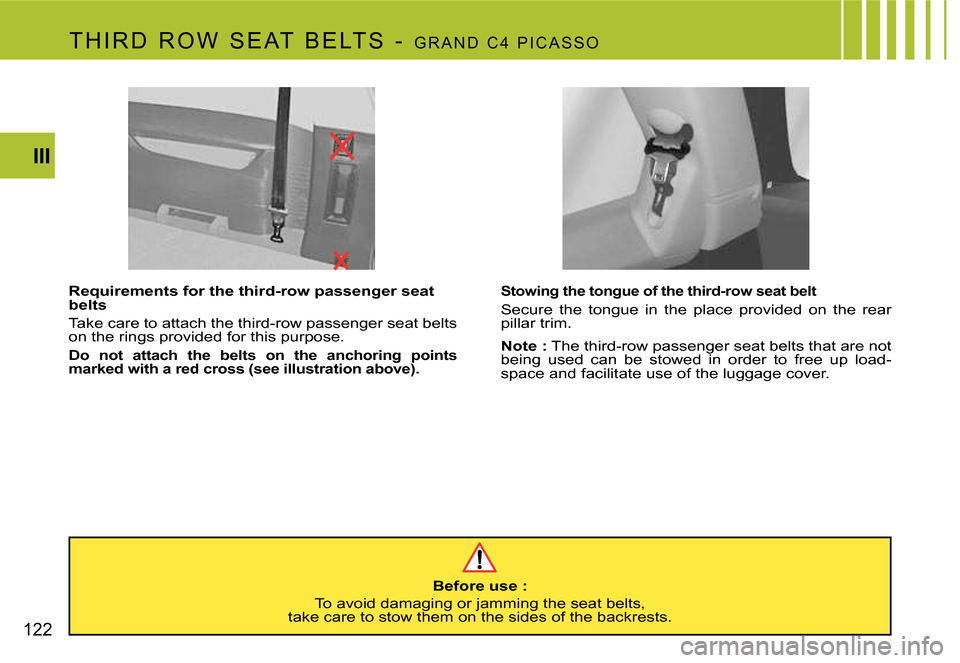
Stowing the tongue of the third-row seat belt
Secure the tongue in the place provided on the rear
pillar trim.
Note :
The third-row passenger seat belts that are not
being used can be stowed in order to free up load-
space and facilitate use of the luggage cover.
Requirements for the third-row passenger seat
belts
Take care to attach the third-row passenger seat belts
on the rings provided for this purpose.
Do not attach the belts on the anchoring points
marked with a red cross (see illustration above).
T H i R d R o W S E AT B E LT S -
G R A N d C 4 P i C A S S o
Before use :
To avoid damaging or jamming the seat belts,
take care to stow them on the sides of the backrests.
Page 123 of 256
A
III
123
Reactivating the front
passenger airbag
do not forget to reactivate the air -
bag function.
For that, with the ignition switched
off, insert and turn the key to the
« oN » position. The airbag is
activated.
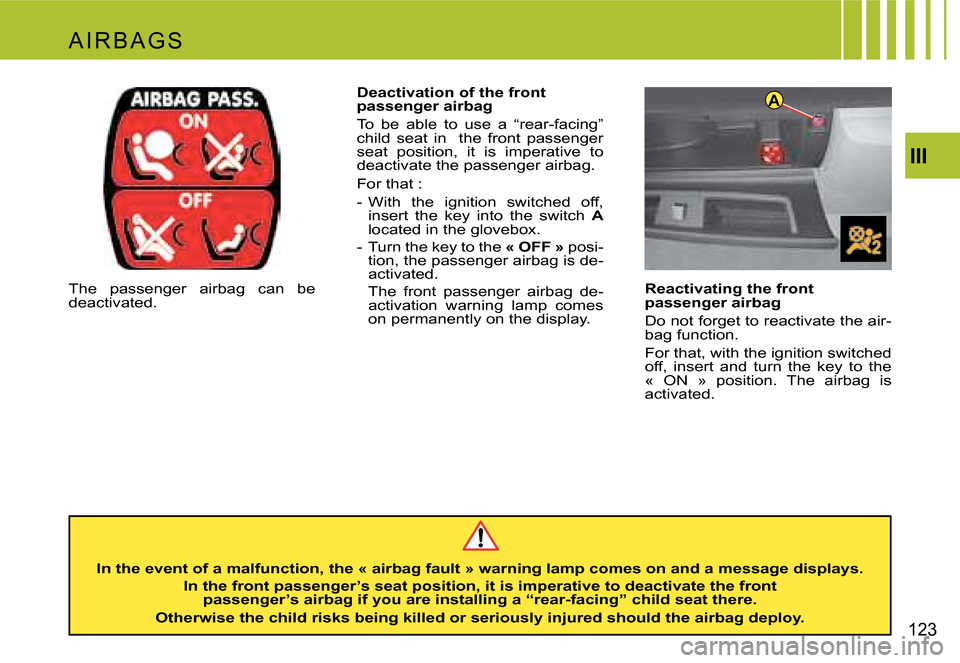
The passenger airbag can be
deactivated. Deactivation of the front
passenger airbag
To be able to use a “rear-facing”
child seat in the front passenger
seat position, it is imperative to
deactivate the passenger airbag.
For that :
- With the ignition switched off,
insert the key into the switch A
located in the glovebox.
- Turn the key to the « OFF »
posi-
tion, the passenger airbag is de-
activated.
The front passenger airbag de -
activation warning lamp comes
on permanently on the display.
In the event of a malfunction, the « airbag fault » warning lamp comes on and a message displays.
In the front passenger’s seat position, it is imperative to deactivate the front
passenger’s airbag if you are installing a “rear-facing” child seat there.
Otherwise the child risks being killed or seriously i njured should the airbag deploy.
A i R B A G S
Page 124 of 256
124III
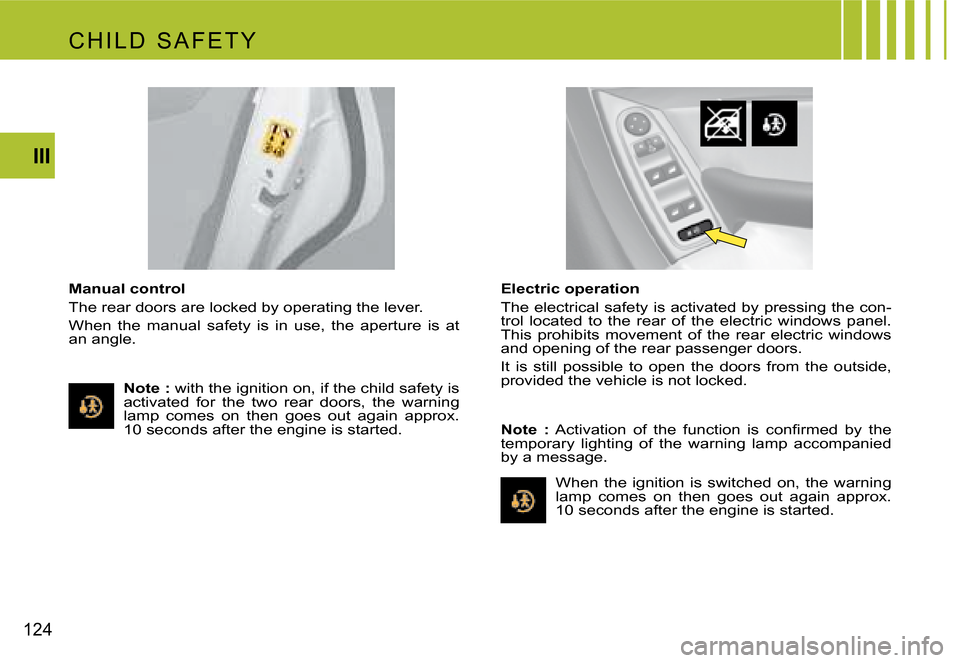
Manual control
The rear doors are locked by operating the lever.
When the manual safety is in use, the aperture is at
an angle.
Electric operation
The electrical safety is activated by pressing the con-
trol located to the rear of the electric windows panel.
This prohibits movement of the rear electric windows
and opening of the rear passenger doors.
it is still possible to open the doors from the outside,
provided the vehicle is not locked.
Note : with the ignition on, if the child safety is
activated for the two rear doors, the warning
lamp comes on then goes out again approx.
10 seconds after the engine is started.
When the ignition is switched on, the warning
lamp comes on then goes out again approx.
10 seconds after the engine is started.
Note :
� �A�c�t�i�v�a�t�i�o�n� �o�f� �t�h�e� �f�u�n�c�t�i�o�n� �i�s� �c�o�n�fi�r�m�e�d� �b�y� �t�h�e�
temporary lighting of the warning lamp accompanied
by a message.
C H i L d S A F E T Y
Page 125 of 256
III
125
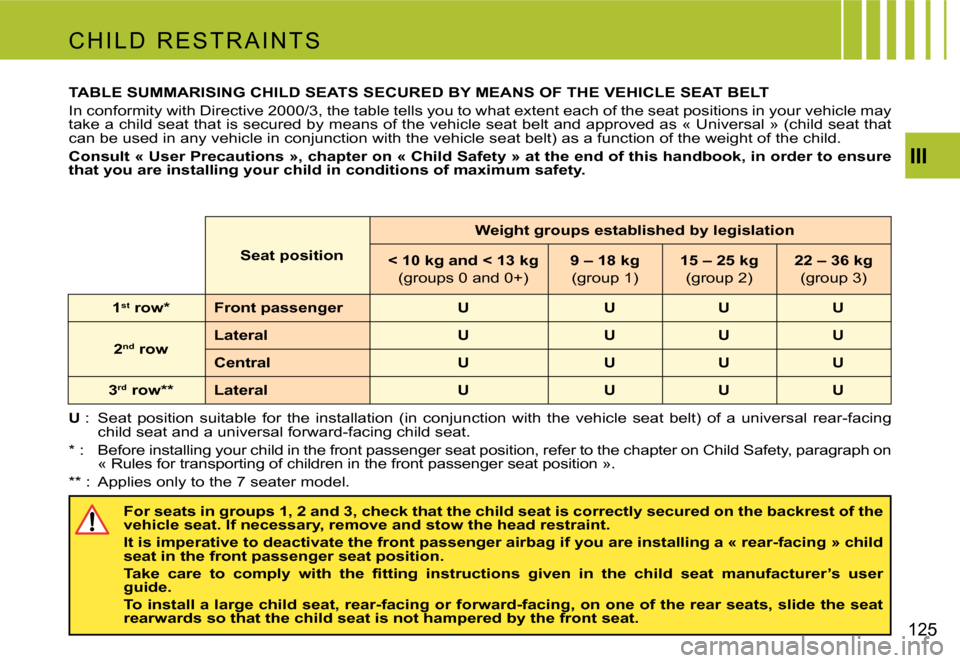
TABLE SUMMARISING CHILD SEATS SECURED BY MEANS OF THE VEHICLE SEAT BELT
in conformity with directive 2000/3, the table tells you to what extent each of the seat positions in your vehicle may
take a child seat that is secured by means of the vehicle seat b elt and approved as « Universal » (child seat that
can be used in any vehicle in conjunction with the vehicle se at belt) as a function of the weight of the child.
Consult « User Precautions », chapter on « Child Safety » at the end of this handbook, in order to ensure
that you are installing your child in conditions of maxi mum safety.
C H i L d R E S T R A i N T S
For seats in groups 1, 2 and 3, check that the child seat is correctly secured on the backrest of the
vehicle seat. If necessary, remove and stow the head re straint.
It is imperative to deactivate the front passenger airbag i f you are installing a « rear-facing » child
seat in the front passenger seat position.
�T�a�k�e� �c�a�r�e� �t�o� �c�o�m�p�l�y� �w�i�t�h� �t�h�e� �fi�t�t�i�n�g� �i�n�s�t�r�u�c�t�i�o�n�s� �g�i�v�e�n� �i�n� �t�h�e� �c�h�i�l�d� �s�e�a�t� �m�a�n�u�f�a�c�t�u�r�e�r�’�s� �u�s�e�r�
guide.
To install a large child seat, rear-facing or forward-faci ng, on one of the rear seats, slide the seat
rearwards so that the child seat is not hampered by the fr ont seat.
Seat position
Weight groups established by legislation
< 10 kg and < 13 kg (groups 0 and 0+) 9 – 18 kg
(group 1) 15 – 25 kg
(group 2) 22 – 36 kg
(group 3)
1 st
row* Front passenger U U U U
2 nd
row Lateral U U U U
Central U U U U
3 rd
row** Lateral U U U U
U
: Seat position suitable for the installation (in conjunction with the vehicle seat belt) of a universal rear-facing
child seat and a universal forward-facing child seat.
* :
Before installing your child in the front passenger seat position, refer to the chapter on Child Safety, paragraph on
« Rules for transporting of children in the front p assenger seat position ».
** :
Applies only to the 7 seater model.
Page 126 of 256
126III
C H i L d R E S T R A i N T S
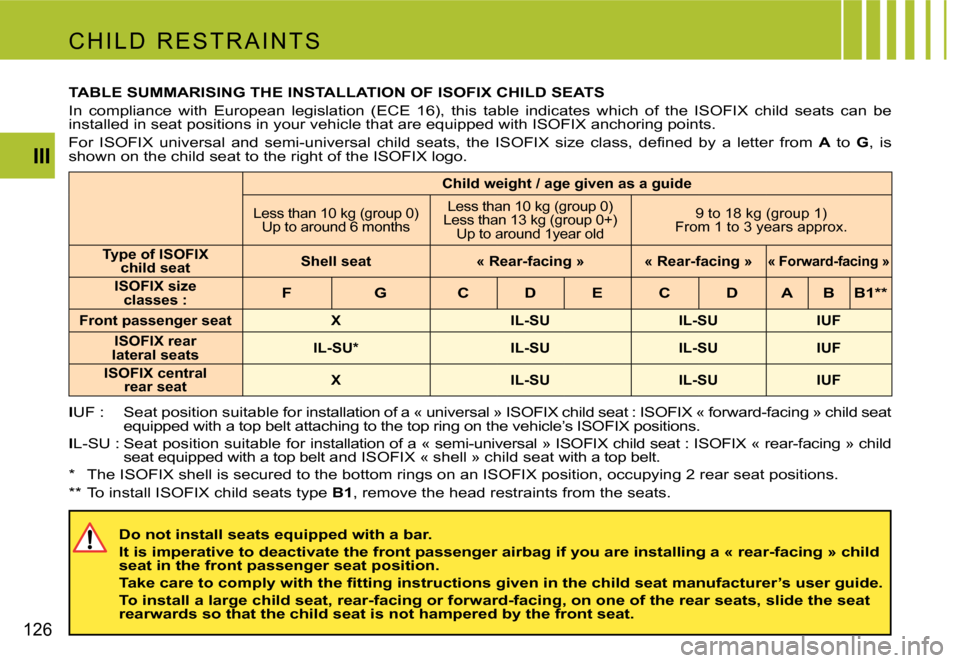
Child weight / age given as a guide
Less than 10 kg (group 0) Up to around 6 months Less than 10 kg (group 0)
Less than 13 kg (group 0+) Up to around 1year old 9 to 18 kg (group 1)
From 1 to 3 years approx.
Type of ISOFIX child seat Shell seat « Rear-facing » « Rear-facing »
« Forward-facing »
ISOFIX size
classes :F G C D E C D A B B1**
Front passenger seat X IL-SU IL-SU IUF
ISOFIX rear
lateral seats IL-SU* IL-SU IL-SU IUF
ISOFIX central rear seat X IL-SU IL-SU IUF
I
UF : Seat position suitable for installation of a « uni versal » iSoFiX child seat : iSoFiX « forward-facing » child seat
equipped with a top belt attaching to the top ring on the vehicle’s iSoFiX positions.
I L-SU : Seat position suitable for installation of a « sem i-universal » iSoFiX child seat : iSoFiX « rear-facing » child
seat equipped with a top belt and iSoFiX « shell » chil d seat with a top belt.
* The iSoFiX shell is secured to the bottom rings on an iSoFiX position, occupying 2 rear seat positions.
** To install iSoFiX child seats type B1, remove the head restraints from the seats.
TABLE SUMMARISING THE INSTALLATION OF ISOFIX CHILD SEATS
in compliance with European legislation (ECE 16), this table i
ndicates which of the iSoFiX child seats can be
installed in seat positions in your vehicle that are equippe d with iSoFiX anchoring points.
�F�o�r� �I�S�O�F�I�X� �u�n�i�v�e�r�s�a�l� �a�n�d� �s�e�m�i�-�u�n�i�v�e�r�s�a�l� �c�h�i�l�d� �s�e�a�t�s�,� �t�h�e� �I�S�O�F�I�X� �s�i�z�e� �c�l �a�s�s�,� �d�e�fi�n�e�d� �b�y� �a� �l�e�t�t�e�r� �f�r�o�m� A to G, is
shown on the child seat to the right of the iSoFiX logo.
Do not install seats equipped with a bar.
It is imperative to deactivate the front passenger airbag i f you are installing a « rear-facing » child
seat in the front passenger seat position.
�T�a�k�e� �c�a�r�e� �t�o� �c�o�m�p�l�y� �w�i�t�h� �t�h�e� �fi�t�t�i�n�g� �i�n�s�t�r�u�c�t�i�o�n�s� �g�i�v�e�n� �i�n� �t�h�e� �c�h�i�l�d� �s�e�a�t� �m�a�n�u�f�a�c�t�u�r�e�r�’�s� �u�s�e�r� �g�u�i�d�e�.
To install a large child seat, rear-facing or forward-faci ng, on one of the rear seats, slide the seat
rearwards so that the child seat is not hampered by the fr ont seat.
Page 127 of 256
III
127
C H i L d R E S T R A i N T S
�I�S�O�F�I�X� �a�n�c�h�o�r�i�n�g� �p�o�i�n�t�s� �a�n�d� �t�h�e� �I�S�O�F�I�X� �fi�x�i�n�g� �s�y�s�t�e�m
Your vehicle is approved to the new iSoFiX regulations. The f
ront passenger seat position and the second row
seat positions on your vehicle are equipped with the regulat ion iSoFiX anchorages.
incorrect installation of a child seat in the vehicle compromises the protection of the child in the event of a collision.
�T�h�e� �I�S�O�F�I�X� �s�y�s�t�e�m� �e�n�a�b�l�e�s� �y�o�u� �t�o� �e�l�i�m�i�n�a�t�e� �t�h�e�s�e� �r�i�s�k�s� �a�r�i�s�i�n�g� �f�r�o�m� �p �o�o�r� �i�n�s�t�a�l�l�a�t�i�o�n�.� �T�h�e� �I�S�O�F�I�X� �fi�x�i�n�g� �s�y�s�t�e�m�
�o�f�f�e�r�s� �y�o�u� �a� �c�h�i�l�d� �s�e�a�t� � �fi�x�i�n�g� �m�e�t�h�o�d� �t�h�a�t� �i�s� �s�t�r�o�n�g�,� �r�e�l�i�a�b�l�e� �a�n�d� �c�o�n�v�e�n�i�e�n�t�.
Consult the legislation in force in your country before instal ling your child seat « forward-facing » in the front pas-
senger seat position.
The ISOFIX child seat recommended for your vehicle is th e ISOFIX RÖMER Duo:
it is marketed in the CiTRoËN network. it is equipped with a top belt and so it is approved as an “iSoFiX universal”
child seat.
if it is installed in a rear seat position, the vehicle’s corre sponding front seat should be adjusted so that the child’s
feet do not touch the backrest of this front seat.
This iSoFiX child seat can also be installed in seat position s that are not equipped with iSoFiX anchoring points.
in this case, it is compulsory to secure it to the vehicle seat by means of the vehicle seat belt.
In the front passenger’s seat position, it is imperative to deactivate the front passenger’s
airbag if you are installing a « rear-facing » child seat there.
Otherwise the child risks being killed or seriously i njured
should the airbag deploy.
�T�a�k�e� �c�a�r�e� �t�o� �c�o�m�p�l�y� �w�i�t�h� �t�h�e� �fi�t�t�i�n�g� �i�n�s�t�r�u�c�t�i�o�n�s�
given in the child seat manufacturer’s user guide.
Page 128 of 256
A
B
D
C
128III
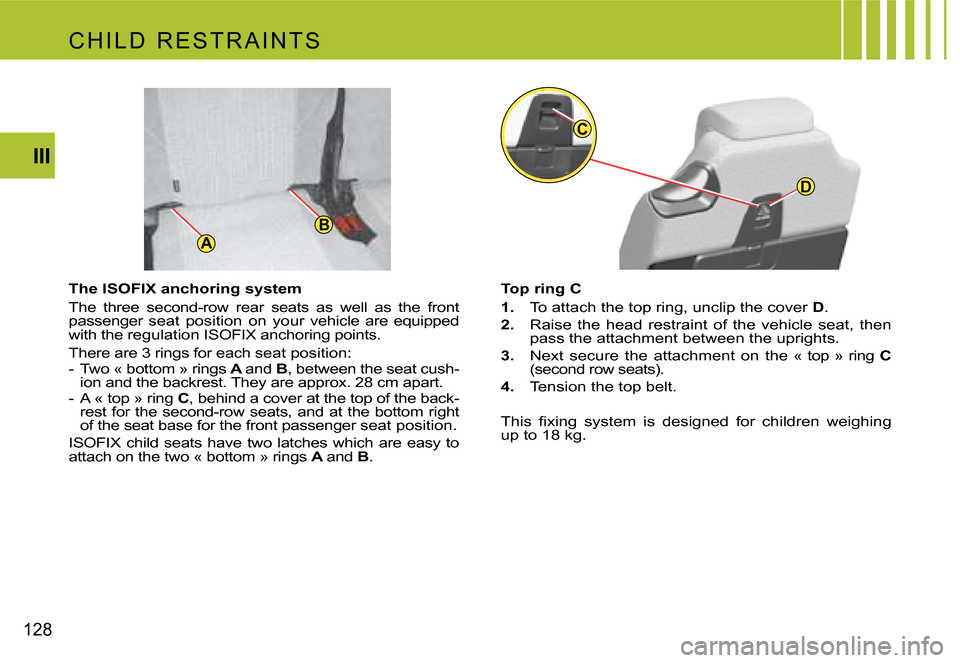
The ISOFIX anchoring system
The three second-row rear seats as well as the fron
t
passenger seat position on your vehicle are equipped
with the regulation iSoFiX anchoring points.
There are 3 rings for each seat position:
- Two « bottom » rings A
and B, between the seat cush-
ion and the backrest. They are approx. 28 cm apart.
- A « top » ring C, behind a cover at the top of the back-
rest for the second-row seats, and at the bottom ri ght
of the seat base for the front passenger seat positio n.
iSoFiX child seats have two latches which are easy to
attach on the two « bottom » rings A and B. Top ring C
1.
To attach the top ring, unclip the cover D.
2. Raise the head restraint of the vehicle seat, then
pass the attachment between the uprights.
3. Next secure the attachment on the « top » ring C
(second row seats).
4. Tension the top belt.
�T�h�i�s� �fi�x�i�n�g� �s�y�s�t�e�m� �i�s� �d�e�s�i�g�n�e�d� �f�o�r� �c�h�i�l�d�r�e�n� �w�e�i�g�h�i�n�g�
up to 18 kg.
C H i L d R E S T R A i N T S
Page 129 of 256
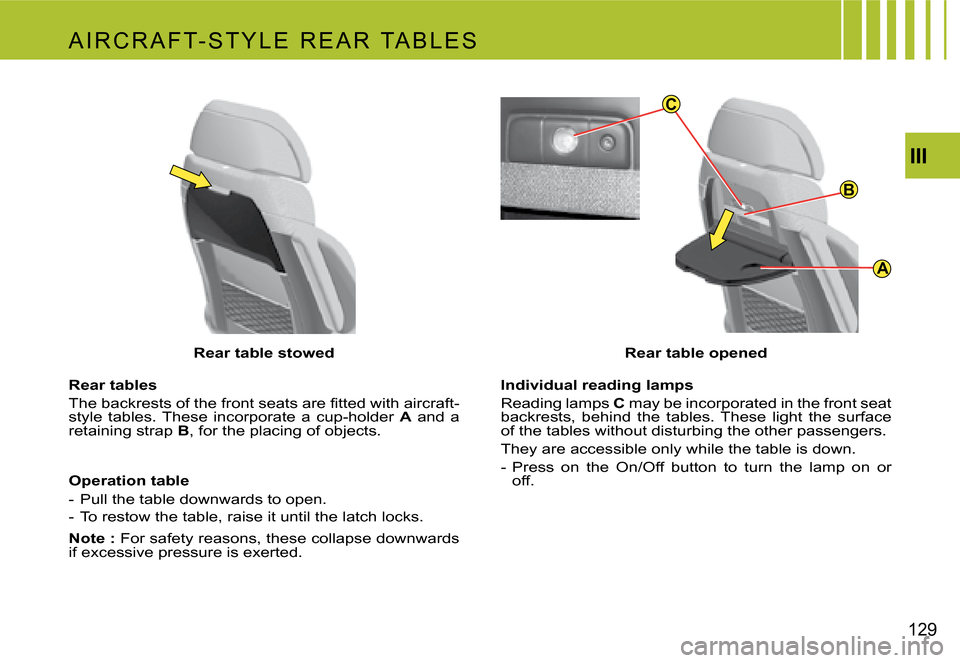
A
B
C
III
129
A i R C R A F T- S T Y L E R E A R TA B L E S
Rear tables
�T�h�e� �b�a�c�k�r�e�s�t�s� �o�f� �t�h�e� �f�r�o�n�t� �s�e�a�t�s� �a�r�e� �fi�t�t�e�d� �w�i�t�h� �a�i�r�c�r�a�f�t�-
style tables. These incorporate a cup-holder
A and a
retaining strap B, for the placing of objects.
Operation table
- Pull the table downwards to open.
- To restow the table, raise it until the latch locks.
Note : For safety reasons, these collapse downwards
if excessive pressure is exerted. Individual reading lamps
Reading lamps
C may be incorporated in the front seat
backrests, behind the tables. These light the surface
of the tables without disturbing the other passengers.
They are accessible only while the table is down.
- Press on the on/off button to turn the lamp on or
off.
Rear table stowed
Rear table opened
Page 130 of 256
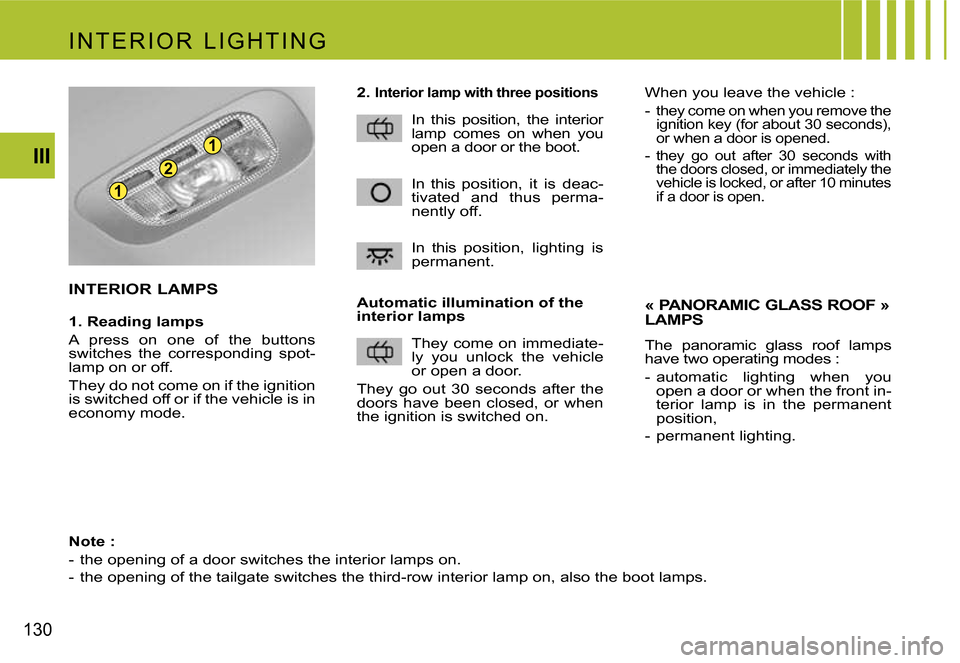
1
1
2
130III
2. Interior lamp with three positions
in this position, the interior
lamp comes on when you
open a door or the boot.
in this position, it is deac
-
tivated and thus perma-
nently off.
in this position, lighting is
permanent.
They come on immediate-
ly you unlock the vehicle
or open a door.
They go out 30 seconds after the
doors have been closed, or when
the ignition is switched on.
Automatic illumination of the
interior lamps
« PANORAMIC GLASS ROOF »
LAMPS
The panoramic glass roof lamps
have two operating modes :
- automatic lighting when you
open a door or when the front in-
terior lamp is in the permanent
position,
- permanent lighting.
i N T E R i o R L i G H T i N G
Note :
- the opening of a door switches the interior lamps on.
- the opening of the tailgate switches the third-row interi or lamp on, also the boot lamps.
INTERIOR LAMPS
1. Reading lamps
A press on one of the buttons
switches the corresponding spot-
lamp on or off.
They do not come on if the ignition
is switched off or if the vehicle is in
economy mode. When you leave the vehicle :
-
they come on when you remove the
ignition key (for about 30 seconds),
or when a door is opened
.
-
they go out after 30 seconds with
the doors closed, or immediately the
vehicle is locked, or after 10 minutes
if a door is open
.