wheel Citroen C4 PICASSO 2008 1.G User Guide
[x] Cancel search | Manufacturer: CITROEN, Model Year: 2008, Model line: C4 PICASSO, Model: Citroen C4 PICASSO 2008 1.GPages: 266, PDF Size: 7.14 MB
Page 77 of 266
78
II
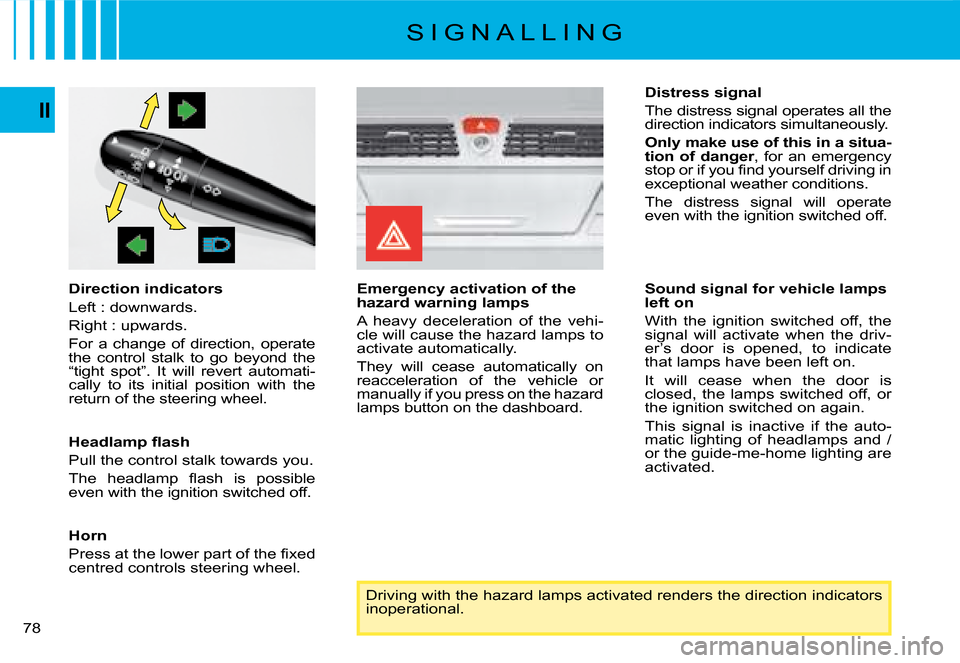
Direction indicators
Left : downwards.
Right : upwards.
For a change of direction, operate the control stalk to go beyond the “tight spot”. It will revert automati-cally to its initial position with the return of the steering wheel.
�H�e�a�d�l�a�m�p� �fl� �a�s�h�
Pull the control stalk towards you.
�T�h�e� �h�e�a�d�l�a�m�p� �fl� �a�s�h� �i�s� �p�o�s�s�i�b�l�e� even with the ignition switched off.
Horn
�P�r�e�s�s� �a�t� �t�h�e� �l�o�w�e�r� �p�a�r�t� �o�f� �t�h�e� �fi� �x�e�d� centred controls steering wheel.
Emergency activation of the hazard warning lamps
A heavy deceleration of the vehi-cle will cause the hazard lamps to activate automatically.
They will cease automatically on reacceleration of the vehicle or manually if you press on the hazard lamps button on the dashboard.
Driving with the hazard lamps activated renders the direction indicators inoperational.
Distress signal
The distress signal operates all the direction indicators simultaneously.
Only make use of this in a situa-tion of danger, for an emergency �s�t�o�p� �o�r� �i�f� �y�o�u� �fi� �n�d� �y�o�u�r�s�e�l�f� �d�r�i�v�i�n�g� �i�n� exceptional weather conditions.
The distress signal will operate even with the ignition switched off.
S I G N A L L I N G
Sound signal for vehicle lamps left on
With the ignition switched off, the signal will activate when the driv-er’s door is opened, to indicate that lamps have been left on.
It will cease when the door is closed, the lamps switched off, or the ignition switched on again.
This signal is inactive if the auto-matic lighting of headlamps and /or the guide-me-home lighting are activated.
Page 86 of 266
A
II
85
For safety, these ma-noeuvres should not be performed while the vehi-cle is in motion.
FRONT SEAT BELTS
Fastening
Pull the belt down in front of you in a steady movement, making sure that it does not become twisted.
Press the fastening into its buckle.
Check that it is properly secured and that the automatic locking mechanism operates correctly by pulling sharply on the belt strap.
The abdominal part of the strap should be positioned as low down as possible in the lap and as tight as possible.
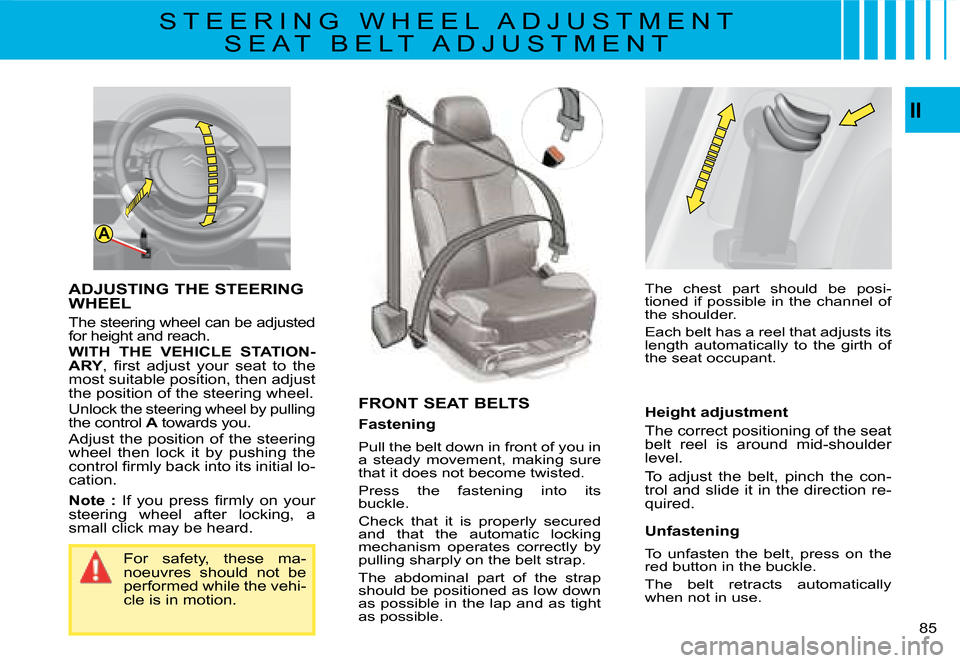
ADJUSTING THE STEERING
WHEEL
The steering wheel can be adjusted for height and reach. WITH THE VEHICLE STATION-ARY�,� �fi� �r�s�t� �a�d�j�u�s�t� �y�o�u�r� �s�e�a�t� �t�o� �t�h�e� most suitable position, then adjust the position of the steering wheel. Unlock the steering wheel by pulling the control A towards you. AAdjust the position of the steering wheel then lock it by pushing the �c�o�n�t�r�o�l� �fi� �r�m�l�y� �b�a�c�k� �i�n�t�o� �i�t�s� �i�n�i�t�i�a�l� �l�o�-cation.
Note :� �I�f� �y�o�u� �p�r�e�s�s� �fi� �r�m�l�y� �o�n� �y�o�u�r� steering wheel after locking, a small click may be heard.
S T E E R I N G W H E E L A D J U S T M E N T
S E A T B E L T A D J U S T M E N T
The chest part should be posi-tioned if possible in the channel of the shoulder.
Each belt has a reel that adjusts its length automatically to the girth of the seat occupant.
Height adjustment
The correct positioning of the seat belt reel is around mid-shoulder level.
To adjust the belt, pinch the con-trol and slide it in the direction re-quired.
Unfastening
To unfasten the belt, press on the red button in the buckle.
The belt retracts automatically when not in use.
Page 88 of 266
A
1
3
4
2II
87
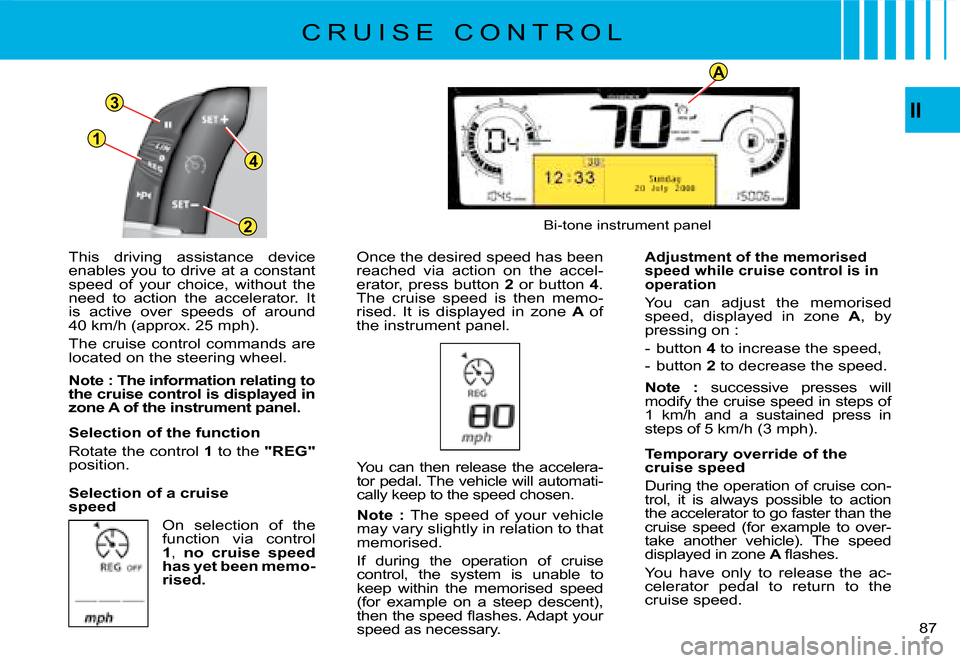
This driving assistance device enables you to drive at a constant speed of your choice, without the need to action the accelerator. It is active over speeds of around 40 km/h (approx. 25 mph).
The cruise control commands are located on the steering wheel.
Note : The information relating to the cruise control is displayed in zone A of the instrument panel.
Selection of the function
Rotate the control 1 to the "REG"position.
Selection of a cruise speed
On selection of the function via control 1, no cruise speed has yet been memo-rised.
Once the desired speed has been reached via action on the accel-erator, press button 2 or button 4. The cruise speed is then memo-rised. It is displayed in zone A of the instrument panel.
You can then release the accelera-tor pedal. The vehicle will automati-cally keep to the speed chosen.
Note : The speed of your vehicle may vary slightly in relation to that memorised.
If during the operation of cruise control, the system is unable to keep within the memorised speed (for example on a steep descent), �t�h�e�n� �t�h�e� �s�p�e�e�d� �fl� �a�s�h�e�s�.� �A�d�a�p�t� �y�o�u�r� speed as necessary.
Bi-tone instrument panel
Adjustment of the memorised speed while cruise control is in operation
You can adjust the memorised speed, displayed in zone A, by pressing on :
- button 4 to increase the speed,
- button 2 to decrease the speed.
Note : successive presses will modify the cruise speed in steps of 1 km/h and a sustained press in steps of 5 km/h (3 mph).
Temporary override of the cruise speed
During the operation of cruise con-trol, it is always possible to action the accelerator to go faster than the cruise speed (for example to over-take another vehicle). The speed displayed in zone A �fl� �a�s�h�e�s�.�
You have only to release the ac-celerator pedal to return to the cruise speed.
C R U I S E C O N T R O L
Page 90 of 266
1
3
4
2
A
II
89
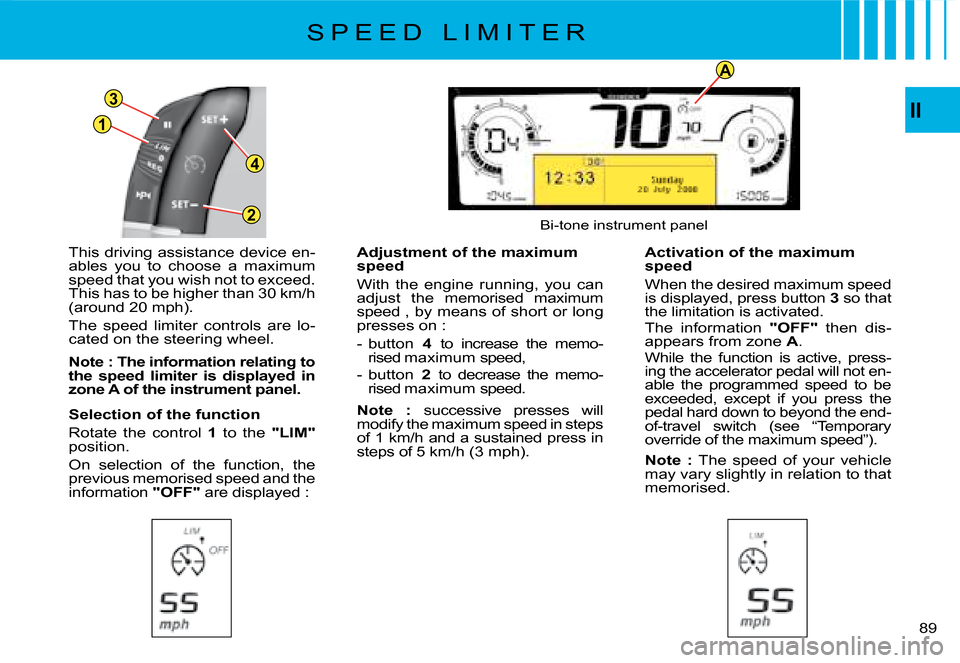
This driving assistance device en-ables you to choose a maximum speed that you wish not to exceed. This has to be higher than 30 km/h (around 20 mph).
The speed limiter controls are lo-cated on the steering wheel.
Note : The information relating to the speed limiter is displayed in zone A of the instrument panel.
Selection of the function
Rotate the control 1 to the "LIM"position.
On selection of the function, the previous memorised speed and the information "OFF" are displayed :
�A�d�j�u�s�t�m�e�n�t� �o�f� �t�h�e� �m�a�x�i�m�u�m� speed
With the engine running, you can adjust the memorised maximum speed , by means of short or long presses on :
- button 4 to increase the memo-rised maximum speed,
- button 2 to decrease the memo-rised maximum speed.
Note : successive presses will modify the maximum speed in steps of 1 km/h and a sustained press in steps of 5 km/h (3 mph).
�A�c�t�i�v�a�t�i�o�n� �o�f� �t�h�e� �m�a�x�i�m�u�m� speed
When the desired maximum speed is displayed, press button 3 so that the limitation is activated.The information "OFF" thendis-appears from zone A.While the function is active, press-ing the accelerator pedal will not en-able the programmed speed to be exceeded, except if you press the pedal hard down to beyond the end-of-travel switch (see “Temporary override of the maximum speed”).
Note : The speed of your vehicle may vary slightly in relation to that memorised.
Bi-tone instrument panel
S P E E D L I M I T E R
Page 101 of 266
100
III
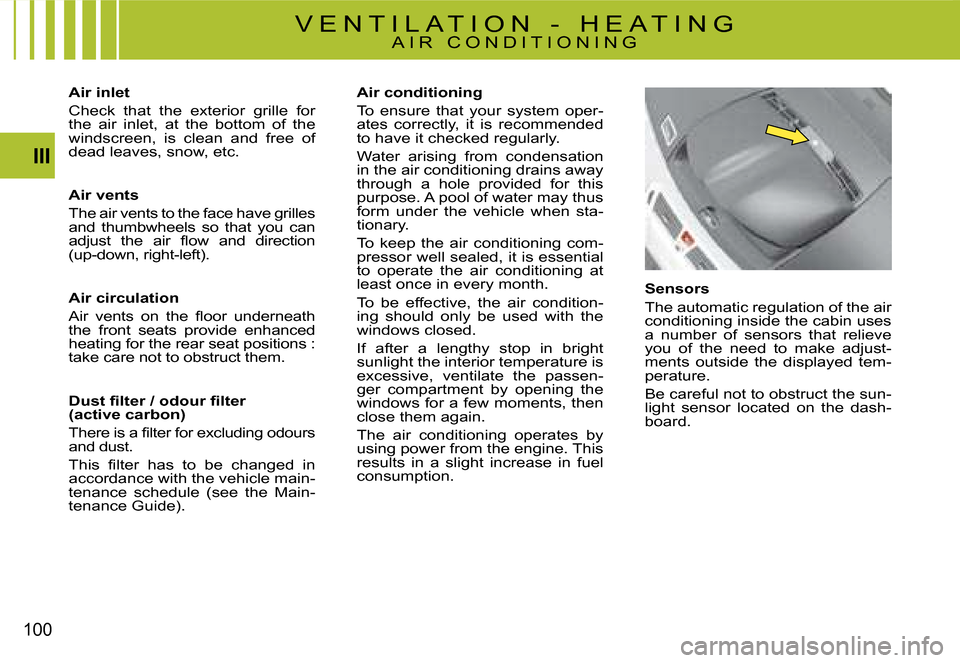
Sensors
The automatic regulation of the air conditioning inside the cabin uses a number of sensors that relieve you of the need to make adjust-ments outside the displayed tem-perature.
Be careful not to obstruct the sun-light sensor located on the dash-board.
Air inlet
Check that the exterior grille for the air inlet, at the bottom of the windscreen, is clean and free of dead leaves, snow, etc.
Air vents
The air vents to the face have grilles and thumbwheels so that you can �a�d�j�u�s�t� �t�h�e� �a�i�r� �fl� �o�w� �a�n�d� �d�i�r�e�c�t�i�o�n� (up-down, right-left).
Air circulation
�A�i�r� �v�e�n�t�s� �o�n� �t�h�e� �fl� �o�o�r� �u�n�d�e�r�n�e�a�t�h� the front seats provide enhanced heating for the rear seat positions : take care not to obstruct them.
�D�u�s�t� �fi� �l�t�e�r� �/� �o�d�o�u�r� �fi� �l�t�e�r� (active carbon)
�T�h�e�r�e� �i�s� �a� �fi� �l�t�e�r� �f�o�r� �e�x�c�l�u�d�i�n�g� �o�d�o�u�r�s� and dust.
�T�h�i�s� �fi� �l�t�e�r� �h�a�s� �t�o� �b�e� �c�h�a�n�g�e�d� �i�n� accordance with the vehicle main-tenance schedule (see the Main-tenance Guide).
Air conditioning
To ensure that your system oper-ates correctly, it is recommended to have it checked regularly.
Water arising from condensation in the air conditioning drains away through a hole provided for this purpose. A pool of water may thus form under the vehicle when sta-tionary.
To keep the air conditioning com-pressor well sealed, it is essential to operate the air conditioning at least once in every month.
To be effective, the air condition-ing should only be used with the windows closed.
If after a lengthy stop in bright sunlight the interior temperature is excessive, ventilate the passen-ger compartment by opening the windows for a few moments, then close them again.
The air conditioning operates by using power from the engine. This results in a slight increase in fuel consumption.
V E N T I L A T I O N - H E A T I N G A I R C O N D I T I O N I N G
Page 107 of 266
III
105
A U T O M A T I C A I R C O N D I T I O N I N G
(Function for retaining ventilation with the engine switched off : REST function, continued…)
Engine stopped, ignition switched on :- The displays will light up, with the air blower shown empty as long as the function is available.- A press on the REST button activates the function for a timing of just a few minutes. Two blades of the �b�l�o�w�e�r� �w�i�l�l� �fi� �l�l� �t�o� �s�i�g�n�i�f�y� �t�h�a�t� �t�h�e� �f�u�n�c�t�i�o�n� �i�s� �a�c�t�i�v�e�.- It can be deactivated and reactivated during the timing.- At the end of the timing, the display will go off.
On stopping the engine :- The displays remain lit up, the blower is shown em pty and the function can be activated for 30 seconds.- A press on the REST button during the next 30 sec-onds activates the function for a timing of several min-utes. The duration and availability of the function are variable according to the state of charge of the battery (a protection to guarantee engine starting). Two blower �b�l�a�d�e�s� �fi� �l�l� �u�p� �t�o� �s�i�g�n�i�f�y� �t�h�a�t� �t�h�e� �f�u�n�c�t�i�o�n� �i�s� �a�c�t�i�v�e�.� �I�t� �r�e�-mains active, even after the doors have been locked , until the end of the timing.�-� �A� �f�u�r�t�h�e�r� �p�r�e�s�s� �b�e�f�o�r�e� �t�h�e� �e�n�d� �o�f� �t�h�e� �t�i�m�i�n�g� �d�e�fi� �n�i�t�i�v�e�l�y� stops the function.
Note : This button does not activate the air conditioning, �o�n�l�y� �t�h�e� �a�i�r� �b�l�o�w�e�r�s�.� �I�n� �t�h�e� �R�E�S�T� �f�u�n�c�t�i�o�n�,� �t�h�e� �a�i�r� �fl� �o�w� �a�n�d� distribution are controlled automatically and you c annot modify them.
4 - Adjustment of the air distribution- Press on button 4 �s�o� �t�h�a�t� �t�h�e� �a�i�r� �fl� �o�w�s� �s�c�r�o�l�l� �s�u�c�c�e�s�-sively on the display.
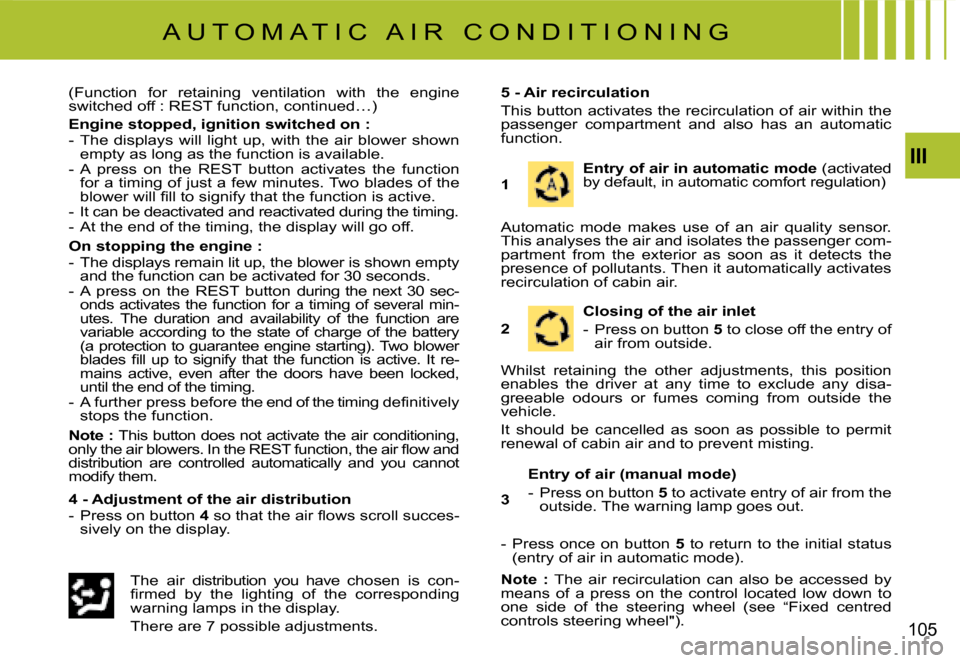
5 - Air recirculation
This button activates the recirculation of air within the passenger compartment and also has an automatic function.
The air distribution you have chosen is con-�fi� �r�m�e�d� �b�y� �t�h�e� �l�i�g�h�t�i�n�g� �o�f� �t�h�e� �c�o�r�r�e�s�p�o�n�d�i�n�g� warning lamps in the display.
There are 7 possible adjustments.
Entry of air in automatic mode (activated by default, in automatic comfort regulation)
Automatic mode makes use of an air quality sensor. This analyses the air and isolates the passenger com-partment from the exterior as soon as it detects the presence of pollutants. Then it automatically activates recirculation of cabin air.
1
Closing of the air inlet
- Press on button 5 to close off the entry of air from outside.2
Whilst retaining the other adjustments, this position enables the driver at any time to exclude any disa-greeable odours or fumes coming from outside the vehicle.
It should be cancelled as soon as possible to permit renewal of cabin air and to prevent misting.
- Press once on button 5 to return to the initial status (entry of air in automatic mode).
Note : The airrecirculation can also be accessed by means of a press on the control located low down to one side of the steering wheel (see “Fixed centred controls steering wheel").
Entry of air (manual mode)
- Press on button 5 to activate entry of air from the outside. The warning lamp goes out. 3
Page 157 of 266
154
IV
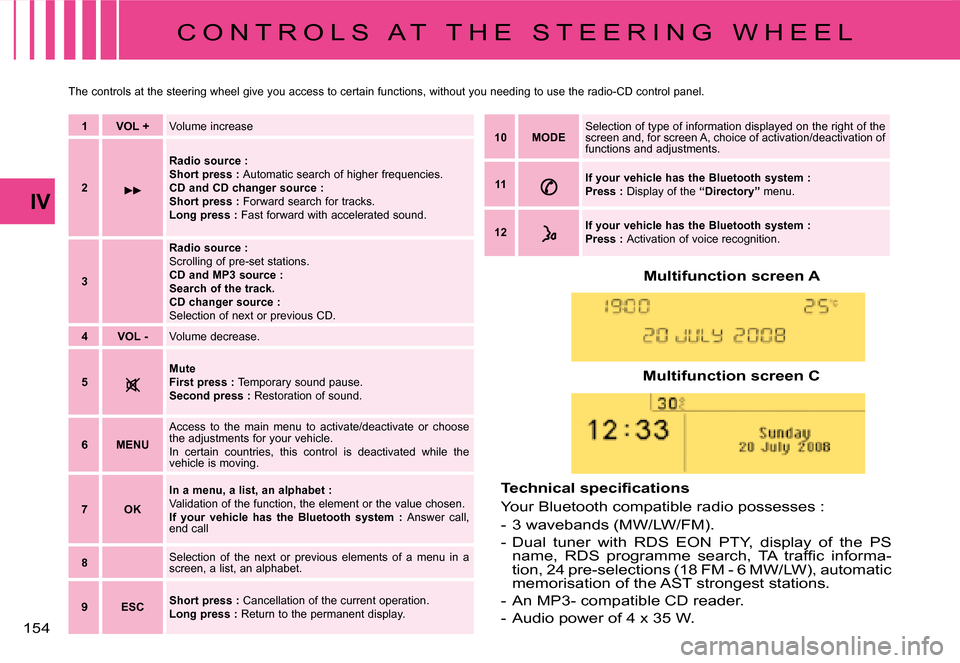
Multifunction screen A
�T�e�c�h�n�i�c�a�l� �s�p�e�c�i�fi� �c�a�t�i�o�n�s
Your Bluetooth compatible radio possesses :
-3 wavebands (MW/LW/FM).
-Dual tuner with RDS EON PTY, display of the PS �n�a�m�e�,� �R�D�S� �p�r�o�g�r�a�m�m�e� �s�e�a�r�c�h�,� �T�A� �t�r�a�f�fi� �c� �i�n�f�o�r�m�a�-tion, 24 pre-selections (18 FM - 6 MW/LW), automatic memorisation of the AST strongest stations.
-An MP3- compatible CD reader.
-Audio power of 4 x 35 W.
Multifunction screen C
C O N T R O L S A T T H E S T E E R I N G W H E E L
The controls at the steering wheel give you access to certain functions, without you needing to use the radio-CD control panel.
1VOL +Volume increase
2
Radio source :Short press : Automatic search of higher frequencies.CD and CD changer source :Short press : Forward search for tracks.Long press : Fast forward with accelerated sound.
3
Radio source :Scrolling of pre-set stations.CD and MP3 source :Search of the track.CD changer source :Selection of next or previous CD.
4VOL -Volume decrease.
5MuteFirst press : Temporary sound pause.Second press : Restoration of sound.
6MENU
Access to the main menu to activate/deactivate or choose the adjustments for your vehicle.In certain countries, this control is deactivated while the vehicle is moving.
7OK
In a menu, a list, an alphabet :Validation of the function, the element or the value chosen.If your vehicle has the Bluetooth system : Answer call, end call
8Selection of the next or previous elements of a menu in a screen, a list, an alphabet.
9ESCShort press : Cancellation of the current operation.Long press : Return to the permanent display.
10MODESelection of type of information displayed on the right of the screen and, for screen A, choice of activation/deactivation of functions and adjustments.
11If your vehicle has the Bluetooth system : Press : Display of the “Directory” menu.
12If your vehicle has the Bluetooth system :Press : Activation of voice recognition.
Page 158 of 266
155
G E N E R A L F U N C T I O N S -
A U D I O A D J U S T M E N T S
On / Off
With the key in Drive position M, press on control A to switch the radio on or off.
Note :
- If the radio was on the last time you switched off the ignition, it will resume automatically when you switch on the ignition again. You will not have to press on control A.
- After switching off the ignition, you can still operate the audio system even without the ignition key be-ing present. Simply press on but-ton A. The system will turn itself off after approx.30minutes.
Anti-theft system
This radio is coded in such a way as to function only on your particu-lar vehicle. It would be unusable if installed on any other vehicle.
Note :
The anti-theft system is automatic and requires no action on your part.
Selection of source
To select either Radio, CD (CD already inserted and Radio source activated), or CD changer source, press on control D.
When you insert a CD it automati-cally starts being read.
Note :
When the radio is switched off, the source selected is memorised.
Volume adjustment
Rotate control A to increase or de-crease the sound volume.
You can also increase or decrease the volume using buttons 1 and 4at the steering wheel.
Note :
- The sound volume when you switch off the radio will be the same when you switch it on again.
- The radio sound volume auto-matically adjusts to the vehicle speed, provided the “volume ad-justment” function is activated.
Temporary sound pause
Press on control 5 at the steering wheel, or on the MUTE button, to activate this function.
The sound will be paused, regard-less of the source selected.
To restore the audio output, press one of the controls at the steering wheel.
Sound adjustments
Each press on button F brings up the parameter to be adjusted :�c�h�o�i�c�e� �o�f� �p�r�e�d�e�fi� �n�e�d� �s�o�u�n�d� �a�m�-biances, bass, treble, loudness, fade (front/rear sound distribu-tion), balance (left/right sound dis-tribution) and volume adjusted to vehicle speed.
Press buttons K or N to modify the values for the function displayed.
Note :
- The selection of a sound am-biance automatically adjusts bass and treble. These can be �m�o�d�i�fi� �e�d�.� �T�o� �r�e�s�t�o�r�e� �t�h�e� �o�r�i�g�i�n�a�l� adjustments for the musical am-biances, reset bass and treble to zero.
- Adjustment of loudness, as well as bass and treble when they �a�r�e� �a�v�a�i�l�a�b�l�e�,� �a�r�e� �s�p�e�c�i�fi� �c� �t�o� each sound source and to each musical ambiance.
- If you leave the audio system un-actioned for a few seconds, it will revert to the normal display.
Page 159 of 266
IV
R A D I O S O U R C E
Notes on radio reception
Your radio will be subject to certain phenomena that are not encoun-tered by domestic systems.
The reception of AM and FM sig-nals may suffer from interference, which is caused by the nature and propagation of the signals and �d�o�e�s� �n�o�t� �r�e�fl� �e�c�t� �o�n� �t�h�e� �q�u�a�l�i�t�y� �o�f� your radio installation.
In AM, the reception may be af-fected when passing under power lines or bridges, or when travelling through tunnels.
In FM mode, the reception may be affected by the distance from the �s�t�a�t�i�o�n� �t�r�a�n�s�m�i�t�t�e�r�,� �t�h�e� �r�e�fl� �e�c�t�i�n�g� �o�f� signals off obstacles (mountains, hills, tower blocks) and radio blacks-pots (no coverage from the station transmitter).
Selection of radio source
Press button D to select the source.
Selection of frequencies and memory banks
Press button E successively to go through the memory banks FM1, FM2 and FM3, for the FM wave-band, and the memory banks MW/LW, for the AM waveband.
Manual search
Manual search is via buttons J or M.
By keeping button J or M pressed, you will be able to scroll through the waveband. Scrolling will stop as soon as you release the button. The radio will remain tuned to the frequency that is displayed.
Tuning sensitivity
Automatic searches can be car-ried out according to two levels of sensitivity :
- To capture the most powerful trans-mitters, choose the local search mode “LO” (default option).
- To capture the weakest or most distant transmitters, choose the sensitive search mode “DX”.
�S�e�a�r�c�h� �f�o�r� �a� �s�t�a�t�i�o�n� �i�s� �d�o�n�e� �fi� �r�s�t� in “LO” (local) sensitivity, then in “DX” (distant) sensitivity.
To commence a search in sensi-tivity “DX” (distant) immediately , press twice in succession on one of the buttons K or N.
Automatic search
A short press on one of the but-tons K or N will tune into higher or lower radio stations respectively, within the chosen waveband.
By keeping button K or N pressed, you will be able to scroll through the waveband. The scrolling will �s�t�o�p� �a�t� �t�h�e� �fi� �r�s�t� �s�t�a�t�i�o�n� �i�t� �fi� �n�d�s� �o�n�c�e� the button is released.
You can also do this by means of control 2 at the steering wheel.
If the automatic search is unable to tune into a known frequency (perhaps owing to very weak re-ception), it is possible to search �m�a�n�u�a�l�l�y� �t�o� �fi� �n�d� �t�h�i�s� �s�t�a�t�i�o�n�.
Display and selection of a station available in the area in which you are travelling
�B�r�i�e�fl� �y� �p�r�e�s�s� �o�n� �b�u�t�t�o�n� G to bring up a list of stations, this is updated every 10 minutes.
You can also update this list at any time by giving a long press on button G.
To listen to one of these stations, select by pressing buttons J or Mand validate using button L.
Page 160 of 266
157
Manual pre-setting
Select the waveband and memory bank required using button E.
Select a station using either auto-matic or manual search.
Keep pressing for more than two seconds on one of the pre-selection buttons 1 to 6 on the keypad P.
The sound momentarily cuts off, then returns to its previous level to �c�o�n�fi� �r�m� �t�h�a�t� �i�t� �h�a�s� �m�e�m�o�r�i�s�e�d� �t�h�e� station.
Automatic memorisation of transmitters (Autostore function)
In FM, if you hold down button Efor more than two seconds, your radio will automatically memorise the 6 strongest stations on the FM3 memory bank.
The display shows “FM AST”.
The radio memorises the 6 strong-est transmitters, deleting the 6 previously memorised.
After the memorisation, the ra-dio goes directly to memory 1 of memory bank FM3.
Note :
�-� �I�f� �t�h�e� �t�r�a�f�fi� �c� �i�n�f�o�r�m�a�t�i�o�n� �f�u�n�c�t�i�o�n� has been activated (see RDS SYSTEM), the stations offering this facility will be memorised as priority.
- If it is unable to memorise any new stations, the system will re-tain the previously memorised stations.
�-� �I�f� �t�h�e� �s�y�s�t�e�m� �i�s� �u�n�a�b�l�e� �t�o� �fi� �n�d� �6� �s�t�a�t�i�o�n�s�,� �t�h�e� �u�n�fi� �l�l�e�d� �m�e�m�o�r�y� slots will remain free.
Recall of pre-set stations
Press button E� �b�r�i�e�fl� �y� �t�o� �s�e�l�e�c�t� �t�h�e� required waveband and memory bank.
A short press on one the pre-selection buttons 1 to 6 on the keypad P recalls the correspond-ing memorised station. You can also do this using the control 3 at the steering wheel.
If it is a RDS station, the frequency appears some seconds before the name appears.
For RDS stations, recall of a sta-tion may prompt a search for a frequency corresponding to the region where you happen to be (see RDS system).
R A D I O S O U R C E