heating CITROEN C4 PICASSO 2010 Owners Manual
[x] Cancel search | Manufacturer: CITROEN, Model Year: 2010, Model line: C4 PICASSO, Model: CITROEN C4 PICASSO 2010Pages: 352, PDF Size: 10.66 MB
Page 19 of 352

Downloaded from www.Manualslib.com manuals search engine 17
FAMILIARISATION
Recommended settings
- Heating/manual air conditioning:
- Digital air conditioning:
the fully automatic mode is recommended - press "AUTO"
.
Operate
For...
Cooling
or
Fully cold to
start, then
personal
settings
Maximum to
start, then
personal
settings
ON
ON when
starting, then
OFF
Heating
or
Fully hot to
start, then
personal
settings
Maximum to
start, then
personal
setting
ON when
starting, then
OFF
Demisting
Defrosting
Fully hot
OFF
VENTILATION
Page 36 of 352

Downloaded from www.Manualslib.com manuals search engine I
34
MONITORING
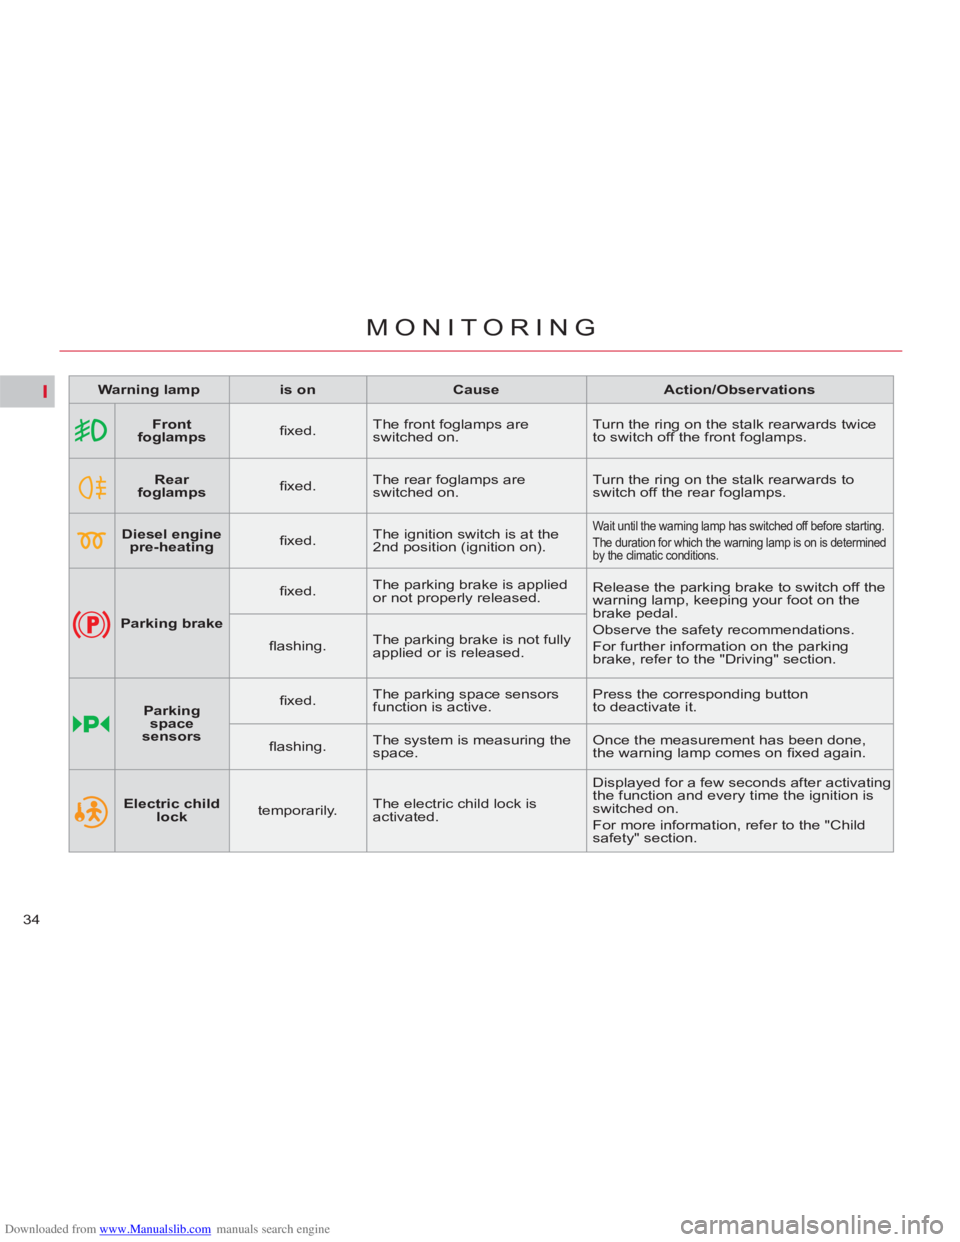
Warning lamp
is on
Cause
Action/Observations
Front
foglamps
fi xed. The front foglamps are
switched on. Turn the ring on the stalk rearwards twice
to switch off the front foglamps.
Rear
foglamps
fi xed. The rear foglamps are
switched on. Turn the ring on the stalk rearwards to
switch off the rear foglamps.
Diesel engine
pre-heating
fi xed. The ignition switch is at the
2nd position (ignition on).
Wait until the warning lamp has switched off before starting.
The duration for which the warning lamp is on is determined
by the climatic conditions.
Parking brake
fi xed. The parking brake is applied
or not properly released. Release the parking brake to switch off the
warning lamp, keeping your foot on the
brake pedal.
Observe the safety recommendations.
For further information on the parking
brake, refer to the "Driving" section.
fl ashing. The parking brake is not fully
applied or is released.
Parking
space
sensors
fi xed. The parking space sensors
function is active. Press the corresponding button
to deactivate it.
fl ashing. The system is measuring the
space. Once the measurement has been done,
the warning lamp comes on fi xed again.
Electric child
lock
temporarily. The electric child lock is
activated. Displayed for a few seconds after activating
the function and every time the ignition is
switched on.
For more information, refer to the "Child
safety" section.
Page 58 of 352

Downloaded from www.Manualslib.com manuals search engine III
56
COMFORT
RECOMMENDED SETTINGS FOR VENTILATION, HEATING AND
AIR CONDITIONING
Air intake
Check that the exterior grille for the
air intake at the bottom of the wind-
screen, is clean and free of dead
leaves, snow, etc.
Air distribution
1.
Windscreen demisting/defrosting
vents.
2.
Front quarter light window demi-
sting/defrosting vents.
3.
Front side window demisting/
defrosting vents.
Adjustable side air vents.
4.
Adjustable central air vents.
5.
Front passenger footwell air out-
lets.
6.
Adjustable 2nd row side air
vents, with air fl ow and tempera-
ture adjustment.
7.
Rear passenger footwell air out-
lets.
8.
Adjustable 3rd row side air vents.
The side air vents 8
apply only to the
7-seater versions.
Page 70 of 352

Downloaded from www.Manualslib.com manuals search engine III
68
COMFORT
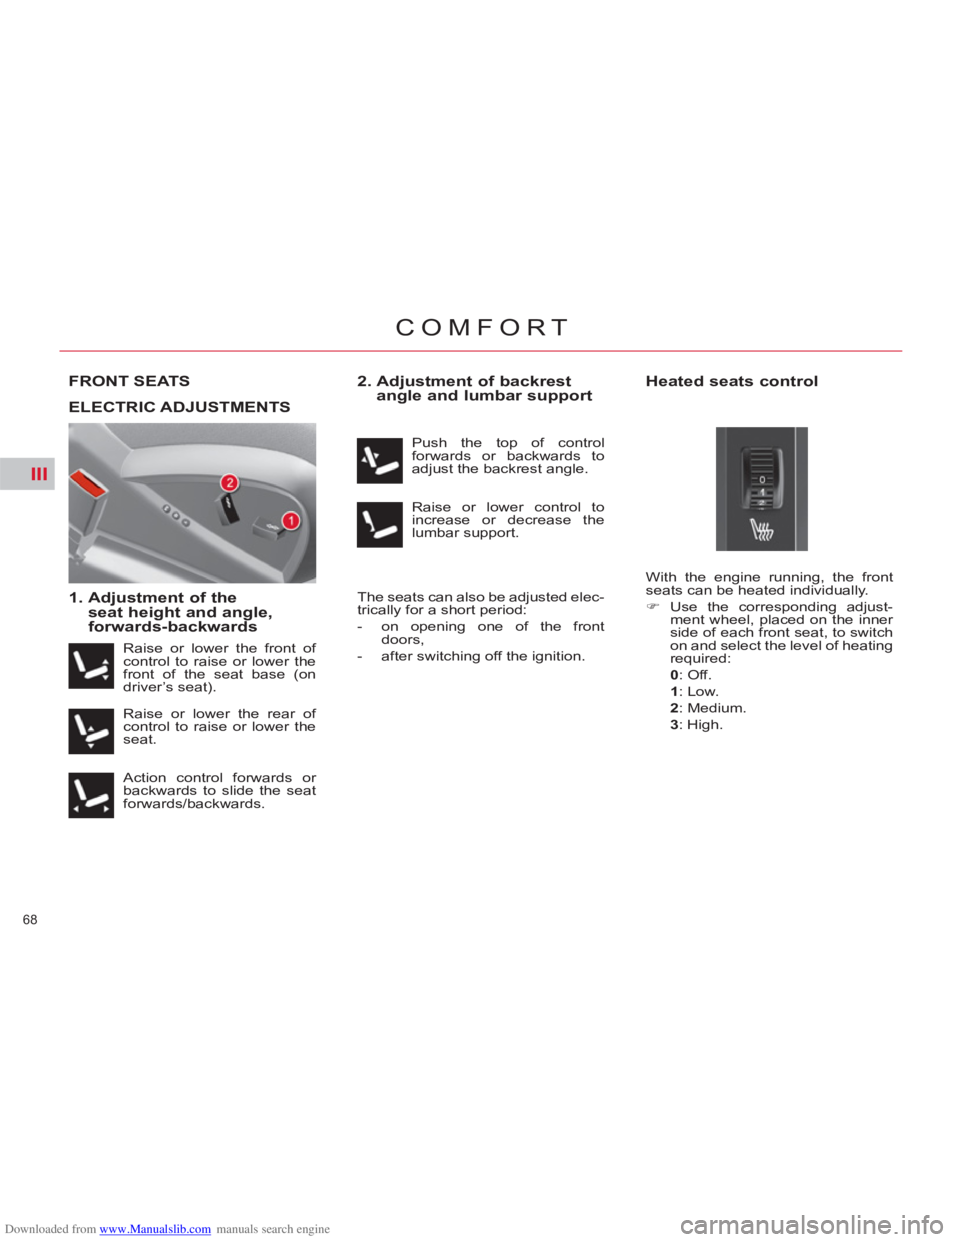
FRONT SEATS
1. Adjustment of the
seat height and angle,
forwards-backwards
2. Adjustment of backrest
angle and lumbar support
The seats can also be adjusted elec-
trically for a short period:
- on opening one of the front
doors,
- after switching off the ignition.
Heated seats control
ELECTRIC ADJUSTMENTS
Raise or lower the front of
control to raise or lower the
front of the seat base (on
driver’s seat).
Raise or lower the rear of
control to raise or lower the
seat.
Action control forwards or
backwards to slide the seat
forwards/backwards. Push the top of control
forwards or backwards to
adjust the backrest angle.
Raise or lower control to
increase or decrease the
lumbar support.
With the engine running, the front
seats can be heated individually.
�)
Use the corresponding adjust-
ment wheel, placed on the inner
side of each front seat, to switch
on and select the level of heating
required:
0
: Off.
1
: Low.
2
: Medium.
3
: High.
Page 107 of 352

Downloaded from www.Manualslib.com manuals search engine VI
105
FITTINGS
SLIDING SUN VISOR
Sliding blinds
Visor rails
The blinds are extended on the sun
visor rails.
Fold the visor downwards, to protect
against dazzle to the face.
If dazzle is coming from the side
windows, detach the visor from its
housing above the centre of the
windscreen and pivot it to the side.
Do not attach or suspend heavy
objects on the slide rail of the sun
blind.
TOLL CARD/CAR PARK TICKET WINDOWS
Facility for affi xing toll cards and/or
car park tickets.
These windows are located on each
side of the base of the child surveil-
lance mirror.
They are two non-refl ective areas of
the athermic windscreen.
Child surveillance mirror
The athermic windscreen limits
heating of the passenger compart-
ment by reducing the effects of the
sun's rays (ultra-violet). It consists of
a refl ective layer, which also blocks
certain radio-electric signals (auto-
matic toll card payments, etc.). A child surveillance mirror is fi tted
above the rear view mirror. This al-
lows you to monitor the vehicle’s
rear passengers, or it can facilitate
conversation between the front and
rear passengers without the need to
move the rear view mirror.
It can be folded away to eliminate
dazzle. Sliding blinds are provided for your
protection against bright sunlight.
They can be adjusted manually.
�)
Slide the blind to the desired po-
sition by pushing at A
.
The visors are fi tted with a lock-
ing system on their central housing
when the blind is reeled in. To re-
move the visor from its central hous-
ing or to reposition it, it must be in a
vertical position.
Page 149 of 352

Downloaded from www.Manualslib.com manuals search engine IX
147
DRIVING
5-SPEED MANUALGEARBOX
Starting the vehicle
�)
Check that the gear lever is in
neutral.
�)
Do not touch the accelerator.
�)
For Diesel engines: turn the
key to position M
and wait until
the pre-heating warning lamp
switches off if it has come on.
�)
Operate the starter, turning the
key until the engine starts (no
more than ten seconds).
�)
In temperatures lower than 0°C,
declutch while operating the
starter to facilitate starting.
Only engage reverse gear when
the vehicle is stationary with the
engine at idle.
Engaging reverse gear
�)
Move the gear lever to the right
then back.
Page 211 of 352

Downloaded from www.Manualslib.com manuals search engine XI
209
PRACTICAL INFORMATION
Towbar suitable for the attachment
of a trailer with additional lighting
and signalling.
Your vehicle is primarily designed
for transporting people and luggage,
but it may also be used for towing a
trailer.
We recommend the use of genuine
CITROËN towbars and their har-
nesses that have been tested and
approved from the design stage
of your vehicle, and that the fi t-
ting of the towbar is entrusted to
a CITROËN dealer or a qualifi ed
workshop.
If the towbar is not fi tted by a
CITROËN dealer, it is imperative
that it is fi tted in accordance with the
vehicle manufacturer's instructions.
Driving advice
Distribution of loads
�)
Distribute the load in the trailer
so that the heaviest items are as
close as possible to the axle and
the nose weight approaches the
maximum permitted without ex-
ceeding it.
Air density decreases with altitude,
thus reducing engine performance.
Above 1 000 metres, the maximum
towed load must be reduced by 10 %
for every 1 000 metres of altitude.
Refer to the "Technical Data" section
for details of the weights and towed
loads which apply to your vehicle.
Side wind
�)
Take into account the increased
sensitivity to side wind.
�)
To lower the engine speed, re-
duce your speed.
The maximum towed load on a long
incline depends on the gradient and
the ambient temperature.
In all cases, keep a check on the
coolant temperature.
�)
If the warning lamp and
the STOP
warning lamp
come on, stop the vehicle
and switch off the engine
as soon as possible.
Braking
Towing a trailer increases the brak-
ing distance.
To avoid overheating of the brakes
on a long mountain type of descent,
the use of engine braking is recom-
mended.
Tyres
�)
Check the tyre pressures of the
towing vehicle and of the trailer,
observing the recommended
pressures.
Lighting
�)
Check the electrical lighting and
signalling on the trailer.
The rear parking sensors will be
deactivated automatically if a gen-
uine CITROËN towbar is used.
Driving with a trailer places greater
demands on the towing vehicle and
the driver must take particular care.
Cooling
Towing a trailer on a slope increases
the temperature of the coolant.
As the fan is electrically controlled,
its cooling capacity is not dependent
on the engine speed.
Page 340 of 352

Downloaded from www.Manualslib.com manuals search engine 338
VISUAL SEARCH
Dashboard fuses ...................... 197-199
Opening the bonnet ......................... 174
Changing a fuse .............................. 197
5-speed manual gearbox ................. 147
Electronic gearbox
system ................................... 149-152
Automatic
gearbox.................................. 156-159
Hill start assist ................................. 146
Sun visor.......................................... 105
Electric parking
brake...................................... 139-145
Courtesy lamps................................ 103
Toll/parking ticket windows .............. 105
Child surveillance mirror .................. 105
Rear view mirror ................................ 77
Interior fi ttings ........................... 106-108
- glovebox
- storage
- cool storage
- mat
INSTRUMENTS AND CONTROLS
NaviDrive .................................. 231-273
Setting the date/time........................ 264
MyWay ...................................... 275-306
Setting the date/time........................ 298
Audio system ............................ 307-328
Setting the date/time........................ 320
General: ventilation/heating/air
conditioning ............................... 56-57
Manual air conditioning................. 58-59
Digital air conditioning .................. 60-63
Additional air conditioning.................. 64
Centre console ................................ 107
Smoker's kit ..................................... 107
Emergency or
assistance call ...................... 130, 227
Lane departure
warning system............................. 168
Page 345 of 352

Downloaded from www.Manualslib.com manuals search engine 343
ALPHABETICAL INDEX
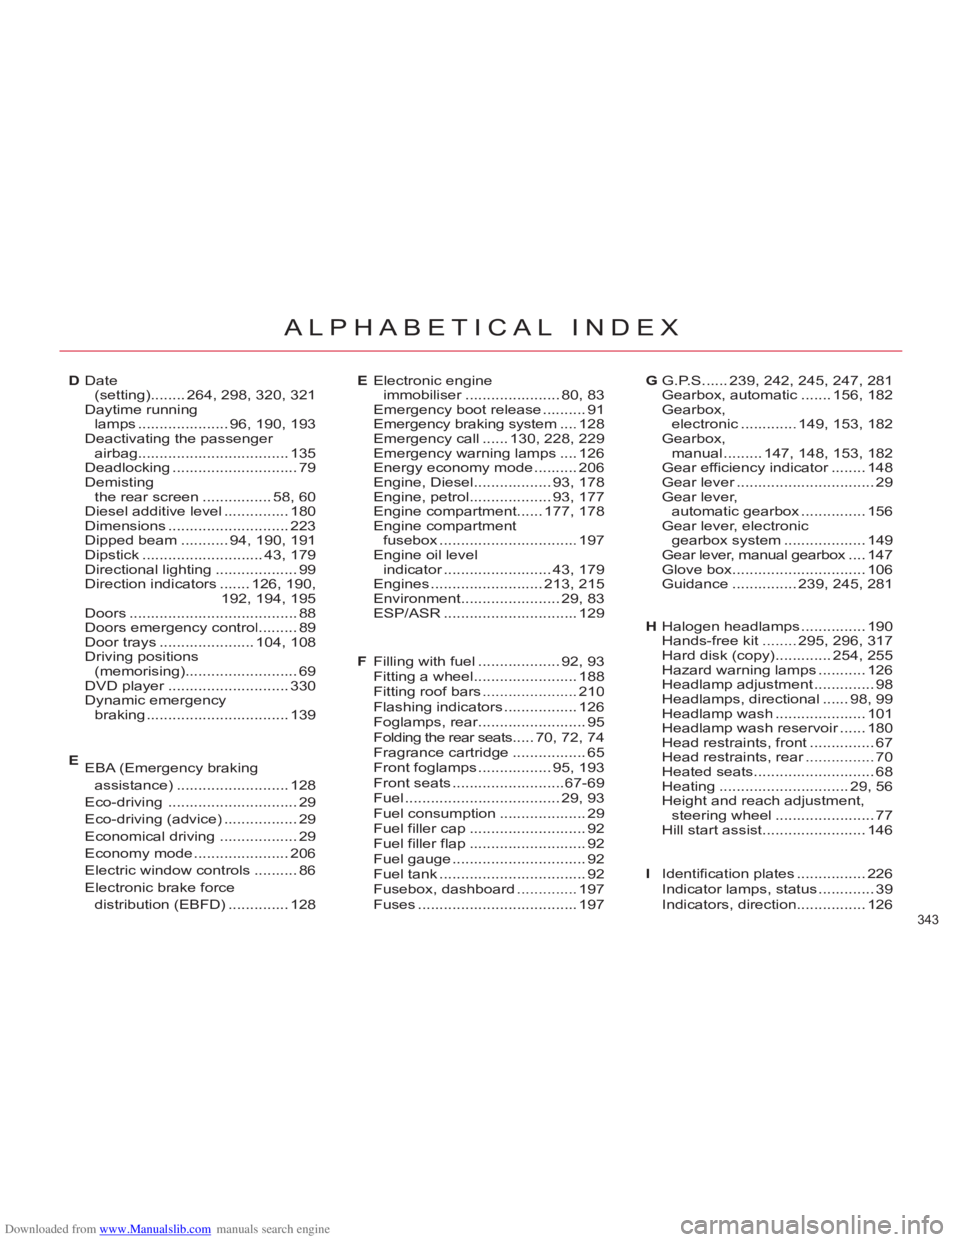
Halogen headlamps...............190Hands-free kit........295, 296,317Hard disk (copy).............254,255Hazard warning lamps...........126Headlamp adjustment..............98Headlamps, directional......98, 99Headlamp wash.....................101Headlamp wash reservoir......r180Head restraints, front...............67Head restraints, rear................r70Heated seats............................68Heating..............................29, 56Height and reach adjustment,
steering wheel.......................77Hill start assist........................146
Date (setting)........264,298, 320,321Daytime runninglamps .....................96, 190,193Deactivating the passenger airbag................................... 135Deadlocking.............................79Demisting
the rear screen ................58,60Diesel additive level............... 180Dimensions............................ 223Dipped beam ...........94, 190,191Dipstick ............................43,179Directional lighting ...................99Direction indicators....... 126, 190,
192, 194,195Doors.......................................88Doors emergency control.........89Door trays ...................... 104,108Driving positions(memorising) ..........................69DVD player............................r330Dynamic emergencybraking................................. 139
Electronic engine immobiliser......................r80,83Emergency boot release ..........91Emergency braking system ....128Emergency call...... 130,228, 229Emergency warning lamps ....126Energy economy mode..........206Engine, Diesel ..................93, 178Engine, petrol ...................93, 177Engine compartment ......177, 178Engine compartmentfusebox................................197Engine oil levelindicator.........................r43, 179Engines ..........................213, 215Environment .......................29,83ESP/ASR ...............................129
G.P.S...... 239,242,245, 247,281Gearbox, automatic....... 156,182Gearbox,electronic .............149, 153,182Gearbox,manual.........147,148, 153,182Gear efficiency indicator........r148Gear lever................................r29Gear lever, automatic gearbox............... 156Gear lever, electronicgearbox system ................... 149Gear lever, manual gearbox....x147Glove box ............................... 106Guidance...............239, 245,281
DEG
H
EBA (Emergency braking
assistance)..........................128
Eco-driving ..............................29
Eco-driving (advice).................29
Economical driving ..................29
Economy mode ......................206
Electric window controls..........86
Electronic brake force
distribution (EBFD) ..............128
EFillin
g with fuel ...................92,93Fitting a wheel........................188Fitting roof bars ......................210Flashing indicators.................126Foglamps, rear.........................r95Folding the rear seats.....70, 72,74Fragrance cartridge.................65Front foglamps.................95, 193Front seats ..........................67-69Fuel....................................29,93Fuel consumption ....................29Fuel filler cap...........................92Fuel filler flap ...........................92Fuel gauge...............................92Fuel tank..................................92Fusebox, dashboard..............197Fuses.....................................197
F
Identification plates
................226Indicator lamps, status.............39Indicators, direction................126
I