change Citroen C4 PICASSO 2013 1.G Owner's Guide
[x] Cancel search | Manufacturer: CITROEN, Model Year: 2013, Model line: C4 PICASSO, Model: Citroen C4 PICASSO 2013 1.GPages: 420, PDF Size: 9.66 MB
Page 185 of 420
183
4
Driving
The change from one level of alertto the next takes place if the drivingconditions do not change (speedunchanged, no change of lane...)
Severe weather conditions (very heavy rain, accumulation of snow in front of the radar) may interfere with the operation of the system, resulting inthe display of the message " Systeminactive: Reduced visibility
". T hesystem remains unavailable until themessage disappears.
If the speed of your vehicle is too high when approaching another vehicle, the first level of aler t may not be displayed: the level 2 aler t may be displayeddirectly.
On the other hand, the level 1 aler t is never displayed with the triggeringthreshold 3 (close).
Alerts
According to the collision risk detected by thesystem and the aler t threshold chosen, three
levels of aler t can be triggered:
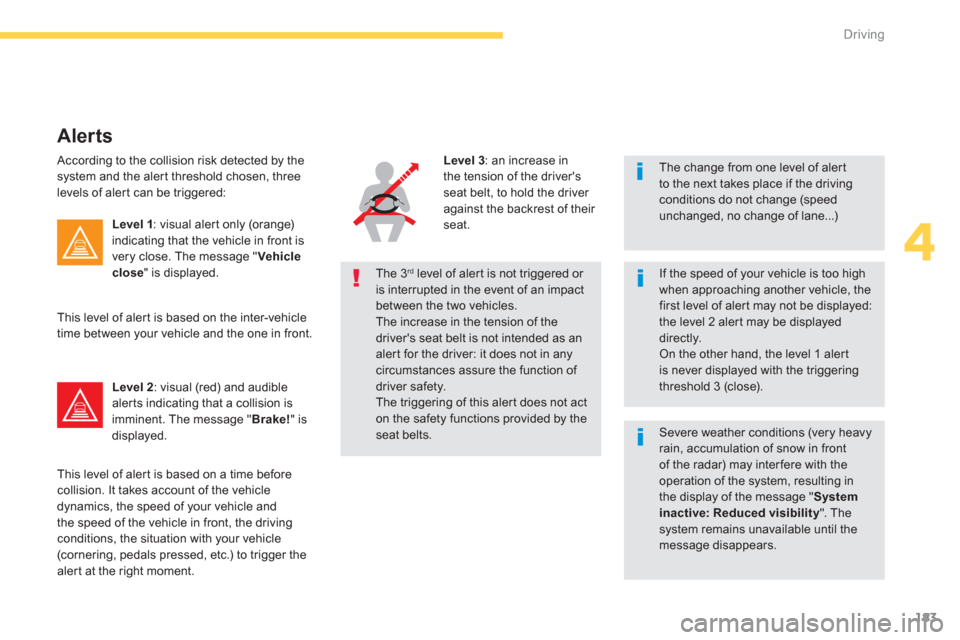
Level 1: visual aler t only (orange)indicating that the vehicle in front is
very close. The message " Vehicle close" is displayed.
Level 2 : visual (red) and audible alerts indicating that a collision is imminent. The message "Brake!
" is
displayed. Thi
s level of alert is based on the inter-vehicletime between your vehicle and the one in front.
Thi
s level of alert is based on a time beforecollision. It takes account of the vehicle
dynamics, the speed of your vehicle and
the speed of the vehicle in front, the driving
conditions, the situation with your vehicle (cornering, pedals pressed, etc.) to trigger the
alert at the right moment. Level
3: an increase in
the tension of the driver'sseat belt, to hold the driver
against the backrest of their seat.
The 3rdlevel of aler t is not triggered or is interrupted in the event of an impactbetween the two vehicles. The increase in the tension of the driver's seat belt is not intended as analer t for the driver: it does not in anycircumstances assure the function of driver safety.The triggering of this aler t does not act on the safety functions provided by theseat belts.
Page 188 of 420
186
Driving
Blind spot sensors
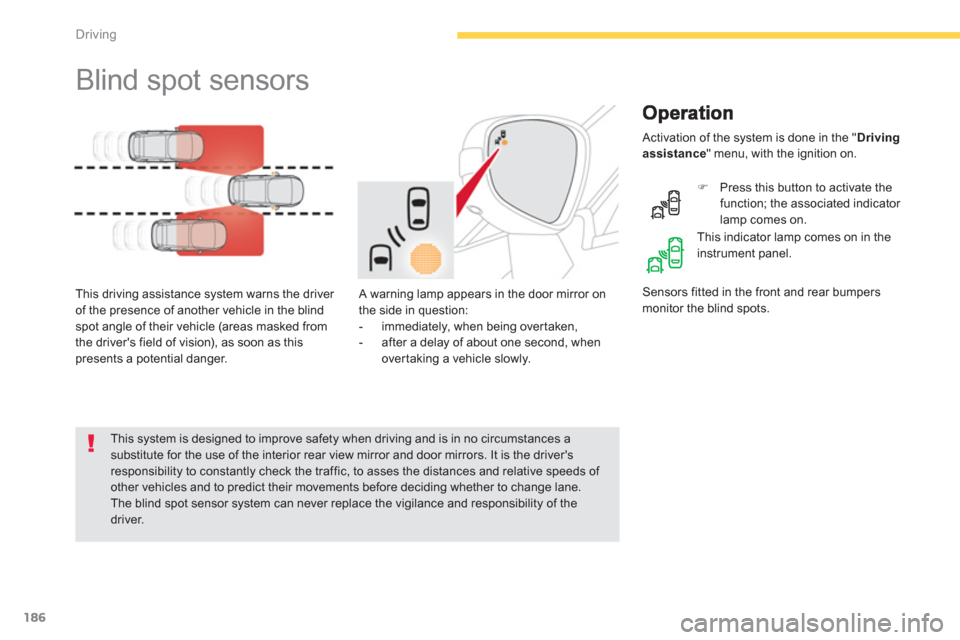
A warning lamp appears in the door mirror on
the side in question:
-
immediately, when being over taken,
- after a delay of about one second, whenover taking a vehicle slowly. This drivin
g assistance system warns the driver
of the presence of another vehicle in the blind
spot angle of their vehicle (areas masked from
the driver's field of vision), as soon as thispresents a potential danger.
Sensors fitted in the front and rear bumpersmonitor the blind spots.
This system is designed to improve safety when driving and is in no circumstances a substitute for the use of the interior rear view mirror and door mirrors. It is the driver'sresponsibility to constantly check the traffic, to asses the distances and relative speeds of other vehicles and to predict their movements before deciding whether to change lane.
The blind spot sensor system can never replace the vigilance and responsibility of thedriver.
Activation of the system is done in the " Driving assistance
" menu, with the ignition on.
�)
Press this button to activate the
function; the associated indicator lamp comes on.
This indicator lamp comes on in the
instrument panel.
Page 196 of 420
194
Driving
Park Assist
This system provides active assistance with parking, detecting a parking space then controlling the steering to park in the space. It controls the steering while the driver manages the accelerator, brakes, gears andclutch (manual gearbox). During phases of entry into and exit from a parking space, the system provides visual and audible information
to the driver in order to make the manoeuvres safe. It may be necessary to move for wards and backwards more than once.
During a manoeuvre the steering wheelturns quickly: do not hold the steeringwheel, do not place your hand between
the spokes of the steering wheel and take care with loose and bulky clothing, scarves, handbags... There is a risk of injury.
When Park Assist is activated, itprevents a change to STOP mode of Stop & Start. In STOP mode, activation of Park Assist restarts the engine.
The Park Assist system cannot in anycircumstances replace the care and responsibility of the driver.
The driver must remain in control of their vehicle ensuring that thespace remains clear throughout themanoeuvre. In some circumstances, the sensors may not detect small obstacles located in their blind spots.
The driver can take control at any time bygripping the steering wheel.
The Park Assist s
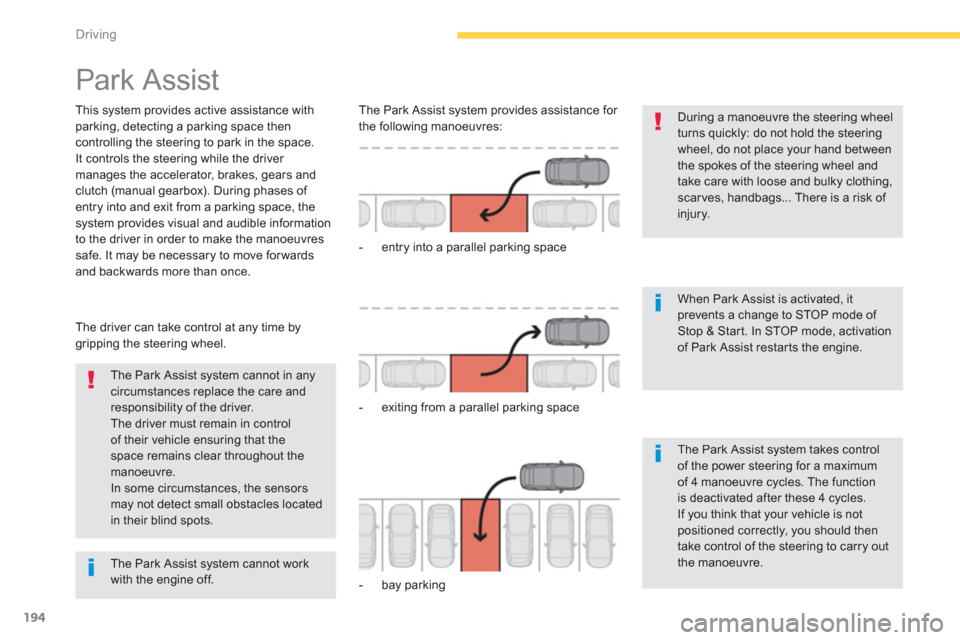
ystem provides assistance for
the following manoeuvres:
- entr
y into a parallel parking space
- exitin
g from a parallel parking space
- ba
y parking
The Park Assist system takes control of the power steering for a maximumof 4 manoeuvre cycles. The functionis deactivated after these 4 cycles.If you think that your vehicle is notpositioned correctly, you should then take control of the steering to carry outthe manoeuvre.
The Park Assist system cannot workwith the engine off.
Page 210 of 420
208
Visibility
Automatic headlamp dipping
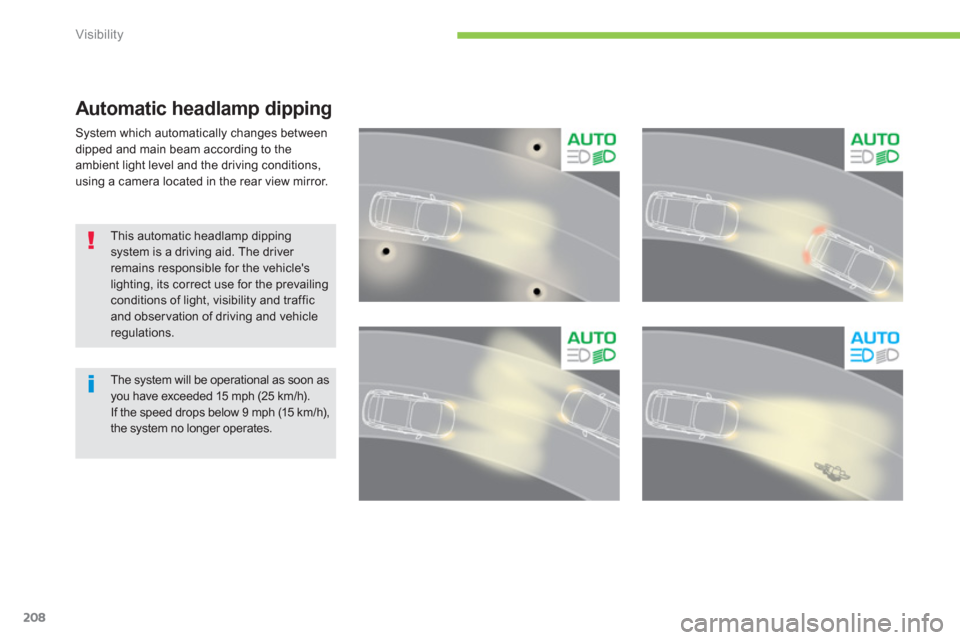
System which automatically changes between
dipped and main beam according to theambient light level and the driving conditions,
using a camera located in the rear view mirror.
This automatic headlamp dipping system is a driving aid. The driver remains responsible for the vehicle's lighting, its correct use for the prevailingconditions of light, visibility and trafficand observation of driving and vehicle regulations.
The system will be operational as soon asyou have exceeded 15 mph (25 km/h).
If the speed drops below 9 mph (15 km/h), the system no longer operates.
Page 211 of 420

209
5
Visibility
The system may suffer interference or not work correctly:
- under conditions of poor visibility(for example, snowfall, heavy rainor thick fog, ...),
- if the windscreen is dir ty, misted or obscured (by a sticker, ...) in front of the camera,
- if the vehicle is facing highly reflective signs.
The system is not able to detect:
- road users that do not have their own lighting, such as pedestrians,
- road users whose lighting is
obscured, such as vehicles running behind a safety barrier (on amotorway, for example),
- road users at the top or bottom of a steep slope, on twisty roads, oncrossroads.Switching off
�)
In the "Driving assistance"menu, press the button, its
indicator lamp goes o
ff and
the the system changes to
"automatic illumination of headlamps" mode. To reactivate the s
ystem, flash the headlampsagain.
Depending on thesituation, one of these two indicator lamps comes on.
Switching on
�)
Put the lighting control stalk ring
in the "AUTO" position.
�)
In the " Driving assistance"
menu, press the button, its
indicator lamp comes on.
Operation
- dipped beam is maintained, this
indicator lamp comes on in the
instrument panel.
�)Flash the headlamps(going beyond the point
of resistance) to activate
the function.
Once the function is activated, the system
operates as follows:
If the ambient li
ght level is very low and the
traffic conditions permit:
- m
ain beam comes on
automatically: this indicator lamp
comes on in the instrument panel. If the ambient li
ght level is sufficient and/or
if the traffic conditions do not allow illumination
of the main beam headlamps:
Pause
If the situation requires a change of headlampbeam, driver can take over at any time.
�) Flashing the headlamps
again pauses the
function and thesystem changes to "automatic illumination of headlamps" mode:
- i
f the AUTO indicator lamp was on in green, the system changes to main
beam,
- i
f the AUTO indicator lamp was on in
blue, the system changes to dippedbeam.
Page 226 of 420
224
Safety
Ty r e u n d e r - i nfl ation detection
The system continuously monitors thepressures on the four tyres, once the vehicle is moving.
It compares the information given by the four
wheel speed sensors with reference values,
which must be reinitialised ever
y time the tyre pressures are adjusted or a wheel changed. The system triggers an aler t as soon as it
detects a drop in the inflation pressure of one
or more tyres.
The under-inflation detection system does not replace the vigilance or theresponsibility of the driver. This system does not avoid the need tocheck the tyre pressures (including the spare wheel) every month as well as before a long journey. Driving with under-inflated tyres impairsroad holding, extends braking distances and causes premature tyre wear,particularly under arduous condition(high loading, high speed, long journey). S
ystem which automatically checks the pressure of the tyres while driving.
The inflation pressures defined for your vehicle can be found on the tyrepressure label (see the "Identificationmarkings" section). Tyre pressures should be checkedwhen the tyres are "cold" (vehicle stopped for 1 hour or after a journey of less than 6 miles (10 km) at moderatespeeds). Other wise, add 0.3 bar to the pressures shown on the label.
Driving with under-inflated tyresincreases fuel consumption.
Page 236 of 420
234
Safety
The driver must ensure that passengers usethe seat belts correctly and that they are allrestrained securely before setting off.
Wherever you are seated in the vehicle, always fasten your seat belt, even for short journeys. Do not interchange the seat belt buckles as they will not fulfil their role fully.
The seat belts are fitted with an inertia reel permitting automatic adjustment of the length of the strap to your size. The seat belt isstowed automatically when not in use.
Before and after use, ensure that the seatbelt is reeled in correctly.
The lower par t of the strap must be positioned as low as possible on the pelvis.
The upper par t must be positioned in the hollow of the shoulder.
The inertia reels are fitted with an automatic locking device which comes into operation inthe event of a collision, emergency braking or if the vehicle rolls over. You can release the device by pulling firmly on the strap and releasing it so that it reels in slightly.
Recommendations for children
Use a suitable child seat if the passenger is less than 12 years old or shor ter than one and a half metres.Never use the same seat belt to secure more than one person. Never allow a child to travel on your lap.
In order to be effective, a seat belt must:
- be tightened as close to the body as possible,
- be pulled in front of you with a smooth movement, checking that it does nottwist,
- be used to restrain only one person,
- not bear any trace of cuts or fraying,
- not be converted or modified to avoidaffecting its per formance.
In the event of an impact
Depending on the nature and seriousness of the impact
, thepretensioning device may be deployedbefore and independently of the airbags.Deployment of the pretensioners isaccompanied by a slight discharge of harmless smoke and a noise, due to theactivation of the pyrotechnic car tridge incorporated in the system. In all cases, the airbag warning lampcomes on.Following an impact, have the seat belts system checked, and if necessary replaced,by a CITROËN dealer or a qualified workshop.
In accordance with current safety regulations, for all repairs on your vehicle, go to a qualified workshop with the skills and equipment needed, which a CITROËN dealer is able to provide.
Have your seat belts checked regularly by a CITROËN dealer or a qualified workshop, particularly if the straps show signs of damage. Clean the seat belt straps with soapywater or a textile cleaning product, sold byCITROËN dealers.
After folding or moving a seat or rear bench seat, ensure that the seat belt is positioned and reeled in correctly.
Page 276 of 420

274
Practical information
Parking the vehicle
Immobilise the vehicle where it does notblock traffic: the ground must be level,stable and not slippery. Apply the parking brake unless it has
been programmed to automatic mode,switch off the ignition and engage first gear *
to block the wheels.
Check that the braking warning lamp and the P
warning lamp in the parking brake control lever come on.
For greater safety, place a chock 2against the wheel opposite to the one being changed.
The occupants must get out of the vehicle and wait where they are safe.
Never go underneath a vehicle raised using a jack; use an axle stand.
List of operations
*
Position Rfor an electronic gearbox or P
for an automatic gearbox.
�)
Remove the finisher from from each of bolts using the tool 4(depending on equipment). �)
Fit the security socket 5
on the wheelbrace 1to slacken the security bolt (if fitted).�)
Slacken the other bolts (no more than a 1/4 turn) using the wheelbrace 1only.
Page 277 of 420
275
7
Practical information
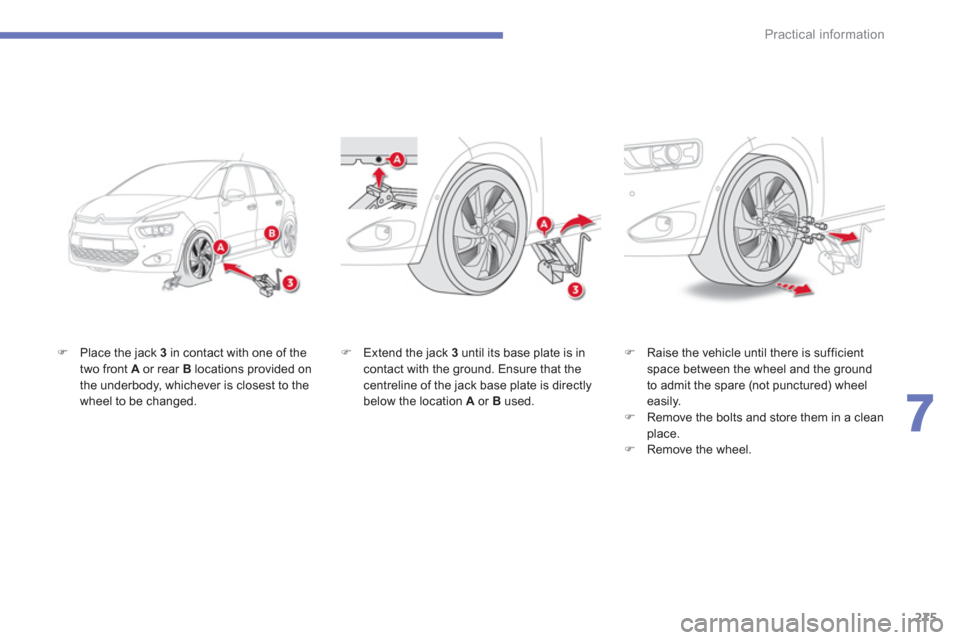
�)Place the jack 3 in contact with one of thetwo front Aor rear B
locations provided on
the underbody, whichever is closest to the
wheel to be changed.
�) Extend the jack 3
until its base plate is in contact with the ground. Ensure that the centreline of the jack base plate is directly below the location Aor B
used.
�)
Raise the vehicle until there is sufficient space between the wheel and the ground
to admit the spare (not punctured) wheel easily.�) Remove the bolts and store them in a clean place. �)
Remove the wheel.
Page 282 of 420
280
Practical information
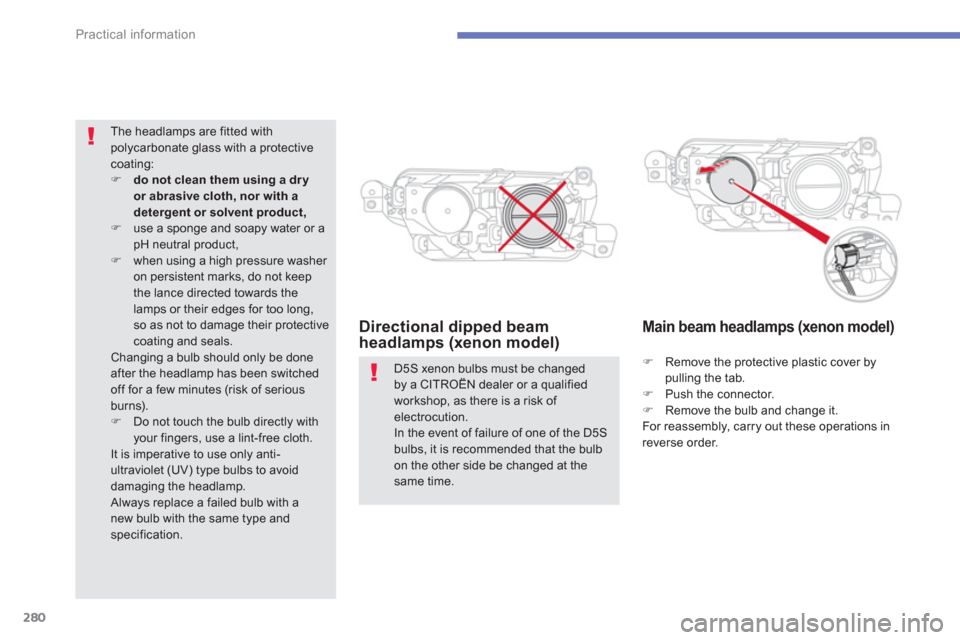
Directional dipped beam
headlamps (xenon model)
Main beam headlamps (xenon model)
�)Remove the protective plastic cover bypulling the tab.�)Push the connector. �)Remove the bulb and change it.
For reassembly, carry out these operations in
reverse order.
D5S xenon bulbs must be changed by a CITRO