window Citroen C4 PICASSO 2016 2.G User Guide
[x] Cancel search | Manufacturer: CITROEN, Model Year: 2016, Model line: C4 PICASSO, Model: Citroen C4 PICASSO 2016 2.GPages: 527, PDF Size: 13.72 MB
Page 75 of 527
73
C4-Picasso-II_en_Chap02_ouvertures_ed01-2016
Electric windows
Manual operation
To open or close the window, press or pull the
switch gently. The window stops as soon as the
s
witch is released.
To open or close the window, press or pull
the
switch fully: the window opens or closes
c
ompletely when the switch is released.
P
ressing the switch again stops the movement
o
f the window.
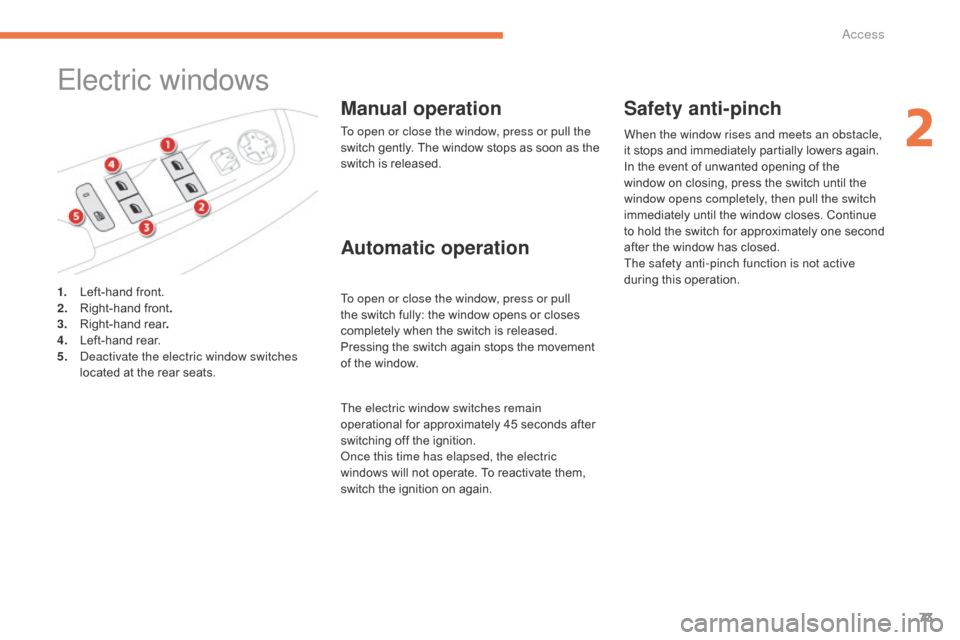
1.
L
eft-hand
front.
2.
R
ight-hand
front .
3.
R
ight-hand
r
ear .
4.
L
eft-hand
r
ear.
5.
D
eactivate the electric window switches
located
at
the
rear
seats.
Automatic operation Safety anti-pinch
When the window rises and meets an obstacle,
it
stops and immediately partially lowers again.
In
the event of unwanted opening of the
w
indow on closing, press the switch until the
w
indow opens completely, then pull the switch
immediately
until the window closes. Continue
t
o
h
old
t
he
s
witch
f
or
a
pproximately
o
ne
s
econd
a
fter the window has closed.
The safety anti-pinch function is not active
during
this operation.
The electric window switches remain
operational
for
approximately
45
seconds
after
s
witching
off
the
ignition.
Once this time has elapsed, the electric
windows
will
not
operate.
To
reactivate
them,
s
witch
the
ignition
on
again.
2
Access
Page 76 of 527
74
C4-Picasso-II_en_Chap02_ouvertures_ed01-2016
Reinitialising the electric
windows
Deactivating the rear
controls for the rear
windows
In the event of contact during operation o
f the windows, you must reverse the
movement
of the window. To do this,
p
ress the switch concerned.
When
operating the passenger electric
w
indow switches, the driver must
ensure
that nothing is preventing
c
orrect closing of the windows.
The driver must ensure that the
passengers
use the electric windows
c
o r r e c t l y.
Be particularly aware of children when
operating
t
he
w
indows.
Be
aware of passengers or other
p
ersons present when closing the
w
indows using the electronic key or the
"
Keyless Entry and Starting" system.
Following
reconnection
of
the
battery,
the
s
afety
anti-pinch
function
must
be
reinitialised.
The safety anti-pinch function is not active
during
these
operations.
For the safety of your children, press
switch 5 to prevent operation of the
rear windows irrespective of their
positions.
The indicator lamp in the button comes on,
accompanied
by
a
message
confirming
a
ctivation.
It
remains
on,
as
long
as
the
child
l
ock
is
off
(deactivated).
Use of the rear electric windows from the
driver's
controls
remains
possible. For
each
window:
-
l
ower the window completely, then raise it,
it will rise in steps of a few centimetres with
each
action.
Repeat
the
operation
until
the
w
indow closes completely,
-
c
ontinue to pull the switch for at least
one second
after
reaching
this
position,
w
indow
c
losed.
Access
Page 94 of 527
92
C4-Picasso-II_en_Chap03_ergonomie-confort_ed01-2016
Ventilation
Air intake
The air circulating in the passenger compartment is filtered and originates either
f
rom the outside via the grille located at the
b
ase of the windscreen or from the inside in air
recirculation
m
ode.
Air treatment
The incoming air follows various routes depending on the controls selected by the
d
river:
-
d
irect arrival in the passenger
c
ompartment (air intake),
-
p
assage through a heating circuit (heating),
-
p
assage through a cooling circuit (air
c
onditioning).
Control panel
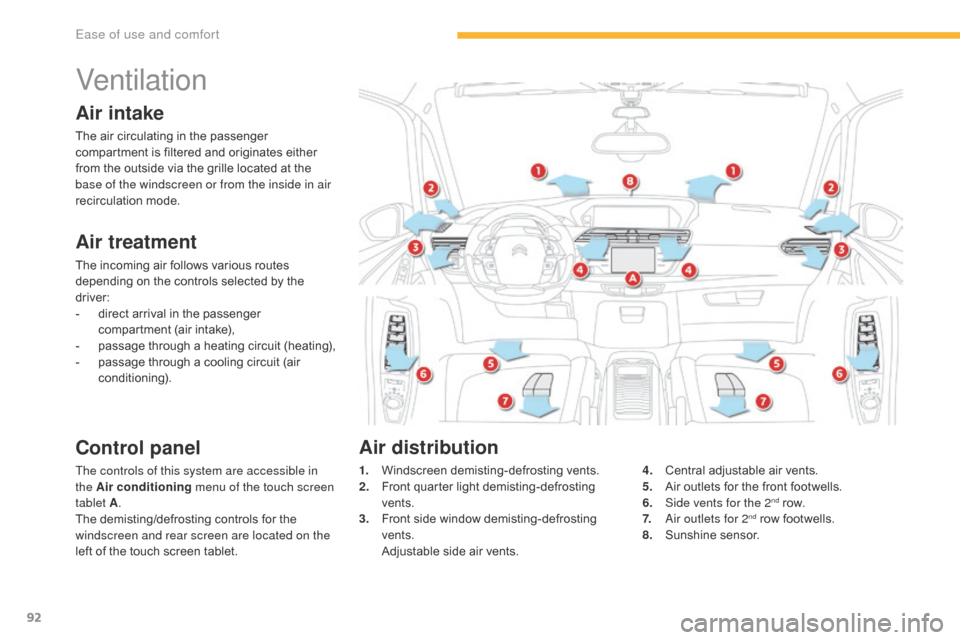
The controls of this system are accessible in
the Air conditioning menu of the touch screen
tablet A .
The
demisting/defrosting controls for the
w
indscreen and rear screen are located on the
left
of the touch screen tablet. 1. W
indscreen d emisting-defrosting v ents.
2. F ront quarter light demisting-defrosting
ve
nts.
3.
F
ront side window demisting-defrosting
ve
nts.
A
djustable side air vents.4. C
entral adjustable air vents.
5. A ir outlets for the front footwells.
6.
S
ide vents for the 2
nd row.
7. A
ir outlets for 2nd row footwells.
8. S
unshine s
ensor.
Air distribution
Ease of use and comfort
Page 98 of 527
96
C4-Picasso-II_en_Chap03_ergonomie-confort_ed01-2016
Air intake / Air recirculation
The intake of exterior air prevents the formation of mist on the windscreen and side windows.
The recirculation of interior air isolates the
passenger
compartment from exterior odours
a
nd smoke.
F
P
ress the button to choose
how
air enters the passenger
c
ompartment.
Air conditioning On / Off
Switching on
Switching off
The air conditioning does not operate when the air flow adjustment is set
t
o off. F
P
ress this button to activate the
air conditioning system.
Avoid
driving
for
too
long
without
r
ecirculation
of
interior
air
(risk
of
m
isting
and
deterioration
of
air
quality).
This function allows hot or cold air to be
delivered
selectively
and
more
quickly.
The
air conditioning is designed to operate
e
ffectively in all seasons, with the windows closed.
It
enables you to:
-
l
ower the temperature, in summer,
-
i
ncrease the effectiveness of the demisting in
w
inter, above 3°C.
F
P
ress this button again to
d
eactivate the air conditioning
s
ystem.
Air distribution
adjustment
These buttons are used to arrange the distribution of air in the passenger
c
ompartment by combining several air outlets.
Windscreen.
The
air distribution can be adapted by using
s
everal buttons: illumination of the button
c
onfirms the presence of fan boosted air in the
direction indicated, the button illumination off
indicates the absence of fan boosted air in the
direction
i
ndicated.
For a uniform distribution of air in the
passenger
compartment, the three buttons can
b
e
us
ed
s
imultaneously.Footwells.
Central
and side vents.When
the indicator lamp is off, air is taken from
o
utside the vehicle. When the indicator lamp is
o
n, air is recirculated from inside the vehicle,
the
intake for air outside the vehicle is inhibited.When the indicator lamp is on, the air
conditioning
function is activated.
When the indicator lamp is off, the air
conditioning
function is deactivated.
Ease of use and comfort
Page 100 of 527
98
C4-Picasso-II_en_Chap03_ergonomie-confort_ed01-2016
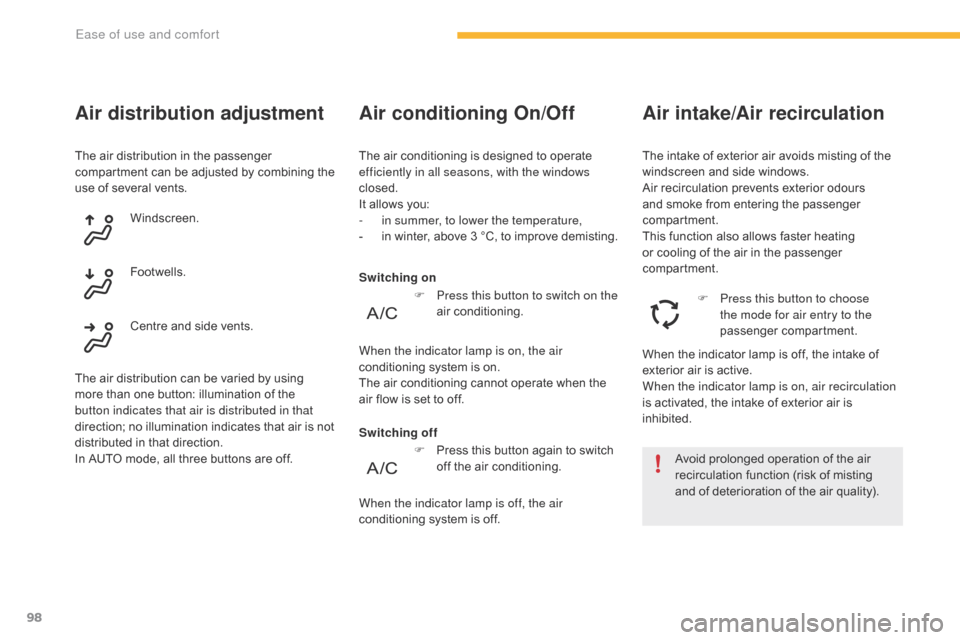
The air distribution in the passenger compartment can be adjusted by combining the
u
se of several vents.
Air distribution adjustment
Windscreen.
Footwells.
Centre
and side vents.
The
air
distribution can be varied by using
m
ore
than one button: illumination of the
b
utton indicates that air is distributed in that
direction;
no illumination indicates that air is not
d
istributed in that direction.
In
AUTO
mode, all three buttons are off.Switching off Switching on
Air conditioning On/Off
The air conditioning is designed to operate e
fficiently in all seasons, with the windows
closed.
It
allows you:
-
i
n summer, to lower the temperature,
-
i
n winter, above 3 °C, to improve demisting.
Avoid
prolonged operation of the air
r
ecirculation function (risk of misting
a
nd of deterioration of the air quality).
When
the indicator lamp is off, the intake of
e
xterior air is active.
When the indicator lamp is on, air recirculation
is
activated, the intake of exterior air is
in
hibited.F
P
ress this button to choose
the mode for air entry to the
passenger
c
ompartment.
The
intake of exterior air avoids misting of the w
indscreen and side windows.
Air
recirculation prevents exterior odours
a
nd smoke from entering the passenger
c
ompartment.
This
function also allows faster heating
o
r cooling of the air in the passenger
c
ompartment.
Air intake/Air recirculation
F Press this button again to switch o
ff the air conditioning.
When the indicator lamp is off, the air
conditioning
system is off.
F
P
ress this button to switch on the
air
c
onditioning.
When the indicator lamp is on, the air
conditioning system is on.
The
air
conditioning cannot operate when the
a
ir
flow
is
set to off.
Ease of use and comfort
Page 104 of 527

102
C4-Picasso-II_en_Chap03_ergonomie-confort_ed01-2016
Front demist -
defrost
F Press this button to demist or defrost the windscreen and side
windows
as quickly as possible.
T
he indicator lamp in the button
comes
on.
With
Stop & Start, when demisting has
b
een activated, the STOP mode is not
available.
The
system automatically manages the air
c
onditioning (depending on version), air
f
low
and
air intake, and provides optimum
d
istribution towards the windscreen and side
windows.
F
T
o
switch it off press this button again or
a
djust the setting for air flow or distribution.
T
he
indicator lamp goes off.
Rear screen demist -
defrost
Switching on
Switching off
F Press this button to demist /
defrost the rear screen and
(depending
on version) the door
m
irrors.
The demisting/defrosting switches off automatically to prevent an excessive consumption of current.
The rear screen demist - defrost
can only operate when the engine is
r
unning.
Switch
off the heating of the rear screen
a
nd door mirrors as soon as you judge it
p
ossible, as reducing the consumption
o
f electrical current reduces fuel
consumption.
F
I
t is possible to stop the
demisting/defrosting
o
peration
b
efore it is switched off
automatically
by
pressing
the
bu
tton
ag
ain.
The indicator lamp associated with the button
goes
off.
The indicator lamp associated with the button comes on.
Ease of use and comfort
Page 108 of 527
106
C4-Picasso-II_en_Chap03_ergonomie-confort_ed01-2016
Sliding sun visor
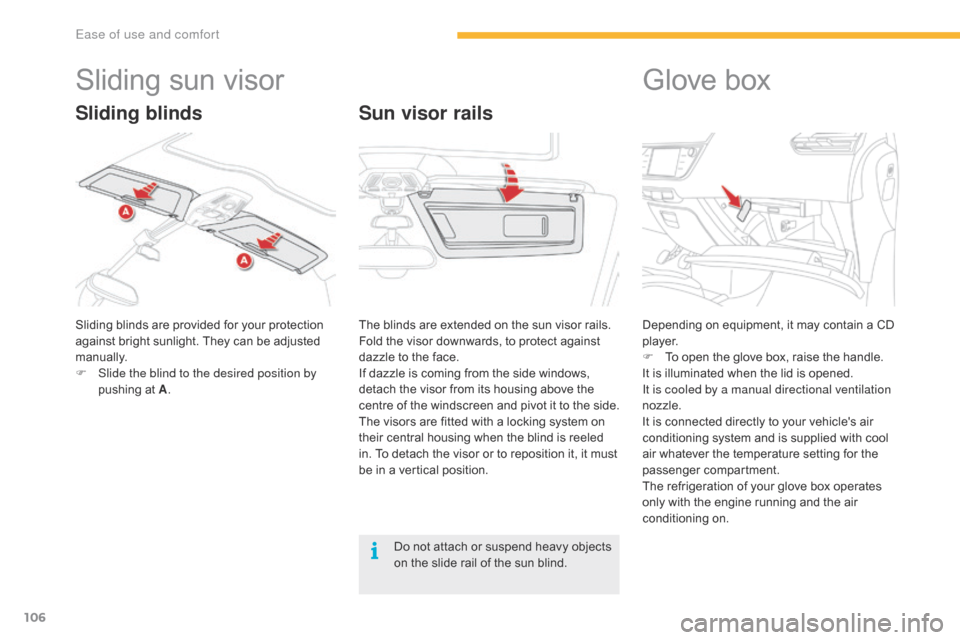
Sliding blinds are provided for your protection against bright sunlight. They can be adjusted
m
anually.
F
S
lide the blind to the desired position by
pushing
at A.
Sun visor rails
Glove box
Depending on equipment, it may contain a CD p
l aye r.
F
T
o open the glove box, raise the handle.
It
is illuminated when the lid is opened.
It is cooled by a manual directional ventilation
nozzle.
It
is connected directly to your vehicle's air
c
onditioning system and is supplied with cool
a
ir whatever the temperature setting for the
p
assenger
c
ompartment.
The
refrigeration of your glove box operates
o
nly with the engine running and the air
c
onditioning
on
.
The
blinds
are
extended
on
the
sun
visor
rails.
Fold
the
visor
downwards,
to
protect
against
d
azzle
to
the
face.
If
dazzle
is
coming
from
the
side
windows,
d
etach
the
visor
from
its
housing
above
the
c
entre
of
the
windscreen
and
pivot
it
to
the side.
The
visors
are
fitted
with
a
locking
system
on
t
heir
central
housing
when
the
blind
is
reeled
i
n.
To
detach
the
visor
or
to
reposition
it,
it
must
b
e
in
a
vertical
position.
Sliding blinds
Do not attach or suspend heavy objects o n the slide rail of the sun blind.
Ease of use and comfort
Page 114 of 527
112
C4-Picasso-II_en_Chap03_ergonomie-confort_ed01-2016
Side blindsStorage wells
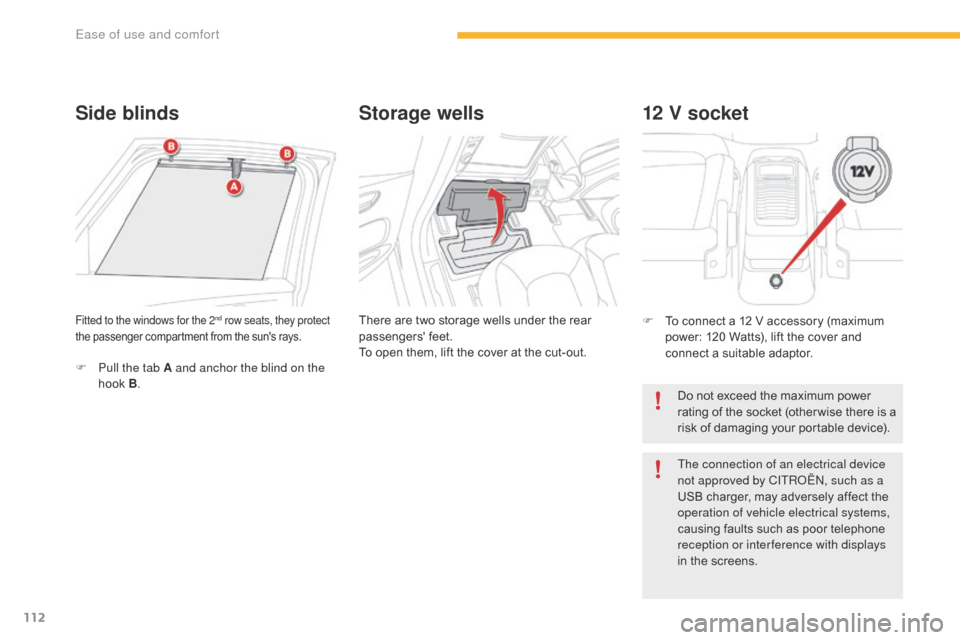
There are two storage wells under the rear p
assengers' f eet.
To
open them, lift the cover at the cut-out.Fitted to the windows for the 2nd row seats, they protect
the
passenger
compartment
from the sun's rays.
F Pull the tab A and anchor the blind on the hook B.
12 V socket
F To connect a 12 V accessory (maximum p
ower: 120 Watts), lift the cover and
c
onnect a suitable adaptor.
Do
not exceed the maximum power
r
ating of the socket (other wise there is a
r
isk of damaging your portable device).
The connection of an electrical device
not approved by CITROËN, such as a
USB
charger, may adversely affect the
o
peration of vehicle electrical systems,
causing
faults such as poor telephone
r
eception or inter ference with displays
in
the screens.
Ease of use and comfort
Page 238 of 527
236
C4-Picasso-II_en_Chap06_securite_ed01-2016
In the event of a minor impact or bump
on the side of the vehicle or if the
vehicle rolls over, the airbags may not
b
e deployed.
In the event of a rear or front collision,
none
of the lateral airbags is deployed.
System
contributing
towards
greater
protection
f
or
the
driver
and
passengers
(with
the
e
xception
of
the
rear
centre
passenger)
in
the
e
vent of a serious side impact in order to limit
the
risk
of
injury
to
the
side
of
the
head.
Each
curtain
airbag
is
built
into
the
pillars
and
t
he
upper
passenger
compartment
area.
Curtain airbags
Deployment
The curtain airbag is deployed at the same t
ime as the corresponding lateral airbag in the
e
vent of a serious side impact applied to all or
part of the side impact zone B, perpendicular
to
the longitudinal centreline of the vehicle on a
h
orizontal plane and directed from the outside
towards
the inside of the vehicle.
The
curtain airbag inflates between the front or
r
ear occupant of the vehicle and the windows.
If this warning lamp comes on in the instrument panel, you must contact
a CITROËN dealer or a qualified
workshop
to have the system checked.
Operating fault
The airbags may no longer be deployed in the event of a serious impact.
Safety
Page 257 of 527
255
C4-Picasso-II_en_Chap06_securite_ed01-2016
Child seats
The incorrect installation of a child seat in a
vehicle compromises the child's protection in
t
he event of an accident.
Check
that there is no seat belt or seat belt
b
uckle under the child seat as this could
de
stabilise
i
t.
Remember to fasten the seat belts or the
child seat harnesses keeping the slack in
relation
to the child's body to a minimum,
even
for short journeys.
For
the installation of a child seat using a
s
eat belt, ensure that this is well tensioned
on
the child seat and that it is holding the
c
hild seat firmly against the seat of your
v
ehicle. If your front passenger seat is
a
djustable, move it for ward if necessary.
At the rear seats, always leave sufficient
space
between the front seat and:
-
a
rear ward facing child seat,
-
t
he feet of a child seated in a for ward
facing
child seat.
Recommendations
For this, move the front seat for ward and if
necessary straighten its backrest.
For
o
ptimum
in
stallation
o
f
t
he
fo
rward
f
acing
c
hild seat, ensure that the back of the child
s
eat is as close as possible to the backrest
o
f the vehicle's seat, or in contact if possible.
The head restraint must be removed before
installing
a child seat with a backrest on the
p
assenger
sea
t.
Ensure that the head restraint is stowed or
attached securely so that it is not thrown
around the vehicle in the event of sharp
braking.
Refit the head restraint as soon as the child
seat
is removed.Installing a booster
cushion
As a safety precaution, do not leave:
- o ne or more children alone and
unsupervised in a vehicle,
-
a c
hild or an animal in a vehicle which
is
exposed to the sun, with the windows
c
losed,
-
t
he keys within reach of children inside
t
he vehicle.
To
prevent accidental opening of the doors,
u
se the child lock.
Take
care not to open the rear windows by
m
ore than one third.
To
protect young children from the rays of
t
he sun, fit side blinds on the rear windows.
The chest part of the seat belt must be
positioned
on the child's shoulder without
t
ouching the neck.
Ensure that the lap part of the seat belt
passes correctly over the child's thighs.
CITROËN recommends the use of a booster
seat which has a back, fitted with a seat belt
g
uide at shoulder level.
The
legislation
on
carrying
a
child
on
the
f
ront
passenger
seat
is
specific
to
each
c
ountry.
Refer
to
the
legislation
in
force
in
t
he
country
in
which
you
are
driving.
Deactivate
the
passenger's
front
airbag
w
hen
a
rear ward
facing
child
seat
is
installed
o
n
the
front
passenger
seat.
Other wise,
the
c
hild
would
risk
being
seriously
injured
or
k
illed
if
the
airbag
were
deployed.
Children at the front
6
Safety