boot CITROEN C4 PICASSO 2019 User Guide
[x] Cancel search | Manufacturer: CITROEN, Model Year: 2019, Model line: C4 PICASSO, Model: CITROEN C4 PICASSO 2019Pages: 316, PDF Size: 10.36 MB
Page 48 of 316

46
In the event of a malfunction with the
c entral locking system, the battery must
be disconnected to lock the boot and thus
ensure that the vehicle is locked fully.
Driver's door
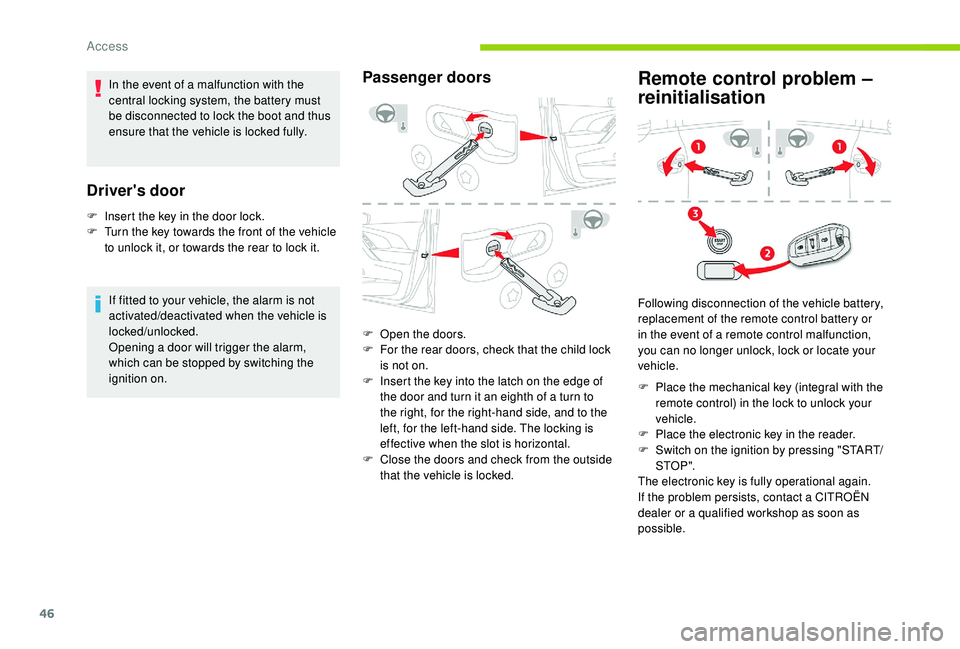
F Insert the key in the door lock.
F T urn the key towards the front of the vehicle
to unlock it, or towards the rear to lock it.
If fitted to your vehicle, the alarm is not
activated/deactivated when the vehicle is
locked/unlocked.
Opening a
door will trigger the alarm,
which can be stopped by switching the
ignition on.
Passenger doors
F Open the doors.
F F or the rear doors, check that the child lock
is not on.
F
I
nsert the key into the latch on the edge of
the door and turn it an eighth of a
turn to
the right, for the right-hand side, and to the
left, for the left-hand side. The locking is
effective when the slot is horizontal.
F
C
lose the doors and check from the outside
that the vehicle is locked.
Remote control problem –
reinitialisation
Following disconnection of the vehicle battery,
replacement of the remote control battery or
in the event of a
remote control malfunction,
you can no longer unlock, lock or locate your
vehicle.
F
P
lace the mechanical key (integral with the
remote control) in the lock to unlock your
vehicle.
F
P
lace the electronic key in the reader.
F
S
witch on the ignition by pressing "START/
STO P ".
The electronic key is fully operational again.
If the problem persists, contact a
CITROËN
dealer or a
qualified workshop as soon as
possible.
Access
Page 49 of 316

47
Changing the battery
Do not throw the remote control
batteries away, they contain metals
which are harmful to the environment.
Take them to an approved collection
point.
Doors
Opening
From outside
F After unlocking the vehicle or with the electronic key of the K eyless Entry and
Starting system in the recognition zone, pull
the door handle.
From inside
F Pull the interior opening control of a front
door; this unlocks the vehicle completely.
Closing
When a door is not closed correctly:
- e ngine running , this warning
lamp and a
message appear
in the instrument panel (digital
monochrome) for a
few seconds,
-
v
ehicle moving (speed above
6
mph (10 km/h)), this warning
lamp and a
message appear
in the instrument panel (digital
monochrome and 12
inch colour)
for a
few seconds, accompanied
by an audible signal.
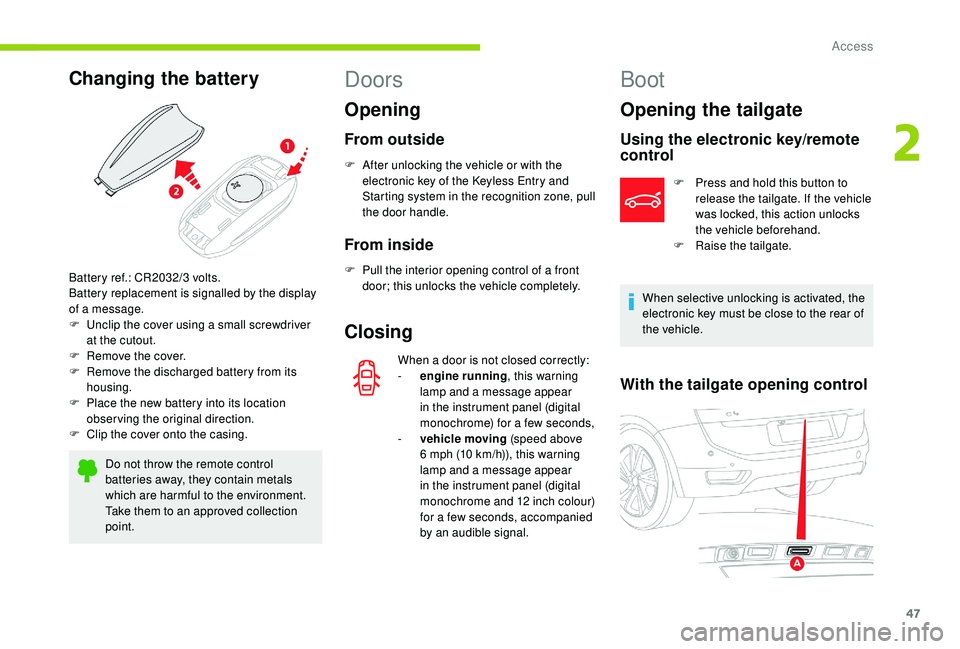
Battery ref.: CR2032/3
volts.
Battery replacement is signalled by the display
of a
message.
F
U
nclip the cover using a
small screwdriver
at the cutout.
F
R
emove the cover.
F
R
emove the discharged battery from its
housing.
F
P
lace the new battery into its location
observing the original direction.
F
C
lip the cover onto the casing.
Boot
Opening the tailgate
Using the electronic key/remote
control
F Press and hold this button to release the tailgate. If the vehicle
was locked, this action unlocks
the vehicle beforehand.
F
Ra
ise the tailgate.
When selective unlocking is activated, the
electronic key must be close to the rear of
the vehicle.
With the tailgate opening control
2
Access
Page 53 of 316

51
Precautions in use
In wintry conditions
In the event of an accumulation of snow
on the tailgate, clear the snow before
commanding a
motorised opening of the
tailgate.
The formation of ice can block the tailgate
and prevent its opening: wait until the ice
melts with the heating of the passenger
compartment.
When washing
When washing the vehicle in an automatic
car wash, lock your vehicle to avoid the
risk of unexpected opening.
Back-up control
To manually unlock the boot in the event of
a battery or central locking failure.
Unlocking
Locking after closing
If the fault persists after closing again, the boot
will remain locked. F
F
old the rear seats to gain access to the
lock from inside the boot.
F
I
nsert a small screwdriver into hole A of the
lock to unlock the boot.
F
M
ove the latch to the left.
Hands-free tailgate
To enable you to open or close the tailgate
while your hands are full, the motorised tailgate
may be fitted with the hands-free function.
For more information on the Motorised
tailgate
, refer to the corresponding section.
"Hands-free " opening
Making another kicking movement with your
foot below the bumper while the tailgate is
opening interrupts the movement. A third kicking
movement reverses the direction of movement.
If the vehicle is locked, it unlocks before
the tailgate opens.
F
I
f your hands are full, with the remote
control on you in the recognition zone A ,
make a kicking movement with your foot
below the rear bumper.
Flashing of the direction indicator lamps and
a
beeping sound confirm the request.
The tailgate opens to the stored position.
2
Access
Page 55 of 316

53
Alarm
System which protects and provides a deterrent
a gainst theft and break-ins. It provides the
following types of monitoring:
-
E
xterior perimeter :
T
he system checks whether the vehicle is
opened. The alarm is triggered if anyone
tries to open a
door, the boot or the bonnet.
-
I
nterior volumetric:
T
he system checks for any variation in the
volume in the passenger compartment.
The alarm is triggered if anyone breaks
a
window, enters the passenger
compartment or moves inside the vehicle.
Self-protection function : the system
checks for the putting out of ser vice of its
own components. The alarm is triggered
if the siren's battery, button or wiring is
disconnected or damaged. For all work on the alarm system,
contact a
CITROËN dealer or a qualified
workshop.
Locking the vehicle with full
alarm system
Activation
F Lock the vehicle using the remote control.
or
F
L
ock the vehicle using the "
K
eyless Entry
and Starting" system.
The monitoring system is active: the indicator
lamp for the button flashes once per second
and the direction indicators come on for about
2
seconds.
After an instruction to lock the vehicle using
the remote control or the "
K
eyless Entry
and Starting" system, the exterior perimeter
monitoring is activated after 5
seconds, the
interior volumetric monitoring after 45
seconds.
If an opening (door, boot, bonnet, etc.) is
incorrectly closed, the vehicle is not locked
but the exterior perimeter monitoring will be
activated after 45
seconds at the same time as
the interior volumetric monitoring.
Deactivation
F Press one of the remote control unlocking buttons.
or
F
U
nlock the vehicle with the "
K
eyless Entry
and Starting" system.
The monitoring system is deactivated: the
indicator lamp for the button goes off and the
direction indicators flash for about 2
seconds.
When the vehicle automatically locks itself
again (as happens if a
door or boot is not
opened within 30
seconds of unlocking),
the monitoring system is automatically
reactivated.
Locking the vehicle
with exterior perimeter
monitoring only
Deactivate the interior volumetric monitoring
to avoid unwanted triggering of the alarm in
certain cases such as:
-
l
eaving a pet in the vehicle,
F
Switch off the ignition and get out of the vehicle.
Short press
Long press
2
Access
Page 56 of 316

54
Deactivating the interior
volumetric monitoring
F Switch off the ignition and within ten seconds, press the alarm button until the
indicator lamp is on continuously.
-
l
eaving a
window partially open,
-
w
ashing your vehicle,
-
c
hanging a
wheel,
-
h
aving your vehicle towed,
-
t
ransport by ship.
F
G
et out of the vehicle.
F
I
mmediately lock the vehicle using the
remote control or the "Keyless Entry and
Starting" system.
The exterior perimeter monitoring alone is
activated: the indicator lamp for the button
flashes once per second.
To take effect, this deactivation must be carried
out each time the ignition is switched off.
Reactivating the interior
volumetric monitoring
F Deactivate the exterior perimeter monitoring by unlocking the vehicle using the remote
control or the "
K
eyless Entry and Starting"
system. The indicator lamp for the button goes off.
F
R
eactivate the full alarm system by locking
the vehicle using the remote control or the
"Keyless Entry and Starting" system.
The indicator lamp for the button flashes once
per second again.
Triggering of the alarm
This results in sounding the siren and flashing
the direction indicators for thirty seconds.
The monitoring functions remain active until
the alarm has been triggered eleven times in
succession.
When the vehicle is unlocked using the remote
control or the "
K
eyless Entry and Starting"
system, rapid flashing of the indicator lamp
for the button informs you that the alarm was
triggered during your absence. When the
ignition is switched on, this flashing stops
immediately.
Failure of the remote
control
To deactivate the monitoring functions:
F U nlock the vehicle using the key (integral to
the remote control) in the driver's door lock,
F
O
pen the door; this sets off the alarm.
F
U
pon switching on the ignition the alarm
stops. The indicator lamp for the button
goes off.
Locking the vehicle without
activating the alarm
F Lock or deadlock the vehicle using the key (integral to the remote control) in the driver's
door lock.
Operating fault
When the ignition is switched on, fixed
illumination of the indicator lamp for the button
indicates a
fault with the system.
Have it checked by a
CITROËN dealer or
a
qualified workshop.
Automatic activation
(Depending on the country where the product
is sold.)
The system is activated automatically 2 minutes
after the last door or the boot is closed.
F
T
o avoid triggering the alarm on entering
the vehicle, first press the unlocking button
on the remote control or unlock the vehicle
using the "
K
eyless Entry and Starting"
system.
Access
Page 64 of 316

62
Front armrest
Height adjustment
Second row seats
The 3 seats of the 2nd row are independent
and are the same width. Their backrests are
adjustable to adapt the boot load space. F
L
ower the armrest completely.
F
L
ift it again to the desired position (low,
intermediate or high).
F
O
nce it is in the high position, lift it to unlock
it and bring it to the low position.
Longitudinal adjustment
A. Longitudinal adjustment: lift the lever.
B. Tilt angle adjustment: pull the strap and
push the seat back.
C. Folding the seat: give a
firm upward pull
on the strap to unlock the seat.
D. Folding the seat from the back: pull the
strap then push the backrest for ward.
F
L
ift lever A , at the front of the seat cushion
and adjust the seat as required.
Ease of use and comfort
Page 65 of 316

63
Rear head restraintsRelax head restraints
Never drive with the head restraints
removed; they must be fitted and correctly
adjusted.
Flat floor
Folding the seat
F Place the seats in the maximum rear wards longitudinal position.
The rear head restraints are removable and
have two positions:
-
h
igh, the position for use,
-
l
ow, the position for storage.
To raise the head restraint, pull it upwards.
To lower it, press the lug A then push the head
restraint downwards.
To remove it:
-
m
ove the head restraint to the high position,
-
p
ress the lug A while pulling the head
restraint upwards.
To replace it:
-
e
ngage the head restraint rods in the
apertures, keeping the head restraint in line
with the seat backrest. Depending on the version, you can fold the
sides to obtain a better comfortable position.
Each seat folds down to the floor to adapt the
boot volume as required.
" Comfort " position
F Pull strap B and push the seat back.
The backrest tilts and the cushion rotates
s l i g ht l y.
Returning the seat to its initial
position
F Pull strap B and push the seat forward.
Do not allow children to operate the
seats unsupervised.
3
Ease of use and comfort
Page 66 of 316

64
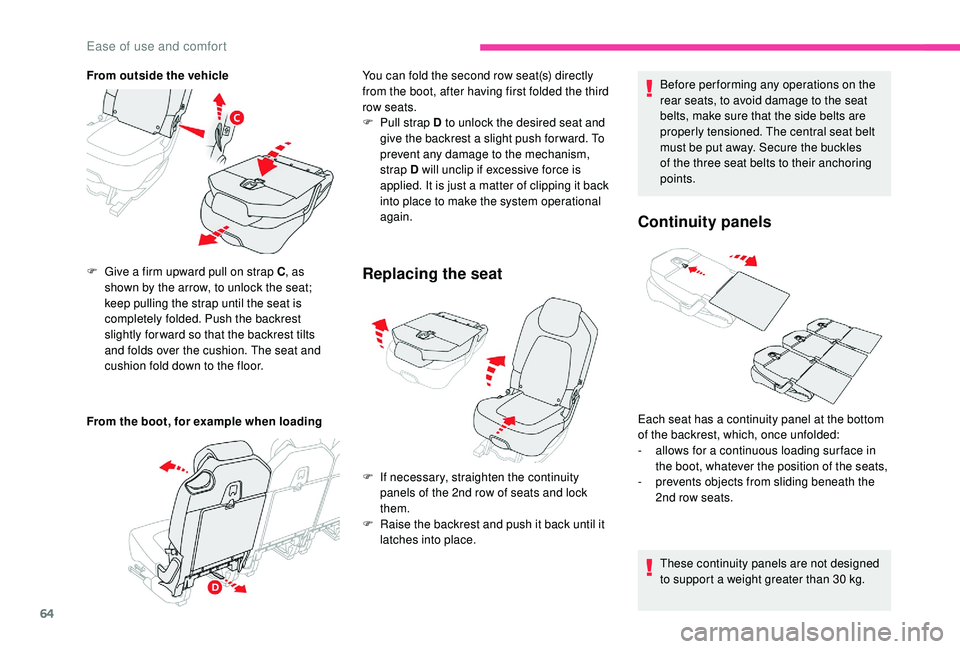
From outside the vehicle
From the boot, for example when loading F
G
ive a firm upward pull on strap C , as
shown by the arrow, to unlock the seat;
keep pulling the strap until the seat is
completely folded. Push the backrest
slightly for ward so that the backrest tilts
and folds over the cushion. The seat and
cushion fold down to the floor.
Replacing the seat
F If necessary, straighten the continuity panels of the 2nd row of seats and lock
them.
F
R
aise the backrest and push it back until it
latches into place. Before per forming any operations on the
rear seats, to avoid damage to the seat
belts, make sure that the side belts are
properly tensioned. The central seat belt
must be put away. Secure the buckles
of the three seat belts to their anchoring
points.
Continuity panels
You can fold the second row seat(s) directly
from the boot, after having first folded the third
row seats.
F
P
ull strap D to unlock the desired seat and
give the backrest a
slight push for ward. To
prevent any damage to the mechanism,
strap D will unclip if excessive force is
applied. It is just a
matter of clipping it back
into place to make the system operational
again.
Each seat has a
continuity panel at the bottom
of the backrest, which, once unfolded:
-
a
llows for a continuous loading sur face in
the boot, whatever the position of the seats,
-
p
revents objects from sliding beneath the
2nd row seats.
These continuity panels are not designed
to support a
weight greater than 30 kg.
Ease of use and comfort
Page 73 of 316

71
Recommendations for ventilation and air conditioning
In order for these systems to be fully
effective, follow the operation and
maintenance guidelines below:
F
T
o ensure that the air is distributed
evenly, keep the external air intake
grilles at the base of the windscreen, the
nozzles, the vents, the air outlets and
the air extractor in the boot free from
obstructions.
F
D
o not cover the sunshine sensor,
located on the dashboard; this is used
for regulation of the automatic air
conditioning system.
F
O
perate the air conditioning system for
at least 5
to 10 minutes once or twice
a
month to keep it in per fect working
o r d e r.
F
E
nsure that the passenger compartment
filter is in good condition and have the
filter elements replaced regularly. We
recommend the use of a
combined
passenger compartment filter. Thanks to
its special active additive, it contributes
to the purification of the air breathed by
the occupants and the cleanliness of
the passenger compartment (reduction
of allergic symptoms, bad odours and
greasy deposits). If after an extended stop in sunshine,
the interior temperature is very high,
first air the passenger compartment for
a
few moments.
Put the air flow control at a
setting high
enough to quickly change the air in the
passenger compartment.
The condensation created by the air
conditioning results in a discharge of water
under the vehicle which is per fectly normal.
Stop & Star t
The heating and air conditioning systems
only work when the engine is running.
To maintain a
comfortable temperature
in the passenger compartment, you may
temporarily deactivate the Stop & Start
system.
For more information on Stop & Star t ,
refer to the corresponding section.
F
T
o ensure correct operation of the
air conditioning system, you are also
advised to have it checked regularly as
recommended in the Maintenance and
Warranty Guide.
F
I
f the system does not produce cold air,
switch it off and contact a
CITROËN
dealer or a
qualified workshop.
When towing the maximum load on a
steep
gradient in high temperatures, switching off
the air conditioning increases the available
engine power and so improves the towing
ability.
To avoid the windows misting up and
deterioration in the quality of the air:
-
d
o not drive for too long with the
ventilation switched off.
-
d
o not keep air recirculation set for an
extended period.
3
Ease of use and comfort
Page 82 of 316

80
Do not attach or hang heavy objects on
the slide rail of the sun visor blinds.
Glove box
Depending on the equipment, it may include
a CD player.
F
T
o open the glove box, raise the handle.
It is illuminated when the lid is opened.
It is cooled by a
ventilation nozzle that can be
closed manually.
It is directly linked to your vehicle's air
conditioning system and is supplied with
fresh air whatever the setting required in the
passenger compartment.
The cooling of your glove box only functions
when the engine is running and the air
conditioning is on.
Portable console
The portable console is a removable storage
space fixed to the low centre console.
It includes a
sliding flap, an open storage
compartment and two cup holders.
Taking out the portable console
Sun visor supports
The window blinds are extended via the sun
visor supports.
Fold the support downwards to avoid glare from
ahead.
In case of glare through the door windows,
release the support from its central fixing and
turn it to the side.
The supports are fitted with a
locking system
on their central fixing when rolling up the
window blind. To remove or replace the
support, it must be positioned vertically.
If it is not fixed to its support, the portable
console must be stored in the boot. It
could turn into a
projectile in the event of
sudden braking or serious impact.
F
P
ull the unlocking control located at the
front of the console.
F
W
ith one hand, lift the front part of the
console.
F
W
ith the other hand, take the rear part to
free the portable console.
Ease of use and comfort