Keyless Citroen C4 PICASSO RHD 2015 1.G User Guide
[x] Cancel search | Manufacturer: CITROEN, Model Year: 2015, Model line: C4 PICASSO RHD, Model: Citroen C4 PICASSO RHD 2015 1.GPages: 428, PDF Size: 10.09 MB
Page 72 of 428
70
OFF
Locking the vehicle
with exterior perimeter
monitoring only
Deactivate the interior volumetric monitoring to avoid unwanted triggering of the alarm in
c
ertain cases such as:
-
l
eaving a window partially open,
-
w
ashing your vehicle,
-
c
hanging a wheel.
Deactivation of the volumetric
monitoring
F Switch of the ignition and within t
en seconds press this button
u
ntil its indicator lamp is on fixed.
F
G
et
out of the vehicle.
F
I
mmediately lock the vehicle using the
r
emote control or the "Keyless Entry and
S
tarting" system.
Only
the
exterior perimeter protection system is
a
ctive:
the indicator lamp in the button flashes
o
nce
per
second.
To
be
effective, this deactivation must be done
e
very
time the ignition is switched off.
In
the
case
of
automatic
locking
of
the
v
ehicle
(which
occurs
after
a
period
of
3
0
seconds
if
a
door
or
the
boot
is
not
o
pened),
the
monitoring
system
is
not
r
eactivated
automatically.
To
reactivate
i
t,
it
is
necessary
to
unlock
the
vehicle
a
nd
lock
it
again,
using
the
remote
c
ontrol
or
the
"Keyless
Entry
and
S
tarting"
system.
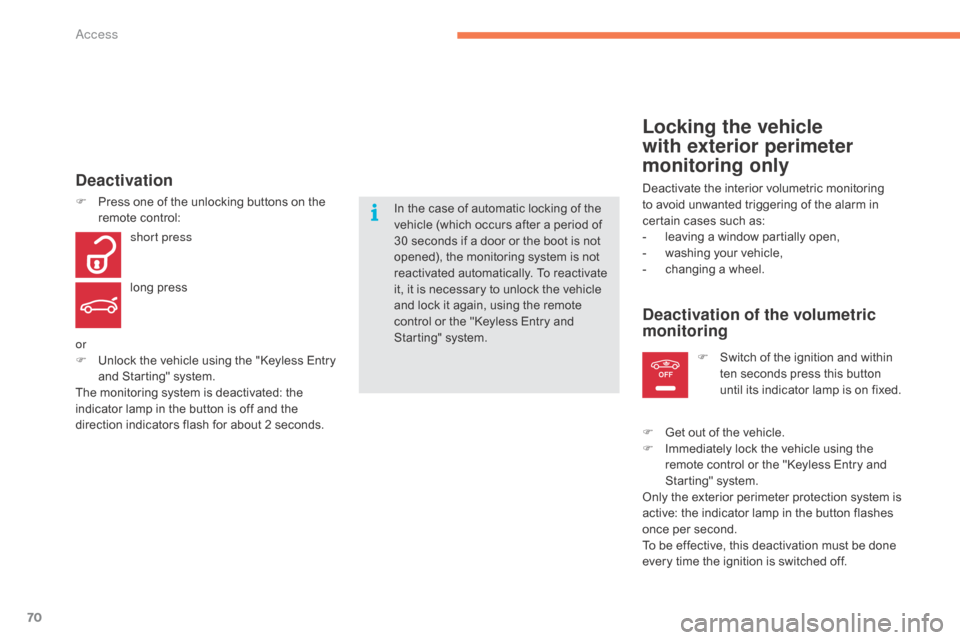
Deactivation
F Press
one of the unlocking buttons on the r
emote control:
short press
long
press
or
F
U
nlock the vehicle using the "Keyless Entry
a
nd Starting" system.
The
monitoring system is deactivated: the
i
ndicator lamp in the button is off and the
d
irection indicators flash for about 2 seconds.
Access
Page 73 of 428
71
Reactivation of the interior
volumetric monitoring
F Deactivate the exterior perimeter m
onitoring by unlocking the vehicle using
t
he remote control or the Keyless Entry and
S
tarting system.
The
indicator lamp in the button goes off.
F
R
eactivate the full alarm system by locking
t
he vehicle using the remote control or the
"
Keyless Entry and Starting" system.
The
indicator lamp in the button flashes
o
nce per second again.
Triggering of the alarm
This is indicated by sounding of the siren
a nd flashing of the direction indicators for
thirty
seconds.
The
monitoring functions remain active until
t
he alarm has been triggered eleven times in
s
uccession.
When
the vehicle is unlocked using the remote
c
ontrol or the Keyless Entry and Starting
s
ystem, rapid flashing of the indicator lamp
i
n the button informs you that the alarm was
t
riggered during your absence. When the
i
gnition is switched on, this flashing stops
i
mmediately.
Failure of the remote control
To deactivate the monitoring functions:
F
U
nlock the vehicle using the key (integral
w
ith the remote control) in the driver's door
l
ock.
F
O
pen the door; the alarm is triggered.
F
S
witch on the ignition; the alarm stops.
T
he indicator lamp in the button goes off.
Locking the vehicle without
activating the alarm
F Lock or deadlock the vehicle using the key (
integral with the remote control) in the
d
river's door lock.
Operating fault
When the ignition is switched on, fixed illumination of the indicator lamp in the button
i
ndicates a fault in the system.
Have
it checked by a CITROËN dealer or a
q
ualified
w
orkshop.
Automatic activation*
2 minutes after the last door or the boot is closed, the system is activated automatically.
F
To avoid triggering the alarm on entering the vehicle, first press the unlocking button o
n the remote control or unlock the vehicle
u
sing the Keyless Entry and Starting system.
* According to country.
2
Access
Page 75 of 428
73
Reinitialisation of
the electric windows
Deactivating the rear controls
for the rear windowsIn the event of contact during operation o
f the windows, you must reverse the
m
ovement of the window. To do this,
p
ress the switch concerned.
When
operating the passenger electric
w
indow switches, the driver must
e
nsure that nothing is preventing
c
orrect closing of the windows.
The
driver must ensure that the
p
assengers use the electric windows
c
o r r e c t l y.
Be
particularly aware of children when
o
perating
t
he
w
indows.
Be
aware of passengers or other
p
ersons present when closing the
w
indows using the the electronic key
o
r the "Keyless Entry and Starting"
s
ystem.
Following
reconnection
of
the
battery,
the
s
afety
anti-pinch
function
must
be
reinitialised.
The
safety
anti-pinch
function
is
not
active
d
uring
these
operations.
For
the
safety
of
your
children,
press
s
witch 5 to prevent operation of the
rear
windows
irrespective
of
their
p
ositions.
The
warning
lamp
in
the
button
comes
on,
a
ccompanied
by
a
message
confirming
a
ctivation.
It
remains
on,
as
long
as
the
child
l
ock
is
deactivated.
Use
of
the
rear
electric
windows
from
the
d
river's
controls
remains
possible. For
each
window:
-
l
ower
the
window
completely,
then
raise
it,
i
t
will
rise
in
steps
of
a
few
centimetres
with
e
ach
action.
Repeat
the
operation
until
the
w
indow
closes
completely,
-
c
ontinue
to
pull
the
switch
for
at
least
o
ne second
after
reaching
this
position,
w
indow
c
losed.
2
Access
Page 93 of 428

91
Mirrors
Adjustment
F Move control A to the right or to the left to s
elect the corresponding mirror.
F
M
ove control B in all four directions to
adj
ust.
F
R
eturn control A to the central position.
Each
fitted
with
an
adjustable
mirror
glass
p
roviding
the
lateral
rear ward
vision
necessary
f
or
overtaking
or
parking.
They
can
also
be
f
olded
for
parking
in
confined
spaces.
Demisting - Defrosting
Door mirrors
Demisting-defrosting of the door m irrors operates with the engine
r
unning, by switching on the heated
re
ar
sc
reen.
Refer
to the "Rear screen demist-
defrost"
s
ection. As
a safety measure, the mirrors should b
e adjusted to reduce the "blind spots".
The
objects observed are, in reality,
c
loser than they appear.
Take
this into account in order to
c
orrectly judge the distance of vehicles
a
pproaching from behind.
Folding
F From outside: lock the vehicle using the e
lectronic key or the Keyless Entry and
S
tarting system.
F
F
rom inside: with the ignition on, pull the
c
ontrol A in the central position rear wards.
If
the mirrors are folded using control A,
they
will not unfold when the vehicle is
u
nlocked. Pull again on control A.
The
folding and unfolding of the door
m
irrors using the remote control can be
d
eactivated by a CITROËN dealer or a
q
ualified
w
orkshop.
F
F
rom outside: unlock the vehicle using the
e
lectronic key or the Keyless Entry and
S
tarting system.
F
F
rom inside: with the ignition on, pull the
c
ontrol A in the central position rear wards.
Unfolding
If necessary, it is possible to fold the mirrors m anually.
3
Comfort
Page 130 of 428
128
Starting-switching off the engine with the "Keyless Entry
a
nd Starting" system
F Place the gear selector lever at N for
vehicles with an electronic gearbox, P or N
with
an automatic gearbox, or neutral with
a m
anual
g
earbox.
F
W
ith the electronic key inside the vehicle
(
it is not necessary to put it in the reader),
p
ress the brake pedal for vehicles with
a
n electronic or automatic gearbox, or
f
ully declutch for vehicles with a manual
g
earbox. For Diesel vehicles
, in
temperatures below zero the
e
ngine will not start until the
p
reheater warning lamp has
g
one off.
If
this warning lamp comes on
a
fter pressing "START/STOP",
y
ou should hold the brake or
c
lutch pedal down until the
w
arning lamp goes off and do
n
ot press the START/STOP
bu
tton
ag
ain.
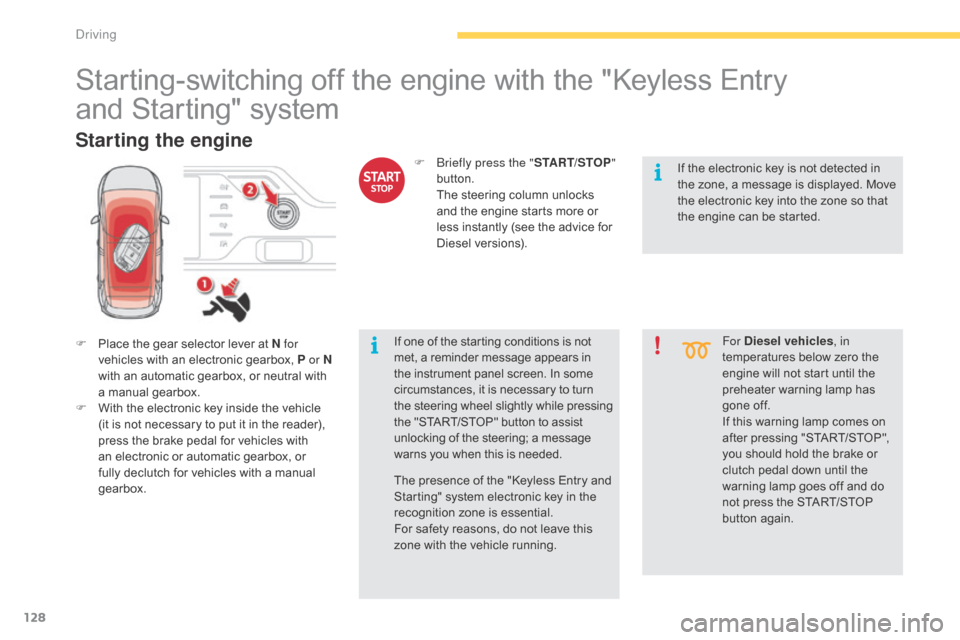
Starting the engine
If one of the starting conditions is not met, a reminder message appears in t
he instrument panel screen. In some
c
ircumstances, it is necessary to turn
t
he steering wheel slightly while pressing
t
he "START/STOP" button to assist
u
nlocking of the steering; a message
w
arns you when this is needed.
F
b
r
iefly press the "
START/STOP"
button.
T
he steering column unlocks
a
nd the engine starts more or
l
ess instantly (see the advice for
D
iesel
v
ersions).
The presence of the "Keyless Entry and
S
tarting" system electronic key in the
r
ecognition zone is essential.
For
safety reasons, do not leave this
z
one with the vehicle running. If
the electronic key is not detected in
t
he zone, a message is displayed. Move
t
he electronic key into the zone so that
t
he engine can be started.
Driving
Page 203 of 428
201
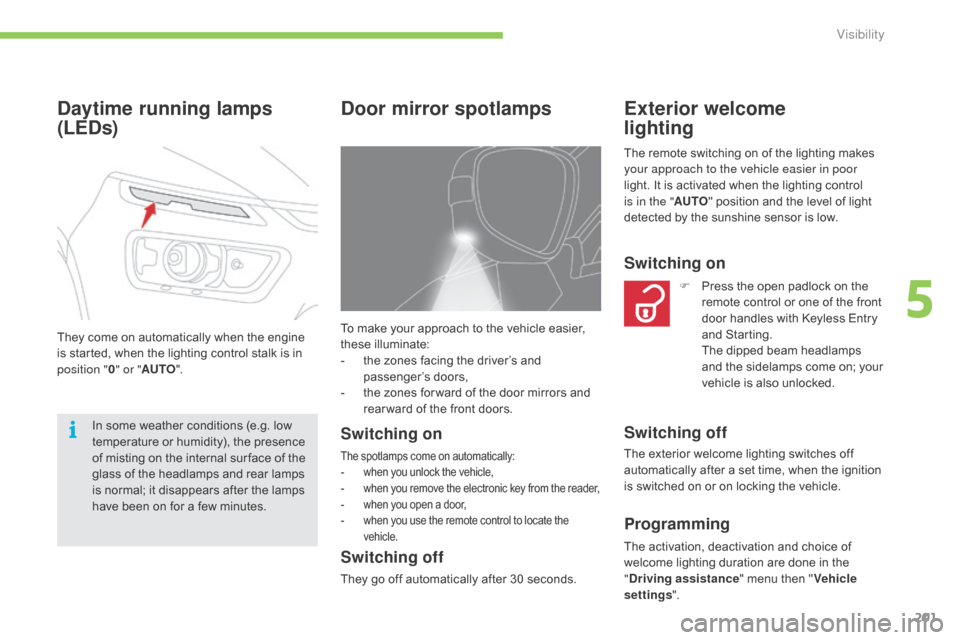
To make your approach to the vehicle easier, these illuminate:
-
t
he zones facing the driver’s and
p
assenger’s
do
ors,
-
t
he zones for ward of the door mirrors and
r
ear ward of the front doors.
Door mirror spotlamps
Switching on
The spotlamps come on automatically:
- w hen you unlock the vehicle,
-
w
hen you remove the electronic key from the reader,
-
w
hen you open a door,
-
w
hen you use the remote control to locate the
v
ehicle.
Switching off
They go off automatically after 30 seconds.
Exterior welcome
lighting
Switching on
F Press the open padlock on the r
emote control or one of the front
d
oor handles with Keyless Entry
an
d
S
tarting.
T
he dipped beam headlamps
a
nd the sidelamps come on; your
v
ehicle is also unlocked.
Programming
Daytime running lamps
(LEDs)
They come on automatically when the engine is started, when the lighting control stalk is in
p
osition " 0" or " AUTO ".
In
some weather conditions (e.g. low
t
emperature or humidity), the presence
o
f misting on the internal sur face of the
g
lass of the headlamps and rear lamps
i
s normal; it disappears after the lamps
h
ave been on for a few minutes. The
remote switching on of the lighting makes
y
our approach to the vehicle easier in poor
light. It is activated when the lighting control
i
s in the "
AUTO" position and the level of light
d
etected by the sunshine sensor is low.
Switching off
The activation, deactivation and choice of w
elcome lighting duration are done in the
"D
riving assistance "
menu then "Vehicle
settings ".
The
exterior welcome lighting switches off
a
utomatically after a set time, when the ignition
i
s switched on or on locking the vehicle.
5
Visibility
Page 285 of 428
283
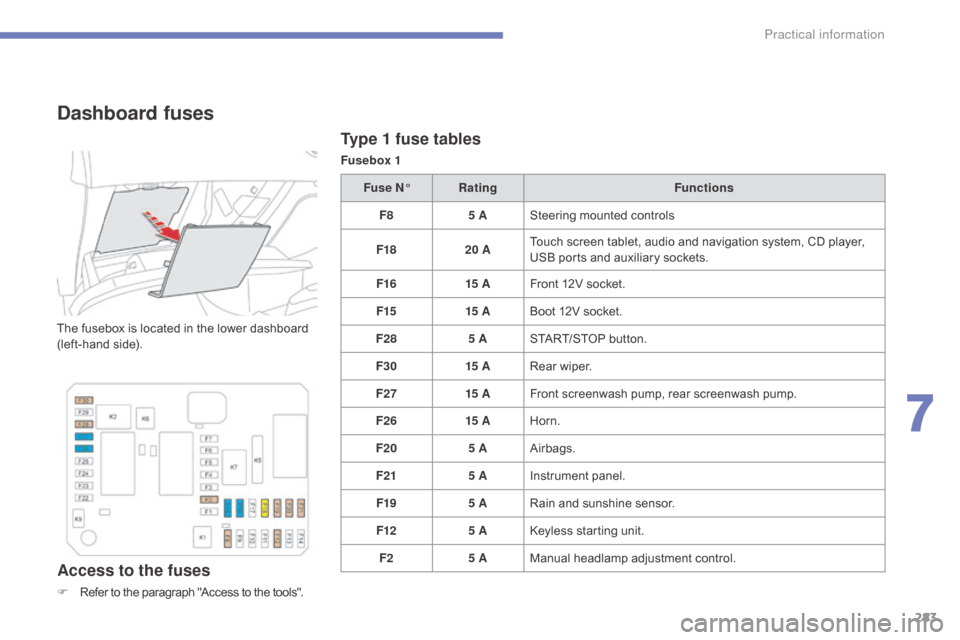
Type 1 fuse tables
Fusebox 1
Dashboard fuses
The fusebox is located in the lower dashboard (left-hand side).
Access to the fuses
F Refer to the paragraph "Access to the tools".Fuse N°
Rating Functions
F8 5 ASteering mounted controls
F18 20 ATouch screen tablet, audio and navigation system, CD player,
U
SB ports and auxiliary sockets.
F16 15 AFront 12V socket.
F15 15 ABoot 12V socket.
F28 5 ASTART/STOP button.
F30 15 ARear wiper.
F27 15 AFront screenwash pump, rear screenwash pump.
F26 15 AHorn.
F20 5 AAirbags.
F21 5 AInstrument panel.
F19 5 ARain and sunshine sensor.
F12 5 AKeyless starting unit.
F2 5 AManual
h
eadlamp
a
djustment
c
ontrol.
7
Practical information
Page 329 of 428
327
Never dispose of AdBlue® additive b
ottles
in
the
household
waste. Place
t
hem
in
a
special
container provided
t
his
p
urpose
o
r
t
ake
t
hem
t
o
y
our
d
ealer.
Important:
w
hen topping up after
running out of additive ,
signalled
b
y
the
message
"Top
up
emissions
a
dditive:
Starting
prevented", you must
w
ait
for
approximately
5
minutes before
s
witching
on
the
ignition,
without
opening the driver's door, unlocking
the vehicle, placing the key of the
"Keyless Entr y and Star ting" system
inside the vehicle or inser ting the
electronic key in the reader.
Switch
on
the
ignition,
wait for
1
0 seconds,
then
start
the engine.
If
any
additive
is
split
or
splashed,
wash
i
mmediately
w
ith
c
old
w
ater
o
r
w
ipe
w
ith
a
damp
cloth.
If
the
additive
has
crystallised,
clean
it
o
ff
using
a
sponge
and
hot
water.
F
A
fter
emptying
the
bottle,
wipe
away
any
s
pillage
around
the
tank
filler
using
a
damp
c
loth.
F
R
efit
the
blue
cap
to
the
tank
and
turn
it
a
6th of a turn clockwise, to its stop.
F
R
efit the black cap and turn it a quarter of
a
turn clockwise without pressing. Ensure
t
hat the indicator on the cap lines up with
t
he indicator on the support.
F
D
epending on equipment, return the spare
w
heel and/or the storage box to the bottom
o
f
the boot.
F
R
efit the boot carpet and close the tailgate.
8
Checks
Page 419 of 428
417
Identification plates ....................................... 3 40
Ignition on...................................................... 131
Indicator
lamps, status
..............................25
-39
Indicators,
d
irection
......................2
13, 275, 280
Inflating
a
ccessories
(
using the kit)
..............................
................260
Inflating
tyres
..............................
..............9, 340
Instrument
p
anels
...............................
......20 -24
Instrument
panel screen
.........................2
2, 150
Intelligent
T
raction
C
ontrol
............................2
19
Interior
f
ittings
....................................... 10
8,
10
9
Interior
m
ood
l
ighting
.................................... 2
12
Inter-vehicle
t
ime
........................................... 15
4
ISOFIX
m
ountings......................................... 244Keeping
children safe ........... 2 26, 229, 233 -252key .......
......................................................51- 61
Keyless
Entry and Starting
.......................5
4-68
Labels,
i
dentification
.....................................3
40
Lamps,
warning and indicator
..................25
-39
Lane
Departure Warning System
(L
dW
S)
.......................................................17
6
LED
daytime running lamps
.........................2
01
LEDs
- light-emitting diodes
.........2
72, 276, 278
Leg
rest, electric
..............................
...............80
Level,
AdBlue
® additive .................................3 24
Level,
brake
fluid ........................................... 3
15
Level,
headlamp wash
.................................. 3
16
Levels
and
checks
..............................
..3 0 6 - 318
Light-emitting
diodes - LEDs
................2
72-280
Lighting
bulbs
(replacement)
........2
72,
2
76-279
Lighting
control stalk
.............................. 19
3 -198
Lighting,
guide-me home
...................... 19
7,
19
8
Lighting,
i
nterior
.................................... 21
0,
21
2
Lighting,
i
nterior
m
ood
.................................. 2
12
Loading
..............................
............................... 9
Load
reduction mode
.................................... 2
91
Locating
your
vehicle
...................................... 53
L
ocking
from
the inside
................................... 62
L
ocking
the
boot......................................... 51- 5 9
Locking
the
doors
..............................
.......55-59
Low fuel level
..............................
..................308
Lumbar
...............................
............................. 79
IK
L
Jack ....................................................... 261, 262
Jack cable ..................................................... 36
4
JACK
socket
...............................
...112, 360, 364
Jukebox
(playing)
.......................................... 3
65
J
Gearbox, automatic .......... 9, 145, 151, 290, 318
Gearbox, e lectronic .......... 9 , 141, 151, 290, 318
Gearbox,
m
anual
...................... 9
, 140, 151, 318
Gear
efficiency indicator
...............................15
0
Gear lever
..............................
........................... 9
Gear
lever, manual gearbox
.........................14
0
Gear
selector, automatic gearbox
........14
1,
14
5
Gear selector, electronic
ge
arbox
...................................... 1
41
Glove
box
.............................................. 10
8,
10
9
Guide-me-home
...............................
.....197,
19
8
Halogen
h
eadlamps
...................................... 2
72
Hands-free
kit
..............................
........ 402, 403
Hazard
w
arning
lam
ps
..........................21
3,
21
4
Headlamp
adj
ustment
................................... 2
02
Headlamps,
d
irectional
.........................2
04, 272
Headlamp
w
ash
............................................ 2
07
Head
restraints, front
...................................... 78
H
ead restraints, rear
....................................... 83
H
eated
s
eats
...............................
....................80
Heating
................
................................ 96, 97, 99
Height
and reach adjustment,
steering
w
heel
..............................
................93
Hill start assist
............................................... 13
9
Hooks
...............................
.............................120
G
H
.
alphabetical index