boot Citroen C4 PICASSO RHD 2015 1.G Owner's Guide
[x] Cancel search | Manufacturer: CITROEN, Model Year: 2015, Model line: C4 PICASSO RHD, Model: Citroen C4 PICASSO RHD 2015 1.GPages: 428, PDF Size: 10.09 MB
Page 265 of 428
263
* Depending on version. The complete tooling i
s with the spare wheel.
Changing a wheelProcedure for changing a wheel with a punctured tyre by the spare wheel using the tools provided with the vehicle.
S
ome
of
the
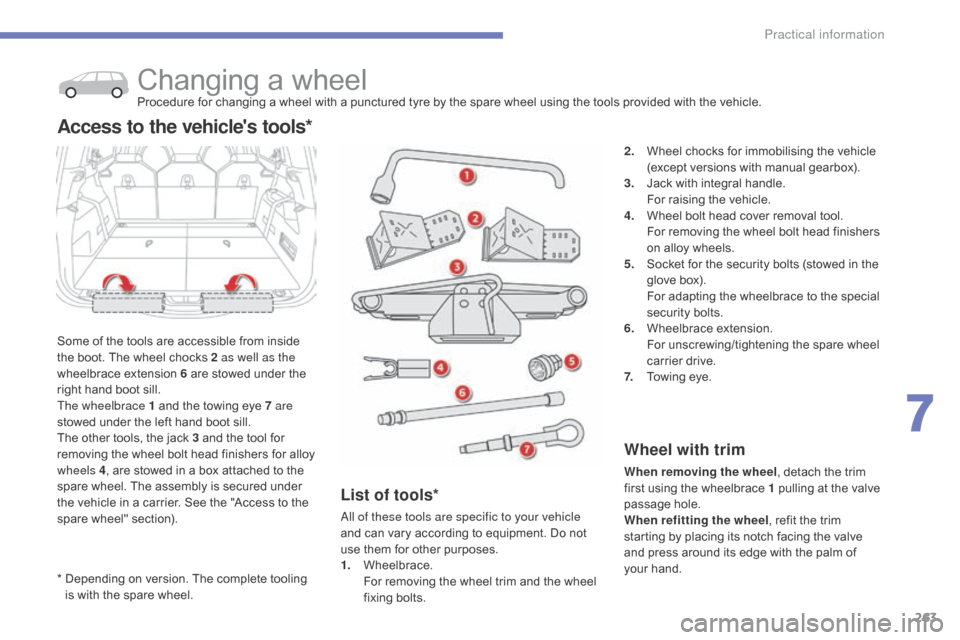
tools are accessible from inside
t
he
boot.
The
wheel chocks 2 as well as the
wheelbrace
extension 6 are stowed under the
r
ight
hand
boot sill.
The wheelbrace 1
and the towing eye 7 are
stowed
under
the left hand boot sill.
The
other
tools, the jack 3 and the tool for
r
emoving
the
wheel bolt head finishers for alloy
w
heels 4 ,
are
stowed in a box attached to the
s
pare
wheel.
The assembly is secured under
t
he
vehicle
in
a carrier. See the "Access to the
s
pare
wheel"
section).
Access to the vehicle's tools*
2. Wheel chocks for immobilising the vehicle (
except versions with manual gearbox).
3.
J
ack with integral handle.
F
or raising the vehicle.
4.
W
heel bolt head cover removal tool.
F
or removing the wheel bolt head finishers
o
n alloy wheels.
5.
S
ocket for the security bolts (stowed in the
g
love box).
F
or adapting the wheelbrace to the special
s
ecurity bolts.
6.
W
heelbrace
e
xtension.
F
or unscrewing/tightening the spare wheel
c
arrier drive.
7.
T
owing eye.
Wheel with trim
When removing the wheel , detach the trim f
irst using the wheelbrace 1 pulling at the valve
p
assage hole.
When refitting the wheel ,
refit the trim
s
tarting by placing its notch facing the valve
a
nd press around its edge with the palm of
y
our hand.
List of tools*
all of these tools are specific to your vehicle
and can vary according to equipment. Do not
u
se them for other purposes.
1.
W
heelbrace.
F
or removing the wheel trim and the wheel
f
ixing
bol
ts.
7
Practical information
Page 267 of 428
265
A puncture wheel from the vehicle cannot be fitted under the vehicle. It
m
ust
b
e
c
arried
i
n
t
he
b
oot.
U
se
a
c
over
t
o protect the boot.
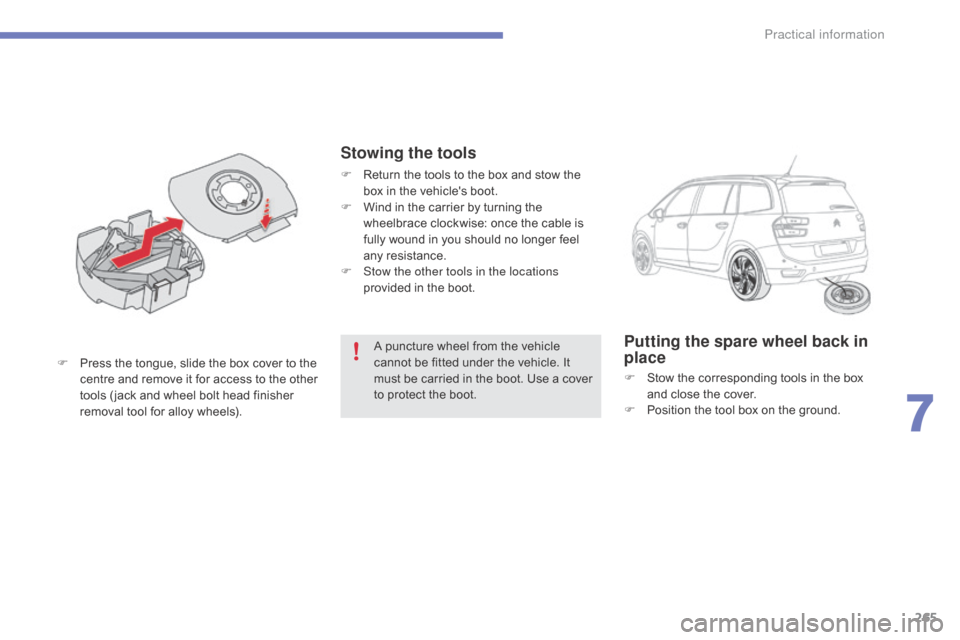
F
P
ress
the
tongue,
slide
the
box
cover
to
the
c
entre
a
nd
r
emove
i
t
f
or
a
ccess
t
o
t
he
o
ther
t
ools
( jack
and
wheel
bolt
head
finisher
r
emoval
tool
for
alloy
wheels).Putting the spare wheel back in
place
F Stow the corresponding tools in the box a
nd close the cover.
F
P
osition the tool box on the ground.
Stowing the tools
F Return the tools to the box and stow the b
ox in the vehicle's boot.
F
W
ind in the carrier by turning the
w
heelbrace clockwise: once the cable is
f
ully wound in you should no longer feel
an
y
r
esistance.
F
S
tow the other tools in the locations
provided
in the boot.
7
Practical information
Page 271 of 428
269
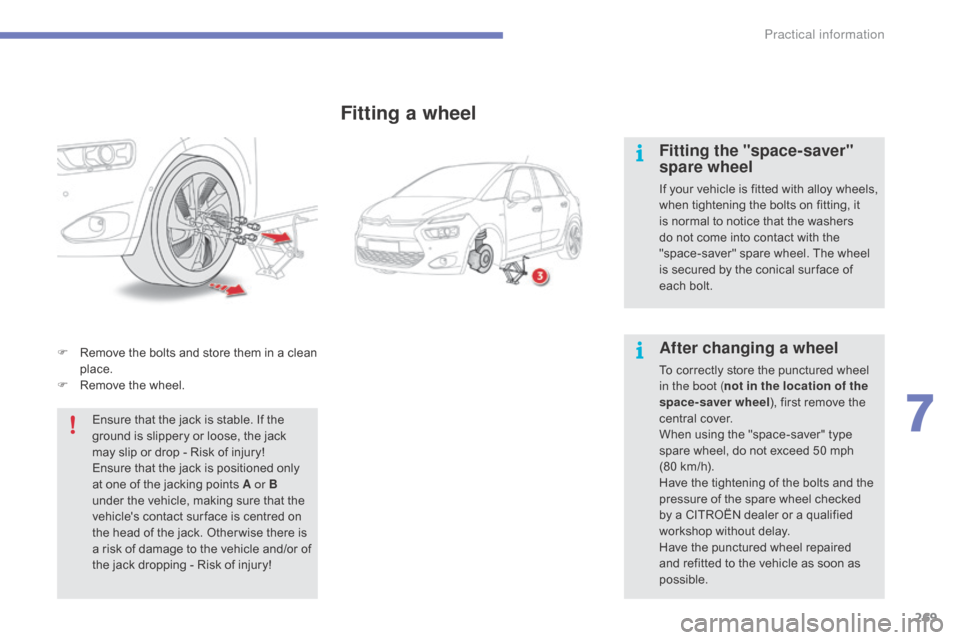
F Remove the bolts and store them in a clean p
lace.
F
R
emove the wheel.
Ensure
that the jack is stable. If the
g
round is slippery or loose, the jack
m
ay slip or drop - Risk of injury!
Ensure
that the jack is positioned only
a
t one of the jacking points A or B
under
the vehicle, making sure that the
v
ehicle's contact sur face is centred on
t
he head of the jack. Other wise there is
a
risk of damage to the vehicle and/or of
t
he jack dropping - Risk of injury!
Fitting a wheel
Fitting the "space-saver"
spare wheel
If your vehicle is fitted with alloy wheels, when tightening the bolts on fitting, it
i
s normal to notice that the washers
d
o not come into contact with the
"
space-saver" spare wheel. The wheel
i
s secured by the conical sur face of
e
ach bolt.
After changing a wheel
To correctly store the punctured wheel in the boot ( not in the location of the
space-saver wheel ),
first remove the
c
entral cover.
When
using the "space-saver" type
s
pare wheel, do not exceed 50 mph
(
80 km/h).
Have
the tightening of the bolts and the
p
ressure of the spare wheel checked
b
y a CITROËN dealer or a qualified
w
orkshop without delay.
Have
the punctured wheel repaired
a
nd refitted to the vehicle as soon as
p
ossible.
7
Practical information
Page 279 of 428
277
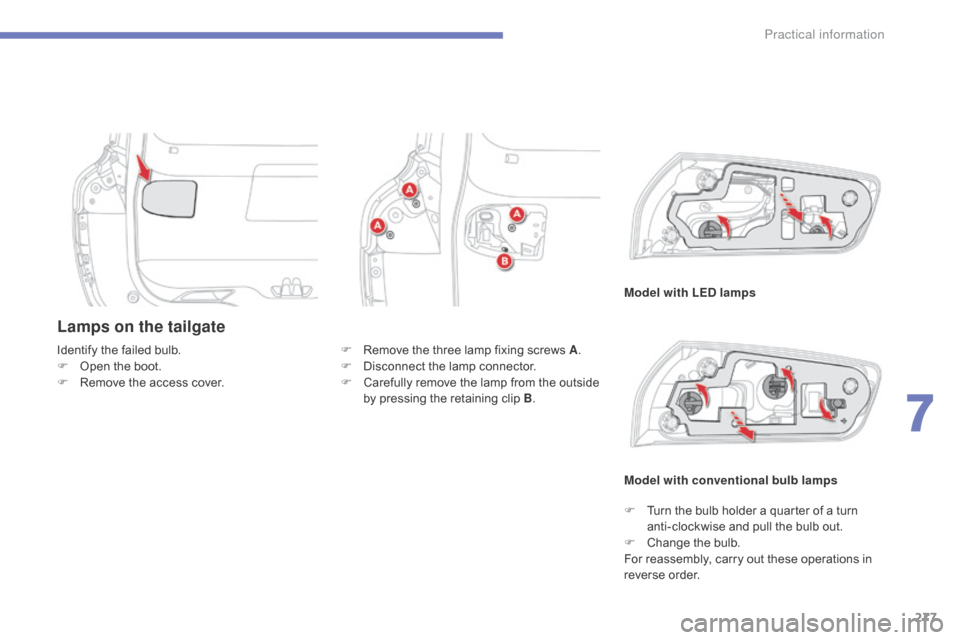
Lamps on the tailgate
Model with LED lamps
Identify
the
failed
bulb.
F
O
pen
the
boot.
F
R
emove
the
access
cover.
Model with conventional bulb lamps
F
R
emove
the
three
lamp
fixing
screws
A .
F
D
isconnect
the
lamp
connector.
F
C
arefully
remove
the
lamp
from
the
outside
b
y
pressing
the
retaining
clip
B .
F
T
urn the bulb holder a quarter of a turn
a
nti-clockwise and pull the bulb out.
F
C
hange the bulb.
For
reassembly, carry out these operations in
r
everse
o
rder.
7
Practical information
Page 281 of 428
279
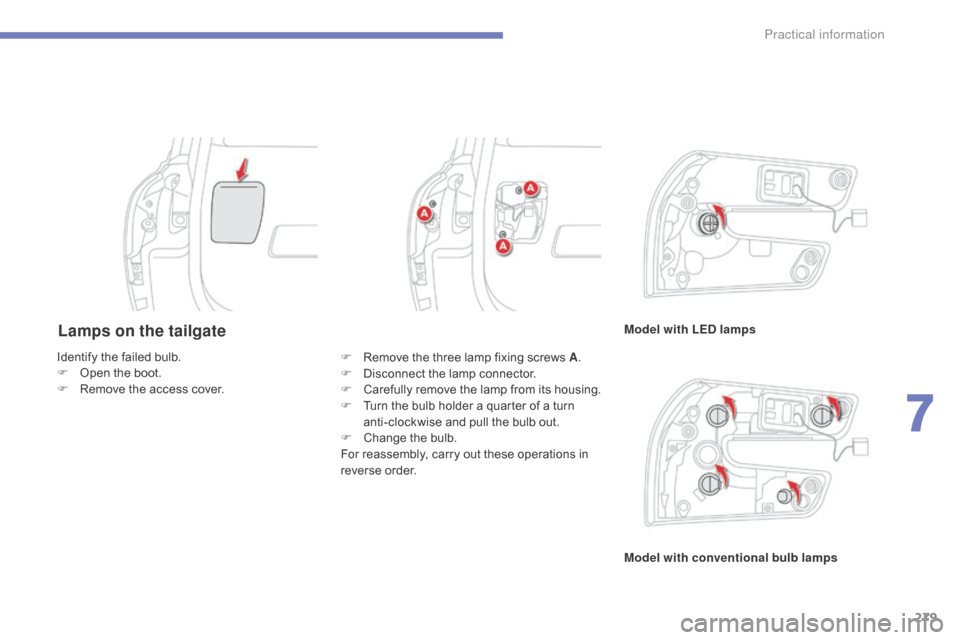
Lamps on the tailgateModel with LED lamps
Model with conventional bulb lamps
Identify
the
failed
bulb.
F
O
pen
the
boot.
F
R
emove
the
access
cover. F
R
emove
the
three
lamp
fixing
screws
A .
F
D
isconnect
the
lamp
connector.
F
C
arefully
r
emove
t
he
l
amp
f
rom
i
ts
h
ousing.
F
T
urn
the
bulb
holder
a
quarter
of
a
turn
a
nti-clockwise
and
pull
the
bulb
out.
F
C
hange
the
bulb.
For
reassembly,
carry
out
these
operations
in
r
everse
o
rder.
7
Practical information
Page 285 of 428
283
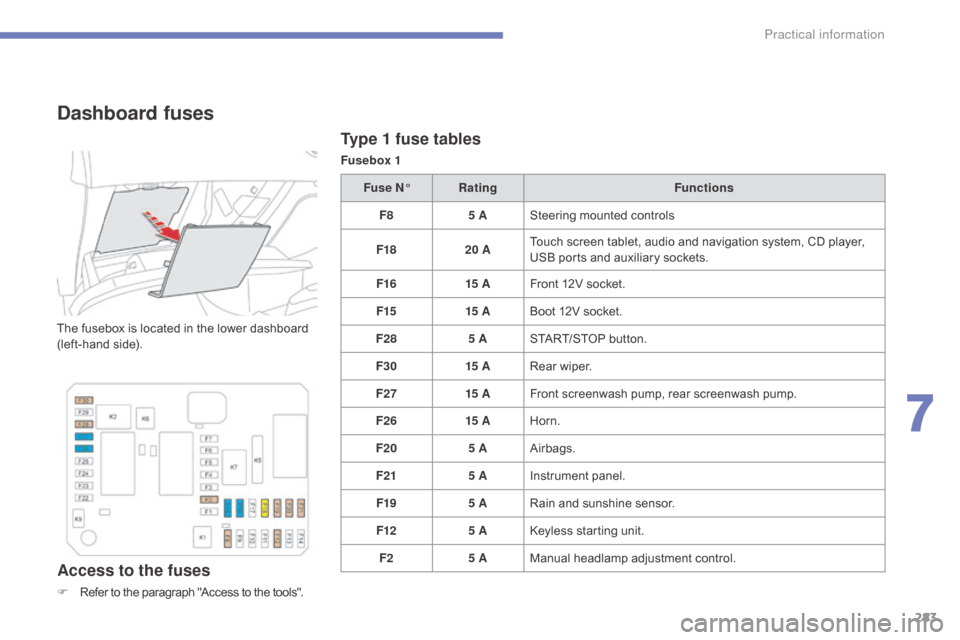
Type 1 fuse tables
Fusebox 1
Dashboard fuses
The fusebox is located in the lower dashboard (left-hand side).
Access to the fuses
F Refer to the paragraph "Access to the tools".Fuse N°
Rating Functions
F8 5 ASteering mounted controls
F18 20 ATouch screen tablet, audio and navigation system, CD player,
U
SB ports and auxiliary sockets.
F16 15 AFront 12V socket.
F15 15 ABoot 12V socket.
F28 5 ASTART/STOP button.
F30 15 ARear wiper.
F27 15 AFront screenwash pump, rear screenwash pump.
F26 15 AHorn.
F20 5 AAirbags.
F21 5 AInstrument panel.
F19 5 ARain and sunshine sensor.
F12 5 AKeyless starting unit.
F2 5 AManual
h
eadlamp
a
djustment
c
ontrol.
7
Practical information
Page 287 of 428
285
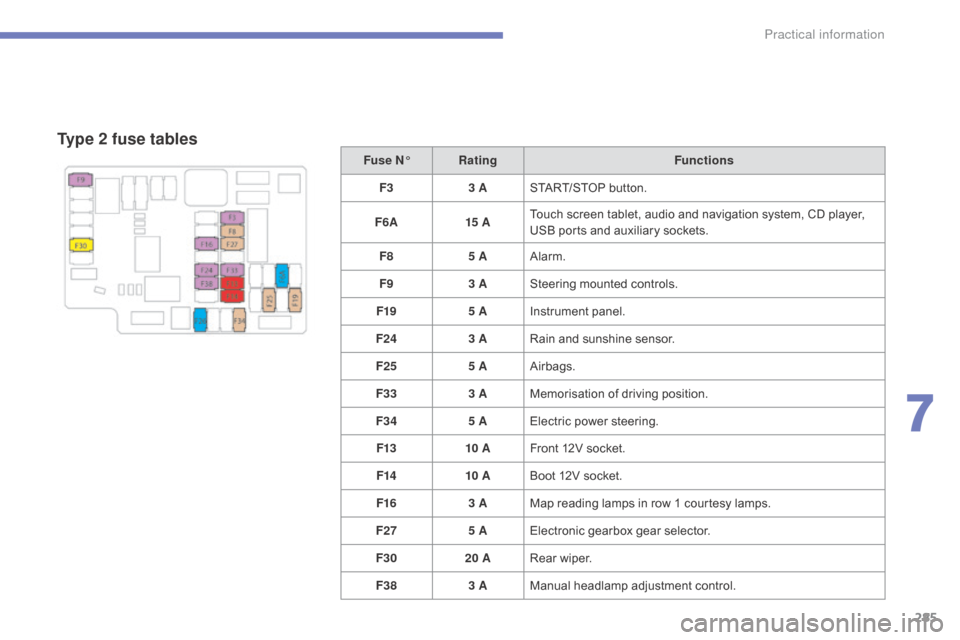
Type 2 fuse tables
Fuse N°Rating Functions
F3 3 ASTART/STOP
button.
F6 A 15 ATouch
screen tablet, audio and navigation system, CD player,
U
SB ports and auxiliary sockets.
F8 5 AAlarm.
F9 3 ASteering
mounted controls.
F19 5 AInstrument
panel.
F24 3 ARain
and sunshine sensor.
F25 5 AAirbags.
F33 3 AMemorisation
o
f
d
riving
p
osition.
F34 5 AElectric
power steering.
F13 10 AFront
12V socket.
F14 10 ABoot
12V socket.
F16 3 AMap
reading lamps in row 1 courtesy lamps.
F27 5 AElectronic
gearbox gear selector.
F30 20 ARear
wiper.
F38 3 AManual
h
eadlamp
a
djustment
c
ontrol.
7
Practical information
Page 295 of 428
293
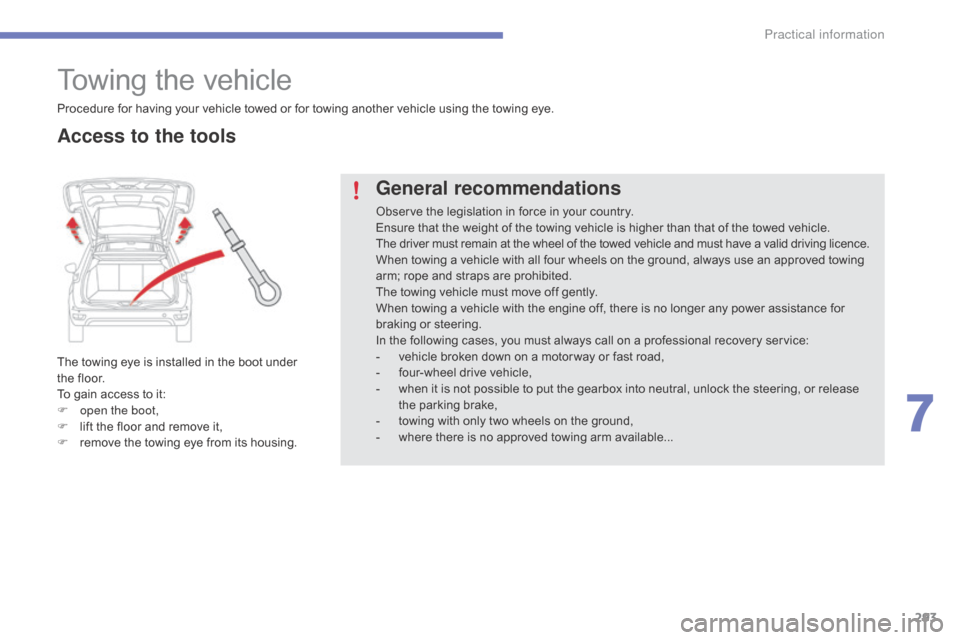
Towing the vehicle
The towing eye is installed in the boot under the floor.
To
gain access to it:
F
o
pen the boot,
F
l
ift the floor and remove it,
F
r
emove the towing eye from its housing.
General recommendations
Observe the legislation in force in your country.
E nsure that the weight of the towing vehicle is higher than that of the towed vehicle.
The
driver must remain at the wheel of the towed vehicle and must have a valid driving licence.
When
towing a vehicle with all four wheels on the ground, always use an approved towing
a
rm; rope and straps are prohibited.
The
towing vehicle must move off gently.
When
towing a vehicle with the engine off, there is no longer any power assistance for
b
raking or steering.
In
the following cases, you must always call on a professional recovery service:
-
v
ehicle broken down on a motor way or fast road,
-
f
our-wheel drive vehicle,
-
w
hen it is not possible to put the gearbox into neutral, unlock the steering, or release
t
he parking brake,
-
t
owing with only two wheels on the ground,
-
w
here there is no approved towing arm available...
Procedure
for
having
your
vehicle
towed
or
for
towing
another vehicle using the towing eye.
Access to the tools
7
Practical information
Page 304 of 428
302
accessories
A wide range of accessories and genuine parts is available from the CITROËN dealer network.
T hese accessories and parts are all suitable for your vehicle and benefit from CITROËN's recommendation and warranty.
"Comfort"
Door deflectors, side window blinds, rear screen blind, insulated module, coat hanger
f
ixed to head restraint, mobile reading
l
amp, mirror for caravan, parking sensors,
p
rogrammable additional heating, smoker's
k
it, solar film for rear door windows, portable
s
cented air freshener...
"Transport systems"
boot carpet, boot liner, boot net, boot spacers,
transverse roof bars, ski carrier, roof boxes,
t
owbars, towbar wiring harnesses, bicycle
c
arriers for towbar and roof bars, towbars
w
ith fixed and detachable towball, separation
n
et, sliding carrier, boot organiser (Grand C4
P
icasso)...
If
a towbar and wiring harness are fitted
o
utside the CITROËN dealer network, the
i
nstallation must be done strictly in line with the
ma
nufacturer's
r
ecommendations.
If
your vehicle has a detachable towball, it is
r
ecommended that the ball be removed when
n
ot towing.
"Styling"
Gear lever knobs, aluminium foot rest, alloy wheels...
"Security and safety"
Anti-intrusion alarm, stolen vehicle tracking system, child seats and booster cushions,
b
reathalyser, first aid kit, fire extinguisher,
w
arning triangle, high visibility vest, wheel
s
ecurity bolts, snow chains, non-slip covers,
w
inter tyres, foglamp kit, security film for front
d
oor windows, dog guard, pet seat belt...
"Protection"
Mats*, seat covers compatible with lateral airbags, mud flaps, door protective mouldings,
b
umper protection strips, vehicle cover, boot
s
ill protector, door sill protectors, seat and boot
p
rotective covers for pets...
The
rear bodywork has been designed to avoid
s
p r ay.
*
T
o avoid any risk of jamming the pedals:
-
e
nsure that mats are correctly positioned
a
nd secured,
-
n
ever fit one mat on top of another.
Practical information
Page 321 of 428
319
AdBlue® additive and SCR system
f
or
BlueHDi Diesel engines
To assure respect for the environment and c
onformity with the new Euro 6 emissions
s
tandard, without adversely affecting the
p
er formance or fuel consumption of Diesel
e
ngines, CITROËN has taken the decision to
e
quip its vehicles with an effective system that
a
ssociates SCR (Selective Catalytic Reduction)
w
ith a particle filter (FAP) for the treatment of
e
xhaust gases.
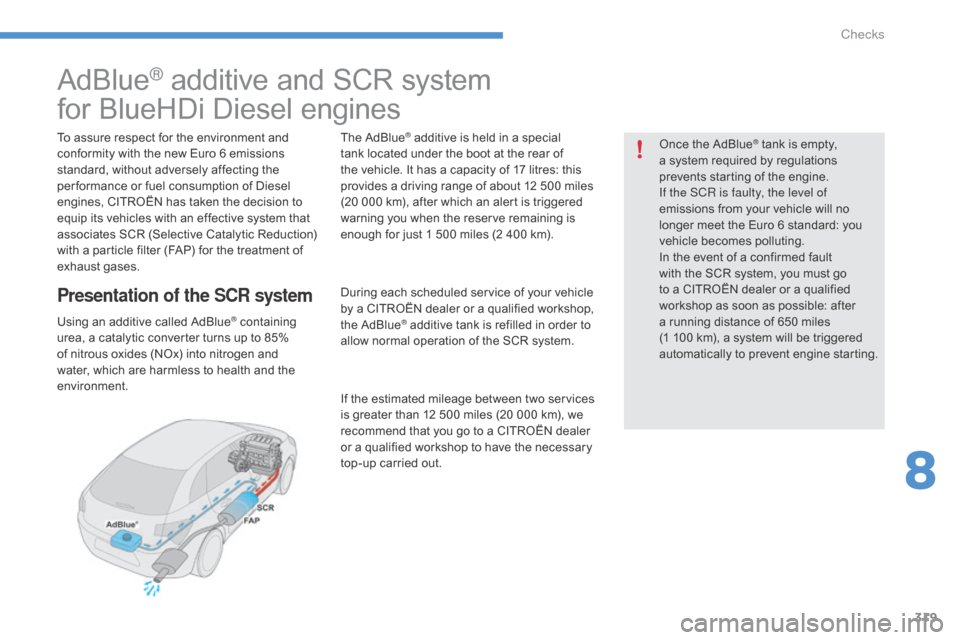
Presentation of the SCR system
Using an additive called AdBlue® containing u
rea,
a
catalytic
converter
turns
up to 85%
o
f
nitrous
oxides
(NOx)
into
nitrogen and
w
ater,
which
are
harmless
to
health and the
e
nvironment. The
AdBlue
® additive is held in a special t
ank
located
under the boot at the rear of
t
he
vehicle.
It has a capacity of 17 litres: this
p
rovides
a
driving range of about 12 500 miles
(
20
000
km),
after which an alert is triggered
w
arning
you
when the reserve remaining is
e
nough
for
just 1 500 miles (2 400 km).
During
each
scheduled service of your vehicle
b
y
a
CITROËN dealer or a qualified workshop,
t
he
AdBlue
® additive tank is refilled in order to a
llow
normal operation of the SCR system.
If
the
estimated mileage between two services
i
s
greater
than 12 500 miles (20 000 km), we
r
ecommend
that you go to a CITROËN dealer
o
r
a
qualified workshop to have the necessary
t
op-up
carried out. Once
the AdBlue
® tank is empty, a s
ystem
required
by regulations
p
revents
starting
of the engine.
If the SCR
is faulty, the level of
emissions
from
your vehicle will no
l
onger
meet
the
Euro 6 standard: you
v
ehicle
becomes
polluting.
In
the
event
of
a
confirmed fault
w
ith
the
SCR
system, you must go
t
o
a
CITROËN
dealer or a qualified
w
orkshop
as
soon as possible: after
a
running
distance of 650 miles
(
1 100
km),
a
system will be triggered
a
utomatically
to
prevent engine starting.
8
Checks