instrument panel Citroen C4 RHD 2011 2.G Owner's Guide
[x] Cancel search | Manufacturer: CITROEN, Model Year: 2011, Model line: C4 RHD, Model: Citroen C4 RHD 2011 2.GPages: 316, PDF Size: 9.93 MB
Page 50 of 316
1
MONITORING
48
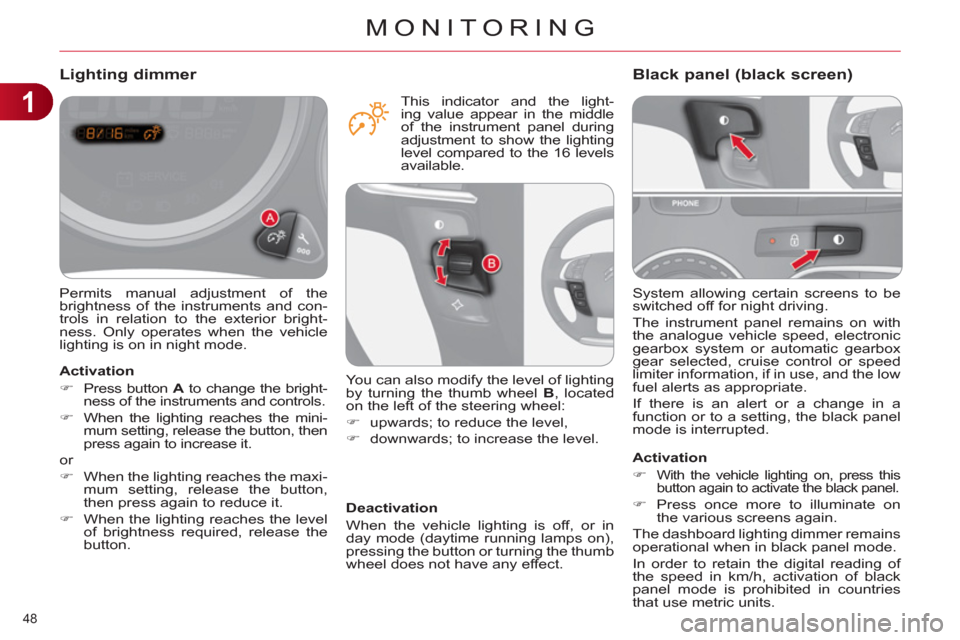
System allowing certain screens to be
switched off for night driving.
The instrument panel remains on with
the analogue vehicle speed, electronic
gearbox system or automatic gearbox
gear selected, cruise control or speed
limiter information, if in use, and the low
fuel alerts as appropriate.
If there is an alert or a change in a
function or to a setting, the black panel
mode is interrupted.
Black panel (black screen)
Activation
)
With the vehicle lighting on, press this
button again to activate the black panel.
)
Press once more to illuminate on
the various screens again.
The dashboard lighting dimmer remains
operational when in black panel mode.
In order to retain the digital reading of
the speed in km/h, activation of black
panel mode is prohibited in countries
that use metric units.
Permits manual adjustment of the
brightness of the instruments and con-
trols in relation to the exterior bright-
ness. Only operates when the vehicle
lighting is on in night mode.
Lighting dimmer
Activation
)
Press button A
to change the bright-
ness of the instruments and controls.
)
When the lighting reaches the mini-
mum setting, release the button, then
press again to increase it.
or
)
When the lighting reaches the maxi-
mum setting, release the button,
then press again to reduce it.
)
When the lighting reaches the level
of brightness required, release the
button.
Deactivation
When the vehicle lighting is off, or in
day mode (daytime running lamps on),
pressing the button or turning the thumb
wheel does not have any effect.
You can also modify the level of lighting
by turning the thumb wheel B
, located
on the left of the steering wheel:
)
upwards; to reduce the level,
)
downwards; to increase the level.
This indicator and the light-
ing value appear in the middle
of the instrument panel during
adjustment to show the lighting
level compared to the 16 levels
available.
Page 51 of 316
1
MONITORING
49
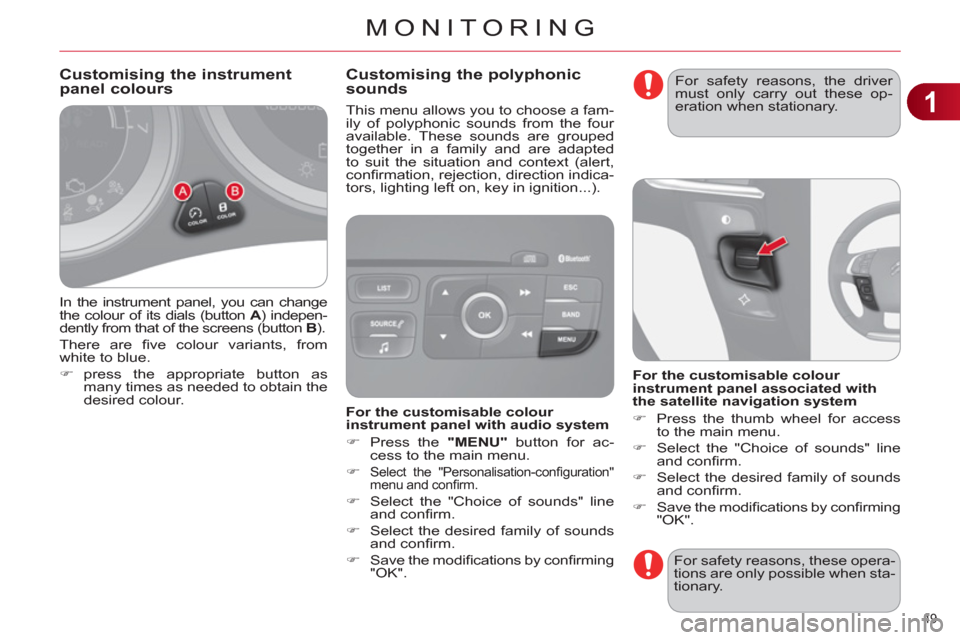
In the instrument panel, you can change
the colour of its dials (button A
) indepen-
dently from that of the screens (button B
).
There are fi ve colour variants, from
white to blue.
)
press the appropriate button as
many times as needed to obtain the
desired colour.
This menu allows you to choose a fam-
ily of polyphonic sounds from the four
available. These sounds are grouped
together in a family and are adapted
to suit the situation and context (alert,
confi rmation, rejection, direction indica-
tors, lighting left on, key in ignition...).
Customising the instrumentpanel colours Customising the polyphonic
sounds
For safety reasons, these opera-
tions are only possible when sta-
tionary.
For the customisable colour
instrument panel with audio system
)
Press the "MENU"
button for ac-
cess to the main menu.
)
Select the "Personalisation-confi guration"
menu and confi rm.
)
Select the "Choice of sounds" line
and confi rm.
)
Select the desired family of sounds
and confi rm.
)
Save the modifi cations by confi rming
"OK".
For the customisable colour
instrument panel associated with
the satellite navigation system
)
Press the thumb wheel for access
to the main menu.
)
Select the "Choice of sounds" line
and confi rm.
)
Select the desired family of sounds
and confi rm.
)
Save the modifi cations by confi rming
"OK".
For safety reasons, the driver
must only carry out these op-
eration when stationary.
Page 58 of 316
2
MULTIFUNCTION SCREENS
56
This group of controls allows:
- when stationary
, confi guration of
the vehicle, central screen and instru-
ment panel parameters (driving and
comfort systems, language, units,
sounds...),
- when stationary and while driving
,
scrolling the active functions available
(trip computer, navigation-guidance...).
Central colour screen and instrument panel controlsassociated with the satellite
navigation system
Controls
Main menu
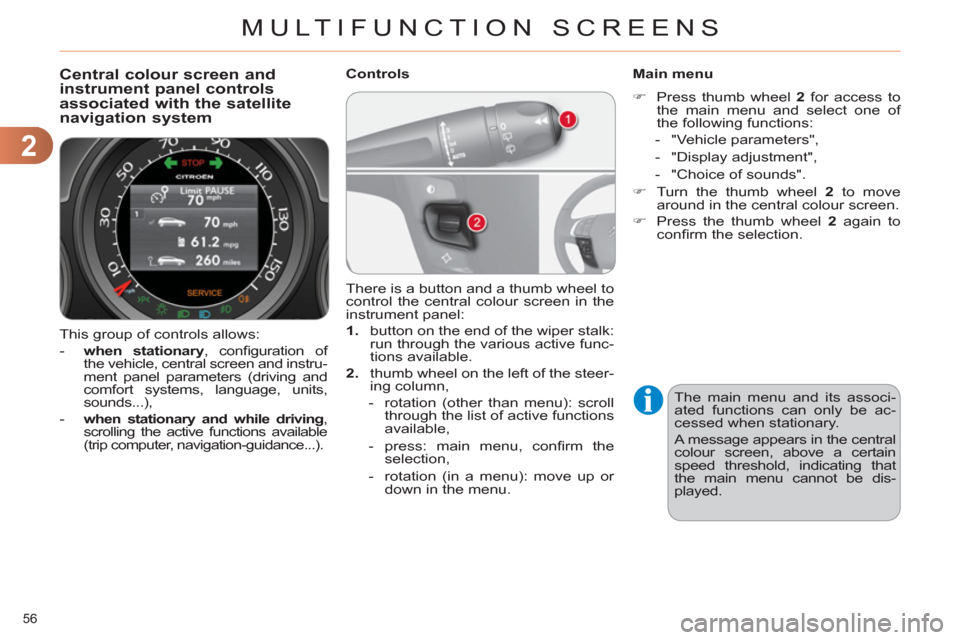
)
Press thumb wheel 2
for access to
the main menu and select one of
the following functions:
- "Vehicle parameters",
- "Display adjustment",
- "Choice of sounds".
)
Turn the thumb wheel 2
to move
around in the central colour screen.
)
Press the thumb wheel 2
again to
confi rm the selection.
There is a button and a thumb wheel to
control the central colour screen in the
instrument panel:
1.
button on the end of the wiper stalk:
run through the various active func-
tions available.
2.
thumb wheel on the left of the steer-
ing column,
- rotation (other than menu): scroll
through the list of active functions
available,
- press: main menu, confi rm the
selection,
- rotation (in a menu): move up or
down in the menu.
The main menu and its associ-
ated functions can only be ac-
cessed when stationary.
A message appears in the central
colour screen, above a certain
speed threshold, indicating that
the main menu cannot be dis-
played.
Page 94 of 316
4
ACCESS
92
FUEL TANK
Capacity of the tank: approximately
60 litres.
When the low fuel level in the
tank is reached, this warning
lamp on the instrument panel
comes on, accompanied by an
audible warning and a mes-
sage in the screen.
When it fi rst comes on, around
6 litres of fuel remain in the tank.
You must refuel as soon as possible to
avoid running out.
Low fuel level
Refuellin
g
Additions of fuel must be of at least
5 litres to be registered by the fuel gauge.
Opening the fi ller cap may result in an
inrush of air. This vacuum is entirely
normal and results from the sealing of
the fuel system.
If you have put in the wrong
fuel for your vehicle, you must
have have the tank drained and
refi lled with the correct fuel be-
fore you start the engine.
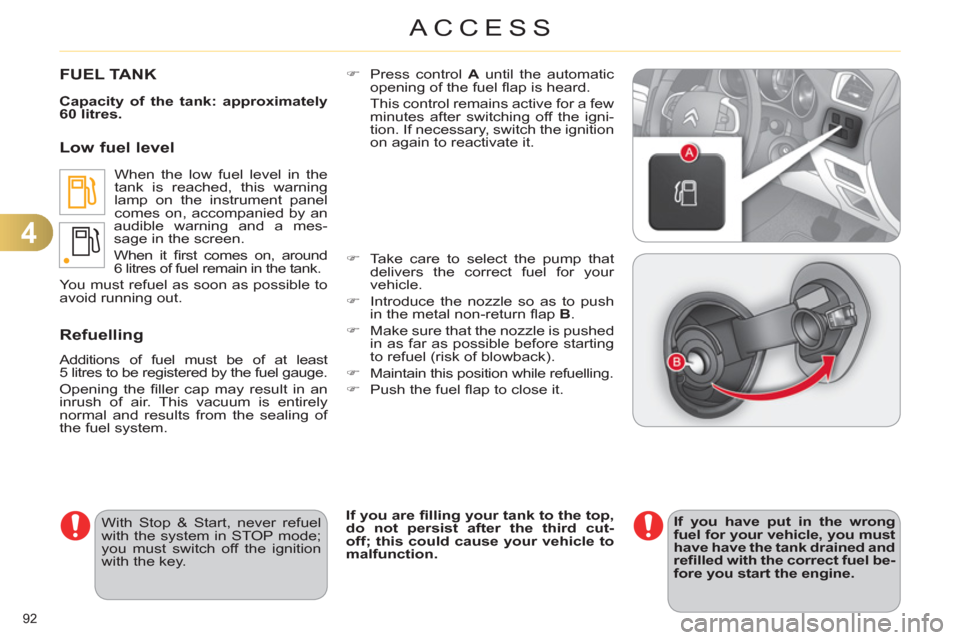
)
Press control A
until the automatic
opening of the fuel fl ap is heard.
This control remains active for a few
minutes after switching off the igni-
tion. If necessary, switch the ignition
on again to reactivate it.
If you are fi lling your tank to the top,
do not persist after the third cut-
off; this could cause your vehicle to
malfunction.
)
Take care to select the pump that
delivers the correct fuel for your
vehicle.
)
Introduce the nozzle so as to push
in the metal non-return fl ap B.
)
Make sure that the nozzle is pushed
in as far as possible before starting
to refuel (risk of blowback).
)
Maintain this position while refuelling.
)
Push the fuel fl ap to close it.
With Stop & Start, never refuel
with the system in STOP mode;
you must switch off the ignition
with the key.
Page 96 of 316
5
VISIBILITY
94
LIGHTING CONTROLS
System for selection and control of the
various front and rear lamps providing
the vehicle's lighting.
Main lighting
The various front and rear lamps of the
vehicle are designed to adapt the driv-
er's visibility progressively according to
the climatic conditions:
- sidelamps, to be seen,
- dipped beam headlamps to see
without dazzling other drivers,
- main beam headlamps to see clearly
when the road is clear.
Additional lighting
Other lamps are installed to fulfi l the
requirements of particular driving con-
ditions:
- rear foglamps,
- front fog lamps with static intersec-
tion lighting,
- directional headlamps for improved
visibility when cornering,
- daytime running lamps to be more
visible during the day,
- guide-me-home and welcome light-
ing to facilitate access to the vehicle,
- parking lamps as vehicle position
markers.
Programming
Various automatic lighting control
modes are also available depending on
whether the following options are fi tted:
- guide-me-home lighting,
- welcome lighting,
- daytime running lamps,
- directional lighting,
- automatic illumination of headlamps.
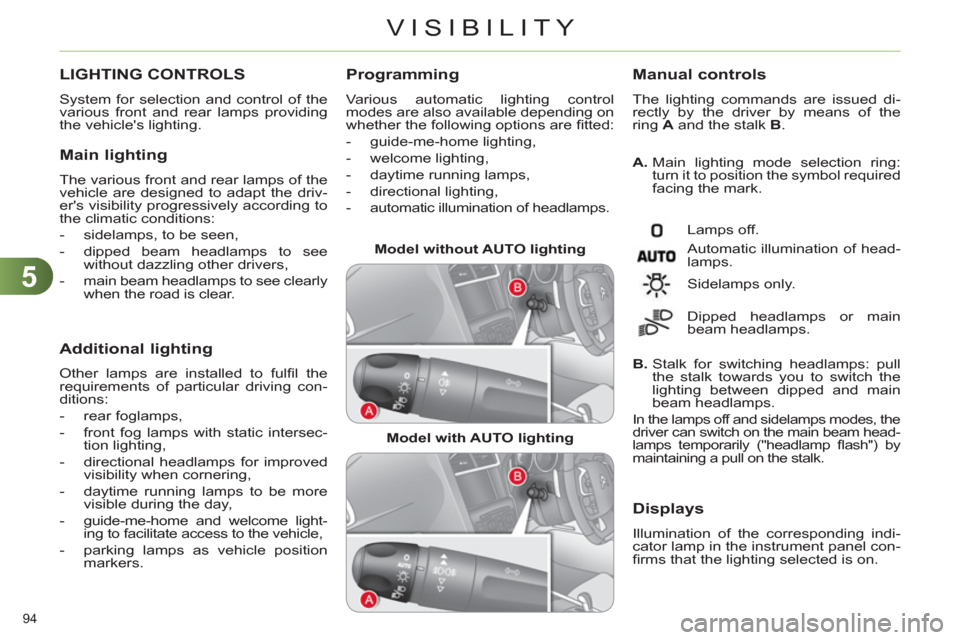
Model without AUTO lighting
Model with AUTO lighting
A.
Main lighting mode selection ring:
turn it to position the symbol required
facing the mark.
Manual controls
The lighting commands are issued di-
rectly by the driver by means of the
ring A
and the stalk B
.
Lamps off.
Automatic illumination of head-
lamps.
B.
Stalk for switching headlamps: pull
the stalk towards you to switch the
lighting between dipped and main
beam headlamps.
In the lamps off and sidelamps modes, the
driver can switch on the main beam head-
lamps temporarily ("headlamp fl ash") by
maintaining a pull on the stalk.
Sidelamps only.
Dipped headlamps or main
beam headlamps.
Displays
Illumination of the corresponding indi-
cator lamp in the instrument panel con-
fi rms that the lighting selected is on.
Page 98 of 316
5
VISIBILITY
96
Switching off the lighting when
switching off the ignition
When the ignition is switched off,
all of the lamps switch off immedi-
ately, except for the dipped beam
headlamps if automatic guide-
me-home lighting is activated.
In some weather conditions (e.g.
low temperature or humidity),
the presence of misting on the
internal surface of the glass of
the headlamps and rear lamps
is normal; it disappears after the
lamps have been on for a few
minutes.
Daytime running lamps
Daytime lighting, compulsory in certain
countries, which comes on automati-
cally when the engine is started making
the vehicle more visible to other users.
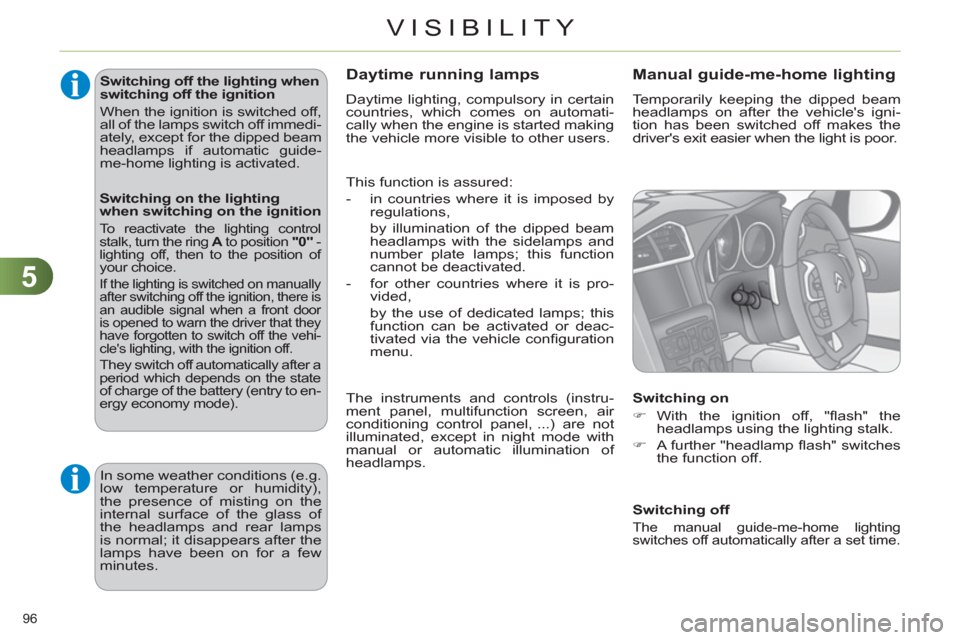
Manual guide-me-home lighting
Temporarily keeping the dipped beam
headlamps on after the vehicle's igni-
tion has been switched off makes the
driver's exit easier when the light is poor.
Switching on
)
With the ignition off, "fl ash" the
headlamps using the lighting stalk.
)
A further "headlamp fl ash" switches
the function off.
Switching off
The manual guide-me-home lighting
switches off automatically after a set time.
This function is assured:
- in countries where it is imposed by
regulations,
by illumination of the dipped beam
headlamps with the sidelamps and
number plate lamps; this function
cannot be deactivated.
- for other countries where it is pro-
vided,
by the use of dedicated lamps; this
function can be activated or deac-
tivated via the vehicle confi guration
menu.
The instruments and controls (instru-
ment panel, multifunction screen, air
conditioning control panel, ...) are not
illuminated, except in night mode with
manual or automatic illumination of
headlamps.
Switching on the lighting
when switching on the ignition
To reactivate the lighting control stalk, turn the ring A
to position "0"
- lighting off, then to the position of
your choice.
If the lighting is switched on manually
after switching off the ignition, there is
an audible signal when a front door
is opened to warn the driver that they
have forgotten to switch off the vehi-
cle's lighting, with the ignition off.
They switch off automatically after a
period which depends on the state
of charge of the battery (entry to en-
ergy economy mode).
Page 99 of 316
5
VISIBILITY
97
Automatic illumination of
headlamps
The sidelamps and dipped beam headlamps
are switched on automatically, without any ac-
tion on the part of the driver, when a low level
of external light is detected or in certain cases
of activation of the windscreen wipers.
As soon as the brightness returns to a
suffi cient level or after the windscreen
wipers are switched off, the lamps are
switched off automatically.
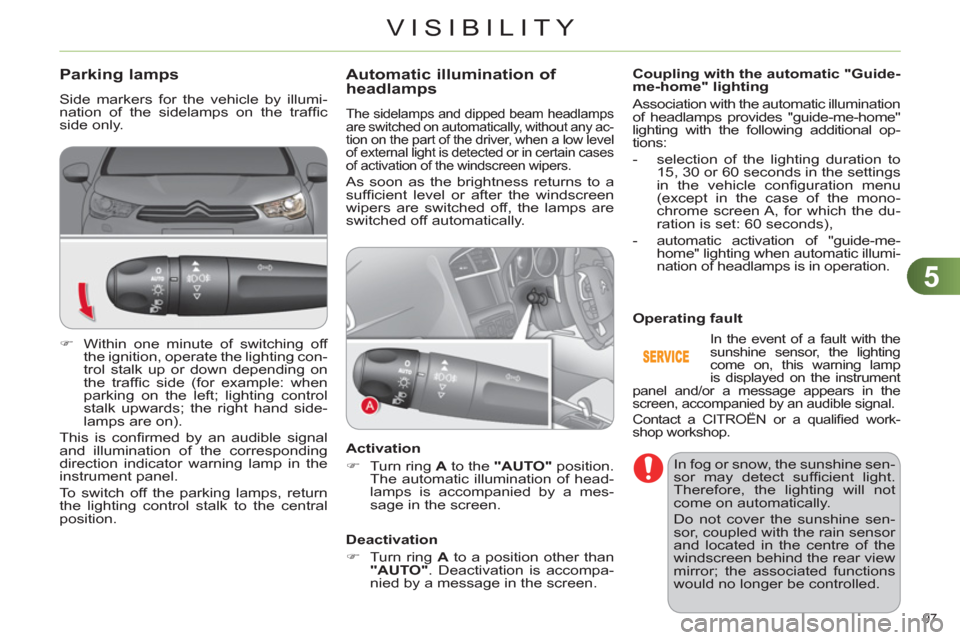
Activation
)
Turn ring A
to the "AUTO"
position.
The automatic illumination of head-
lamps is accompanied by a mes-
sage in the screen.
Deactivation
)
Turn ring A
to a position other than
"AUTO"
. Deactivation is accompa-
nied by a message in the screen.
Coupling with the automatic "Guide-
me-home" lighting
Association with the automatic illumination
of headlamps provides "guide-me-home"
lighting with the following additional op-
tions:
- selection of the lighting duration to
15, 30 or 60 seconds in the settings
in the vehicle confi guration menu
(except in the case of the mono-
chrome screen A, for which the du-
ration is set: 60 seconds),
- automatic activation of "guide-me-
home" lighting when automatic illumi-
nation of headlamps is in operation.
In the event of a fault with the
sunshine sensor, the lighting
come on, this warning lamp
is displayed on the instrument
panel and/or a message appears in the
screen, accompanied by an audible signal.
Contact a CITROËN or a qualifi ed work-
shop workshop.
Operating fault
In fog or snow, the sunshine sen-
sor may detect suffi cient light.
Therefore, the lighting will not
come on automatically.
Do not cover the sunshine sen-
sor, coupled with the rain sensor
and located in the centre of the
windscreen behind the rear view
mirror; the associated functions
would no longer be controlled.
Parking lamps
Side markers for the vehicle by illumi-
nation of the sidelamps on the traffi c
side only.
)
Within one minute of switching off
the ignition, operate the lighting con-
trol stalk up or down depending on
the traffi c side (for example: when
parking on the left; lighting control
stalk upwards; the right hand side-
lamps are on).
This is confi rmed by an audible signal
and illumination of the corresponding
direction indicator warning lamp in the
instrument panel.
To switch off the parking lamps, return
the lighting control stalk to the central
position.
Page 100 of 316
5
VISIBILITY
98
EXTERIOR WELCOMELIGHTING
Switching on
)
Press the open padlock on
the remote control.
Switching off
The exterior welcome lighting switches
off automatically after a set time, when
the ignition is switched on or on locking
the vehicle.
Programming
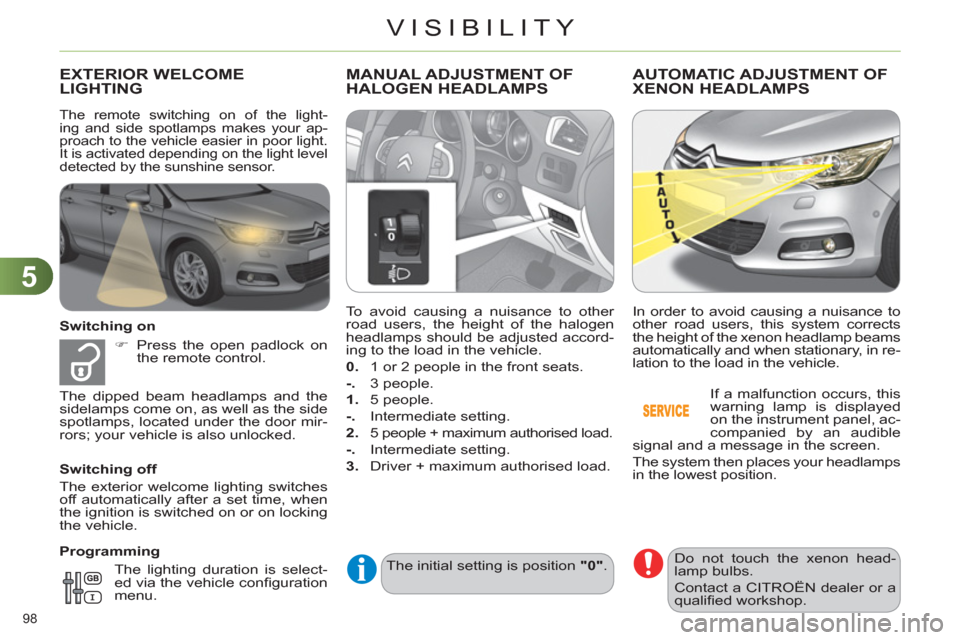
To avoid causing a nuisance to other
road users, the height of the halogen
headlamps should be adjusted accord-
ing to the load in the vehicle.
0.
1 or 2 people in the front seats.
-.
3 people.
1.
5 people.
-.
Intermediate setting.
2.
5 people + maximum authorised load.
-.
Intermediate setting.
3.
Driver + maximum authorised load.
MANUAL ADJUSTMENT OFHALOGEN HEADLAMPS
The initial setting is position "0"
.
AUTOMATIC ADJUSTMENT OFXENON HEADLAMPS
The remote switching on of the light-
ing and side spotlamps makes your ap-
proach to the vehicle easier in poor light.
It is activated depending on the light level
detected by the sunshine sensor.
The dipped beam headlamps and the
sidelamps come on, as well as the side
spotlamps, located under the door mir-
rors; your vehicle is also unlocked.
In order to avoid causing a nuisance to
other road users, this system corrects
the height of the xenon headlamp beams
automatically and when stationary, in re-
lation to the load in the vehicle.
If a malfunction occurs, this
warning lamp is displayed
on the instrument panel, ac-
companied by an audible
signal and a message in the screen.
The system then places your headlamps
in the lowest position.
Do not touch the xenon head-
lamp bulbs.
Contact a CITROËN dealer or a
qualifi ed workshop. The lighting duration is select-
ed via the vehicle confi guration
menu.
Page 101 of 316

5
VISIBILITY
99
DIRECTIONAL LIGHTING
Programming
with directional lighting
without directional lighting
When the dipped or main beam head-
lamps are on, this function, allows the
light beams to better follow the road.
The use of this function, coupled with
the xenon headlamps and the static
intersection lighting, considerably im-
proves the quality of your lighting when
cornering.
Operating fault
If a fault occurs, this warning
lamp fl ashes in the instrument
panel, accompanied by a mes-
sage in the screen.
Contact a CITROËN dealer or a quali-
fi ed workshop.
This function is inactive:
- when stationary or at low speeds,
- when reverse is engaged.
The system is activated or de-
activated in the vehicle confi gu-
ration menu.
The system is activated by default.
The state of the system stays in memory
on switching off the ignition.
Page 104 of 316

5
102
Automatic rain sensitive
windscreen wipers
The windscreen wipers operate automat-
ically, without any action on the part of
the driver, if rain is detected (sensor be-
hind the rear view mirror), adapting their
speed to the intensity of the rainfall.
Briefl y push stalk A
downwards.
The instruction is confi rmed by
a wiping cycle, accompanied by
illumination of this warning lamp
in the instrument panel and an activation
message.
Switching on
Switching off
Operating fault
If an automatic rain sensitive wiper mal-
function occurs, the wipers will operate
in intermittent mode.
Contact a CITROËN dealer or a quali-
fi ed workshop.
Do not cover the rain sensor,
linked with the sunshine sensor
and located in the centre of the
windscreen behind the rear view
mirror.
Switch off the automatic rain
sensitive wipers when using an
automatic car wash.
In winter, it is advisable to wait
until the windscreen is completely
clear of ice before activating the
automatic rain sensitive wipers.
The automatic rain sensitive
windscreen wipers must be re-
activated if the ignition has been
off for more than one minute.
Briefl y push stalk A
downwards
again.
The instruction is confi rmed by
this warning lamp going off in
the instrument panel and/or the display
of a deactivation message.
Windscreen and headlamp
wash
On vehicle fi tted with headlamp wash-
ers, the low level of this fl uid is indicated
by gauge in the reservoir fi ller neck un-
der the bonnet.
Checking and topping up this fl uid can
only be done when stationary with the
engine off.
The driver should check the level of this
fl uid regularly, particularly during winter.
Refer to "Checks - § Screenwash/head-
lamp wash level" for the procedure on
checking the level.
Low screenwash/headlamp wash
level
)
Pull the windscreen wiper stalk to-
wards you. The windscreen wash
then the windscreen wipers operate
for a fi xed period.
The headlamp washers only operate
when the dipped beam headlamps
are on
.