dashboard Citroen C4 RHD 2015 2.G Owner's Manual
[x] Cancel search | Manufacturer: CITROEN, Model Year: 2015, Model line: C4 RHD, Model: Citroen C4 RHD 2015 2.GPages: 328, PDF Size: 12.72 MB
Page 8 of 328
6 6
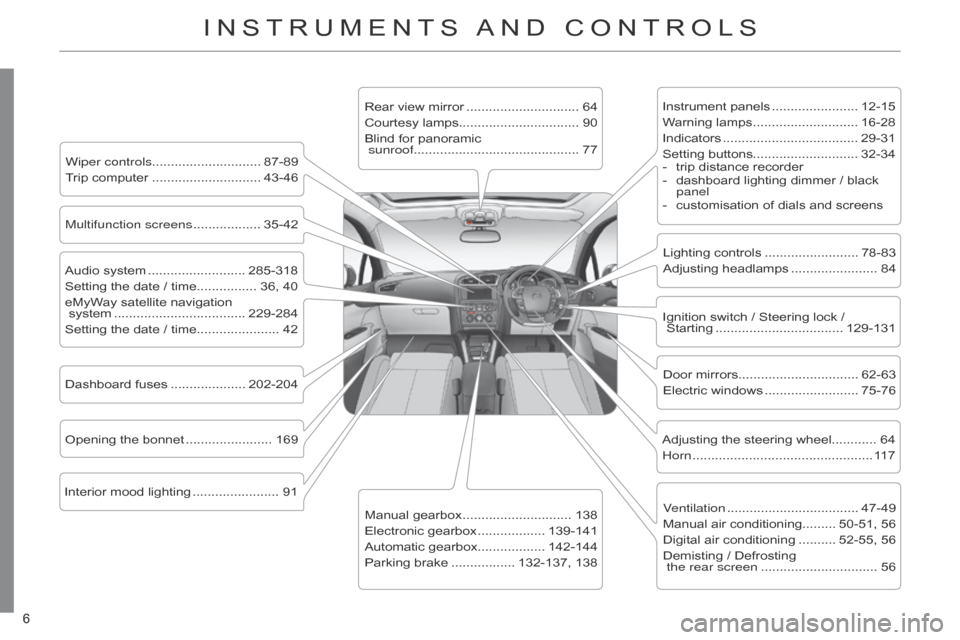
INSTRUMENTS AND CONTROLS
Instrument panels ....................... 12-15
W arning lamps ............................ 16-28
Indicators
.................................... 29-31
Setting
buttons............................ 32-34
-
trip
distance recorder
-
dashboard
lighting dimmer / black
panel
-
customisation
of dials and screens
Lighting
controls
......................... 78-83
Adjusting
headlamps
....................... 84
Door
mirrors
................................ 62-63
Electric
windows
......................... 75-76
Dashboard
fuses
.................... 202-204
Opening
the
bonnet
....................... 169 Adjusting
the steering wheel............ 64
Horn
................................................ 11
7
Audio
system
.......................... 285-318
Setting
the
date
/
time................ 36,
40
eMyWay
satellite
navigation
system
................................... 229-284
Setting
the
date
/
time...................... 42 Manual
gearbox
............................. 138
Electronic
gearbox
.................. 139-141
Automatic
gearbox.................. 142-144
Parking
brake
................. 132-137,
138
Wiper controls............................. 87-89
Trip
computer
............................. 43-46 Rear
view
mirror
.............................. 64
Courtesy
lamps................................ 90
Blind
for
panoramic
sunroof ............................................ 77
Interior
mood
lighting
....................... 91 Ignition
switch / Steering lock /
Starting
.................................. 129-131
Multifunction screens
.................. 35-42
V
entilation
................................... 47-49
Manual
air conditioning......... 50-51, 56
Digital
air conditioning
.......... 52-55,
56
Demisting
/ Defrosting
the rear screen
............................... 56
Page 27 of 328

25
Operation indicator lamps
If one of the following indicator lamps comes on, this confirms that the corresponding system has come into operation.
It
may be accompanied by an audible signal and a message in the screen.
Warning/indicator lamp is onCause Action/Observations
Left-hand direction
indicator flashing
with
buzzer
.The
lighting stalk is pushed
down.
Right-hand direction
indicator flashing
with
buzzer
.The
lighting stalk is pushed up.
Hazard warning lamps flashing
with
audible
signal.The
hazard warning lamps
switch,
located on the
dashboard,
has been operated.The
left-hand and right-hand direction
indicators
and their associated indicator
lamps
flash simultaneously.
Sidelamps fixed.The
lighting stalk is in the
"Sidelamps"
position.
Dipped beam headlamps fixed.The
lighting stalk is in the
"Dipped
beam headlamps"
position
or in the "AUTO"
position
in conditions of low
light.
Main beam
headlamps fixed.The
lighting stalk is pulled
towards
you.Pull
the stalk again to return to dipped
beam
headlamps.
Front foglamps fixed.The
front foglamps are
switched
on using the ring on
the
lighting control stalk.Turn
the ring on the lighting control stalk
rearwards
twice to switch off the front
foglamps.
Rear foglamps fixed. The
rear foglamps are on.Turn
the ring on the stalk rearward to turn
of
f the rear foglamps.
1
MONITORING
Page 50 of 328

33
48
RECOMMENDATIONS FOR VENTILA TION AND AIR CONDITIONING
In order for these systems to be fully ef fective, follow the operation and maintenance
guidelines below:
F
T
o
obtain
an
even
air
distribution,
take
care
not
to
obstruct
the
exterior
air
intake
grille
s
located
at
the
base
of
the
windscreen,
the
nozzles,
the
vents
and
the
air
outlets,
as
well
as
the
air
extractor
located
in
the
boot.
F
Do
not
cover
the
sunshine
sensor
,
located
on
the
dashboard;
this
is
used
for regulation of the air conditioning system.
F
Operate
the
air
conditioning
system
for
at
least
5
to
10
minutes,
once
or
twice
a month to keep it in perfect working order.
F
Ensure
that
the
passenger
compartment
filter
is
in
good
condition
and
have
the filter elements replaced regularly.
W
e
recommend
the
use
of
a
combined
passenger
compartment
filter
.
Thanks
to
its
special
active
additive,
it
contributes
to
the
purification
of
the
air
breathed
by
the
occupants
and
the
cleanliness
of
the
passenger
compartment
(reduction
of
allergic
symptoms,
bad
odours
and
greasy
deposits).
F
T
o
ensure
correct
operation
of
the
air
conditioning
system,
you
are
also
advised
to
have
it
checked
regularly
as
recommended
in
the
mainte
-
nance
and warranty guide.
F
If
the
system
does
not
produce
cold
air
,
switch
it
of
f
and
contact
a
CITROËN
dealer or a qualified workshop.
When
towing
the
maximum
load
on
a
steep
gradient
in
high
temperatures,
switching
of
f
the
air
conditioning
increases
the
available
engine
power
and
so
improves the towing ability. If
after
an
extended
stop
in
sun
-
shine,
the
interior
temperature
is
very
high, first ventilate the pas -
senger compartment for a few moments.
Put
the
air
flow
control
at
a
set
-
ting
high
enough
to
quickly
change
the
air
in
the
passenger
compartment.
The
air
conditioning
system
does
not
contain
chlorine
and
does
not
present
any
danger
to
the
ozone layer.
The
condensation
created
by
the
air
conditioning
results
in
a
discharge
of
water
under
the
ve
-
hicle
which is perfectly normal.
Stop & Start
The
heating
and
air
conditioning
systems
only
work
when
the
engine
is
running.
T
o
maintain
a
comfortable
temperature
in
the
passenger
compart
-
ment,
you
can
temporarily
deactivate
the
Stop
&
Start
system
(see
the
corresponding
section).
COMFORT
Page 95 of 328
93
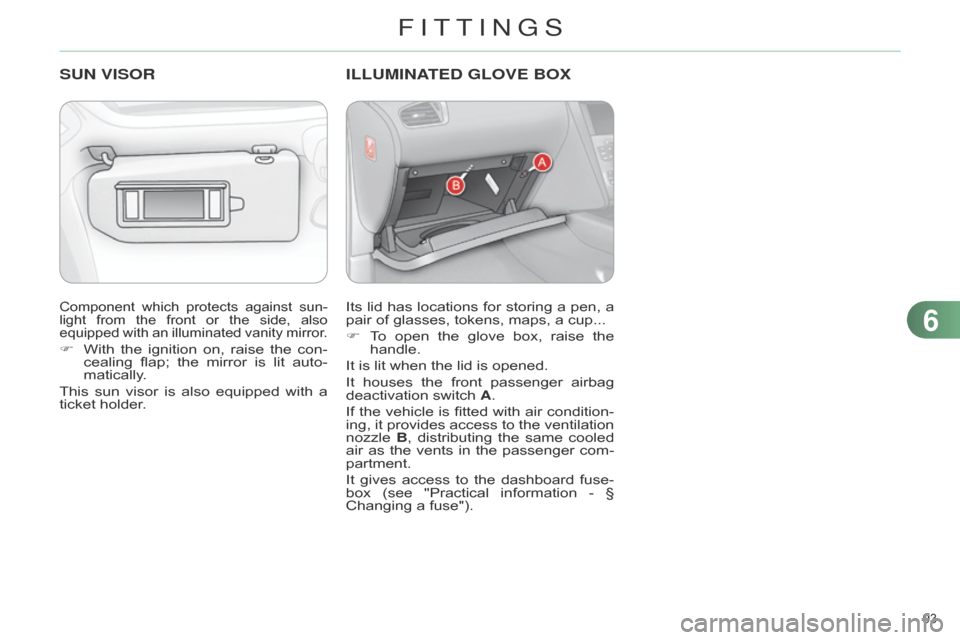
Component which protects against sun -
light from the front or the side, also
equipped
with
an
illuminated
vanity
mirror
.
F With the ignition on, raise the con -
cealing flap; the mirror is lit auto -
matically.
This
sun
visor
is
also
equipped
with
a
ticket
holder.
SUN VISORI LLUMINATED GLOVE BOX
Its lid has locations for storing a pen, a pair
of glasses, tokens, maps, a cup...
F
T
o
open
the
glove
box,
raise
the
handle.
It
is lit when the lid is opened.
It
houses
the
front
passenger
airbag
deactivation
switch A.
If
the
vehicle
is
fitted
with
air
condition
-
ing,
it
provides
access
to
the
ventilation
nozzle
B
,
distributing
the
same
cooled
air
as
the
vents
in
the
passenger
com
-
partment.
It
gives
access
to
the
dashboard
fuse
-
box
(see
"Practical
information
-
§
Changing
a fuse").
6
FITTINGS
Page 126 of 328
88
124
AIRBAGS
System designed to contribute towards improving
the safety of the occupants
(with
the
exception
of
the
rear
centre
passenger)
in
the
event
of
violent
colli-
sions.
The
airbags
supplement
the
ac
-
tion
of
the
force-limiting
seat
belts
(with
the
exception
of
the
centre
rear
pas
-
senger).
If
a
collision
occurs,
the
electronic
de
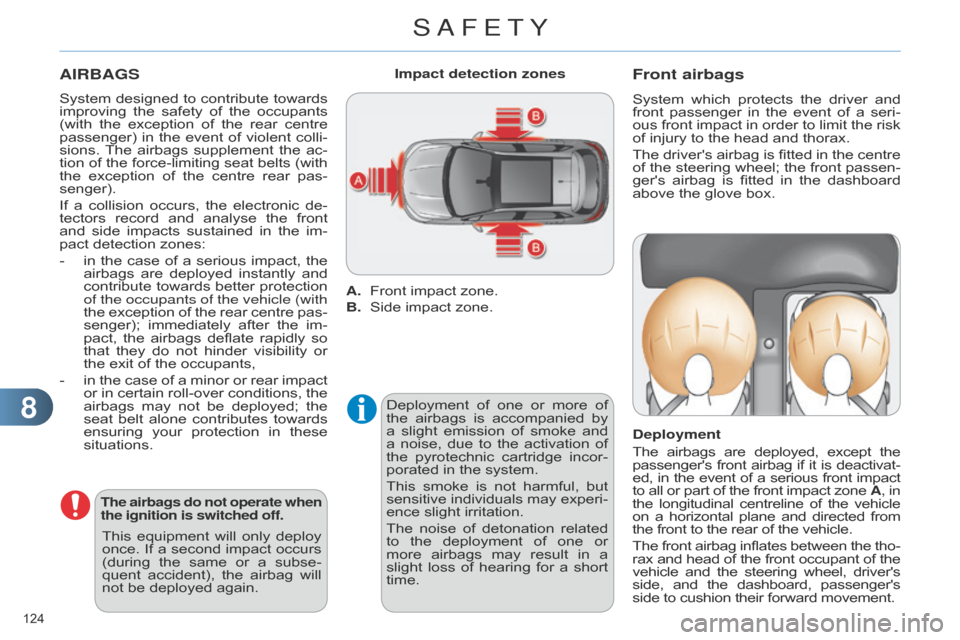
-
tectors
record
and
analyse
the
front
and
side
impacts
sustained
in
the
im
-
pact
detection zones:
-
in
the
case
of
a
serious
impact,
the
airbags
are
deployed
instantly
and
contribute
towards
better
protection
of the occupants of the vehicle (with
the
exception
of
the
rear
centre
pas
-
senger);
immediately
after
the
im
-
pact,
the
airbags
deflate
rapidly
so
that
they
do
not
hinder
visibility
or
the
exit of the occupants,
-
in
the
case
of
a
minor
or
rear
impact
or
in
certain
roll-over
conditions,
the
airbags
may
not
be
deployed;
the
seat
belt
alone
contributes
towards
ensuring
your
protection
in
these
situations.
The airbags do not operate when
the ignition is switched off.
A. Front impact zone.
B.
Side
impact zone.
Impact detection zones
Deployment
of
one
or
more
of
the
airbags
is
accompanied
by
a
slight
emission
of
smoke
and
a
noise,
due
to
the
activation
of
the
pyrotechnic
cartridge
incor
-
porated
in the system.
This
smoke
is
not
harmful,
but
sensitive
individuals
may
experi
-
ence
slight irritation.
The
noise
of
detonation
related
to
the
deployment
of
one
or
more
airbags
may
result
in
a
slight
loss
of
hearing
for
a
short
time.
Front airbags
System which protects the driver and front
passenger in the event of a seri -
ous
front
impact
in
order
to
limit
the
risk
of
injury to the head and thorax.
The
driver's
airbag
is
fitted
in
the
centre
of
the
steering
wheel;
the
front
passen
-
ger's
airbag
is
fitted
in
the
dashboard
above
the glove box.
Deployment
The
airbags
are
deployed,
except
the passenger's
front
airbag
if
it
is
deactivat
-
ed,
in
the
event
of
a
serious
front
impact to
all
or
part
of
the
front
impact
zone
A, in
the
longitudinal
centreline
of
the
vehicle on
a
horizontal
plane
and
directed
from the
front to the rear of the vehicle.
The
front
airbag
inflates
between
the
tho
-
rax
and
head
of
the
front
occupant
of
the vehicle
and
the
steering
wheel,
driver's side,
and
the
dashboard,
passenger's side
to cushion their forward movement.
This
equipment
will
only
deploy
once.
If
a
second
impact
occurs
(during
the
same
or
a
subse
-
quent
accident),
the
airbag
will
not
be
deployed
again.
SAFETY
Page 129 of 328
88
127
For the airbags to be fully
effective, observe the
following safety rules:
Sit in a normal upright position.
Wear
a
correctly
adjusted
seat
belt.
Do
not
leave
anything
between
the
occupants
and
the
airbags
(a
child,
pet,
object...).
This
could
hamper
the
operation
of
the
air
-
bags
or injure the occupants.
After
an
accident
or
if
the
ve
-
hicle
has
been
stolen
or
broken
into,
have
the
airbag
systems
checked.
All
work
on
the
airbag
system
must be
carried
out
by
a
CITROËN
deal
-
er
or a qualified workshop.
Even if all of the precautions
mentioned
are
observed,
a
risk
of
injury
or
of
minor
burns
to
the
head,
chest
or
arms
when
an
air
-
bag
is
deployed
cannot
be
ruled
out.
The
bag
inflates
almost
in
-
stantly
(within
a
few
millis
econds)
then
deflates
within
the
same
time
discharging
the
hot
gas
via
openings
provided
for
this
pur
-
pose. Front airbags
Do
not
drive
holding
the
steering
wheel
by
its
spokes
or
resting
your
hands
on
the
centre part of the wheel.
Passengers
must not place their feet on the dashboard.
Do
not
smoke
as
deployment
of
the
airbags
can
cause
burns
or
the
risk
of
injury
from
a cigarette or pipe.
Never
remove or pierce the steering wheel or hit it violently.
Do
not
fit
or
attach
anything
to
the
steering
wheel
or
dashboard,
this
could
cause
injuries
with deployment of the airbags.
Lateral airbags
Use
only
approved
covers
on
the
seats,
compatible
with
the
deployment
the
lat
-
eral
airbags.
For
information
on
the
range
of
seat
covers
suitable
for
your
vehicle,
you
can contact a CITROËN dealer.
Refer
to the "Accessories" section.
Do
not
fix
or
attach
anything
to
the
seat
backs
(clothing...).
This
could
cause
injury
to the chest or arms if the lateral airbag is deployed.
Do
not
sit
with
the
upper
part
of
the
body
any
nearer
to
the
door
than
necessary
.
Curtain airbags
Do
not
fix
or
attach
anything
to
the
roof.
This
could
cause
injury
to
the
head
if
the
curtain
airbag is deployed.
If
fitted
on
your
vehicle,
do
not
remove
the
grab
handles
installed
on
the
roof,
they
play
a part in securing the curtain airbags.
SAFETY
Page 204 of 328
1111
202
CHANGING A FUSE
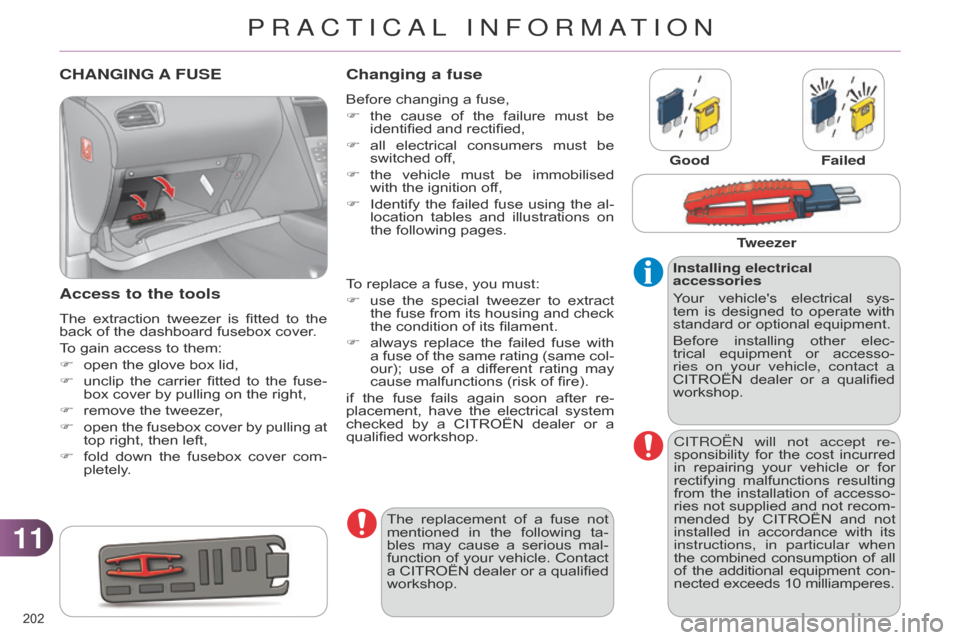
Access to the tools
The extraction tweezer is fitted to the back
of the dashboard fusebox cover.
To
gain access to them:
F
open
the glove box lid,
F
unclip
the
carrier
fitted
to
the
fuse
-
box
cover by pulling on the right,
F
remove
the tweezer,
F
open
the
fusebox
cover
by
pullin
g
at
top
right, then left,
F
fold
down
the
fusebox
cover
com
-
pletely.
Changing a fuse
Before changing a fuse,
F
the
cause
of
the
failure
must
be
identified
and rectified,
F
all
electrical
consumers
must
be
switched
off,
F
the
vehicle
must
be
immobilised
with
the ignition off,
F
Identify
the
failed
fuse
using
the
al
-
location
tables
and
illu
strations
on
the
following pages. Good
Failed
To
replace a fuse, you must:
F
use
the
special
tweezer
to
extract
the
fuse
from
its
housing
and
check
the
condition of its filament.
F
always
replace
the
failed
fuse
with
a
fuse
of
the
same
rating
(same
col
-
our);
use
of
a
dif
ferent
rating
may
cause
malfunctions (risk of fire).
if
the
fuse
fails
again
soon
after
re
-
placement,
have
the
electrical
system
checked
by
a
CITROËN
dealer
or
a
qualified
workshop. Installing electrical
accessories
Your
vehicle's
electrical
sys
-
tem
is
designed
to
operate
with
standard
or optional equipment.
Before
installing
other
elec
-
trical
equipment
or
accesso
-
ries on your vehicle, contact a
CITROËN
dealer
or
a
qualified
workshop.CITR
o Ë n will not accept re-
sponsibility
for
the
cost
incurred
in
repairing
your
vehicle
or
for
rectifying
malfunctions
resulting
from
the
installation
of
accesso
-
ries
not
supplied
and
not
recom
-
mended
by
CITROËN
and
not
installed
in
accordance
with
its
instructions, in particular when
the
combined
consumption
of
all of
the
additional
equipment
con
-
nected
exceeds 10 milliamperes.
The
replacement
of
a
fuse
not
mentioned
in
the
following
ta
-
bles
may
cause
a
serious
mal
-
function
of
your
vehicle.
Contact
a
CITROËN
dealer
or
a
qualified
workshop. T
weezer
PRACTICAL INFORMATION
Page 205 of 328
1111
203
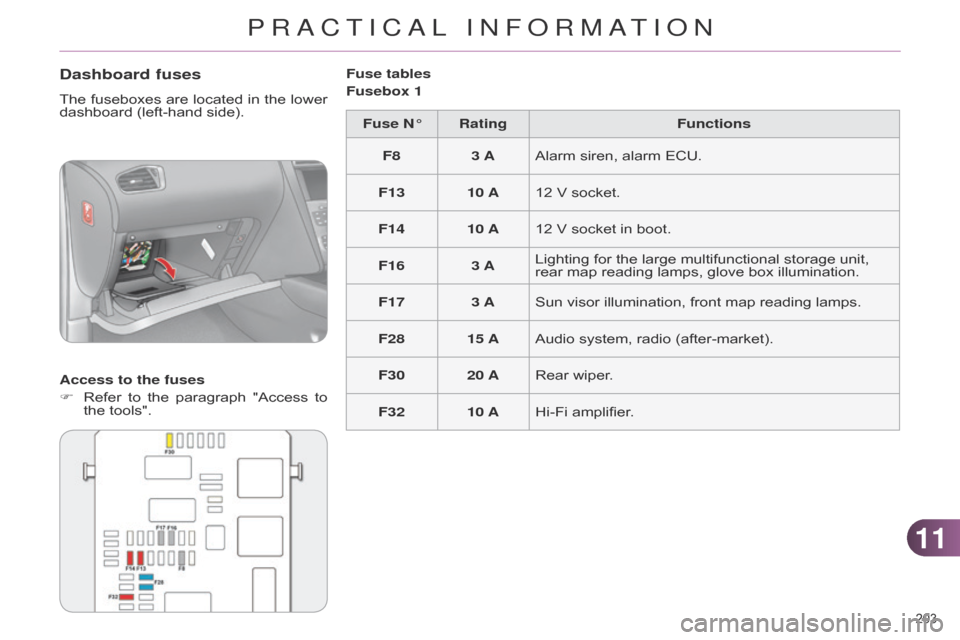
Dashboard fuses
The fuseboxes are located in the lower dashboard
(left-hand side).
Access to the fuses
F
Refer
to
the
paragraph
"Access
to
the
tools". Fuse tables
Fusebox 1
Fuse N° Rating Functions
F8 3 AAlarm
siren, alarm ECU.
F13 10 A12
V socket.
F14 10 A12
V socket in boot.
F16 3 ALighting
for the large multifunctional storage unit,
rear
map reading lamps, glove box illumination.
F17 3 ASun
visor illumination, front map reading lamps.
F28 15 AAudio
system, radio (after-market).
F30 20 ARear
wiper.
F32 10 AHi-Fi
amplifier.
PRACTICAL INFORMATION
Page 216 of 328
1111
214
AUDIO PRE-EqUIPMENT
Your vehicle is equipped with certain factory-fitted
audio equipment:
-
a
dual-function
aerial
at
the
rear
of
the roof,
-
a
coaxial aerial cable,
-
basic
interference suppression,
-
cabling
for
speakers
in
the
front
doors and
tweeters in the dashboard,
-
cabling
for
speakers
in
the
rear
doors,
-
two
8-way connectors.
Before
installin
g
a
radio
unit
or
speakers
in
your
vehicle,
contact
a
CITROËN
dealer
or
a
qualified
workshop
to
obtain
a
suitable
wiring
harness.
n
ever use a separate wire to
connect
the
(+)
of
your
audio
equipment
(risk
of
discharging
of
the
battery).
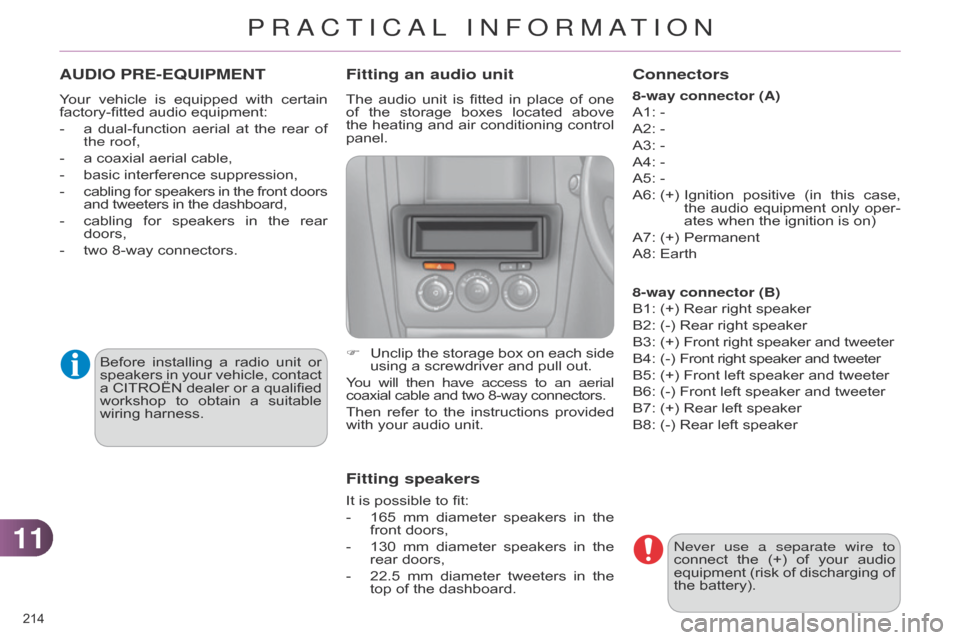
Fitting an audio unit
The audio unit is fitted in place of one of
the storage boxes located above
the
heating
and
air
conditioning
control
panel.
F
Unclip
the
storage
box
on
each
side
using
a screwdriver and pull out.
You will then have access to an aerial
coaxial
cable and two 8-way connectors.
Then
refer
to
the
instructions
provided
with
your audio unit.
Fitting speakers
It is possible to fit:
-
165
mm
diameter
speakers
in
the
front
doors,
-
130
mm
diameter
speakers
in
the
rear
doors,
-
22.5
mm
diameter
tweeters
in
the
top
of the dashboard.
Connectors
8-way connector (A)
A1: -
A2:
-
A3:
-
A4:
-
A5:
-
A6:
(+)
Ignition
positive
(in
this
case,
the
audio
equipment
only
oper
-
ates
when the ignition is on)
A7:
(+)
Permanent
A8:
Earth
8-way connector (B)
B1:
(+) Rear right speaker
B2:
(-) Rear right speaker
B3:
(
+)
Front
right speaker and tweeter
B4:
(
-)
Front
right speaker and tweeter
B5:
(+) Front left speaker and tweeter
B6:
(-) Front left speaker and tweeter
B7:
(+) Rear left speaker
B8:
(-) Rear left speaker
PRACTICAL INFORMATION
Page 228 of 328
226
IDENTIFICATION MARKINGS
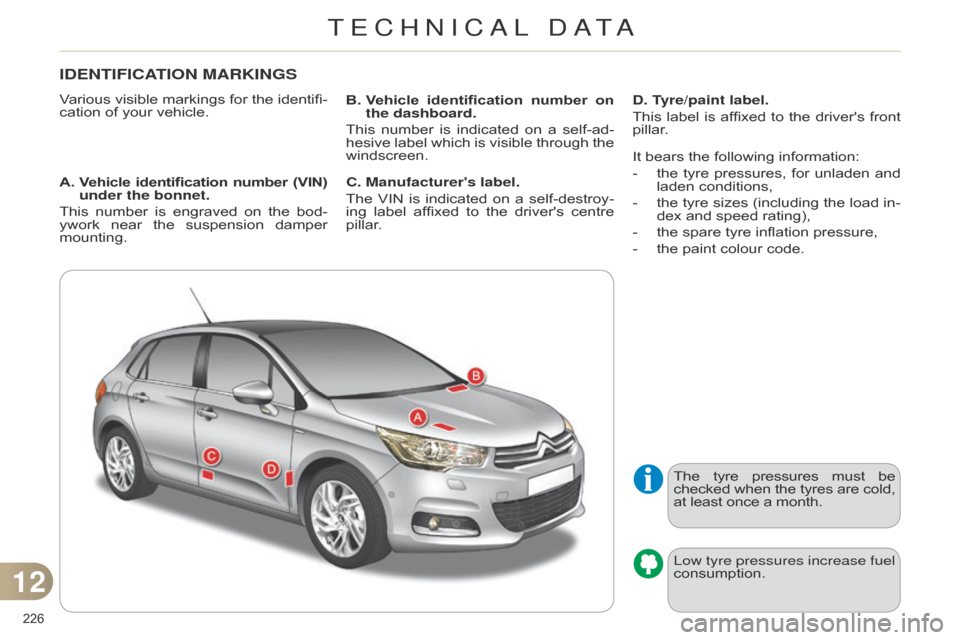
Various visible markings for the identifi-
cation of your vehicle.
A.
V
ehicle identification number (VIN)
under the bonnet.
This
number
is
engraved
on
the
bod
-
ywork
near
the
suspension
damper
mounting. B.
V ehicle identification number on
the dashboard.
This
number
is
indicated
on
a
self-ad
-
hesive
label
which
is
visible
through
the
windscreen.D. T
yre/paint label.
This
label
is
affixed
to
the
driver's
front
pilla
r.
The
tyre
pressures
must
be checked
when
the
tyres
are
cold, at
least once a month.
Low tyre pressures increase fuel
consumption.
C. Manufacturer's label.
The
VIN
is
indicated
on
a
self-destroy
-
ing
label
affixed
to
the
driver's
centre
pilla
r.It
bears the following information:
-
the
tyre
pressures,
for
unladen
and
laden
conditions,
-
the
tyre
sizes
(including
the
load
in
-
dex
and speed rating),
-
the
spare tyre inflation pressure,
-
the
paint colour code.
12
TECHNICAL DATA