tailgate Citroen C4 RHD 2015 2.G Owner's Manual
[x] Cancel search | Manufacturer: CITROEN, Model Year: 2015, Model line: C4 RHD, Model: Citroen C4 RHD 2015 2.GPages: 328, PDF Size: 12.72 MB
Page 76 of 328

74Â
BOOT
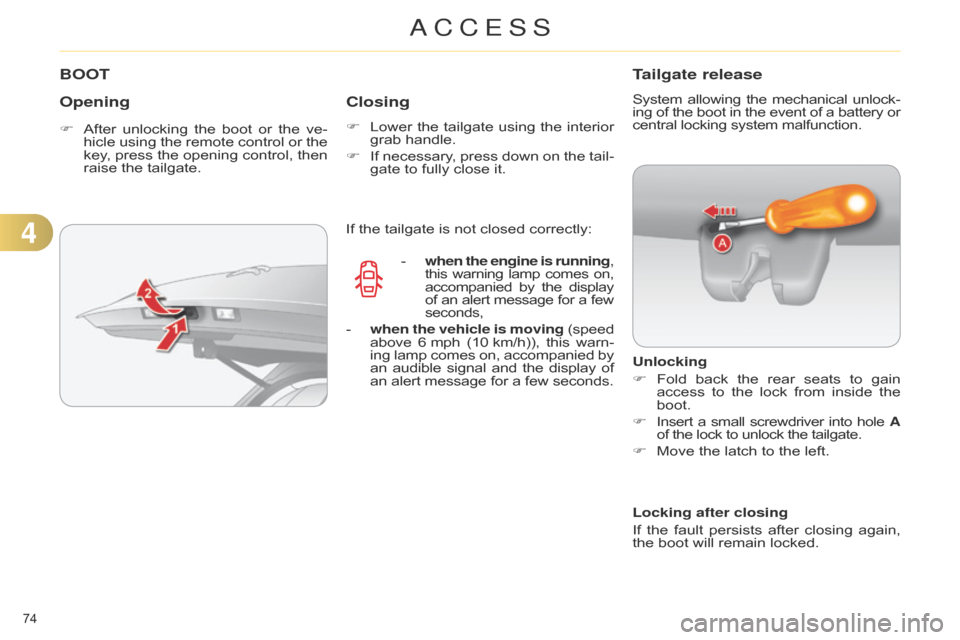
Opening
F After unlocking  the  boot  or  the  ve -
hicle  using  the  remote  control  or  the Â
key
, Â
press
Â
the
Â
opening
Â
control,
Â
then
Â
raise
 the  tailgate.
Closing
F Lower the  tailgate  using  the  interior  grab
 handle.
F
Â
If
Â
necessary
, Â
press
Â
down
Â
on
Â
the
Â
tail
-
gate
 to  fully  close  it.
Tailgate release
System allowing the  mechanical  unlock -
ing  of  the  boot  in  the  event  of  a  battery  or central
 locking  system  malfunction.
Unlocking
F
Â
Fold
Â
back
Â
the
Â
rear
Â
seats
Â
to
Â
gain
Â
access
Â
to
Â
the
Â
lock
Â
from
Â
inside
Â
the
Â
boot.
F
Â
Insert
Â
a
Â
small
Â
screwdriver
Â
into
Â
hole
Â
A
of
 the  lock  to  unlock  the  tailgate.
F
Â
Move
 the  latch  to  the  left.
If
Â
the
Â
tailgate
Â
is
Â
not
Â
closed
Â
correctly:
-
Â
when
the engine is running,
this
Â
warning
Â
lamp
Â
comes
Â
on, accompanied
Â
by
Â
the
Â
display of
Â
an
Â
alert
Â
message
Â
for
Â
a
Â
few seconds,
-
Â
when the vehicle is moving
Â
(speed above
Â
6
Â
mph
Â
(10
Â
km/h)),
Â
this
Â
warn
-
ing
Â
lamp
Â
comes
Â
on,
Â
accompanied
Â
by an
Â
audible
Â
signal
Â
and
Â
the
Â
display
Â
of an
Â
alert
Â
message
Â
for
Â
a
Â
few
Â
seconds. Locking after closing
If
Â
the
Â
fault
Â
persists
Â
after
Â
closing
Â
again,
Â
the
 boot  will  remain  locked.
4
ACCESS
Page 91 of 328

55
89Â
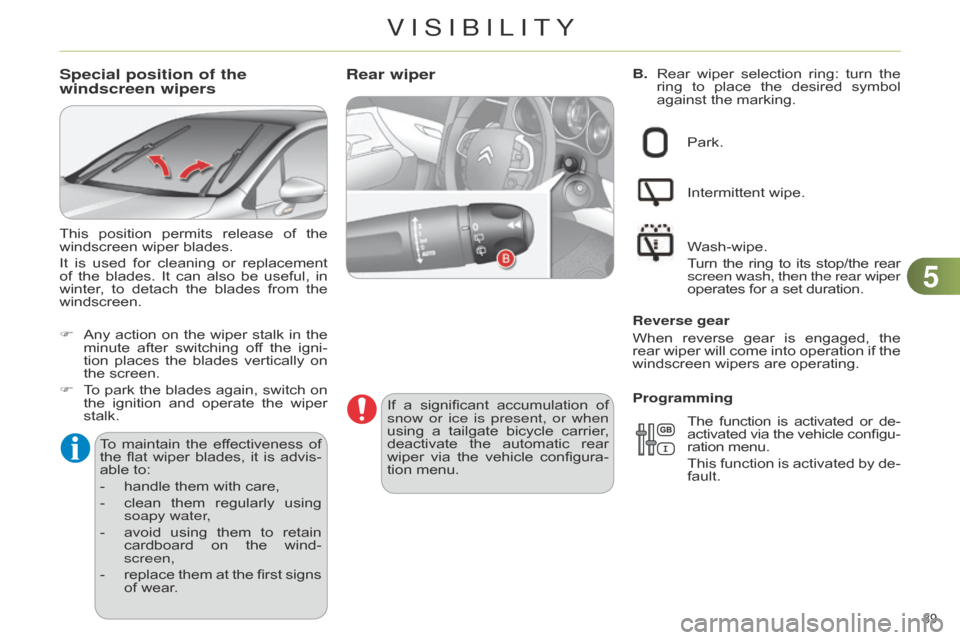
B.  Rear wiper  selection  ring:  turn  the  ring
 to  place  the  desired  symbol Â
against
 the  marking.Rear wiper
If a significant  accumulation  of  snow
or ice is present, or when
using
Â
a
Â
tailgate
Â
bicycle
Â
carrier
, Â
deactivate
Â
the
Â
automatic
Â
rear
Â
wiper
Â
via
Â
the
Â
vehicle
Â
configura
-
tion
 menu. Park.
Intermittent
 wipe.
Wash-wipe.
 T
urn Â
the
Â
ring
Â
to
Â
its
Â
stop/the
Â
rear screen wash, then the rear wiper
operates  for  a  set  duration.
Reverse gear
When Â
reverse
Â
gear
Â
is
Â
engaged,
Â
the
Â
rear
Â
wiper
Â
will
Â
come
Â
into
Â
operation
Â
if
Â
the
Â
windscreen
 wipers  are  operating.
The  function  is  activated  or  de -
activated
Â
via
Â
the
Â
vehicle
Â
configu
-
ration
 menu.
This
Â
function
Â
is
Â
activated
Â
by
Â
de
-
fault.
Programming
Special position of the
windscreen wipers
To maintain
 the  ef fectiveness  of  the
 flat  wiper  blades,  it  is  advis -
able
 to:
-
Â
handle
 them  with  care,
-
Â
clean
Â
them
Â
regularly
Â
using
Â
soapy water
,
-
Â
avoid
Â
using
Â
them
Â
to
Â
retain
Â
cardboard
Â
on
Â
the
Â
wind
-
screen,
-
Â
replace
Â
them
Â
at
Â
the
Â
first
Â
signs
Â
of
 wear.
This
Â
position
Â
permits
Â
release
Â
of
Â
the
Â
windscreen
 wiper  blades.
It
Â
is
Â
used
Â
for
Â
cleaning
Â
or
Â
replacement
Â
of
Â
the
Â
blades.
Â
It
Â
can
Â
also
Â
be
Â
useful,
Â
in
Â
winter
, Â
to
Â
detach
Â
the
Â
blades
Â
from
Â
the
Â
windscreen.
F
Â
Any
Â
action
Â
on
Â
the
Â
wiper
Â
stalk
Â
in
Â
the
Â
minute
Â
after
Â
switching
Â
of
f Â
the
Â
igni
-
tion Â
places
Â
the
Â
blades
Â
vertically
Â
on
Â
the
 screen.
F
Â
T
o Â
park
Â
the
Â
blades
Â
again,
Â
switch
Â
on
Â
the
Â
ignition
Â
and
Â
operate
Â
the
Â
wiper
Â
stalk.
VISIBILITY
Page 202 of 328

1111
200Â
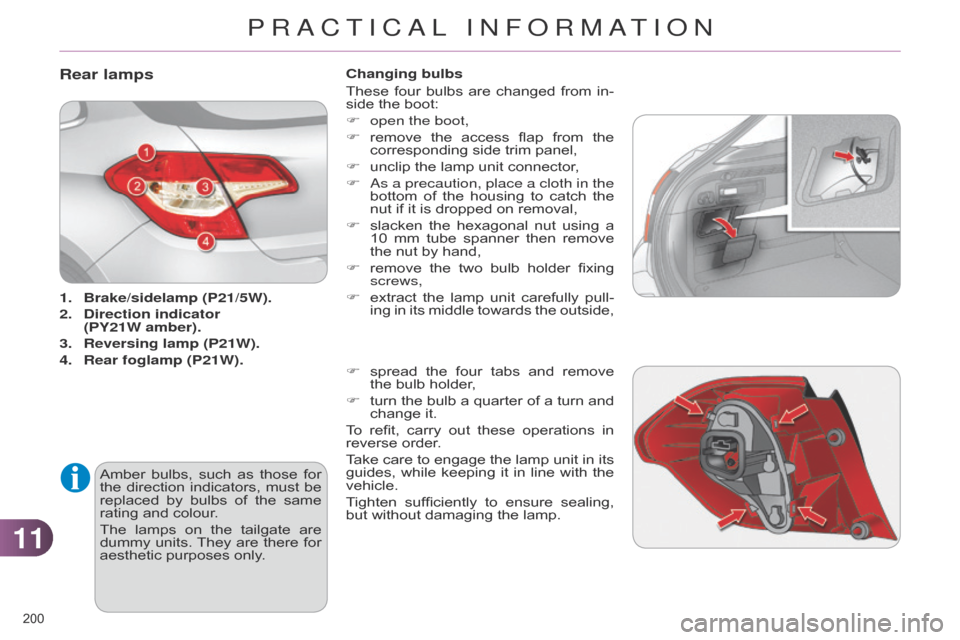
Rear lamps
1. Brake/sidelamp (P21/5W).
2.
Direction
indicator
(PY21W amber).
3.
Reversing lamp (P21W).
4.
Rear
foglamp (P21W).
Amber
Â
bulbs,
Â
such
Â
as
Â
those
Â
for
Â
the
Â
direction
Â
indicators,
Â
must
Â
be
Â
replaced
Â
by
Â
bulbs
Â
of
Â
the
Â
same
Â
rating
 and  colour.
The
Â
lamps
Â
on
Â
the
Â
tailgate
Â
are
Â
dummy
Â
units.
Â
They
Â
are
Â
there
Â
for
Â
aesthetic
 purposes  only.Changing bulbs
These
Â
four
Â
bulbs
Â
are
Â
changed
Â
from
Â
in
-
side  the  boot:
F
open the boot,
F
Â
remove
Â
the
Â
access
Â
flap
Â
from
Â
the
Â
corresponding
 side  trim  panel,
F Â
unclip
 the  lamp  unit  connector,
F a s a precaution, place a cloth in the
bottom Â
of
Â
the
Â
housing
Â
to
Â
catch
Â
the
Â
nut
 if  it  is  dropped  on  removal,
F Â
slacken
Â
the
Â
hexagonal
Â
nut
Â
using
Â
a
Â
10
Â
mm
Â
tube
Â
spanner
Â
then
Â
remove
Â
the
 nut  by  hand,
F Â
remove
Â
the
Â
two
Â
bulb
Â
holder
Â
fixing
Â
screws,
F
 extract  the  lamp  unit  carefully  pull -
ing  in  its  middle  towards  the  outside,
F
Â
spread
Â
the
Â
four
Â
tabs
Â
and
Â
remove
Â
the
 bulb  holder,
F
Â
turn
Â
the
Â
bulb
Â
a
Â
quarter
Â
of
Â
a
Â
turn
Â
and
Â
change
 it.
To
Â
refit,
Â
carry
Â
out
Â
these
Â
operations
Â
in
Â
reverse
 order.
Take
Â
care
Â
to
Â
engage
Â
the
Â
lamp
Â
unit
Â
in
Â
its
Â
guides,
Â
while
Â
keeping
Â
it
Â
in
Â
line
Â
with
Â
the
Â
vehicle.
T
ighten Â
sufficiently
Â
to
Â
ensure
Â
sealing,
Â
but
 without  damaging  the  lamp.
PRACTICAL INFORMATION
Page 203 of 328

1111
201Â
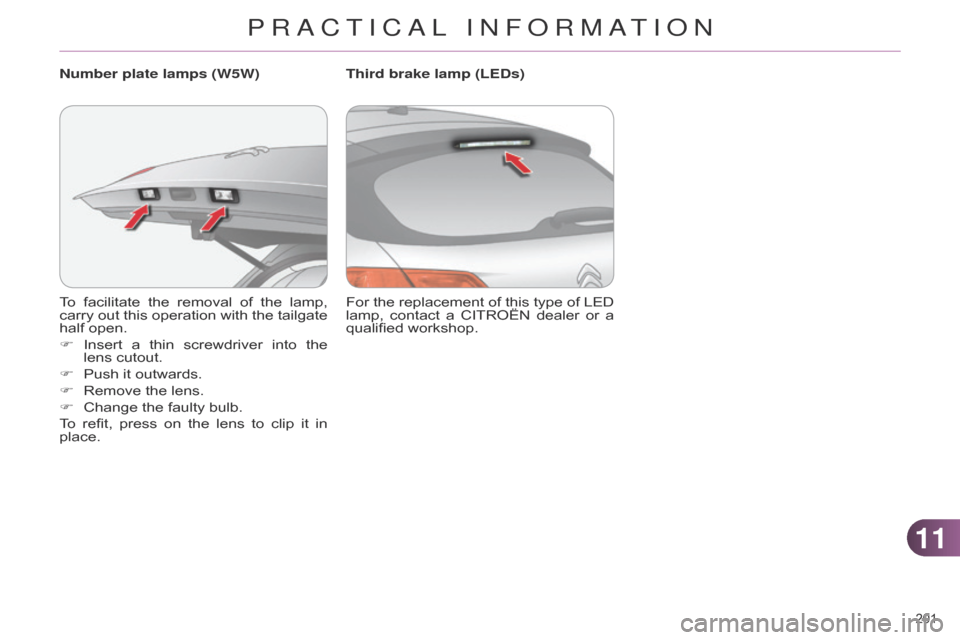
To facilitate the  removal  of  the  lamp,  carry
 out  this  operation  with  the  tailgate Â
half
 open.
F
Â
Insert
Â
a
Â
thin
Â
screwdriver
Â
into
Â
the
Â
lens
 cutout.
F
Â
Push
 it  outwards.
F
Â
Remove
 the  lens.
F
Â
Change
 the  faulty  bulb.
To
Â
refit,
Â
press
Â
on
Â
the
Â
lens
Â
to
Â
clip
Â
it
Â
in
Â
place. Number plate lamps (W5W)
For
 the  replacement  of  this  type  of  LED  lamp,
 contact  a  CITROĂ‹N  dealer  or  a Â
qualified
 workshop.
Third brake lamp (LEDs)
PRACTICAL INFORMATION
Page 217 of 328

1111
215Â
ACCESSORIES
A wide range  of  accessories  and  genu -
ine  parts  is  available  from  the  CITROĂ‹N Â
dealer
 network.
These
Â
accessories
Â
and
Â
parts
Â
are
Â
all
Â
suitable
Â
for
Â
your
Â
vehicle
Â
and
Â
benefit
Â
from
Â
CITROĂ‹N's
Â
recommendation
Â
and
Â
warranty
.
Conversion kits
You
Â
can
Â
obtain
Â
an
Â
"Enterprise"
Â
kit
Â
to
Â
convert
Â
a
Â
trade
Â
vehicle
Â
to
Â
a
Â
private
Â
car
Â
and
 vice-versa.
"Comfort":
door
Â
deflectors,
Â
side
Â
window
Â
blinds,
Â
rear
Â
screen
Â
blind,
Â
insulated
Â
module,
Â
coat
Â
hanger
Â
fixed
Â
to
Â
head
Â
restraint,
Â
reading
Â
lamp,
Â
mirror
Â
for
Â
caravan,
Â
cruise
Â
control,
Â
scented
Â
air
Â
freshener
Â
and
Â
car
-
tridges,
 parking  sensors... "Transport systems":
boot carpet, boot liner, boot net, boot
spacers, transverse roof bars, bicycle
carrier,
Â
ski
Â
carrier
, Â
roof
Â
boxes,
Â
towbars,
Â
towbar
 wiring  harnesses...
"Styling":
gear
Â
lever
Â
knobs,
Â
aluminium
Â
foot
Â
rest,
Â
alloy
Â
wheels,
Â
wheel
Â
embellishers,
Â
chrome
Â
mirror
Â
shells,
Â
chrome
Â
door
Â
Â
aperture
Â
finishers,
Â
door
Â
sill
Â
finishers,
Â
tailgate
 lower  chrome  finisher...*
Â
T
o Â
avoid
Â
any
Â
risk
Â
of
Â
jamming
Â
the
Â
pedals:-
Â
ensure
Â
that
Â
mats
Â
are
Â
correctly
Â
positioned
 and  secured,
-
Â
never
Â
fit
Â
one
Â
mat
Â
on
Â
top
Â
of
Â
Â
another
.
"Security and safety":
anti-intrusion
 alarm,  microwave  sensor ,  anti-tilt
 sensor ,  stolen  vehicle  tracking Â
system,
Â
child
Â
seats
Â
and
Â
booster
Â
cush
-
ions,
Â
breathalyser
, Â
first
Â
aid
Â
kit,
Â
fire
Â
extin
-
guisher,
Â
warning
Â
triangle,
Â
high
Â
visibility
Â
vest,
Â
dog
Â
guard,
Â
pet
Â
seat
Â
belt,
Â
wheel
Â
security
Â
bolts,
Â
snow
Â
chains,
Â
non-slip
Â
covers,
 front  foglamp  kit...
"Protection":
mats*,
Â
seat
Â
covers
Â
compatible
Â
with
Â
Â
lateral
Â
airbags,
Â
door
Â
sill
Â
protectors,
Â
mud
Â
flaps,
Â
door
Â
protective
Â
rubbing
Â
strips,
Â
bumper
Â
protection
Â
strips,
Â
protective
Â
covers
 for  pets,  vehicle  cover...
If
Â
a
Â
towbar
Â
and
Â
wiring
Â
harness
Â
are
Â
fitted
Â
outside
Â
the
Â
CITROĂ‹N
Â
dealer
Â
network,
Â
the
Â
installation
Â
must
Â
be
Â
done
Â
using
Â
the
Â
vehicle's
Â
electrical
Â
pre-equipment
Â
and
Â
in
Â
line
Â
with
Â
the
Â
manufacturer's
Â
rec
-
ommendations.
PRACTICAL INFORMATION