Citroen C4 RHD 2016 2.G Owner's Manual
Manufacturer: CITROEN, Model Year: 2016, Model line: C4 RHD, Model: Citroen C4 RHD 2016 2.GPages: 472, PDF Size: 13.96 MB
Page 211 of 472
209
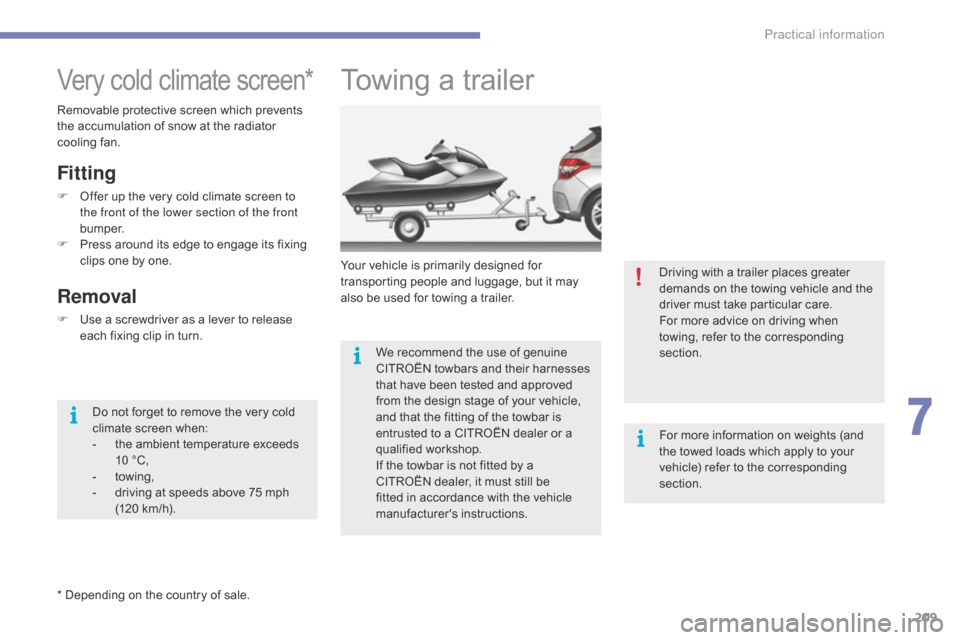
Towing a trailer
Your vehicle is primarily designed for transporting p eople a nd l uggage, b ut i t m ay al
so
b
e
u
sed
f
or
t
owing
a t
railer.
We
r
ecommend
t
he
u
se
o
f
g
enuine
CI
TROËN
t
owbars
a
nd
t
heir
h
arnesses
th
at
h
ave
b
een
t
ested
a
nd
a
pproved
fr
om
t
he
d
esign
s
tage
o
f
y
our
v
ehicle,
an
d
t
hat
t
he
f
itting
o
f
t
he
t
owbar
i
s
en
trusted
t
o
a C
ITROËN
d
ealer
o
r
a qu
alified
wo
rkshop.
If
t
he
t
owbar
i
s
n
ot
f
itted
b
y
a CI
TROËN
d
ealer,
i
t
m
ust
s
till
b
e
fi
tted
i
n
a
ccordance
w
ith
t
he
v
ehicle
ma
nufacturer's
ins
tructions.
Very cold climate screen*
* Depending on the country of sale.
Fitting
F Offer up t he v ery c old c limate s creen t o th
e front of the lower section of the front
b u m p e r.
F
Pr
ess
a
round
i
ts
e
dge
t
o
e
ngage
i
ts
f
ixing
cl
ips
o
ne
b
y
o
ne.
Removal
F Use a screwdriver a s a l ever t o r elease ea
ch f ixing c lip i n t urn.
Removable
p
rotective
s
creen
w
hich
p
revents
th
e
a
ccumulation
o
f
s
now
a
t
t
he
r
adiator
co
oling
f
an.
Do
n
ot
f
orget
t
o
r
emove
t
he
v
ery
c
old
cl
imate
s
creen
w
hen:
-
th
e
a
mbient
t
emperature
e
xceeds
10 °
C,
-
towi
ng,
-
dr
iving
a
t
s
peeds
a
bove
7
5
m
ph
(1
20
k
m/h). Driving
w
ith
a t
railer
p
laces
g
reater
de
mands
o
n
t
he
t
owing
v
ehicle
a
nd
t
he
dr
iver m ust t ake p articular c are.
For m ore a dvice o n d riving w hen to
wing,
r
efer
t
o
t
he
c
orresponding
sec
tion.
For
m
ore
i
nformation
o
n
w
eights
(
and
th
e
t
owed
l
oads
w
hich
a
pply
t
o
y
our
ve
hicle)
r
efer
t
o
t
he
c
orresponding
sec
tion.
7
Practical information
Page 212 of 472
210
Towbar with quickly detachable towball
Presentation
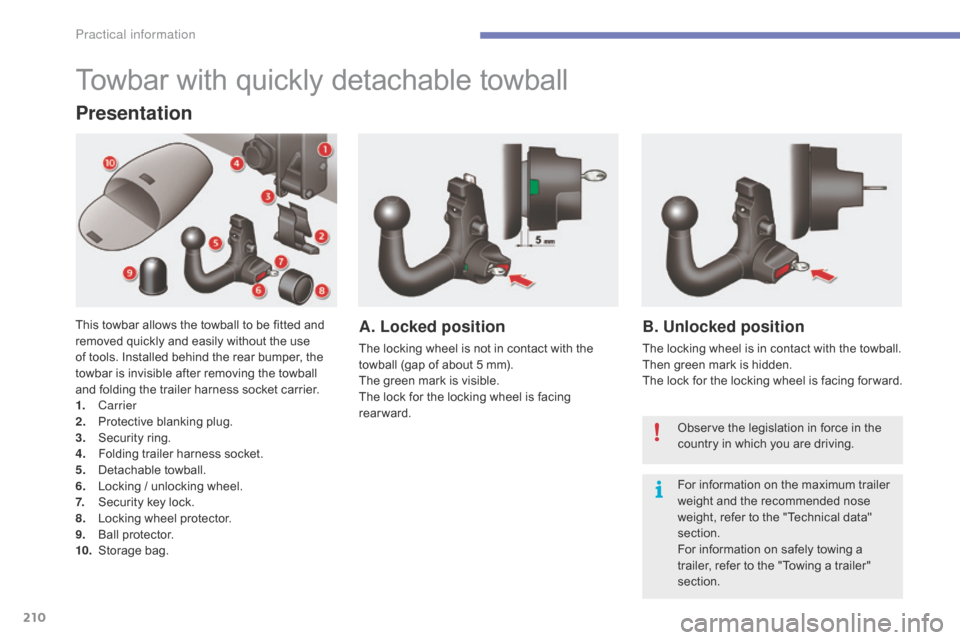
This towbar allows the towball to be fitted and removed q uickly a nd e asily w ithout t he u se of t
ools.
I
nstalled
b
ehind
t
he
r
ear
b
umper,
t
he
to
wbar
i
s
i
nvisible
a
fter
r
emoving
t
he
t
owball
an
d
f
olding
t
he
t
railer
h
arness
s
ocket
c
arrier.
1.
Ca
rrier
2.
Pr
otective
b
lanking
p
lug.
3.
Se
curity
r
ing.
4.
Fo
lding
t
railer
h
arness
s
ocket.
5.
De
tachable
to
wball.
6.
Lo
cking
/ u
nlocking
w
heel.
7.
Se
curity
k
ey
l
ock.
8.
Lo
cking
w
heel
p
rotector.
9.
Bal
l
prot
ector.
10.
Sto
rage
ba
g.A. Locked position
The locking wheel is not in contact with the towball ( gap o f a bout 5 m m).
The
g
reen
m
ark
i
s
v
isible.
The
l
ock
f
or
t
he
l
ocking
w
heel
i
s
f
acing
re
arward.
B. Unlocked position
The locking wheel is in contact with the towball.
Th en g reen m ark i s h idden.
The
l
ock
f
or
t
he
l
ocking
w
heel
i
s
f
acing
f
or ward.
Observe
t
he
l
egislation
i
n
f
orce
i
n
t
he
co
untry
i
n
w
hich
y
ou
a
re
d
riving.
For
i
nformation
o
n
t
he
m
aximum
t
railer
we
ight
a
nd
t
he
r
ecommended
n
ose
we
ight,
r
efer
t
o
t
he
"
Technical
d
ata"
sec
tion.
For
i
nformation
o
n
s
afely
t
owing
a tr
ailer,
r
efer
t
o
t
he
"
Towing
a t
railer"
sec
tion.
Practical information
Page 213 of 472
211
Before each use
Check that the towball is correctly fitted by verifying the following points:
- th e t owball i s c orrectly l ocked i n p lace ( position A),
- th
e
s
ecurity
k
ey
l
ock
i
s
o
n
a
nd
t
he
k
ey
r
emoved;
t
he
l
ocking
w
heel
c
an
n
o
l
onger
b
e
opera
ted,
-
th
e
t
owball
m
ust
n
o
l
onger
m
ove
a
t
a
ll
i
n
i
ts
c
arrier;
t
ry
t
o
s
hake
i
t
b
y
h
and.
During use
Never unlock the device when a trailer or load carrier is fitted to the towball.
Ne ver e xceed t he m aximum a uthorised w eight f or t he v ehicle p lus t railer ( Gross T rain We
ight
- G
TW).
Before
d
riving,
c
heck
t
he
a
djustment
o
f
t
he
h
eadlamp
b
eam
h
eight.
For
m
ore
i
nformation
o
n
a
djusting
t
he
h
eadlamps,
r
efer
t
o
t
he
c
orresponding
s
ection.
After use
For journeys made without a trailer or load carrier, the trailer harness socket must be folded away, t he t owball r emoved a nd t he b lanking p lug i nserted i n t he c arrier. T his m easure ap
plies
p
articularly
i
f
t
he
t
owball
c
ould
h
inder
v
isibility
o
f
t
he
n
umber
p
late
o
r
l
ighting.
7
Practical information
Page 214 of 472
212
Fitting the towball
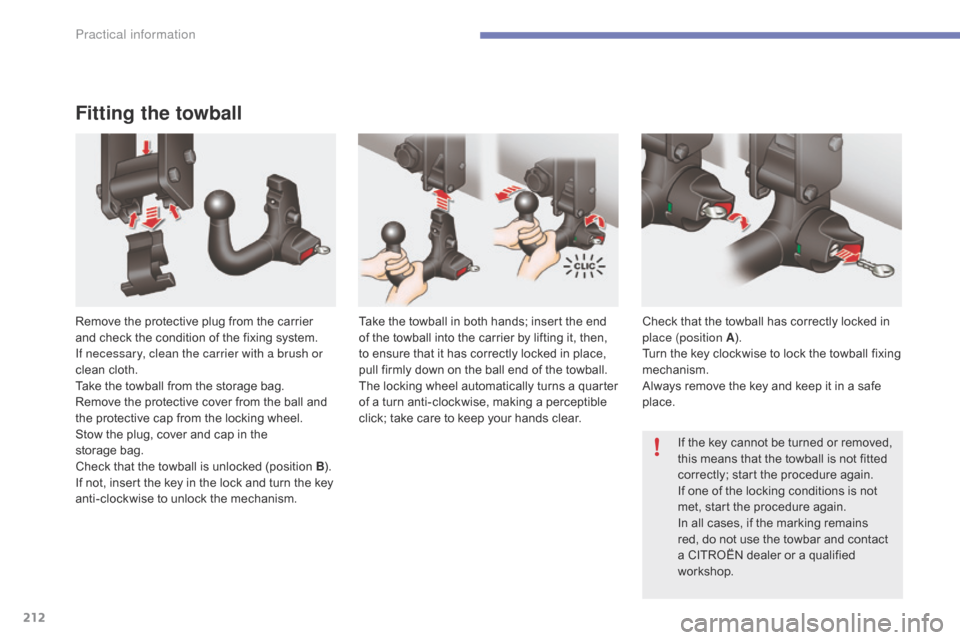
Remove the protective plug from the carrier and c heck t he c ondition o f t he f ixing s ystem. If n
ecessary, clean the carrier with a brush or
clean
c
loth.
Take
t
he
t
owball
f
rom
t
he
s
torage
b
ag.
Remove
t
he
p
rotective
c
over
f
rom
t
he
b
all
a
nd
th
e
p
rotective
c
ap
f
rom
t
he
l
ocking
w
heel.
Stow
t
he
p
lug,
c
over
a
nd
c
ap
i
n
t
he
st
orage bag.
Check
t
hat
t
he
t
owball
i
s
u
nlocked
(
position
B)
.
If n
ot,
i
nsert
t
he
k
ey
i
n
t
he
l
ock
a
nd
t
urn
t
he
k
ey
an
ti-clockwise
t
o
u
nlock
t
he
m
echanism.Take t
he t owball i n b oth h ands; i nsert t he e nd of t
he t owball i nto t he c arrier b y l ifting i t, t hen, to e
nsure
t
hat
i
t
h
as
c
orrectly
l
ocked
i
n
p
lace,
pu
ll
f
irmly
d
own
o
n
t
he
b
all
e
nd
o
f
t
he
t
owball.
The
l
ocking
w
heel
a
utomatically
t
urns
a q
uarter
of a t
urn
a
nti-clockwise,
m
aking
a p
erceptible
cl
ick;
t
ake
c
are
t
o
k
eep
y
our
h
ands
c
lear.Check t
hat t he t owball h as c orrectly l ocked i n pl
ace (position A).
Turn
t
he
k
ey
c
lockwise
t
o
l
ock
t
he
t
owball
f
ixing
me
chanism.
Always
r
emove
t
he
k
ey
a
nd
k
eep
i
t
i
n
a s
afe
pl
ace.If
t
he
k
ey
c
annot
b
e
t
urned
o
r
r
emoved,
th
is
m
eans
t
hat
t
he
t
owball
i
s
n
ot
f
itted
co
rrectly;
s
tart
t
he
p
rocedure
a
gain.
If
o
ne
o
f
t
he
l
ocking
c
onditions
i
s
n
ot
me
t,
s
tart
t
he
p
rocedure
a
gain.
In
a
ll
c
ases,
i
f
t
he
m
arking
r
emains
re
d,
d
o
n
ot
u
se
t
he
t
owbar
a
nd
c
ontact
a C
ITROËN
d
ealer
o
r
a q
ualified
wo
rkshop.
Practical information
Page 215 of 472
213
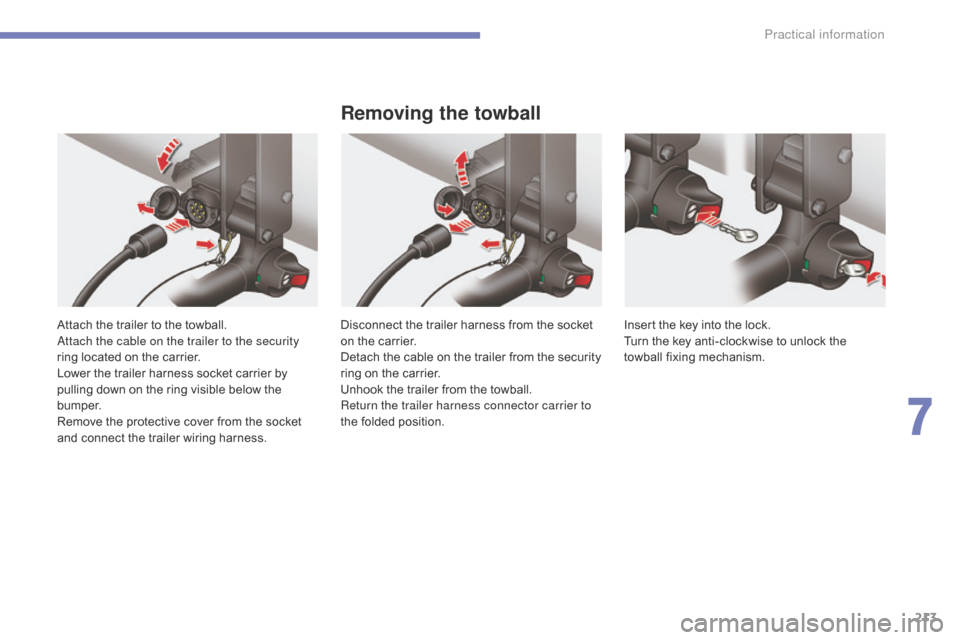
Attach the trailer to the towball.
At tach the cable on the trailer to the security
ring
l
ocated
o
n
t
he
c
arrier.
Lower
t
he
t
railer
h
arness
s
ocket
c
arrier
b
y
pu
lling
d
own
o
n
t
he
r
ing
v
isible
b
elow
t
he
b u
m p e r.
Remove
t
he
p
rotective
c
over
f
rom
t
he
s
ocket
an
d
c
onnect
t
he
t
railer
w
iring
h
arness.
Removing the towball
Disconnect the trailer harness from the socket on the c arrier.
Detach
t
he
c
able
o
n
t
he
t
railer
f
rom
t
he
s
ecurity
ri
ng
o
n
t
he
c
arrier.
Unhook
t
he
t
railer
f
rom
t
he
t
owball.
Return the trailer harness connector carrier to
the
f
olded
p
osition. Insert t
he k ey i nto t he l ock.
Turn t he k ey a nti-clockwise t o u nlock t he to
wball
fi
xing
me
chanism.
7
Practical information
Page 216 of 472
214
Maintenance
Correct operation is only possible if the towball
and its c arrier r emain c lean.
Before
c
leaning
t
he
v
ehicle
w
ith
a h
igh
p
ressure
je
t
w
ash,
t
he
t
owbar
h
arness
s
ocket
c
arrier
m
ust
be f
olded
a
way,
t
he
t
owball
r
emoved
a
nd
t
he
bl
anking
p
lug
i
nserted
i
n
t
he
c
arrier.
For
a
ny
w
ork
o
n
t
he
t
owbar,
g
ot
t
o
a C
ITROËN
de
aler
o
r
a q
ualified
w
orkshop.
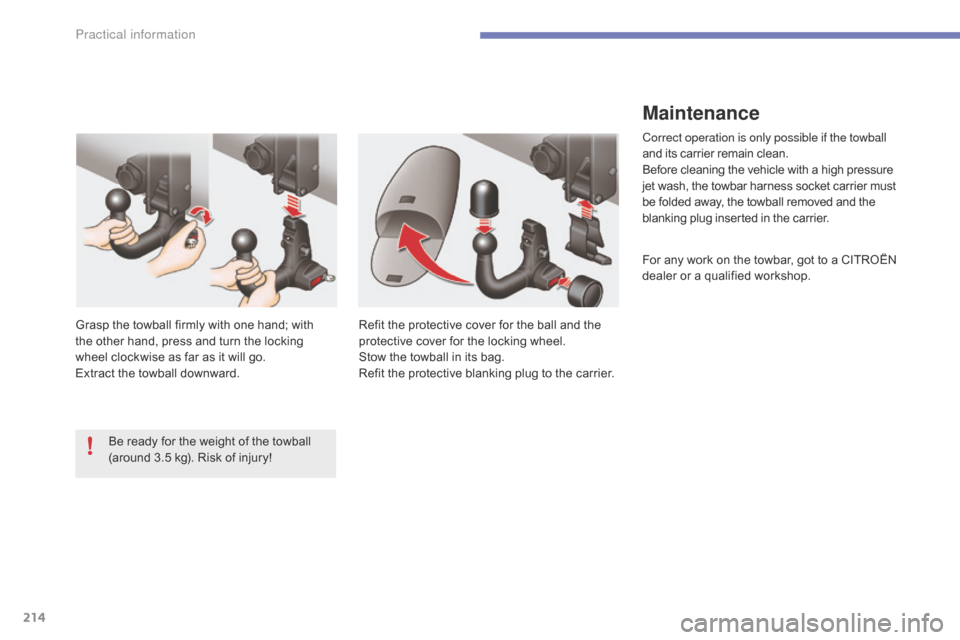
Refit
t
he
p
rotective
c
over
f
or
t
he
b
all
a
nd
t
he
pr
otective
c
over
f
or
t
he
l
ocking
w
heel.
Stow
t
he
t
owball
i
n
i
ts
b
ag.
Refit
t
he
p
rotective
b
lanking
p
lug
t
o
t
he
c
arrier.
Grasp
t
he
t
owball
f
irmly
w
ith
o
ne
h
and;
w
ith
th
e
o
ther
h
and,
p
ress
a
nd
t
urn
t
he
l
ocking
wh
eel clockwise
a
s
f
ar
a
s
i
t
w
ill
g
o.
Extract
t
he
t
owball
d
ownward.
Be
r
eady
f
or
t
he
w
eight
o
f
t
he
t
owball
(a
round
3
.5
k
g).
R
isk
o
f
i
njury!
Practical information
Page 217 of 472
215
Load reduction modeEn ergy econ omy mo de
Switching to economy mode
Once this period has elapsed, a message ap
pears i n t he s creen i ndicating t hat t he ve
hicle
h
as
s
witched
t
o
e
conomy
m
ode
a
nd
t
he
ac
tive
f
unctions
a
re
p
ut
o
n
s
tandby.
Exiting economy mode
These functions are reactivated automatically the n ext t ime t he v ehicle i s d riven.
F
In o
rder
t
o
r
esume
t
he
u
se
o
f
t
hese
fu
nctions
i
mmediately,
s
tart
t
he
e
ngine
a
nd
le
t
i
t
r
un
f
or
a f
ew
m
inutes.
The
t
ime
a
vailable
t
o
y
ou
w
ill
t
hen
b
e
d
ouble
th
e
p
eriod
f
or
w
hich
t
he
e
ngine
i
s
l
eft
r
unning.
Ho
wever,
t
his
p
eriod
w
ill
a
lways
b
e
b
etween
fi
ve
a
nd
t
hirty
m
inutes.
System
w
hich
m
anages
t
he
u
se
o
f
c
ertain
fu
nctions
a
ccording
t
o
t
he
l
evel
o
f
c
harge
re
maining
i
n
t
he
b
attery.
When
t
he
v
ehicle
i
s
b
eing
d
riven,
t
he
l
oad
re
duction
f
unction
t
emporarily
d
eactivates
ce
rtain
f
unctions,
s
uch
a
s
t
he
a
ir
c
onditioning,
th
e
h
eated
r
ear
s
creen...
The
d
eactivated
f
unctions
a
re
r
eactivated
au
tomatically
a
s
s
oon
a
s
c
onditions
p
ermit. System
w
hich
m
anages
t
he
p
eriod
o
f
u
se
o
f
c
ertain
f
unctions
t
o
c
onserve
a s
ufficient
l
evel
o
f
ch
arge
i
n
t
he
b
attery.
After
t
he
e
ngine
h
as
s
topped,
y
ou
c
an
s
till
u
se
f
unctions
s
uch
a
s
t
he
a
udio
e
quipment,
w
indscreen
wi
pers,
d
ipped
b
eam
h
eadlamps, courtesy
l
amps,
e
tc.
f
or
a m
aximum
c
ombined
p
eriod
o
f
th
irty minutes.
A
f
lat
b
attery
p
revents
t
he
e
ngine
f
rom
st
arting.
For
m
ore
i
nformation
o
n
t
he
1
2
V ba
ttery,
r
efer
t
o
t
he
c
orresponding
sec
tion.
This
p
eriod
m
ay
b
e
g
reatly
r
educed
i
f
th
e
b
attery
i
s
n
ot
f
ully
c
harged.
If
t
he
t
elephone
i
s
b
eing
u
sed
a
t
t
he
sa
me
t
ime
w
ith
t
he
t
ouch
s
creen
t
ablet,
it w
ill
b
e
i
nterrupted
a
fter
1
0
m
inutes.
7
Practical information
Page 218 of 472
216
Audio pre-equipment
Fitting an audio unit
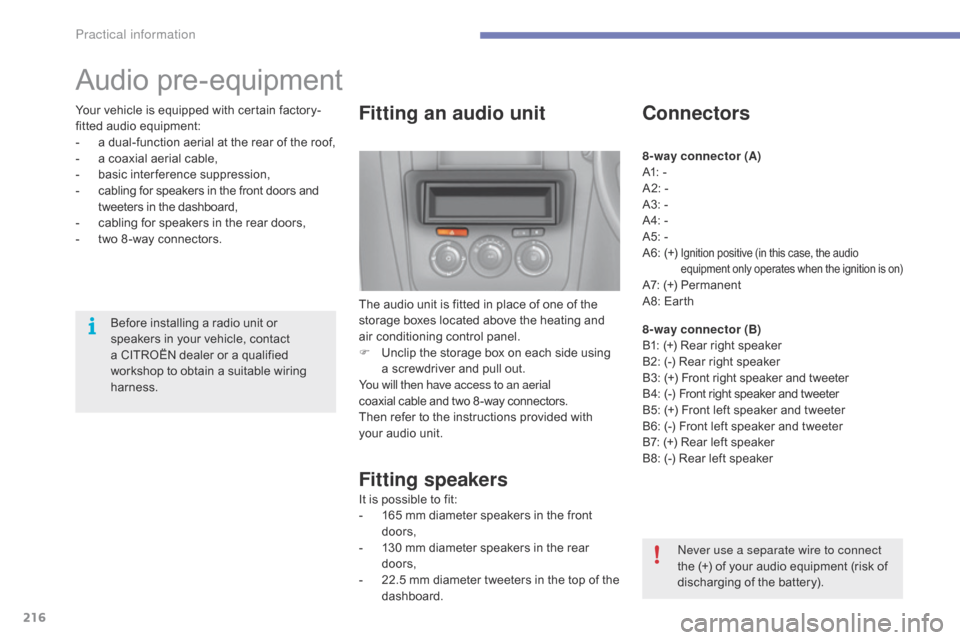
The audio unit is fitted in place of one of the storage b oxes l ocated a bove t he h eating a nd ai
r
c
onditioning
c
ontrol
p
anel.
F
Un
clip
t
he
s
torage
b
ox
o
n
e
ach
s
ide
u
sing
a s
crewdriver
a
nd
p
ull
o
ut.
You will then have access to an aerial
coaxial
c
able
a
nd
t
wo
8
-way
c
onnectors.
Then
r
efer
t
o
t
he
i
nstructions
p
rovided
w
ith
yo
ur
a
udio
u
nit.
Fitting speakers
It is possible to fit:
- 16 5 m m d iameter s peakers i n t he f ront do
ors,
-
13
0
m
m
d
iameter
s
peakers
i
n
t
he
r
ear
do
ors,
-
22
.5
m
m
d
iameter
t
weeters
i
n
t
he
t
op
o
f
t
he
dashb
oard.
Connectors
8-way connector (A)
A1: -
A
2:
-
A
3:
-
A
4:
-
A
5:
-
A
6:
(
+)
Ignition positive (in this case, the audio equipment o nly o perates w hen t he i gnition i s o n)
A7: (+) Permanent
A8 : E arth
8-way connector (B)
B1:
(
+)
R
ear
r
ight
s
peaker
B2:
(
-)
R
ear
r
ight
s
peaker
B3:
(+
)
Fr
ont
r
ight
s
peaker
a
nd
t
weeter
B 4:
(-
)
Fr
ont
r
ight
s
peaker
a
nd
t
weeter
B5:
(
+)
F
ront
l
eft
s
peaker
a
nd
t
weeter
B6:
(
-)
F
ront
l
eft
s
peaker
a
nd
t
weeter
B7:
(
+)
R
ear
l
eft
s
peaker
B8:
(
-)
R
ear
l
eft
s
peaker
Never use a separate wire to connect
the
(
+)
o
f
y
our
a
udio
e
quipment
(
risk
o
f
di
scharging
o
f
t
he
b
attery).
Before
i
nstalling
a r
adio
u
nit
o
r
sp
eakers
i
n
y
our
v
ehicle,
c
ontact
a C
ITROËN
d
ealer
o
r
a q
ualified
wo
rkshop
t
o
o
btain
a s
uitable
w
iring
harn
ess.
Your
v
ehicle
i
s
e
quipped
w
ith
c
ertain
f
actory-
fitted
a
udio
e
quipment:
-
a d
ual-function
a
erial
a
t
t
he
r
ear
o
f
t
he
r
oof,
-
a c
oaxial
a
erial
c
able,
-
ba
sic
i
nter ference
s
uppression,
-
ca
bling
f
or
s
peakers
i
n
t
he
f
ront
d
oors
a
nd
tw
eeters
i
n
t
he
d
ashboard,
-
ca
bling
f
or
s
peakers
i
n
t
he
r
ear
d
oors,
-
tw
o
8
-way
c
onnectors.
Practical information
Page 219 of 472
217
Changing a wiper blade
Before removing a front
wiper blade
F Within one m inute a fter s witching o ff th
e i gnition, o perate t he w iper s talk t o po
sition
t
he
w
iper
b
lades
v
ertically
o
n
t
he
wi
ndscreen.
Removing
F Raise t he c orresponding w iper a rm.
F Un clip t he w iper b lade a nd r emove i t.
Fitting
F Put the corresponding n ew w iper b lade i n pl
ace a nd c lip i t.
F
Fo
ld
d
own
t
he
w
iper
a
rm
c
arefully.
After fitting a front wiper
blade
F Switch on t he i gnition.
F Op erate t he w iper s talk a gain t o p ark t he wi
per
b
lades.
7
Practical information
Page 220 of 472
218
Fitting roof bars
For safety reasons and to avoid damaging the roof, it is essential to use the transverse bars approved f or y our v ehicle.
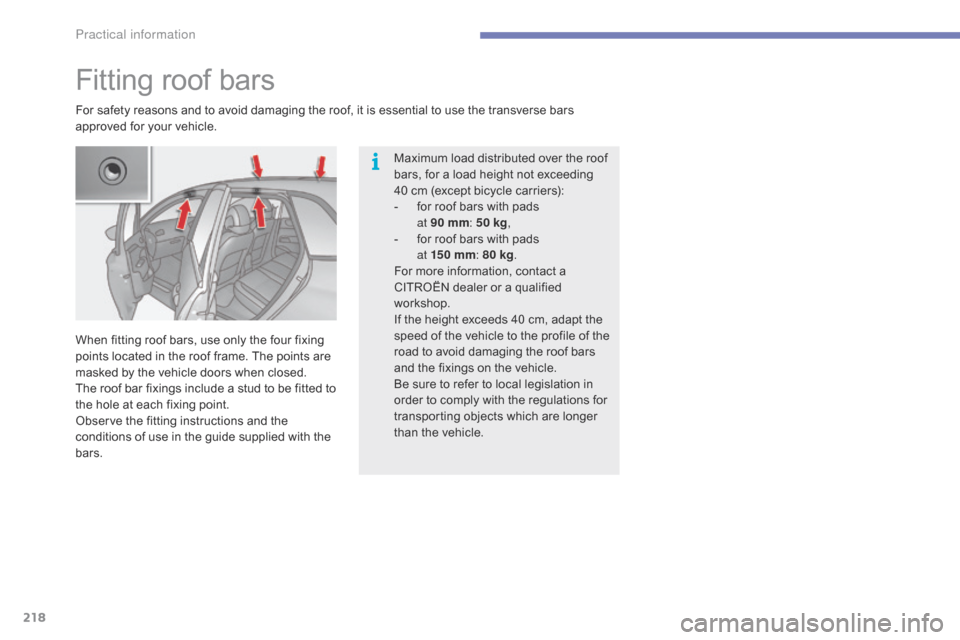
When
f
itting
r
oof
b
ars,
u
se
o
nly
t
he
f
our
f
ixing
po
ints
l
ocated
i
n
t
he
r
oof
f
rame.
T
he
p
oints
a
re
ma
sked
b
y
t
he
v
ehicle
d
oors
w
hen
c
losed.
The
r
oof
b
ar
f
ixings
i
nclude
a s
tud
t
o
b
e
f
itted
t
o
th
e
h
ole
a
t
e
ach
f
ixing
p
oint.
Observe
t
he
f
itting
i
nstructions
a
nd
t
he
co
nditions
o
f
u
se
i
n
t
he
g
uide
s
upplied
w
ith
t
he
ba
rs. Maximum
l
oad
d
istributed
ov
er
t
he
r
oof
ba
rs,
f
or
a l
oad
h
eight
n
ot
e
xceeding
40 c
m
(
except
b
icycle
c
arriers):
-
fo
r
r
oof
b
ars
w
ith
p
ads
a
t 90
m
m:
5
0 kg,
-
fo
r
r
oof
b
ars
w
ith
p
ads
a
t 15 0
m
m:
8
0 kg.
For
m
ore
i
nformation,
c
ontact
a CI
TROËN
d
ealer
o
r
a q
ualified
wo
rkshop.
If
t
he
h
eight
e
xceeds
4
0
c
m,
a
dapt
t
he
sp
eed
o
f
t
he
v
ehicle
t
o
t
he
p
rofile
o
f
t
he
ro
ad
t
o
a
void
d
amaging
t
he
r
oof
b
ars
an
d
t
he
f
ixings
o
n
t
he
v
ehicle.
Be
s
ure
t
o
r
efer
t
o
l
ocal
l
egislation
i
n
or
der
t
o
c
omply
w
ith
t
he
r
egulations
f
or
tr
ansporting
o
bjects
w
hich
a
re
l
onger
th
an
t
he
v
ehicle.
Practical information