oil pressure Citroen C4 RHD 2016 2.G Owner's Manual
[x] Cancel search | Manufacturer: CITROEN, Model Year: 2016, Model line: C4 RHD, Model: Citroen C4 RHD 2016 2.GPages: 472, PDF Size: 13.96 MB
Page 19 of 472
17
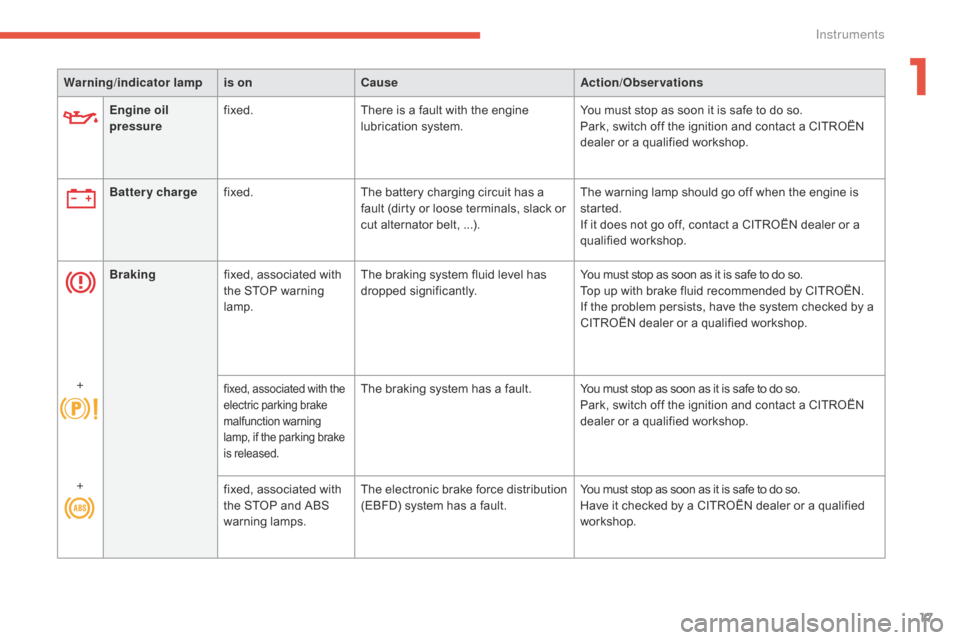
Engine oil
pressurefixed.
There i s a f ault w ith t he e ngine lu
brication s ystem.You m
ust s top a s s oon i t i s s afe t o d o s o.
Park, s witch o ff t he i gnition a nd c ontact a C ITROËN de
aler
o
r
a q
ualified
w
orkshop.
Warning
/indicator lampis on Cause Action/Observations
Battery charge fixed. The
b
attery
c
harging
c
ircuit
h
as
a fa
ult
(
dirty
o
r
l
oose
t
erminals,
s
lack
o
r
cu
t
a
lternator
b
elt,
.
..).The
w
arning
l
amp
s
hould
g
o
o
ff
w
hen
t
he
e
ngine
i
s
st
arted.
If
i
t
d
oes
n
ot
g
o
o
ff,
c
ontact
a C
ITROËN
d
ealer
o
r
a qu
alified
wo
rkshop.
Braking fixed,
a
ssociated
w
ith
th
e
S
TOP
w
arning
lamp
.The
b
raking
s
ystem
f
luid
l
evel
h
as
dr
opped
si
gnificantly.You
m
ust
s
top
a
s
s
oon
a
s
i
t
i
s
s
afe
t
o
d
o
s
o.
Top
u
p
w
ith
b
rake
f
luid
r
ecommended
b
y
C
ITROËN.
If
t
he
p
roblem
p
ersists,
h
ave
t
he
s
ystem
c
hecked
b
y
a CI
TROËN
d
ealer
o
r
a q
ualified
w
orkshop.
+
fixed, associated with the el ectric p arking b rake mal
function
war
ning
la
mp,
i
f
t
he
p
arking
b
rake
is re
leased.The braking system has a fault. Yo u m ust s top a s s oon a s i t i s s afe t o d o s o.
Park, s witch o ff t he i gnition a nd c ontact a C ITROËN de
aler
o
r
a q
ualified
w
orkshop.
+ fixed,
a
ssociated
w
ith
th
e
S
TOP
a
nd
A
BS
war
ning
lamp
s. The
el
ectronic
br
ake
fo
rce
di
stribution
(E
BFD)
s
ystem
h
as
a f
ault.You
m
ust
s
top
a
s
s
oon
a
s
i
t
i
s
s
afe
t
o
d
o
s
o.
Have
i
t
c
hecked
b
y
a C
ITROËN
d
ealer
o
r
a q
ualified
wo
rkshop.
1
Instruments
Page 241 of 472
239
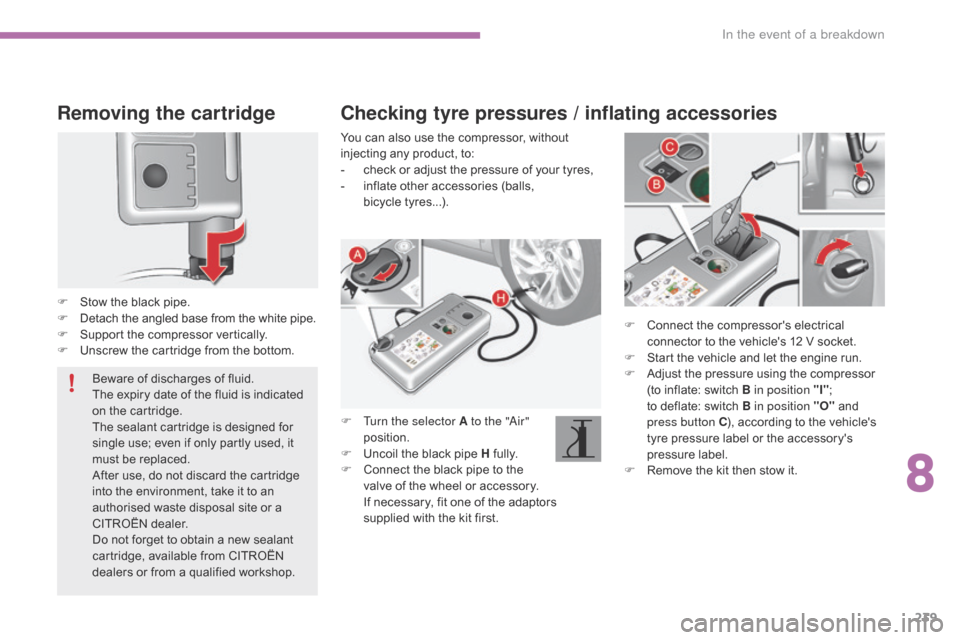
Removing the cartridge
F Stow the black p ipe.
F De tach t he a ngled b ase f rom t he w hite p ipe.
F
Su
pport
t
he
c
ompressor
v
ertically.
F
Un
screw
t
he
c
artridge
f
rom
t
he
b
ottom. F
Co
nnect
t
he
c
ompressor's
e
lectrical
co
nnector
t
o
t
he
v
ehicle's
1
2
V s
ocket.
F
St
art
t
he
v
ehicle
a
nd
l
et
t
he
e
ngine
r
un.
F
Ad
just
t
he
p
ressure
u
sing
t
he
c
ompressor
(t
o
i
nflate:
s
witch
B
in position "I";
to d
eflate:
s
witch
B
in position "O"
a
nd
pr
ess button C),
a
ccording
t
o
t
he
v
ehicle's
ty
re
p
ressure
l
abel
o
r
t
he
a
ccessory's
pr
essure
l
abel.
F
Re
move
t
he
k
it
t
hen
s
tow
i
t.
Checking tyre pressures / inflating accessories
You can also use the compressor, without injecting a ny p roduct, t o:
-
ch
eck
o
r
a
djust
t
he
p
ressure
o
f
y
our
t
yres,
-
in
flate
o
ther
a
ccessories
(
balls,
bi
cycle tyres...).
F
Tu
rn the selector A to the "Air"
position.
F
Un
coil
t
he
b
lack
p
ipe
H ful
ly.
F
Co
nnect
t
he
b
lack
p
ipe
t
o
t
he
va
lve
o
f
t
he
w
heel
o
r
a
ccessory.
If n
ecessary,
f
it
o
ne
o
f
t
he
a
daptors
su
pplied
w
ith
t
he
k
it
f
irst.
Beware
o
f
d
ischarges
o
f
f
luid.
The
e
xpiry
d
ate
o
f
t
he
f
luid
i
s
i
ndicated
on t
he
c
artridge.
The
s
ealant
c
artridge
i
s
d
esigned
f
or
si
ngle
u
se;
e
ven
i
f
o
nly
p
artly
u
sed,
i
t
mu
st
b
e
r
eplaced.
After
u
se,
d
o
n
ot
d
iscard
t
he
c
artridge
in
to
t
he
e
nvironment,
t
ake
i
t
t
o
a
n
au
thorised
w
aste
d
isposal
s
ite
o
r
a CI
TROËN
d
ealer.
Do
n
ot
f
orget
t
o
o
btain
a n
ew
s
ealant
ca
rtridge,
a
vailable
f
rom
C
ITROËN
de
alers
o
r
f
rom
a q
ualified
w
orkshop.
8
In the event of a breakdown
Page 383 of 472
381
Locking from the inside ..................................69
Lo ng o bjects, t ransporting ............................ 115
L
ow fuel level
.........................................
20,
2
05
Luggage
r
etaining
s
trap
................................11 6 R
adio .................................................... 304, 3 53
Radio, d igital ( Digital A udio
B
roadcasting
- D
AB)
.......................... 30
6,
3
55
RDS
......................................................
305,
3
54
Rear screen, demisting
................................................... 10 0
R
echarging
t
he
b
attery
........................ 26
3,
2
64
Reduction
o
f
e
lectrical
l
oad
.............................................................215
R
egeneration
o
f
t
he
p
article
f
ilter
............................................................2
26
Reinitialising
t
he
e
lectric
w
indows
.......................................................76
Re
initialising
t
he
r
emote
c
ontrol
.....................................................61
,
6
7
Reminder,
k
ey
i
n
i
gnition
..............................167
R
emote
c
ontrol
..........................................56-
68
Removing
a w
heel
.......................................24
3
Removing
t
he
m
at
.........................................111
R
eplacing
bul
bs
....................................2
47-25 5
Replacing
fus
es
....................................2
56-260
Replacing
t
he
a
ir
f
ilter
..................................226
R
eplacing
t
he
o
il
f
ilter
..................................226
R
eplacing
the pa
ssenger
co
mpartment
f
ilter
.....................................226
R
esetting
t
he
s
ervice
i
ndicator
.......................................................32
R
esetting
t
he
t
rip
re
corder
.......................................................36
R
ev counter
................................................12
-15
Reversing
lamp
s
..........................................253
R
isk
a
reas
(
update)
......................................295
Ro
of bars
.......................................................218
R
unning
o
ut
o
f
f
uel
(
Diesel)
......................................................234
R
Maintenance, routine ...................... 10 , 2 20 -227
Map r eading l amps ...................................... 104
M
arkings,
ide
ntification
............................................... 2 74
M
assage
f
unction
.......................................... 84
M
at
................................................................ 111
M
emorising
a s
peed
.................................... 200
M
enu (touch screen tablet)
......... 28
4,
2
86,
2
90,
298,
3
00,
3
02,
3
12,
3
14,
3
16,
3
32,
3
34
Menu,
m
ain
.................................................. 3
52
Menus
(
audio)
..............................29
8,
3
00,
3
02
Mirror, rear view
............................................. 88
Mi
rrors,
d
oor......................................86,
87
,
1
91
Mirror, vanity
................................................ 10
2
Misfuel prevention
........................................ 2
07
Mountings,
Is
ofix
.......................................... 15
7
MP3
C
D
........................................
308,
3
57,
3
58Pads,
br
ake
..................................................227
P
aint
c
olour
c
ode
..........................................2
74
Panoramic
g
lass
sun
roof
.......................................................10
6
Parcel shelf, rear
........................................... 117
P
arking
b
rake
........................................17
1,
2
27
Parking
b
rake,
e
lectric
................... 18
,
1
72,
2
27
Parking
s
ensors,
f
ront
..................................203
P
arking
s
ensors,
r
ear...................................202
Personalisation
.............................................. 39
Pe
trol
............................................................20
6
Player, Apple
® ............................................... 3 10
Player, M
P3 C D ............................ 30 8, 3 57, 3 58
Player,
U
SB
.......................................... 30
8,
3
59
Port,
U
SB
..................................... 10
3,
3
08,
3
59
Pressures, tyres
............................................ 2 74
P
re-tensioning
seat
belts
................................................... 14
3
Priming
t
he
f
uel
s
ystem
............................... 234
P
rotecting
c
hildren
................. 14
3,
1
45,
1
48 -162
Puncture
....................................................... 23
5
M
P
Oil change .................................................... 2 22
Oil c onsumption ........................................... 222
O
il,
e
ngine
.................................................... 2
22
Opening
t
he
b
onnet
...................................... 219
O
pening
t
he
b
oot
................................
57,
6
2,
7
9
Opening
t
he
d
oors
............................. 56
,
6
2,
7
8
Opening
t
he
p
anoramic
r
oof
b
lind
.................................................... 10 6
N
avigation
.................................................... 28
4
Net,
s
torage................................................... 11 6
Number
p
late
l
amps
..................................... 255
N
O
.
Alphabetical index
Page 402 of 472
In the event of a breakdown
6
C4-2-additif_en_Chap08_en-cas-de-panne_ed02-2015
Do not exceed a speed of 50 mph (80 km/h) when driving with a tyre repaired using this type of kit.
Avoid removing any foreign bodies which have penetrated into the tyre.
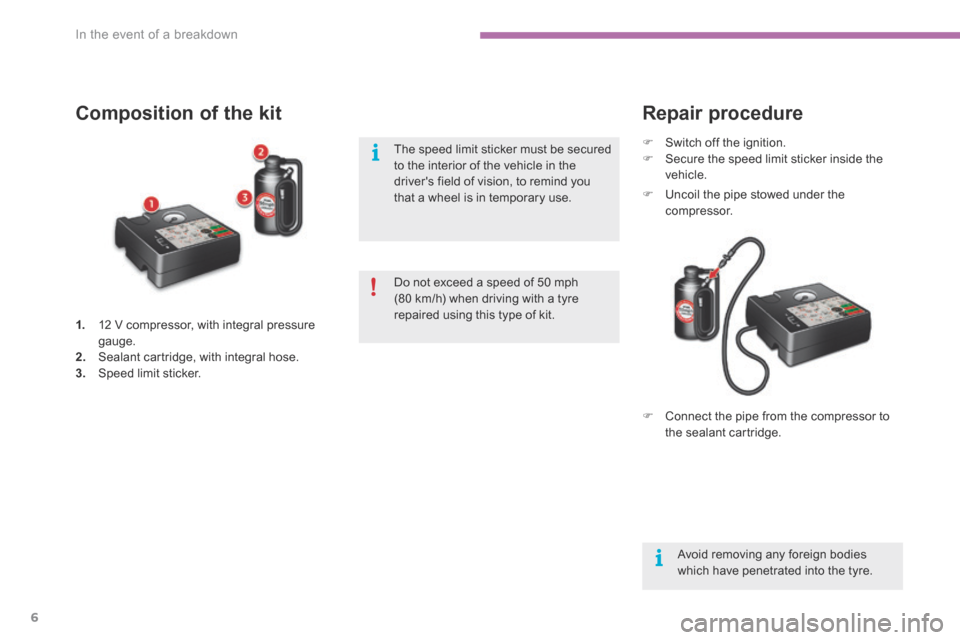
Composition of the kit
Switch off the ignition. Secure the speed limit sticker inside the vehicle.
Repair procedure
1. 12 V compressor, with integral pressure gauge. 2. Sealant cartridge, with integral hose. 3. Speed limit sticker.
The speed limit sticker must be secured to the interior of the vehicle in the driver's field of vision, to remind you that a wheel is in temporary use. Uncoil the pipe stowed under the compressor.
Connect the pipe from the compressor to the sealant cartridge.
Page 405 of 472
8
In the event of a breakdown9
C4-2-additif_en_Chap08_en-cas-de-panne_ed02-2015
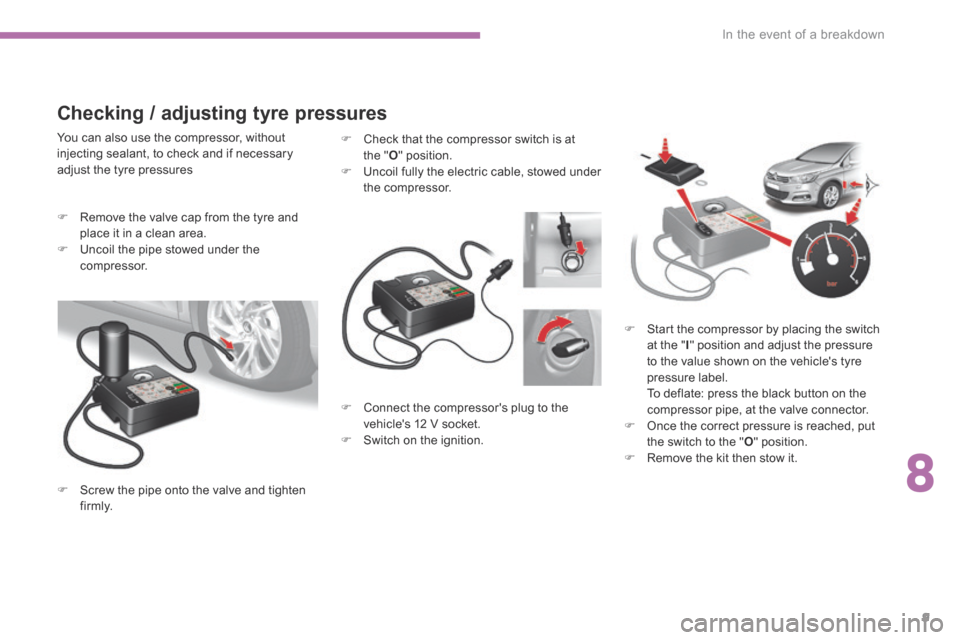
Connect the compressor's plug to the vehicle's 12 V socket. Switch on the ignition.
Check that the compressor switch is at the " O " position. Uncoil fully the electric cable, stowed under the compressor.
You can also use the compressor, without injecting sealant, to check and if necessary adjust the tyre pressures
Start the compressor by placing the switch at the " I " position and adjust the pressure to the value shown on the vehicle's tyre pressure label. To deflate: press the black button on the compressor pipe, at the valve connector. Once the correct pressure is reached, put the switch to the " O " position. Remove the kit then stow it.
Checking / adjusting tyre pressures
Remove the valve cap from the tyre and place it in a clean area. Uncoil the pipe stowed under the compressor.
Screw the pipe onto the valve and tighten f i r m l y.