mode CITROEN C4 SPACETOURER 2022 Owners Manual
[x] Cancel search | Manufacturer: CITROEN, Model Year: 2022, Model line: C4 SPACETOURER, Model: CITROEN C4 SPACETOURER 2022Pages: 316, PDF Size: 10.36 MB
Page 5 of 316
3
.
.
bit.ly/helpPSA
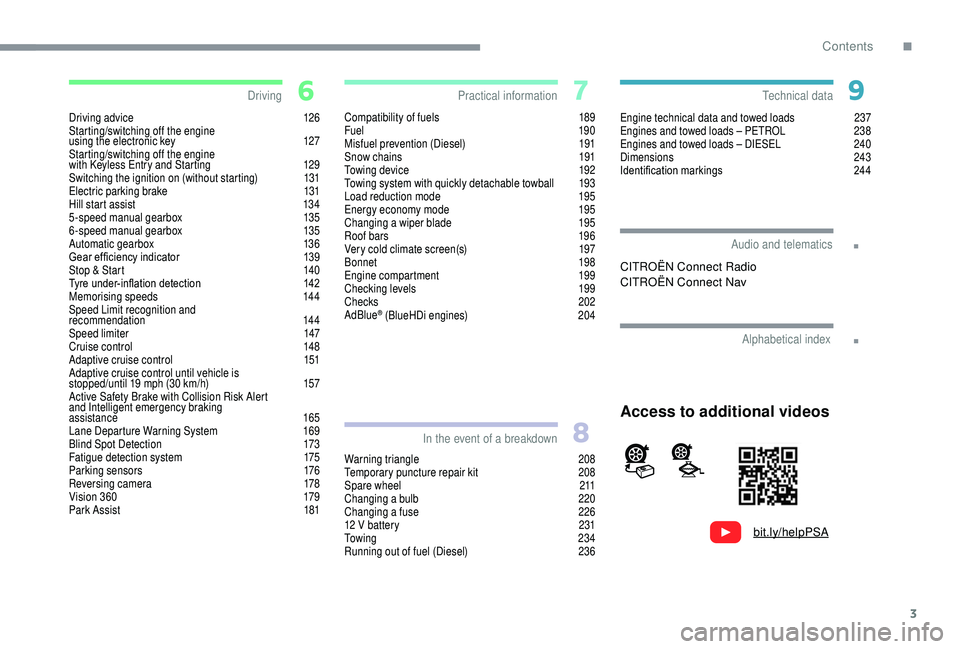
Driving advice 126
Starting/switching off the engine
using the electronic key
1
27
Starting/switching off the engine
with
K
eyless Entry and Starting
1
29
Switching the ignition on (without starting)
1
31
Electric parking brake
1
31
Hill start assist
1
34
5-speed manual gearbox
1
35
6-speed manual gearbox
1
35
Automatic gearbox
1
36
Gear ef ficiency indicator
1
39
Stop & Start
1
40
Tyre under-inflation detection
1
42
Memorising speeds
1
44
Speed Limit recognition and
recommendation
144
Speed limiter
1
47
Cruise control
1
48
Adaptive cruise control
1
51
Adaptive cruise control until vehicle is
stopped/until 19
mph (30 km/h)
1
57
Active Safety Brake with Collision Risk Alert
and Intelligent emergency braking
assistance
165
Lane Departure Warning System
1
69
Blind Spot Detection
1
73
Fatigue detection system
1
75
Parking sensors
1
76
Reversing camera
1
78
Vision 360
1
79
Park Assist
1
81Compatibility of fuels 1
89
Fuel 19 0
Misfuel prevention (Diesel)
1
91
Snow chains
1
91
Towing device
1
92
Towing system with quickly detachable towball
1
93
Load reduction mode
1
95
Energy economy mode
1
95
Changing a
wiper blade
1
95
Roof bars
1
96
Very cold climate screen(s)
1
97
Bonnet
19
8
Engine compartment
1
99
Checking levels
1
99
Checks
202
AdBlue
® (BlueHDi engines) 2 04
Warning triangle
2
08
Temporary puncture repair kit
2
08
Spare wheel
2
11
Changing a
bulb
2
20
Changing a
fuse
2
26
12
V battery
2
31
To w i n g
2 3 4
Running out of fuel (Diesel)
2
36Engine technical data and towed loads
2
37
Engines and towed loads – PETROL
2
38
Engines and towed loads – DIESEL
2
40
Dimensions
2
43
Identification markings
2
44
Driving
Practical information
In the event of a breakdown Technical data
Alphabetical index
Audio and telematics
Access to additional videos
CITROËN Connect Radio
CITROËN Connect Nav
.
Contents
Page 7 of 316
5
7
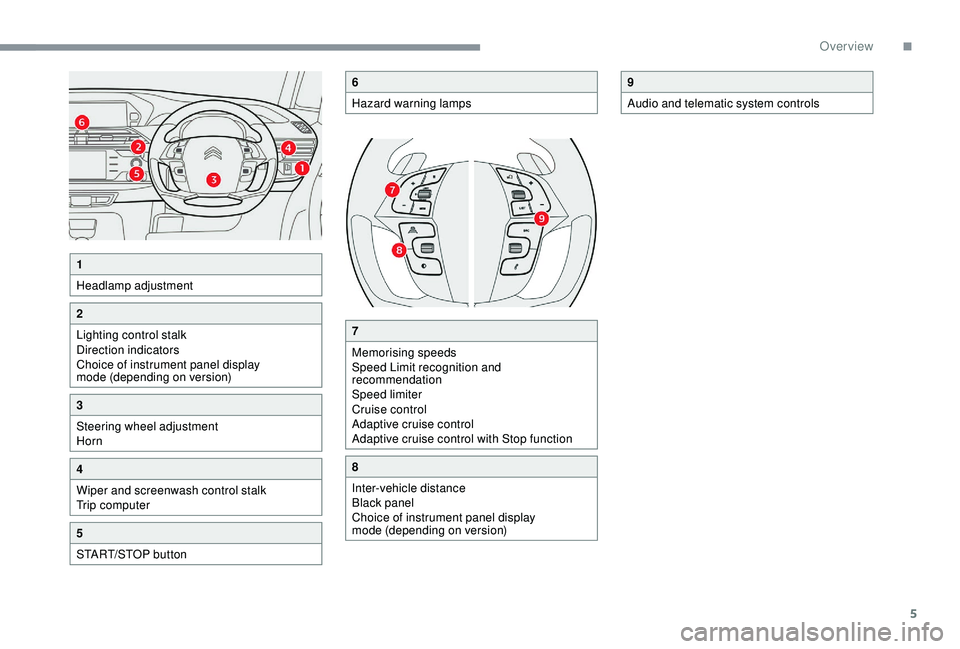
Memorising speeds
Speed Limit recognition and
recommendation
Speed limiter
Cruise control
Adaptive cruise control
Adaptive cruise control with Stop function
8
Inter-vehicle distance
Black panel
Choice of instrument panel display
mode (depending on version)
9
Audio and telematic system controls
1
Headlamp adjustment
2
Lighting control stalk
Direction indicators
Choice of instrument panel display
mode (depending on version)
3
Steering wheel adjustment
Horn
4
Wiper and screenwash control stalk
Trip computer
5
START/STOP button
6
Hazard warning lamps
.
Over view
Page 8 of 316
6
Eco- driving
Eco-driving is a range of everyday practices
t hat allow the motorist to optimise their fuel
consumption and CO
2 emissions.
Optimise the use of your
gearbox
With a manual gearbox, move off gently
a nd change up without waiting. When
accelerating, change up early.
With an automatic gearbox, give preference
to automatic mode and avoid pressing the
accelerator pedal heavily or suddenly.
The gear efficiency indicator invites you to
engage the most suitable gear: as soon as the
indication is displayed in the instrument panel,
follow it straight away.
For vehicles fitted with an automatic gearbox,
this indicator appears only in manual mode.
Drive smoothly
Maintain a safe distance between vehicles,
u se engine braking rather than the
brake pedal, and press the accelerator
progressively. These practices contribute
towards a
reduction in fuel consumption and
CO
2 emissions and also help reduce the
b
ackground traffic noise.
Control the use of your electrical
equipment
Before moving off, if the passenger
compartment is too warm, ventilate it by
opening the windows and air vents before
using the air conditioning.
Above 31
mph (50 km/h), close the windows
and leave the air vents open.
Consider using equipment that can help
keep the temperature in the passenger
compartment down (sunroof blind and window
blinds, etc.).
Switch off the air conditioning, unless it has
automatic regulation, as soon as the desired
temperature is attained. Switch off the headlamps and front foglamps
when the ambient light level does not require
their use.
Avoid running the engine before moving off,
particularly in winter; your vehicle will warm up
much faster while driving.
As a
passenger, if you avoid connecting your
multimedia devices (film, music, video game
etc.), you will contribute towards limiting the
consumption of electrical energy, and so of
fuel.
Disconnect your portable devices before
leaving the vehicle.
Limit the causes of excess
consumption
Spread loads throughout the vehicle; place
the heaviest items in the bottom of the boot,
as close as possible to the rear seats.
If your vehicle has cruise control, make use of
the system at speeds above 25
mph (40
km/h)
when the traffic is flowing well. Switch off the demisting and defrosting
controls when not required, if they are not
automatically controlled.
Switch off the heated seat as soon as
possible.
Eco-driving
Page 10 of 316
8
Digital monochrome
instrument panel
Dials and display screens
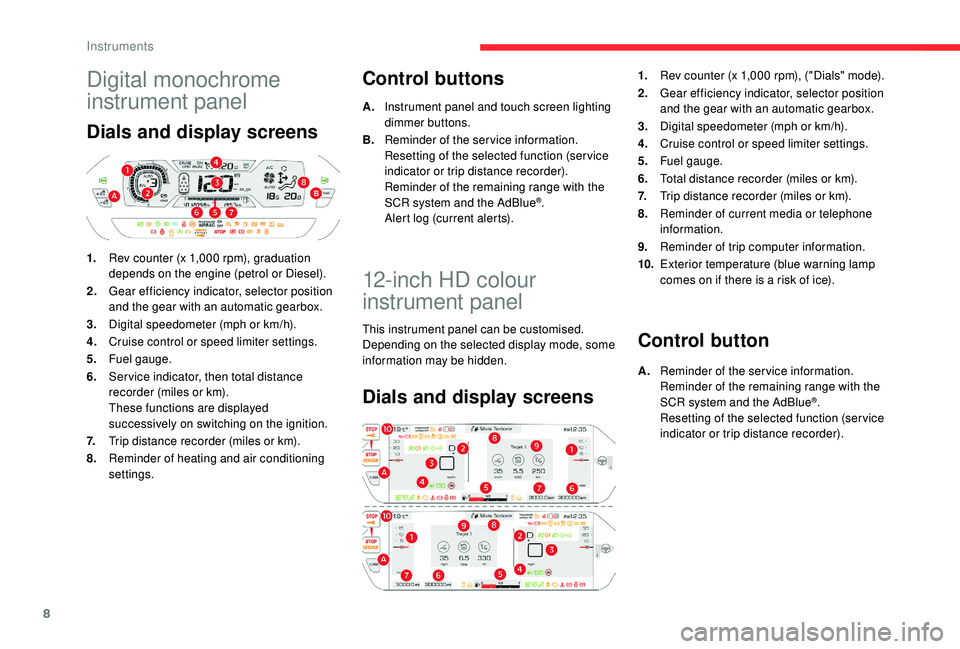
1.Rev counter (x 1,000 rpm), graduation
depends on the engine (petrol or Diesel).
2. Gear efficiency indicator, selector position
and the gear with an automatic gearbox.
3. Digital speedometer (mph or km/h).
4. Cruise control or speed limiter settings.
5. Fuel gauge.
6. Ser vice indicator, then total distance
recorder (miles or km).
These functions are displayed
successively on switching on the ignition.
7. Trip distance recorder (miles or km).
8. Reminder of heating and air conditioning
settings.
Control buttons
A.Instrument panel and touch screen lighting
dimmer buttons.
B. Reminder of the service information.
Resetting of the selected function (ser vice
indicator or trip distance recorder).
Reminder of the remaining range with the
SCR system and the AdBlue
®.
Alert log (current alerts).
12-inch HD colour
instrument panel
This instrument panel can be customised.
Depending on the selected display mode, some
information may be hidden.
Dials and display screens
1. Rev counter (x 1,000 rpm), ("Dials" mode).
2. Gear efficiency indicator, selector position
and the gear with an automatic gearbox.
3. Digital speedometer (mph or km/h).
4. Cruise control or speed limiter settings.
5. Fuel gauge.
6. Total distance recorder (miles or km).
7. Trip distance recorder (miles or km).
8. Reminder of current media or telephone
information.
9. Reminder of trip computer information.
10. Exterior temperature (blue warning lamp
comes on if there is a
risk of ice).
Control button
A.Reminder of the service information.
Reminder of the remaining range with the
SCR system and the AdBlue
®.
Resetting of the selected function (ser vice
indicator or trip distance recorder).
Instruments
Page 11 of 316
9
Display areas
Most warning and indicator lamps do not have
a fixed position.
The warning and indicator lamps are displayed
from right to left in order of priority.
For certain functions that have indicator lamps
for both operation and for deactivation, there is
only one dedicated location.
Customisation of the 12-inch
colour instrument panel
You can modify the appearance of the
instrument panel, by choosing:
-
a c
oloured ambience,
-
a d
isplay mode.
As a safety measure, these adjustments should
b e carried out with the vehicle stationary.
Choice of language
It depends on the configuration of the touch
screen.
Certain languages are not available for this
instrument panel, English is selected by default.
Choice of coloured ambience
Per form changes when the vehicle is stationary:
Choice of display mode
or
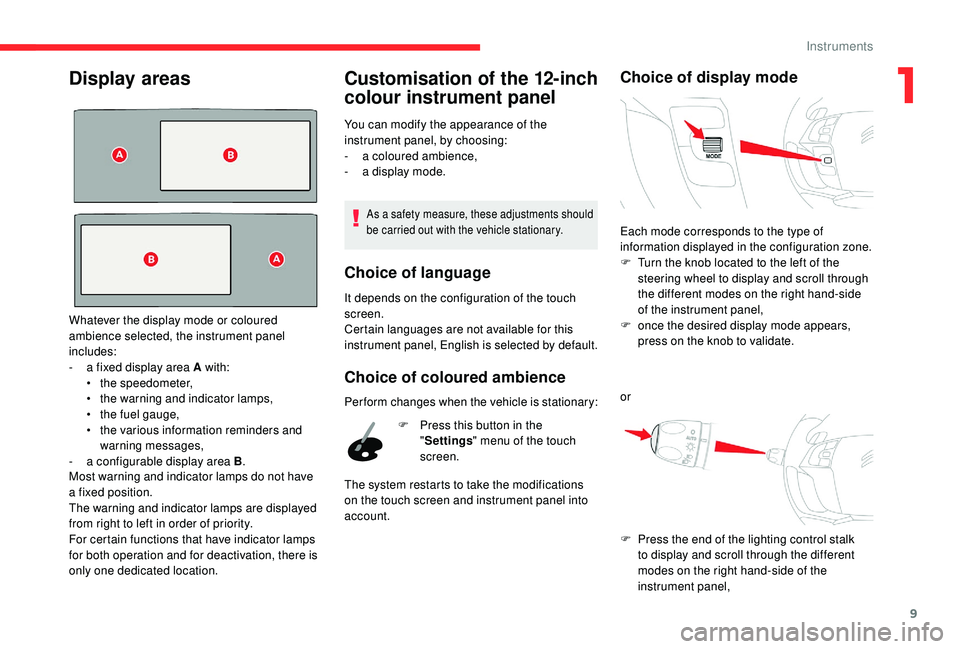
Whatever the display mode or coloured
ambience selected, the instrument panel
includes:
-
a f
ixed display area A with:
• t
he speedometer,
• t
he warning and indicator lamps,
•
t
he fuel gauge,
•
t
he various information reminders and
warning messages,
-
a c
onfigurable display area B . F
P
ress this button in the
" Settings " menu of the touch
screen.
The system restarts to take the modifications
on the touch screen and instrument panel into
account. Each mode corresponds to the type of
information displayed in the configuration zone.
F
T
urn the knob located to the left of the
steering wheel to display and scroll through
the different modes on the right hand-side
of the instrument panel,
F
o
nce the desired display mode appears,
press on the knob to validate.
F
P
ress the end of the lighting control stalk
to display and scroll through the different
modes on the right hand-side of the
instrument panel,
1
Instruments
Page 12 of 316
10
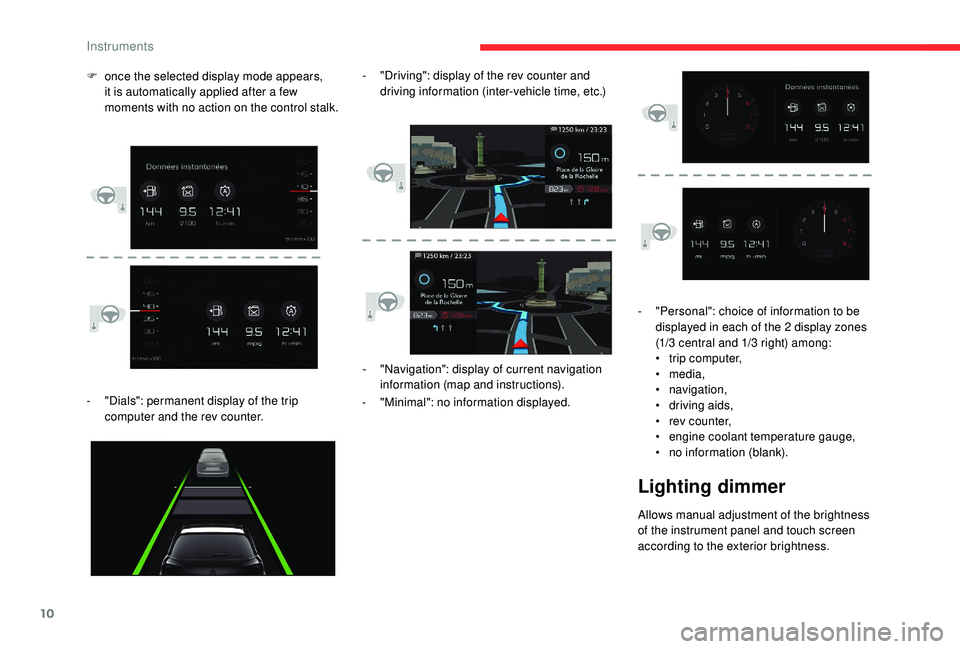
- "Dials": permanent display of the trip computer and the rev counter. -
"
Navigation": display of current navigation
information (map and instructions).
- " Minimal": no information displayed.
F
o
nce the selected display mode appears,
it is automatically applied after a few
moments with no action on the control stalk. -
"
Driving": display of the rev counter and
driving information (inter-vehicle time, etc.)
-
"
Personal": choice of information to be
displayed in each of the 2 display zones
(1/3 central and 1/3 right) among:
•
t
rip computer,
• media,
• navigation,
• d riving aids,
•
r
ev counter,
•
eng
ine coolant temperature gauge,
•
n
o information (blank).
Lighting dimmer
Allows manual adjustment of the brightness
of the instrument panel and touch screen
according to the exterior brightness.
Instruments
Page 16 of 316
14
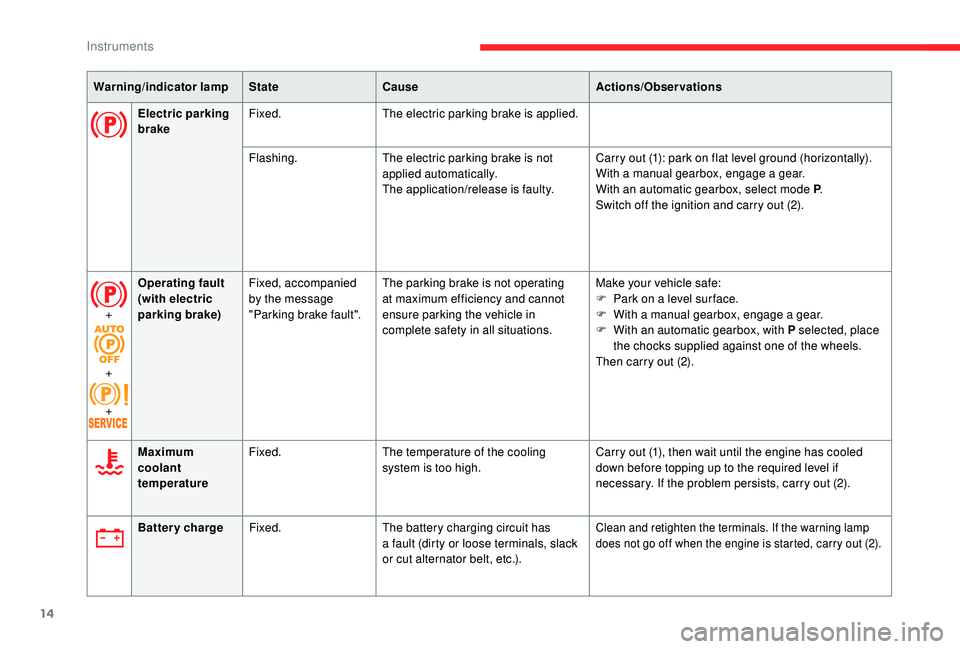
Warning/indicator lampStateCause Actions/Observations
Electric parking
brake Fixed.
The electric parking brake is applied.
Flashing. The electric parking brake is not
applied automatically.
The application/release is faulty. Carry out (1): park on flat level ground (horizontally).
With a
manual gearbox, engage a
gear.
With an automatic gearbox, select mode P .
Switch off the ignition and carry out (2).
+
+
+ Operating fault
(with electric
parking brake)
Fixed, accompanied
by the message
"Parking brake fault". The parking brake is not operating
at maximum efficiency and cannot
ensure parking the vehicle in
complete safety in all situations. Make your vehicle safe:
F
P
ark on a level sur face.
F
W
ith a
manual gearbox, engage a
gear.
F
W
ith an automatic gearbox, with P selected, place
the chocks supplied against one of the wheels.
Then carry out (2).
Maximum
coolant
temperature Fixed.
The temperature of the cooling
system is too high. Carry out (1), then wait until the engine has cooled
down before topping up to the required level if
necessary. If the problem persists, carry out (2).
Battery charge Fixed. The battery charging circuit has
a
fault (dirty or loose terminals, slack
or cut alternator belt, etc.).
Clean and retighten the terminals. If the warning lamp
does not go off when the engine is started, carry out (2).
Instruments
Page 26 of 316
24
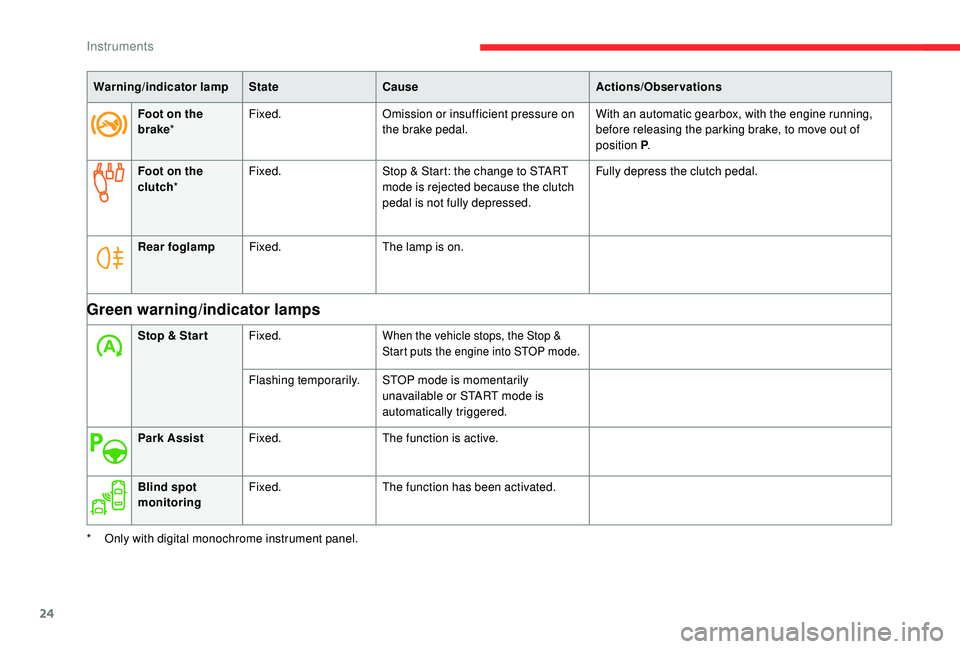
Warning/indicator lampStateCause Actions/Observations
Foot on the
brake * Fixed.
Omission or insufficient pressure on
the brake pedal. With an automatic gearbox, with the engine running,
before releasing the parking brake, to move out of
position P
.
Foot on the
clutch * Fixed.
Stop & Start: the change to START
mode is rejected because the clutch
pedal is not fully depressed. Fully depress the clutch pedal.
Rear foglamp Fixed. The lamp is on.
Green warning/indicator lamps
Stop & Star tFixed.When the vehicle stops, the Stop &
Start puts the engine into STOP mode.
Flashing temporarily. STOP mode is momentarily
unavailable or START mode is
automatically triggered.
Park Assist Fixed. The function is active.
Blind spot
monitoring Fixed.
The function has been activated.
*
O
nly with digital monochrome instrument panel.
Instruments
Page 39 of 316
37
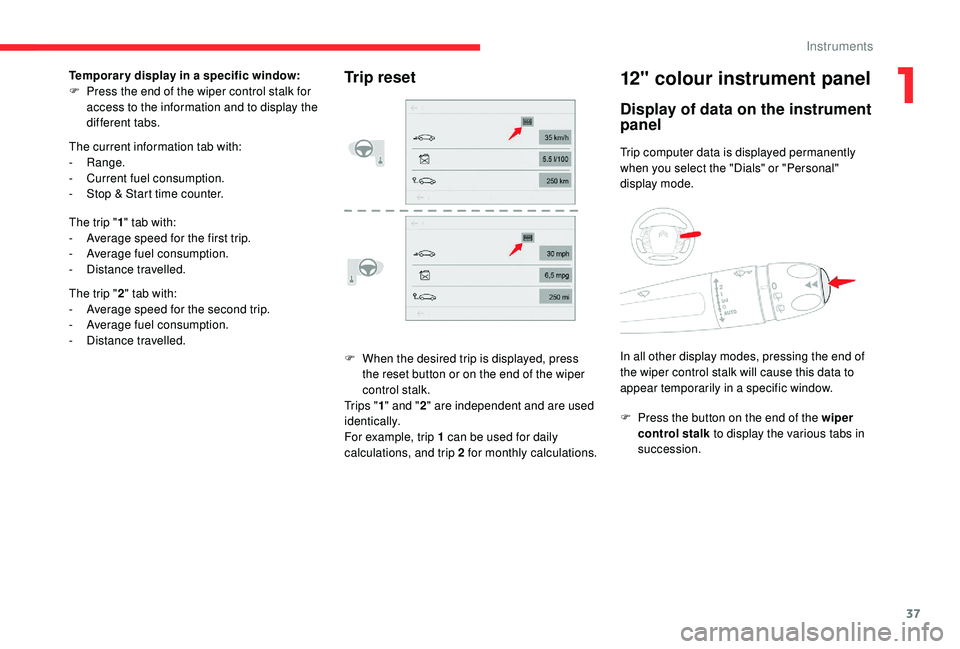
F When the desired trip is displayed, press the reset button or on the end of the wiper
control stalk.
Tr i p s " 1" and " 2" are independent and are used
identically.
For example, trip 1 can be used for daily
calculations, and trip 2 for monthly calculations.
12" colour instrument panel
Display of data on the instrument
panel
Trip computer data is displayed permanently
when you select the "Dials" or "Personal"
display mode.
F
P
ress the button on the end of the wiper
control stalk to display the various tabs in
succession.
The current information tab with:
-
Range.
-
C
urrent fuel consumption.
-
S
top & Start time counter.
The trip " 1" tab with:
-
A
verage speed for the first trip.
-
A
verage fuel consumption.
-
D
istance travelled.
The trip " 2" tab with:
-
A
verage speed for the second trip.
-
A
verage fuel consumption.
-
D
istance travelled.
Trip resetTemporar y display in a specific window:
F P ress the end of the wiper control stalk for
access to the information and to display the
different tabs.
In all other display modes, pressing the end of
the wiper control stalk will cause this data to
appear temporarily in a specific window.
1
Instruments
Page 41 of 316
39
(mph or km/h)
Calculated since the last time the
trip was reset.
Distance travelled
(miles or km)
Calculated since the last time the
trip was reset.
Stop & Star t time counter
(minutes/seconds or hours/minutes)
A time counter calculates the total of the
periods in STOP mode during a
journey.
It resets to zero every time the ignition is
switched on.
Average speed
Setting the date and time
With CITROËN Connect
Radio
F Select the Settings menu.
F
Sel
ect " System configuration ".
F
Sel
ect "Date and time ". F
Sel
ect "
Date " or "Time ".
F
C
hoose the display formats.
F
C
hange the date and/or time using the
numeric keypad.
F
Pr
ess this button to confirm.
With CITROËN Connect Nav
Adjustment of the time and date is only
available if synchronisation with GPS is
deactivated.
F
Sel
ect the Settings menu.
F
P
ress the " OPTIONS " button to go to the
secondary page.
F
Sel
ect "Setting the time- date".
F
Sel
ect the " Date" or "Time " tab.
F
A
djust the date and/or time using the
numeric keypad.
F
Pr
ess this button to confirm.F
Pr
ess this button to confirm.
Additional adjustments
You can choose:
- T o change the display format of the date
and time (12h/24h).
-
T
o change the time zone.
-
T
o activate or deactivate synchronisation
with the GPS (UTC).
The system does not automatically
manage the change between winter and
summer time (depending on country).
The change between winter and summer
time is done by changing the time zone.
1
Instruments