engine Citroen C5 2007.5 (DC/DE) / 1.G User Guide
[x] Cancel search | Manufacturer: CITROEN, Model Year: 2007.5, Model line: C5, Model: Citroen C5 2007.5 (DC/DE) / 1.GPages: 231, PDF Size: 7.63 MB
Page 34 of 231
36
II
I N S T R U M E N T P A N E L
T R I P C O M P U T E R
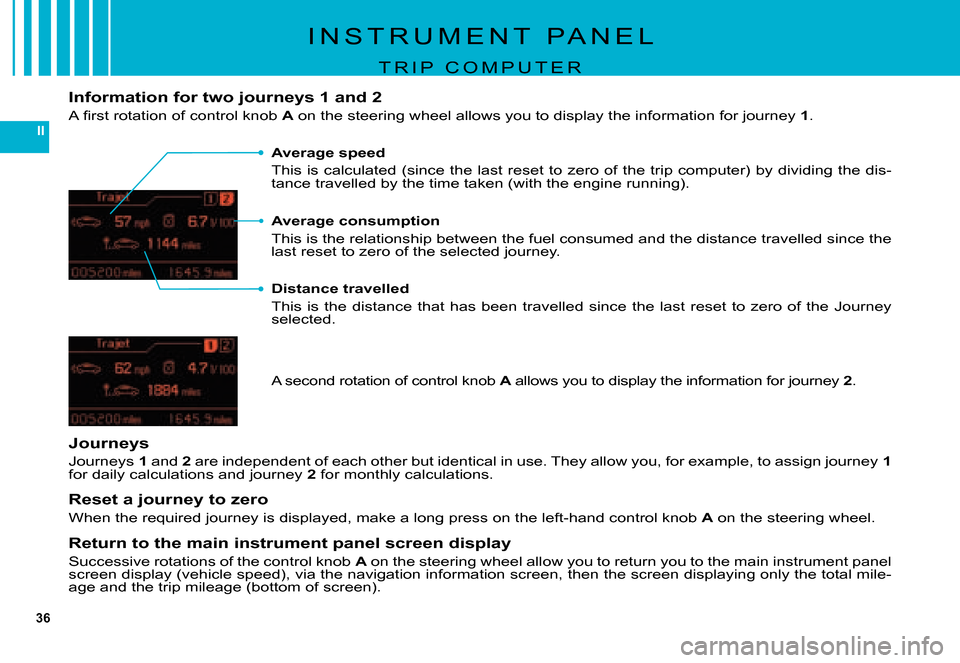
Distance travelled
This is the distance that has been travelled since the last reset to zero of the Journey selected.
Journeys
Journeys 1 and 2 are independent of each other but identical in use. They allow you, for example, to assign journey 1for daily calculations and journey 2 for monthly calculations.
Reset a journey to zero
When the required journey is displayed, make a long press on th e left-hand control knob A on the steering wheel.
Return to the main instrument panel screen display
Successive rotations of the control knob A on the steering wheel allow you to return you to the main instrument panel screen display (vehicle speed), via the navigation information scree n, then the screen displaying only the total mile-age and the trip mileage (bottom of screen).
A second rotation of control knob A allows you to display the information for journey A2.
Average speed
This is calculated (since the last reset to zero of the trip computer) by dividing the dis-tance travelled by the time taken (with the engine running).
Average consumption
This is the relationship between the fuel consumed and the distance travelled since the last reset to zero of the selected journey.
Information for two journeys 1 and 2
�A� �fi� �r�s�t� �r�o�t�a�t�i�o�n� �o�f� �c�o�n�t�r�o�l� �k�n�o�b� A on the steering wheel allows you to display the information for journey 1.
Page 36 of 231
38
II
A
I N S T R U M E N T P A N E L
C H E C K S / O I L L E V E L
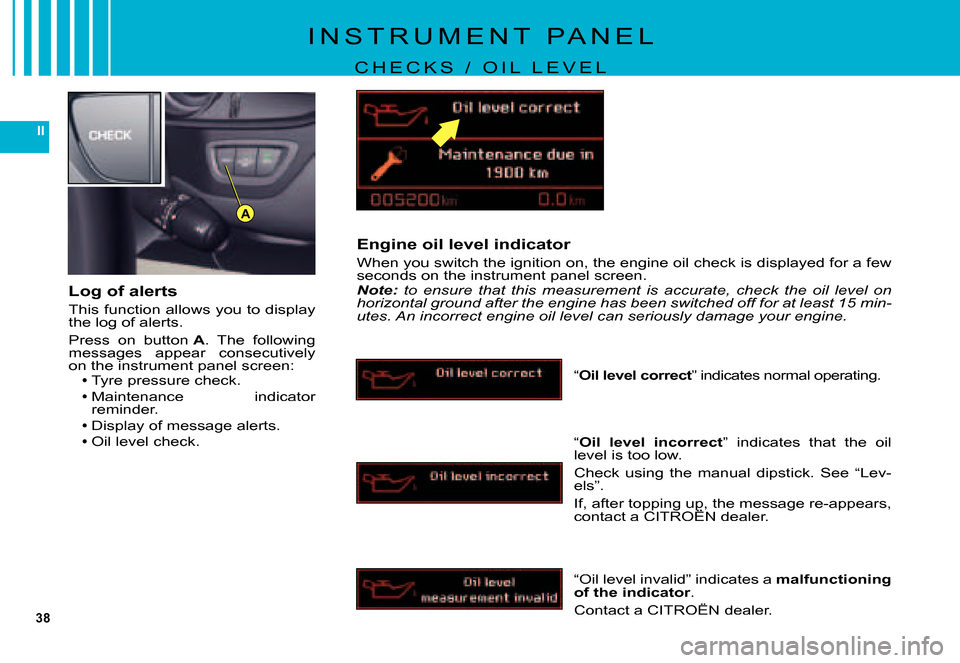
Engine oil level indicator
When you switch the ignition on, the engine oil check is displayed for a few seconds on the instrument panel screen.Note: to ensure that this measurement is accurate, check the oil level o n horizontal ground after the engine has been switched off for at least 15 min-utes. An incorrect engine oil level can seriously damage your engi ne.
“Oil level incorrect” indicates that the oil level is too low.
Check using the manual dipstick. See “Lev-els”.
If, after topping up, the message re-appears, contact a CITROËN dealer.If, after topping up, the message topping up, the
“Oil level invalid” indicates a malfunctioning of the indicator.
Contact a CITROËN dealer.
“Oil level correct” indicates normal operating.
Log of alerts
This function allows you to display the log of alerts.
Press on button A. The following messages appear consecutively on the instrument panel screen:Tyre pressure check.
Maintenance indicator reminder.Display of message alerts.
Oil level check.
Page 47 of 231
50
II
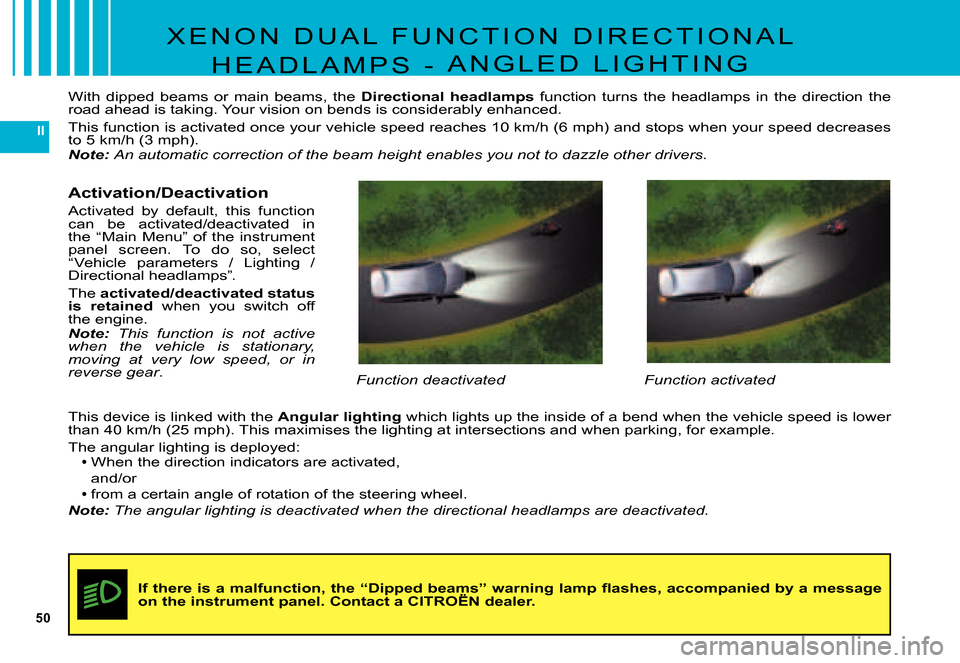
With dipped beams or main beams, the Directional headlamps function turns the headlamps in the direction the road ahead is taking. Your vision on bends is considerably enhanced.
This function is activated once your vehicle speed reaches 10 km/h (6 mph) and stops when your speed decreases to 5 km/h (3 mph).Note: An automatic correction of the beam height enables you not to dazzle other drivers.
X E N O N D U A L F U N C T I O N D I R E C T I O N A L
H E A D L A M P S - A N G L E D L I G H T I N G
Function activatedFunction deactivated
Activation/Deactivation
Activated by default, this function can be activated/deactivated in the “Main Menu” of the instrument panel screen. To do so, select “Vehicle parameters / Lighting / Directional headlamps”.
The activated/deactivated status is retained when you switch off the engine.Note: This function is not active when the vehicle is stationary, moving at very low speed, or in reverse gear.
�I�f� �t�h�e�r�e� �i�s� �a� �m�a�l�f�u�n�c�t�i�o�n�,� �t�h�e� �“�D�i�p�p�e�d� �b�e�a�m�s�”� �w�a�r�n�i�n�g� �l�a�m�p � �fl� �a�s�h�e�s�,� �a�c�c�o�m�p�a�n�i�e�d� �b�y� �a� �m�e�s�s�a�g�e� on the instrument panel. Contact a CITROËN dealer.�I�f� �t�h�e�r�e� �i�s� �a� �m�a�l�f�u�n�c�t�i�o�n�,� �t�h�e� �“�D�i�p�p�e�d� �b�e�a�m�s�”� �w�a�r�n�i�n�g� �l�a�m�p� �fl� �a�s�h�e�s�,� �a�c�c�o�m�p�a�n�i�e�d� �b�y� �a� �m�e�s�s�a�g�e� �I�f� �t�h�e�r�e� �i�s� �a� �m�a�l�f�u�n�c�t�i�o�n�,� �t�h�e� �“�D�i�p�p�e�d� �b�e�a�m�s�”� �w�a�r�n�i�n�g� �l�a�m�p� �fl� �a�s�h�e�s�,� �a�c�c�o�m�p�a�n�i�e�d� �b�y� �a� �m�e�s�s�a�g�e�
This device is linked with the Angular lighting which lights up the inside of a bend when the vehicle speed is lower than 40 km/h (25 mph). This maximises the lighting at intersectio ns and when parking, for example.
The angular lighting is deployed:When the direction indicators are activated,
and/orfrom a certain angle of rotation of the steering wheel.
Note: The angular lighting is deactivated when the directional headlamps are deactivated.
Page 52 of 231
55
II
A
5
4
3
2
1
6
F R O N T S E A T S
M A N U A L A D J U S T M E N T S
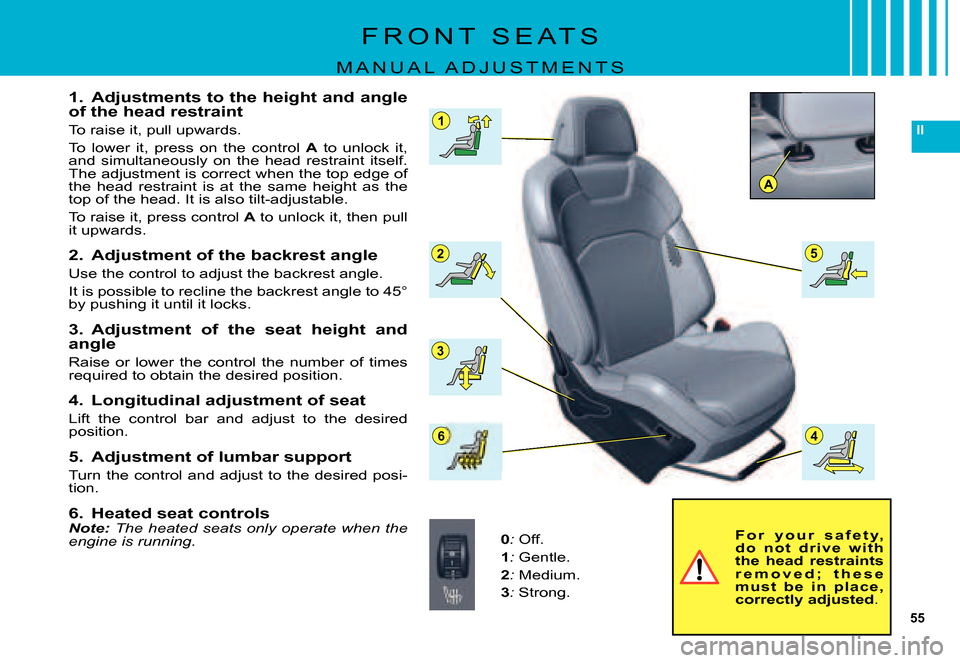
1. Adjustments to the height and angle of the head restraint
To raise it, pull upwards.
To lower it, press on the control A to unlock it, and simultaneously on the head restraint itself. The adjustment is correct when the top edge of the head restraint is at the same height as the top of the head. It is also tilt-adjustable.
To raise it, press control A to unlock it, then pull it upwards.
2. Adjustment of the backrest angle
Use the control to adjust the backrest angle.
It is possible to recline the backrest angle to 45° by pushing it until it locks.
3. Adjustment of the seat height and angle
Raise or lower the control the number of times required to obtain the desired position.
4. Longitudinal adjustment of seat
Lift the control bar and adjust to the desired position.
5. Adjustment of lumbar support
Turn the control and adjust to the desired posi-tion.
6. Heated seat controlsNote: The heated seats only operate when the engine is running.0: Off.
1: Gentle.
2: Medium.
3: Strong.
F o r y o u r s a f e t y, d o n o t d r i v e w i t h the head restraints r e m o v e d ; t h e s e m u s t b e i n p l a c e , correctly adjusted.
Page 53 of 231
56
II
32
a
b
c
d
4
1
F R O N T S E A T S
E L E C T R I C A L A D J U S T M E N T S
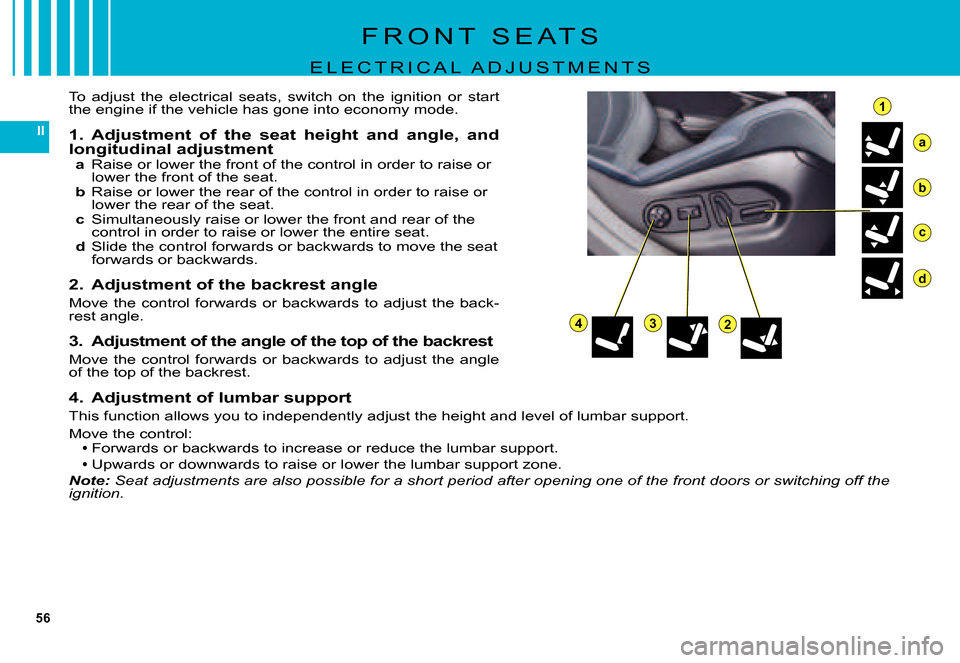
To adjust the electrical seats, switch on the ignition or start the engine if the vehicle has gone into economy mode.
1. Adjustment of the seat height and angle, and longitudinal adjustmenta Raise or lower the front of the control in order to raise or lower the front of the seat.b Raise or lower the rear of the control in order to raise or lower the rear of the seat.c Simultaneously raise or lower the front and rear of the control in order to raise or lower the entire seat.d Slide the control forwards or backwards to move the seat forwards or backwards.
2. Adjustment of the backrest angle
Move the control forwards or backwards to adjust the back-rest angle.
3. Adjustment of the angle of the top of the backrest
Move the control forwards or backwards to adjust the angle of the top of the backrest.
4. Adjustment of lumbar support
This function allows you to independently adjust the height and level of lumbar support.
Move the control:Forwards or backwards to increase or reduce the lumbar support.
Upwards or downwards to raise or lower the lumbar support zone.Note: Seat adjustments are also possible for a short period after open ing one of the front doors or switching off the ignition.
Page 54 of 231

57
II
CBDA
F R O N T S E A T S
E L E C T R I C A L A D J U S T M E N T S
The Welcome function
When the driver's door is opened and the ignition is off, the seat moves to ease accessing or leav-ing the vehicle.
You may activate or deactivate this function using the “Main Menu” on the instrument panel screen. To do so, select “Vehicle parameters / Comfort / Driver welcome”.
Head restraint height and angle adjustments on elec-tric seats
To adjust the angle of the head restraint, push back or pull forward section C of the head restraint until you reach the desired position.
To raise it, pull upwards.
To lower it, press on the control Dto unlock it, and simultaneously on the head restraint itself.
To raise it, press control D to unlock it, then pull it upwards.
0: Off.
1: Gentle.
2: Medium.
3: Strong.
Controls for the heated seats
The front seats can be heated indi-vidually. With the engine running, use control A, located beside the seats to choose between three heating levels:
Massage function
This function provides the driver with a back massage.
To activate the massage, with the engine runnuing, press on but-ton B. The warning lamp comes on and the massage function is acti-vated for a period of 1 hour. During this time, massage is performed in cycles of 6 minutes (4 minutes of massage followed by 2 minutes break). In total, the system will per-form 10 cycles.
After 1 hour, the function is deacti-vated. The warning lamp goes out.
You can deactivate the massage function at any time by pressing on button B.
Page 56 of 231
60
II
1
2
R E A R V I E W M I R R O R S
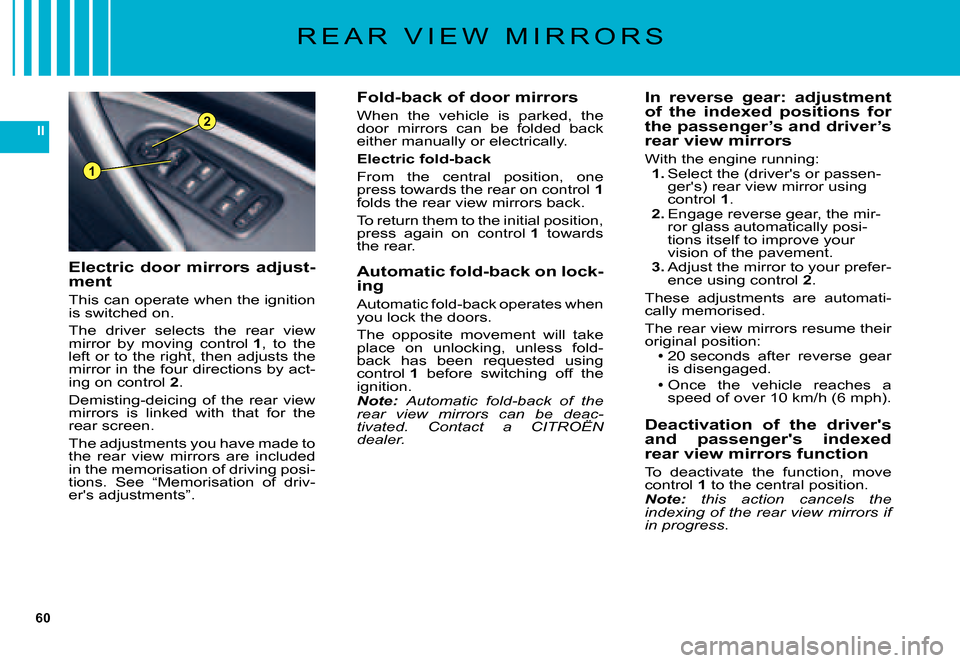
Fold-back of door mirrors
When the vehicle is parked, the door mirrors can be folded back either manually or electrically.
Electric fold-back
From the central position, one press towards the rear on control 1folds the rear view mirrors back.
To return them to the initial position, press again on control 1 towards the rear.
Automatic fold-back on lock-ing
Automatic fold-back operates when you lock the doors.
The opposite movement will take place on unlocking, unless fold-back has been requested using control 1 before switching off the ignition.Note: Automatic fold-back of the rear view mirrors can be deac-tivated. Contact a CITROËN dealer.
In reverse gear: adjustment of the indexed positions for the passenger’s and driver’s rear view mirrors
With the engine running:1. Select the (driver's or passen-ger's) rear view mirror using control 1.2. Engage reverse gear, the mir-ror glass automatically posi-tions itself to improve your vision of the pavement.3. Adjust the mirror to your prefer-ence using control 2.
These adjustments are automati-cally memorised.
The rear view mirrors resume their original position:20 seconds after reverse gear is disengaged.
Once the vehicle reaches a speed of over 10 km/h (6 mph).
Deactivation of the driver's and passenger's indexed rear view mirrors function
To deactivate the function, move control 1 to the central position.Note: this action cancels the indexing of the rear view mirrors if in progress.
Page 62 of 231
66
II
3
5
4
2
1
C R U I S E C O N T R O L
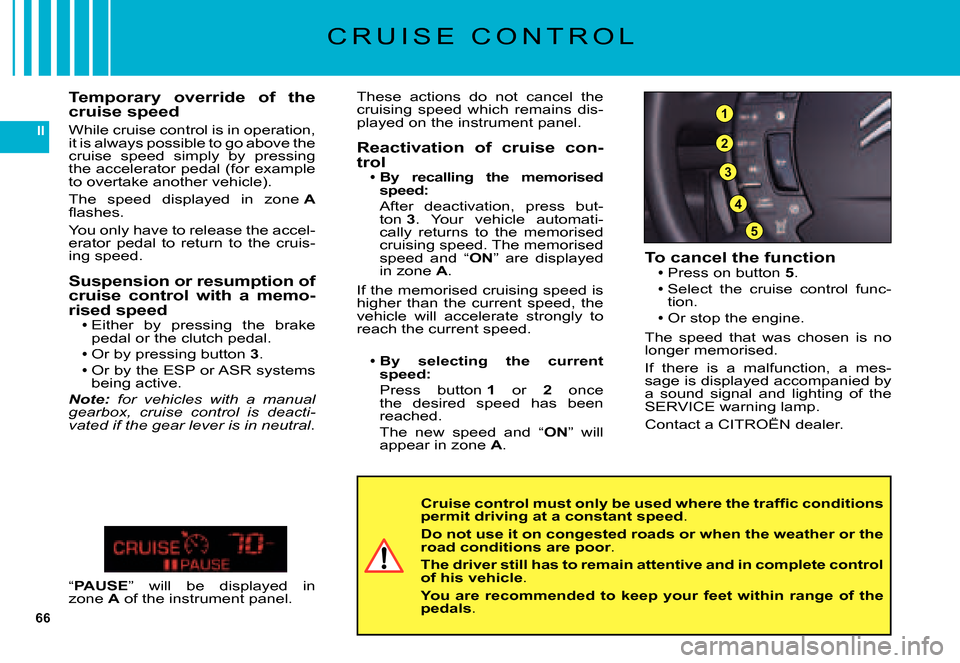
To cancel the functionPress on button 5.
Select the cruise control func-tion.Or stop the engine.
The speed that was chosen is no longer memorised.
If there is a malfunction, a mes-sage is displayed accompanied by a sound signal and lighting of the SERVICE warning lamp.
Contact a CITROËN dealer.
Page 63 of 231
67
II
3
5
4
2
1
A
S P E E D L I M I T E R
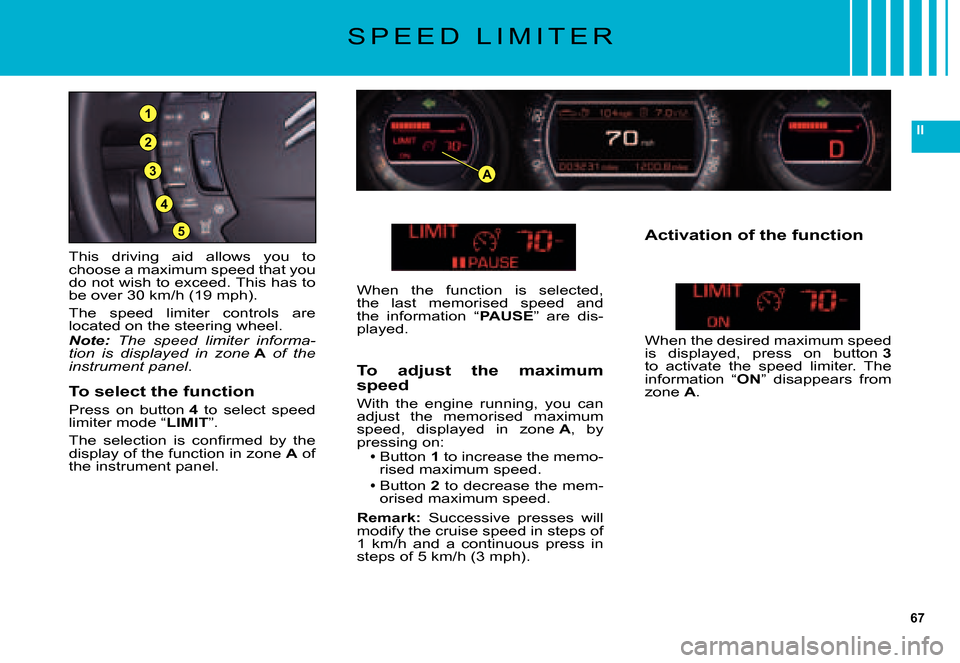
This driving aid allows you to choose a maximum speed that you do not wish to exceed. This has to be over 30 km/h (19 mph).
The speed limiter controls are located on the steering wheel.Note: The speed limiter informa-tion is displayed in zone A of the instrument panel.
To select the function
Press on button 4 to select speed limiter mode “LIMIT”.
�T�h�e� �s�e�l�e�c�t�i�o�n� �i�s� �c�o�n�fi� �r�m�e�d� �b�y� �t�h�e� display of the function in zone A of the instrument panel.
To adjust the maximum speed
With the engine running, you can adjust the memorised maximum speed, displayed in zone A, by pressing on:Button 1 to increase the memo-rised maximum speed.
Button 2 to decrease the mem-orised maximum speed.
Remark: Successive presses will modify the cruise speed in steps of 1 km/h and a continuous press in steps of 5 km/h (3 mph).
Page 64 of 231

68
II
3
5
4
2
1
A
S P E E D L I M I T E R
Suspension or resumption of maximum speed
Press on button 3.
Temporary override of the maximum speed
The accelerator pedal has an end-of-travel switch. In order to exceed the memorised maximum speed at any time, you can press the pedal all the way down. While the speed is being exceeded, the speed dis-played in zone A� �w�i�l�l� �fl� �a�s�h�.� �Y�o�u� have only to release the accelera-tor pedal to return below the maxi-mum speed, to restore the func-tion.
Remark:� �t�h�e� �s�p�e�e�d� �w�i�l�l� �a�l�s�o� �fl� �a�s�h� if the speed limiter is not able to prevent the vehicle from exceeding the programmed speed (e.g. on a steep descent or under excessive acceleration).
To reactivate the speed limiter, release the accelerator to slow to a speed lower than the programmed speed.
To cancel the functionPress on button 5.Select the speed limiter func-tion.
Or stop the engine.
The speed that was chosen is no longer memorised.
If there is a malfunction, a mes-sage is displayed accompanied by a sound signal and lighting of the SERVICE warning lamp.
Contact a CITROËN dealer.