ignition Citroen C5 2012 (RD/TD) / 2.G User Guide
[x] Cancel search | Manufacturer: CITROEN, Model Year: 2012, Model line: C5, Model: Citroen C5 2012 (RD/TD) / 2.GPages: 316, PDF Size: 9.75 MB
Page 37 of 316
I
35
MONITORING
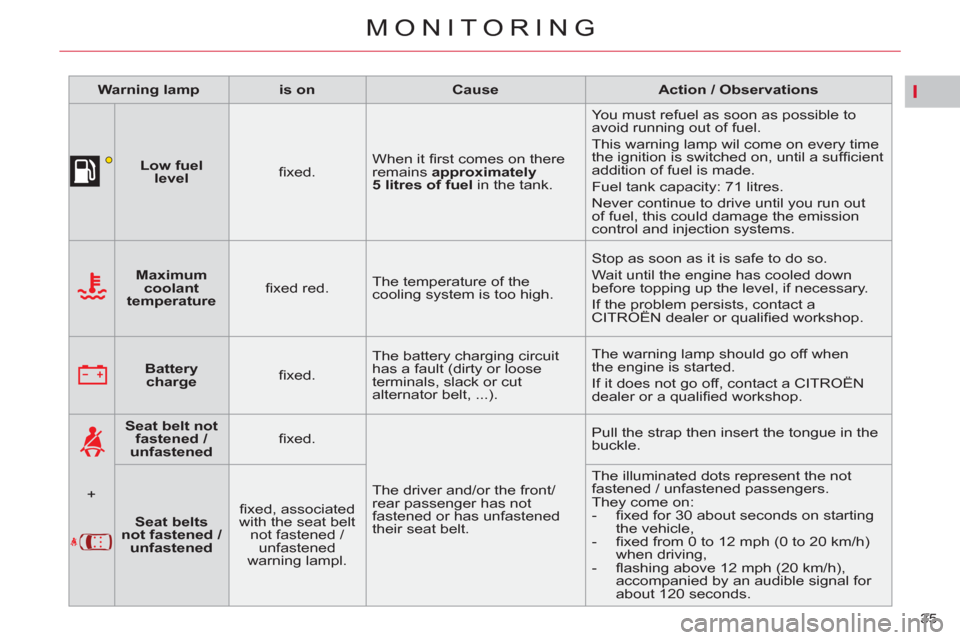
Warning lamp
is on
Cause
Action / Observations
Low fuel
level
fi xed. When it fi rst comes on there
remains approximately
5 litres of
fuel
in the tank. You must refuel as soon as possible to
avoid running out of fuel.
This warning lamp wil come on every time
the ignition is switched on, until a suffi cient
addition of fuel is made.
Fuel tank capacity: 71 litres.
Never continue to drive until you run out
of fuel, this could damage the emission
control and injection systems.
Maximum
coolant
temperature
fi xed red. The temperature of the
cooling system is too high. Stop as soon as it is safe to do so.
Wait until the engine has cooled down
before topping up the level, if necessary.
If the problem persists, contact a
CITROËN dealer or qualifi ed workshop.
Battery
charge
fi xed. The battery charging circuit
has a fault (dirty or loose
terminals, slack or cut
alternator belt, ...). The warning lamp should go off when
the engine is started.
If it does not go off, contact a CITROËN
dealer or a qualifi ed workshop.
+
Seat belt not
fastened /
unfastened
fi xed.
The driver and/or the front/
rear passenger has not
fastened or has unfastened
their seat belt. Pull the strap then insert the tongue in the
buckle.
Seat belts
not fastened /
unfastened
fi xed, associated
with the seat belt
not fastened /
unfastened
warning lampl. The illuminated dots represent the not
fastened / unfastened passengers.
They come on:
- fi xed for 30 about seconds on starting
the vehicle,
- fi xed from 0 to 12 mph (0 to 20 km/h)
when driving,
- fl ashing above 12 mph (20 km/h),
accompanied by an audible signal for
about 120 seconds.
Page 39 of 316
I
37
MONITORING
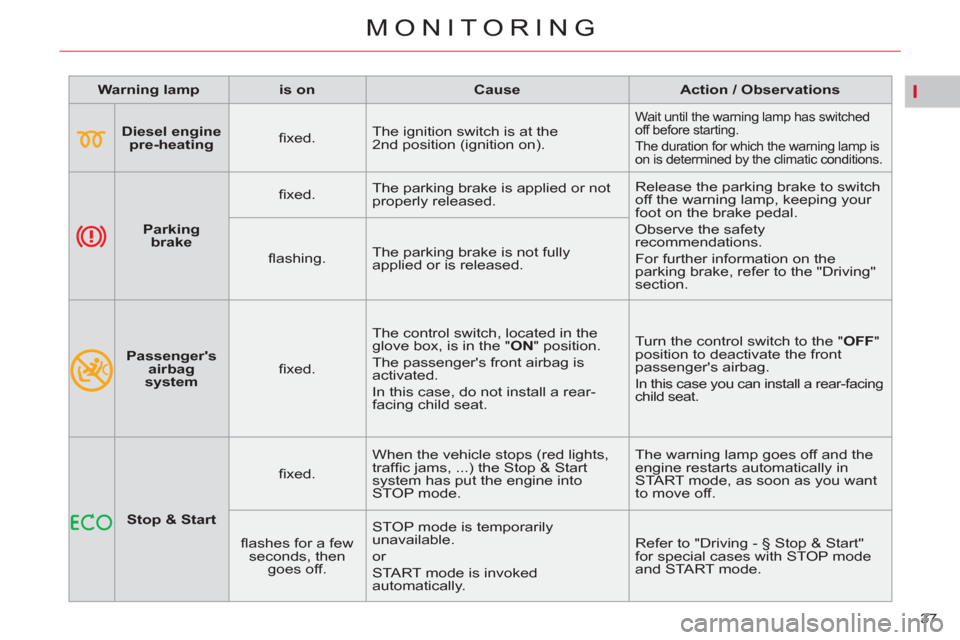
Warning lamp
is on
Cause
Action / Observations
Diesel engine
pre-heating
fi xed. The ignition switch is at the
2nd position (ignition on).
Wait until the warning lamp has switched
off before starting.
The duration for which the warning lamp is
on is determined by the climatic conditions.
Parking
brake
fi xed. The parking brake is applied or not
properly released. Release the parking brake to switch
off the warning lamp, keeping your
foot on the brake pedal.
Observe the safety
recommendations.
For further information on the
parking brake, refer to the "Driving"
section.
fl ashing. The parking brake is not fully
applied or is released.
Passenger's
airbag
system
fi xed. The control switch, located in the
glove box, is in the " ON
" position.
The passenger's front airbag is
activated.
In this case, do not install a rear-
facing child seat. Turn the control switch to the " OFF
"
position to deactivate the front
passenger's airbag.
In this case you can install a rear-facing
child seat.
Stop & Start
fi xed. When the vehicle stops (red lights,
traffi c jams, ...) the Stop & Start
system has put the engine into
STOP mode. The warning lamp goes off and the
engine restarts automatically in
START mode, as soon as you want
to move off.
fl ashes for a few
seconds, then
goes off. STOP mode is temporarily
unavailable.
or
START mode is invoked
automatically. Refer to "Driving - § Stop & Start"
for special cases with STOP mode
and START mode.
Page 41 of 316
I
39
MONITORING
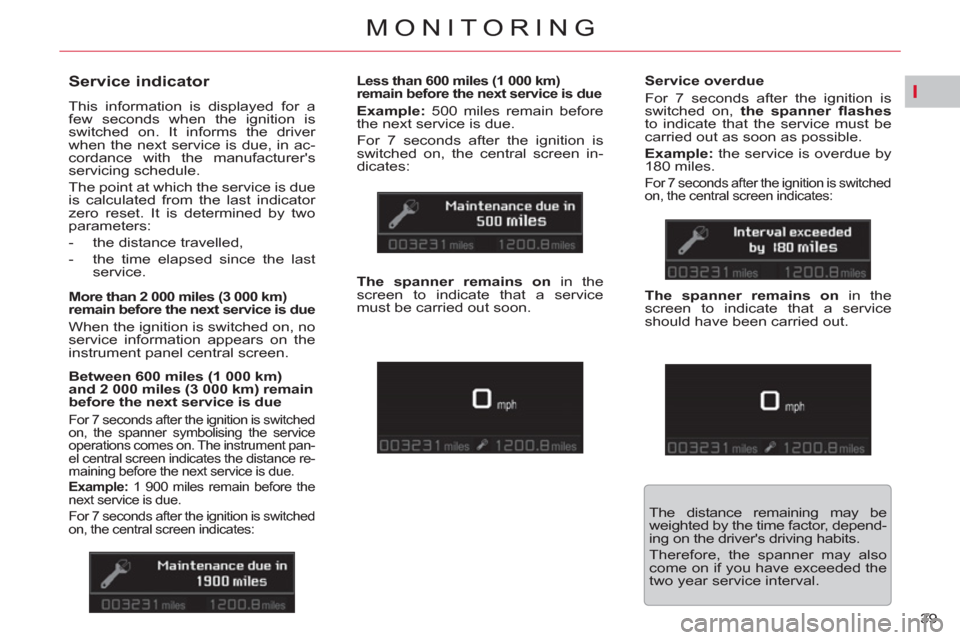
Service indicator
This information is displayed for a
few seconds when the ignition is
switched on. It informs the driver
when the next service is due, in ac-
cordance with the manufacturer's
servicing schedule.
The point at which the service is due
is calculated from the last indicator
zero reset. It is determined by two
parameters:
- the distance travelled,
- the time elapsed since the last
service.
More than 2 000 miles (3 000 km)
remain before the next service is due
When the ignition is switched on, no
service information appears on the
instrument panel central screen.
Between 600 miles (1 000 km)
and 2 000 miles (3 000 km) remain
before the next service is due
For 7 seconds after the ignition is switched
on, the spanner symbolising the service
operations comes on. The instrument pan-
el central screen indicates the distance re-
maining before the next service is due.
Example:
1 900 miles remain before the
next service is due.
For 7 seconds after the ignition is switched
on, the central screen indicates:
Less than 600 miles (1 000 km)
remain before the next service is due
Example:
500 miles remain before
the next service is due.
For 7 seconds after the ignition is
switched on, the central screen in-
dicates:
Service overdue
For 7 seconds after the ignition is
switched on, the spanner fl ashes
to indicate that the service must be
carried out as soon as possible.
Example:
the service is overdue by
180 miles.
For 7 seconds after the ignition is switched
on, the central screen indicates:
The spanner remains on
in the
screen to indicate that a service
must be carried out soon.
The distance remaining may be
weighted by the time factor, depend-
ing on the driver's driving habits.
Therefore, the spanner may also
come on if you have exceeded the
two year service interval.
The spanner remains on
in the
screen to indicate that a service
should have been carried out.
Page 42 of 316
I
40
MONITORING
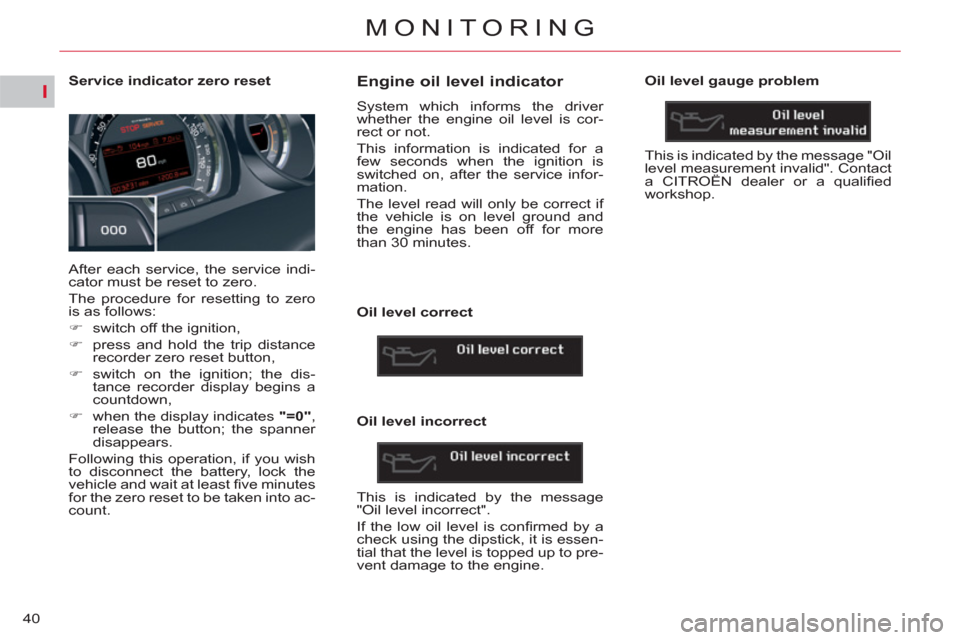
Service indicator zero reset
After each service, the service indi-
cator must be reset to zero.
The procedure for resetting to zero
is as follows:
�)
switch off the ignition,
�)
press and hold the trip distance
recorder zero reset button,
�)
switch on the ignition; the dis-
tance recorder display begins a
countdown,
�)
when the display indicates "=0"
,
release the button; the spanner
disappears.
Following this operation, if you wish
to disconnect the battery, lock the
vehicle and wait at least fi ve minutes
for the zero reset to be taken into ac-
count.
Engine oil level indicator
System which informs the driver
whether the engine oil level is cor-
rect or not.
This information is indicated for a
few seconds when the ignition is
switched on, after the service infor-
mation.
The level read will only be correct if
the vehicle is on level ground and
the engine has been off for more
than 30 minutes.
Oil level correct
Oil level incorrect
This is indicated by the message
"Oil level incorrect".
If the low oil level is confi rmed by a
check using the dipstick, it is essen-
tial that the level is topped up to pre-
vent damage to the engine.
Oil level gauge problem
This is indicated by the message "Oil
level measurement invalid". Contact
a CITROËN dealer or a qualifi ed
workshop.
Page 43 of 316
I
41
MONITORING
Engine oil temperature gauge
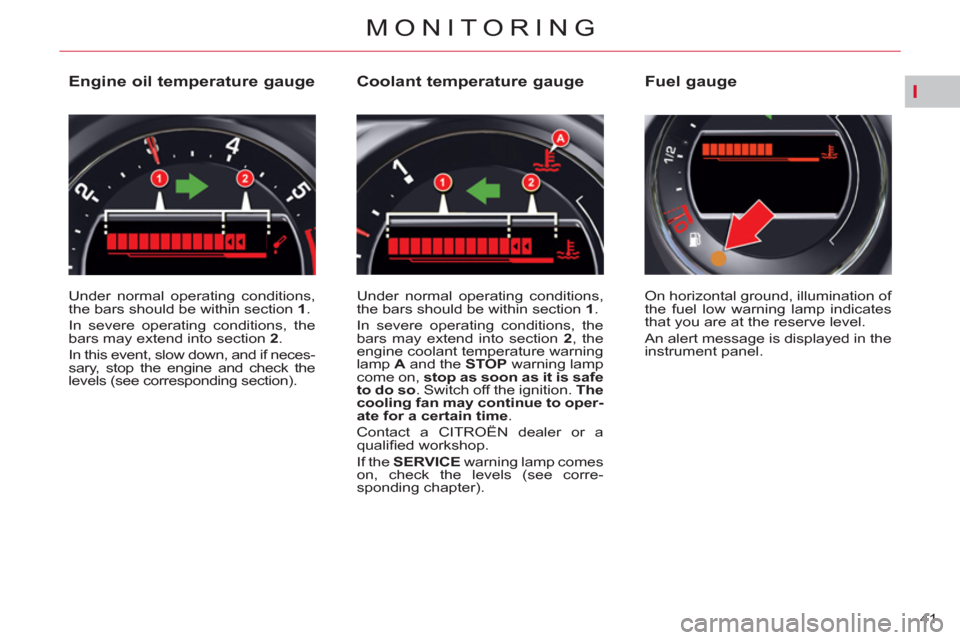
Under normal operating conditions,
the bars should be within section 1
.
In severe operating conditions, the
bars may extend into section 2
.
In this event, slow down, and if neces-
sary, stop the engine and check the
levels (see corresponding section).
Coolant temperature gauge
Under normal operating conditions,
the bars should be within section 1
.
In severe operating conditions, the
bars may extend into section 2
, the
engine coolant temperature warning
lamp A
and the STOP
warning lamp
come on, stop as soon as it is safe
to do so
. Switch off the ignition. The
cooling fan may continue to oper-
ate for a certain time
.
Contact a CITROËN dealer or a
qualifi ed workshop.
If the SERVICE
warning lamp comes
on, check the levels (see corre-
sponding chapter). On horizontal ground, illumination of
the fuel low warning lamp indicates
that you are at the reserve level.
An alert message is displayed in the
instrument panel.
Fuel gauge
Page 44 of 316
I
42
MONITORING
Total distance recorder
System which measures the total
distance travelled by the vehicle
during its life.
The total and trip distances are dis-
played for thirty seconds when the
ignition is switched off, when the
driver's door is opened and when
the vehicle is locked or unlocked.
To conform to legislation in the
country you are crossing, change
the units of distance (miles or km)
via the confi guration menu.
Lighting dimmer
System for manual adjustment of
the brightness of the instruments
and controls in relation to the exte-
rior brightness.
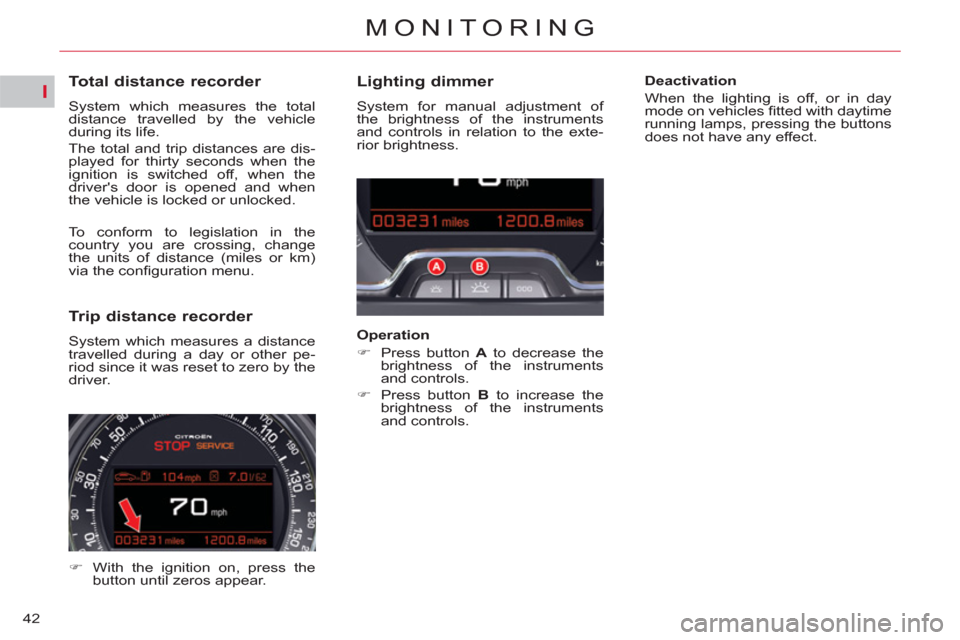
Operation
�)
Press button A
to decrease the
brightness of the instruments
and controls.
�)
Press button B
to increase the
brightness of the instruments
and controls.
Deactivation
When the lighting is off, or in day
mode on vehicles fi tted with daytime
running lamps, pressing the buttons
does not have any effect.
Trip distance recorder
System which measures a distance
travelled during a day or other pe-
riod since it was reset to zero by the
driver.
�)
With the ignition on, press the
button until zeros appear.
Page 63 of 316
III
61
COMFORT
FRONT SEATS
ELECTRIC ADJUSTMENTS
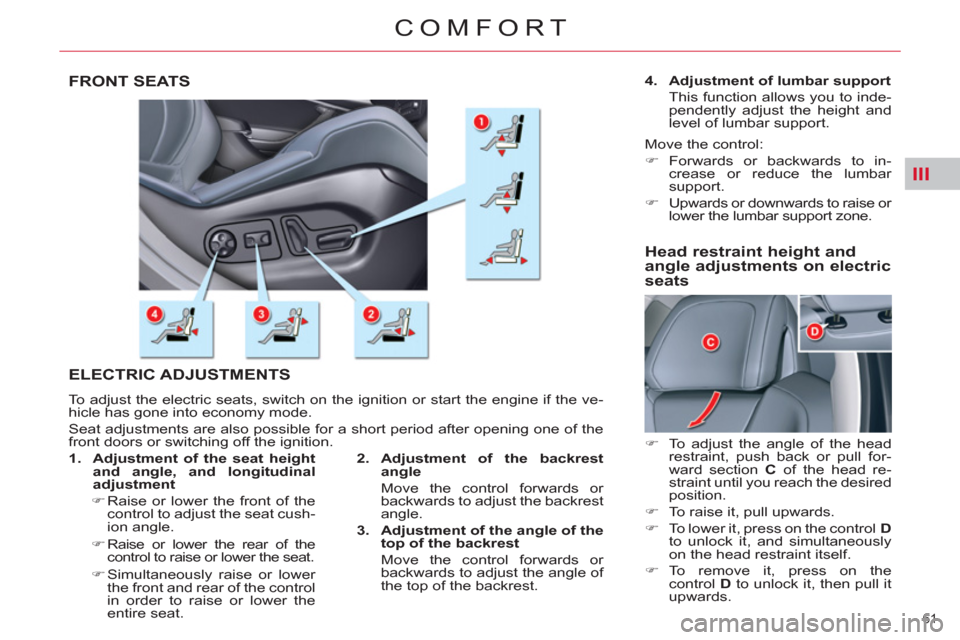
To adjust the electric seats, switch on the ignition or start the engine if the ve-
hicle has gone into economy mode.
Seat adjustments are also possible for a short period after opening one of the
front doors or switching off the ignition.
2.
Adjustment of the backrest
angle
Move the control forwards or
backwards to adjust the backrest
angle.
3.
Adjustment of the angle of the
top of the backrest
Move the control forwards or
backwards to adjust the angle of
the top of the backrest.
1.
Adjustment of the seat height
and angle, and longitudinal
adjustment
�)
Raise or lower the front of the
control to adjust the seat cush-
ion angle.
�)
Raise or lower the rear of the
control to raise or lower the seat.
�)
Simultaneously raise or lower
the front and rear of the control
in order to raise or lower the
entire seat.
4.
Adjustment of lumbar support
This function allows you to inde-
pendently adjust the height and
level of lumbar support.
Move the control:
�)
Forwards or backwards to in-
crease or reduce the lumbar
support.
�)
Upwards or downwards to raise or
lower the lumbar support zone.
Head restraint height and
angle adjustments on electric
seats
�)
To adjust the angle of the head
restraint, push back or pull for-
ward section C
of the head re-
straint until you reach the desired
position.
�)
To raise it, pull upwards.
�)
To lower it, press on the control D
to unlock it, and simultaneously
on the head restraint itself.
�)
To remove it, press on the
control D
to unlock it, then pull it
upwards.
Page 64 of 316
III
62
COMFORT
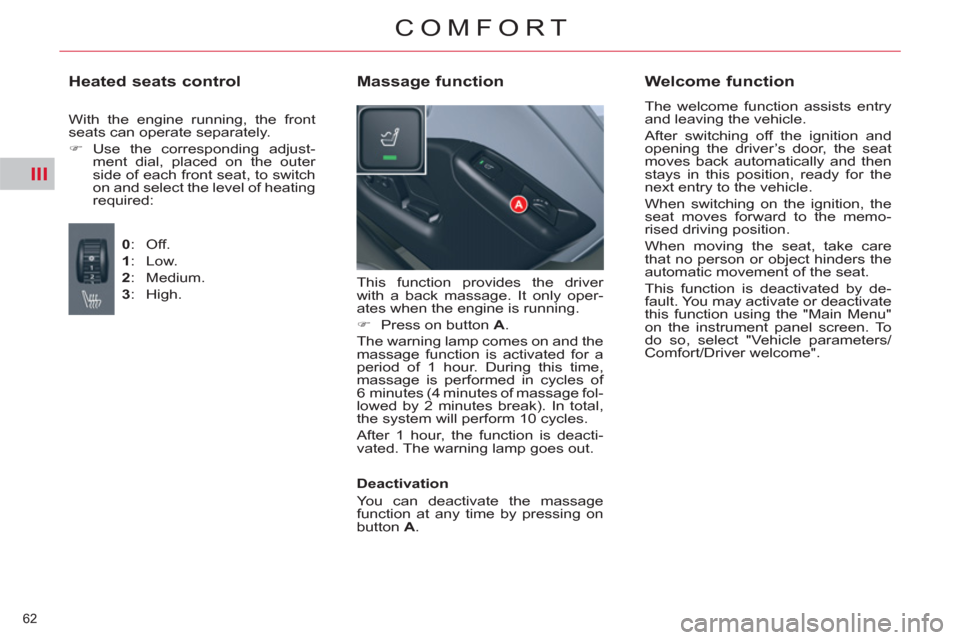
This function provides the driver
with a back massage. It only oper-
ates when the engine is running.
�)
Press on button A
.
The warning lamp comes on and the
massage function is activated for a
period of 1 hour. During this time,
massage is performed in cycles of
6 minutes (4 minutes of massage fol-
lowed by 2 minutes break). In total,
the system will perform 10 cycles.
After 1 hour, the function is deacti-
vated. The warning lamp goes out.
Massage function
Welcome function
The welcome function assists entry
and leaving the vehicle.
After switching off the ignition and
opening the driver’s door, the seat
moves back automatically and then
stays in this position, ready for the
next entry to the vehicle.
When switching on the ignition, the
seat moves forward to the memo-
rised driving position.
When moving the seat, take care
that no person or object hinders the
automatic movement of the seat.
This function is deactivated by de-
fault. You may activate or deactivate
this function using the "Main Menu"
on the instrument panel screen. To
do so, select "Vehicle parameters/
Comfort/Driver welcome".
Deactivation
You can deactivate the massage
function at any time by pressing on
button A
.
Heated seats control
With the engine running, the front
seats can operate separately.
�)
Use the corresponding adjust-
ment dial, placed on the outer
side of each front seat, to switch
on and select the level of heating
required:
0
: Off.
1
: Low.
2
: Medium.
3
: High.
Page 65 of 316
III
63
COMFORT
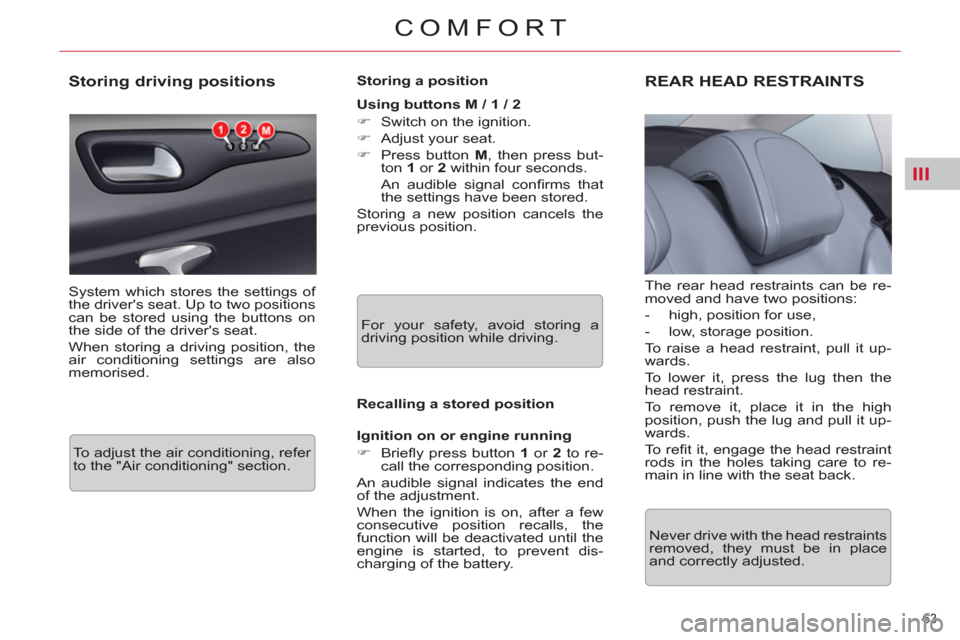
Storing driving positions
System which stores the settings of
the driver's seat. Up to two positions
can be stored using the buttons on
the side of the driver's seat.
When storing a driving position, the
air conditioning settings are also
memorised.
Storing a position
Using buttons M / 1 / 2
�)
Switch on the ignition.
�)
Adjust your seat.
�)
Press button M
, then press but-
ton 1
or 2
within four seconds.
An audible signal confi rms that
the settings have been stored.
Storing a new position cancels the
previous position.
Recalling a stored position
Ignition on or engine running
�)
Briefl y press button 1
or 2
to re-
call the corresponding position.
An audible signal indicates the end
of the adjustment.
When the ignition is on, after a few
consecutive position recalls, the
function will be deactivated until the
engine is started, to prevent dis-
charging of the battery.
For your safety, avoid storing a
driving position while driving.
REAR HEAD RESTRAINTS
The rear head restraints can be re-
moved and have two positions:
- high, position for use,
- low, storage position.
To raise a head restraint, pull it up-
wards.
To lower it, press the lug then the
head restraint.
To remove it, place it in the high
position, push the lug and pull it up-
wards.
To r efi t it, engage the head restraint
rods in the holes taking care to re-
main in line with the seat back.
Never drive with the head restraints
removed, they must be in place
and correctly adjusted. To adjust the air conditioning, refer
to the "Air conditioning" section.
Page 67 of 316
III
65
COMFORT
MIRRORS
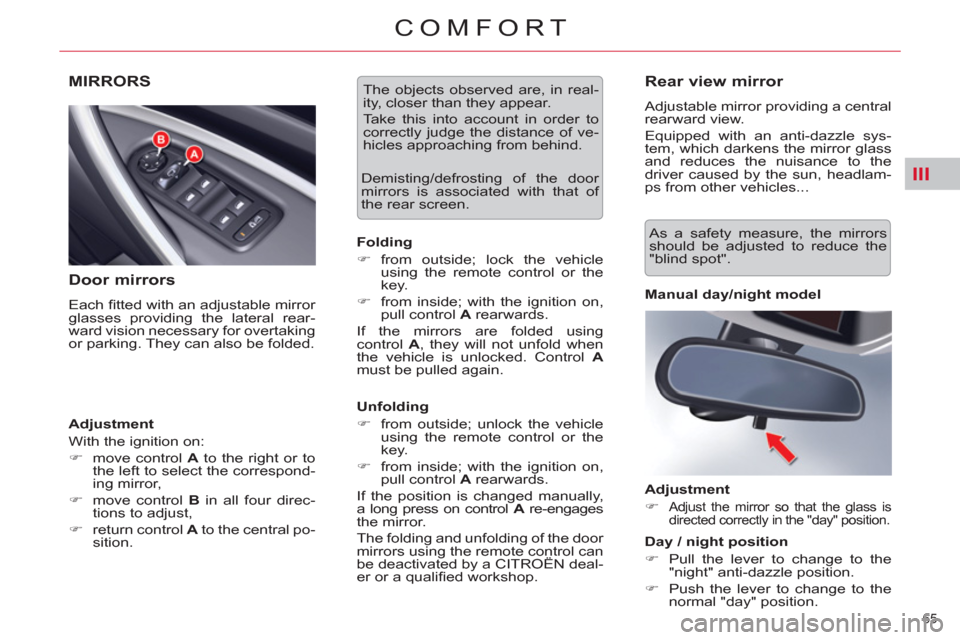
Door mirrors
Each fi tted with an adjustable mirror
glasses providing the lateral rear-
ward vision necessary for overtaking
or parking. They can also be folded.
Adjustment
With the ignition on:
�)
move control A
to the right or to
the left to select the correspond-
ing mirror,
�)
move control B
in all four direc-
tions to adjust,
�)
return control A
to the central po-
sition. Demisting/defrosting of the door
mirrors is associated with that of
the rear screen.
Folding
�)
from outside; lock the vehicle
using the remote control or the
key.
�)
from inside; with the ignition on,
pull control A
rearwards.
If the mirrors are folded using
control A
, they will not unfold when
the vehicle is unlocked. Control A
must be pulled again.
Unfolding
�)
from outside; unlock the vehicle
using the remote control or the
key.
�)
from inside; with the ignition on,
pull control A
rearwards.
If the position is changed manually,
a long press on control A
re-engages
the mirror.
The folding and unfolding of the door
mirrors using the remote control can
be deactivated by a CITROËN deal-
er or a qualifi ed workshop.
The objects observed are, in real-
ity, closer than they appear.
Take this into account in order to
correctly judge the distance of ve-
hicles approaching from behind.
Rear view mirror
Adjustable mirror providing a central
rearward view.
Equipped with an anti-dazzle sys-
tem, which darkens the mirror glass
and reduces the nuisance to the
driver caused by the sun, headlam-
ps from other vehicles...
Manual day/night model
Adjustment
�)
Adjust the mirror so that the glass is
directed correctly in the "day" position.
Day / night position
�)
Pull the lever to change to the
"night" anti-dazzle position.
�)
Push the lever to change to the
normal "day" position.
As a safety measure, the mirrors
should be adjusted to reduce the
"blind spot".