Citroen C5 2012 (RD/TD) / 2.G Repair Manual
Manufacturer: CITROEN, Model Year: 2012, Model line: C5, Model: Citroen C5 2012 (RD/TD) / 2.GPages: 316, PDF Size: 9.75 MB
Page 61 of 316
III
!
59
COMFORT
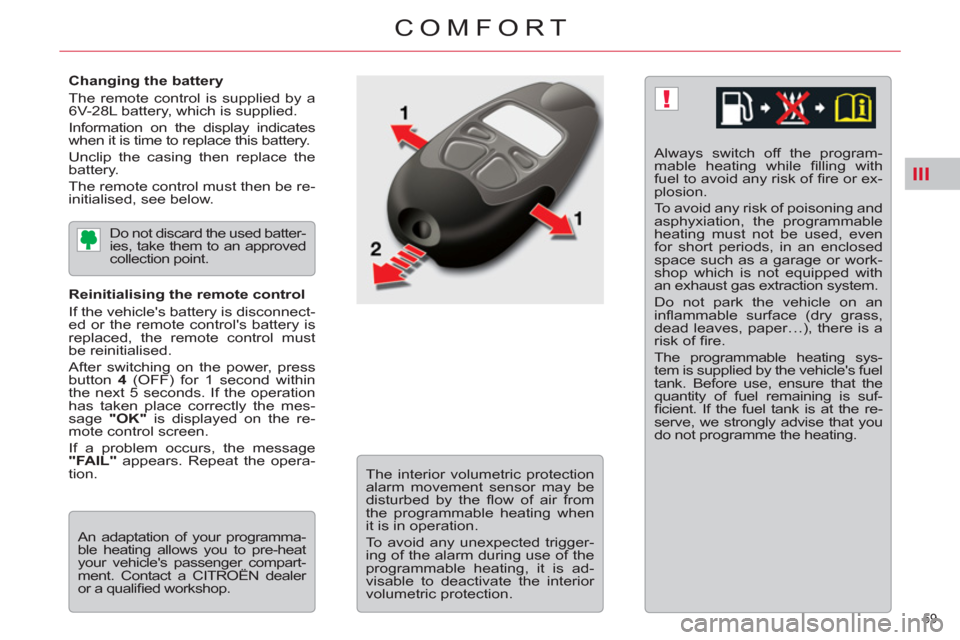
Changing the battery
The remote control is supplied by a
6V-28L battery, which is supplied.
Information on the display indicates
when it is time to replace this battery.
Unclip the casing then replace the
battery.
The remote control must then be re-
initialised, see below.
Always switch off the program-
mable heating while fi lling with
fuel to avoid any risk of fi re or ex-
plosion.
To avoid any risk of poisoning and
asphyxiation, the programmable
heating must not be used, even
for short periods, in an enclosed
space such as a garage or work-
shop which is not equipped with
an exhaust gas extraction system.
Do not park the vehicle on an
infl ammable surface (dry grass,
dead leaves, paper…), there is a
risk of fi re.
The programmable heating sys-
tem is supplied by the vehicle's fuel
tank. Before use, ensure that the
quantity of fuel remaining is suf-
fi cient. If the fuel tank is at the re-
serve, we strongly advise that you
do not programme the heating.
Do not discard the used batter-
ies, take them to an approved
collection point.
Reinitialising the remote control
If the vehicle's battery is disconnect-
ed or the remote control's battery is
replaced, the remote control must
be reinitialised.
After switching on the power, press
button 4
(OFF) for 1 second within
the next 5 seconds. If the operation
has taken place correctly the mes-
sage "OK"
is displayed on the re-
mote control screen.
If a problem occurs, the message
"FAIL"
appears. Repeat the opera-
tion.
An adaptation of your programma-
ble heating allows you to pre-heat
your vehicle's passenger compart-
ment. Contact a CITROËN dealer
or a qualifi ed workshop.
The interior volumetric protection
alarm movement sensor may be
disturbed by the fl ow of air from
the programmable heating when
it is in operation.
To avoid any unexpected trigger-
ing of the alarm during use of the
programmable heating, it is ad-
visable to deactivate the interior
volumetric protection.
Page 62 of 316
III
60
COMFORT
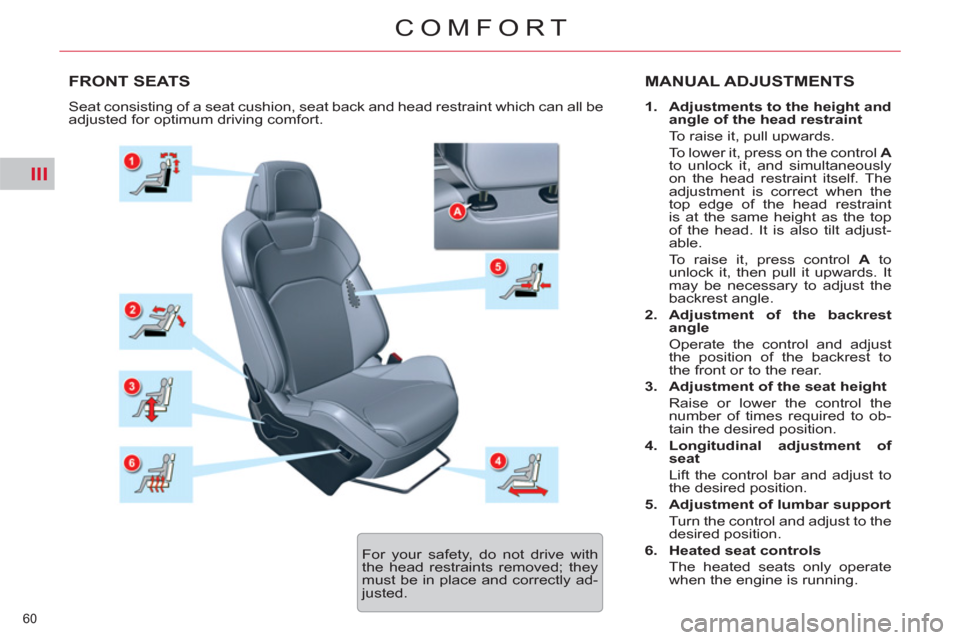
FRONT SEATS MANUAL ADJUSTMENTS
1.
Adjustments to the height and
angle of the head restraint
To raise it, pull upwards.
To lower it, press on the control A
to unlock it, and simultaneously
on the head restraint itself. The
adjustment is correct when the
top edge of the head restraint
is at the same height as the top
of the head. It is also tilt adjust-
able.
To raise it, press control A
to
unlock it, then pull it upwards. It
may be necessary to adjust the
backrest angle.
2.
Adjustment of the backrest
angle
Operate the control and adjust
the position of the backrest to
the front or to the rear.
3.
Adjustment of the seat height
Raise or lower the control the
number of times required to ob-
tain the desired position.
4.
Longitudinal adjustment of
seat
Lift the control bar and adjust to
the desired position.
5.
Adjustment of lumbar support
Turn the control and adjust to the
desired position.
6.
Heated seat controls
The heated seats only operate
when the engine is running. Seat consisting of a seat cushion, seat back and head restraint which can all be
adjusted for optimum driving comfort.
For your safety, do not drive with
the head restraints removed; they
must be in place and correctly ad-
justed.
Page 63 of 316
III
61
COMFORT
FRONT SEATS
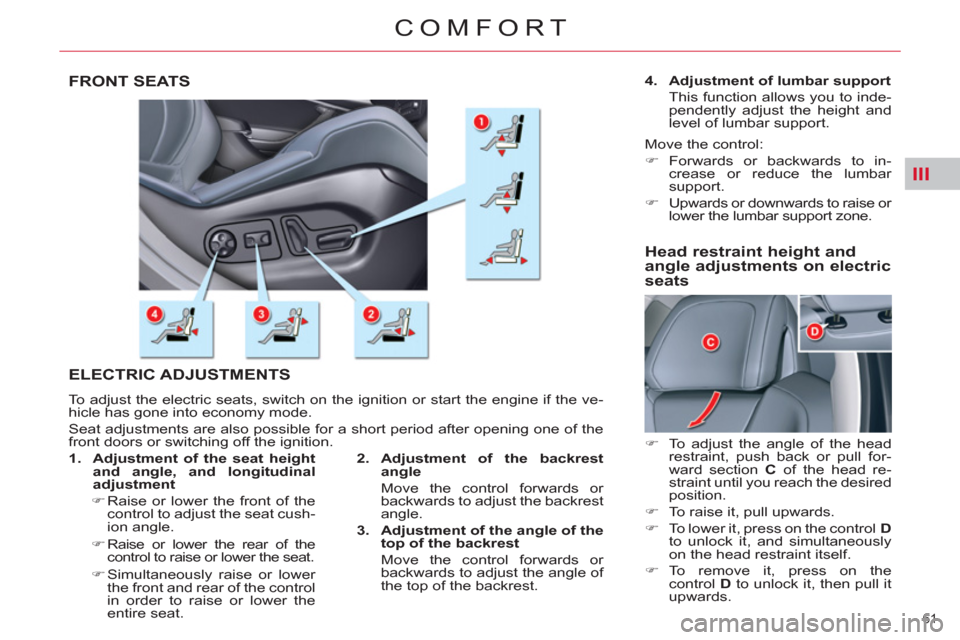
ELECTRIC ADJUSTMENTS
To adjust the electric seats, switch on the ignition or start the engine if the ve-
hicle has gone into economy mode.
Seat adjustments are also possible for a short period after opening one of the
front doors or switching off the ignition.
2.
Adjustment of the backrest
angle
Move the control forwards or
backwards to adjust the backrest
angle.
3.
Adjustment of the angle of the
top of the backrest
Move the control forwards or
backwards to adjust the angle of
the top of the backrest.
1.
Adjustment of the seat height
and angle, and longitudinal
adjustment
�)
Raise or lower the front of the
control to adjust the seat cush-
ion angle.
�)
Raise or lower the rear of the
control to raise or lower the seat.
�)
Simultaneously raise or lower
the front and rear of the control
in order to raise or lower the
entire seat.
4.
Adjustment of lumbar support
This function allows you to inde-
pendently adjust the height and
level of lumbar support.
Move the control:
�)
Forwards or backwards to in-
crease or reduce the lumbar
support.
�)
Upwards or downwards to raise or
lower the lumbar support zone.
Head restraint height and
angle adjustments on electric
seats
�)
To adjust the angle of the head
restraint, push back or pull for-
ward section C
of the head re-
straint until you reach the desired
position.
�)
To raise it, pull upwards.
�)
To lower it, press on the control D
to unlock it, and simultaneously
on the head restraint itself.
�)
To remove it, press on the
control D
to unlock it, then pull it
upwards.
Page 64 of 316
III
62
COMFORT
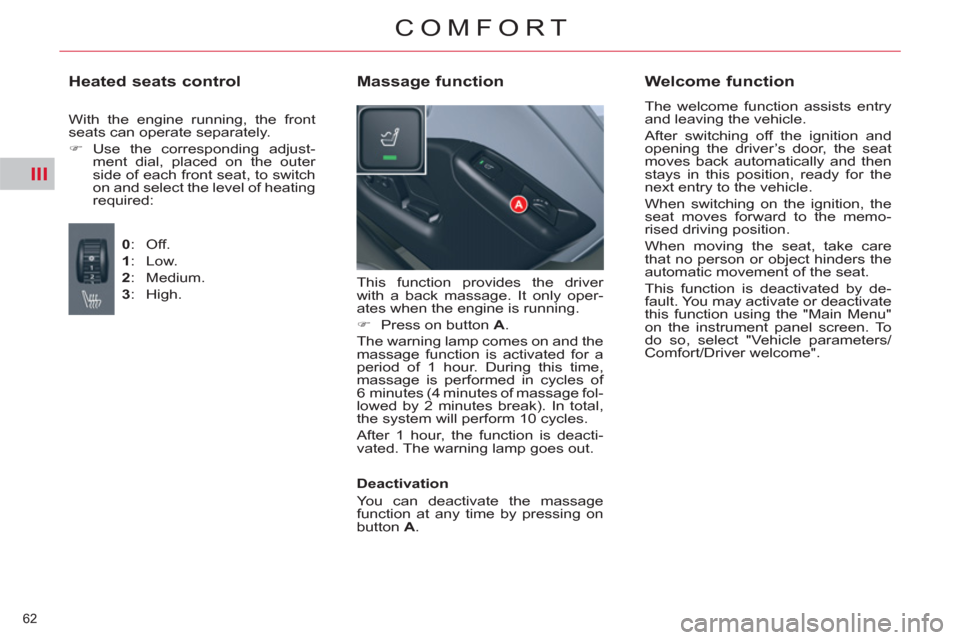
This function provides the driver
with a back massage. It only oper-
ates when the engine is running.
�)
Press on button A
.
The warning lamp comes on and the
massage function is activated for a
period of 1 hour. During this time,
massage is performed in cycles of
6 minutes (4 minutes of massage fol-
lowed by 2 minutes break). In total,
the system will perform 10 cycles.
After 1 hour, the function is deacti-
vated. The warning lamp goes out.
Massage function
Welcome function
The welcome function assists entry
and leaving the vehicle.
After switching off the ignition and
opening the driver’s door, the seat
moves back automatically and then
stays in this position, ready for the
next entry to the vehicle.
When switching on the ignition, the
seat moves forward to the memo-
rised driving position.
When moving the seat, take care
that no person or object hinders the
automatic movement of the seat.
This function is deactivated by de-
fault. You may activate or deactivate
this function using the "Main Menu"
on the instrument panel screen. To
do so, select "Vehicle parameters/
Comfort/Driver welcome".
Deactivation
You can deactivate the massage
function at any time by pressing on
button A
.
Heated seats control
With the engine running, the front
seats can operate separately.
�)
Use the corresponding adjust-
ment dial, placed on the outer
side of each front seat, to switch
on and select the level of heating
required:
0
: Off.
1
: Low.
2
: Medium.
3
: High.
Page 65 of 316
III
63
COMFORT
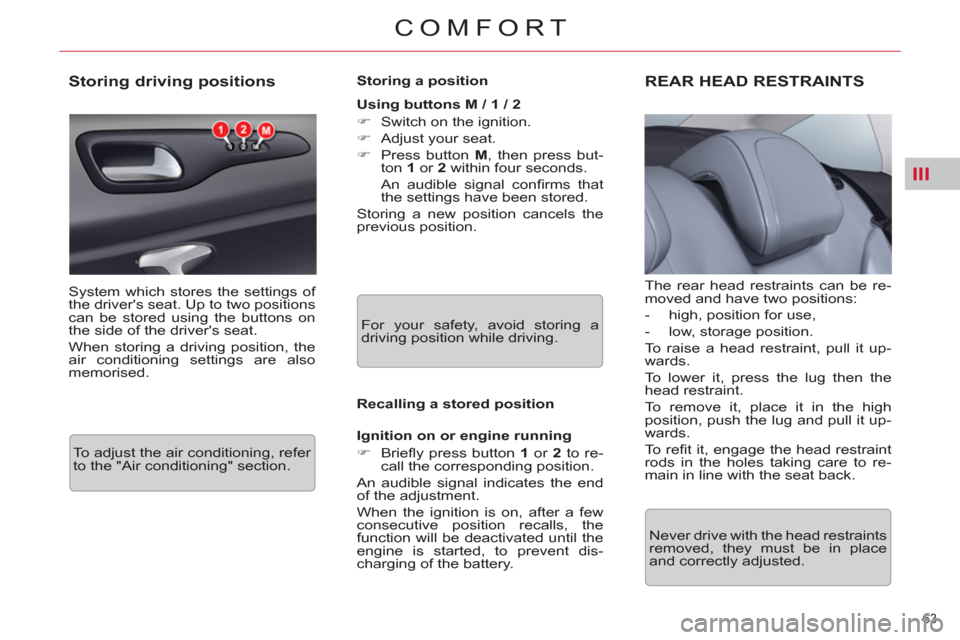
Storing driving positions
System which stores the settings of
the driver's seat. Up to two positions
can be stored using the buttons on
the side of the driver's seat.
When storing a driving position, the
air conditioning settings are also
memorised.
Storing a position
Using buttons M / 1 / 2
�)
Switch on the ignition.
�)
Adjust your seat.
�)
Press button M
, then press but-
ton 1
or 2
within four seconds.
An audible signal confi rms that
the settings have been stored.
Storing a new position cancels the
previous position.
Recalling a stored position
Ignition on or engine running
�)
Briefl y press button 1
or 2
to re-
call the corresponding position.
An audible signal indicates the end
of the adjustment.
When the ignition is on, after a few
consecutive position recalls, the
function will be deactivated until the
engine is started, to prevent dis-
charging of the battery.
For your safety, avoid storing a
driving position while driving.
REAR HEAD RESTRAINTS
The rear head restraints can be re-
moved and have two positions:
- high, position for use,
- low, storage position.
To raise a head restraint, pull it up-
wards.
To lower it, press the lug then the
head restraint.
To remove it, place it in the high
position, push the lug and pull it up-
wards.
To r efi t it, engage the head restraint
rods in the holes taking care to re-
main in line with the seat back.
Never drive with the head restraints
removed, they must be in place
and correctly adjusted. To adjust the air conditioning, refer
to the "Air conditioning" section.
Page 66 of 316
III
64
COMFORT
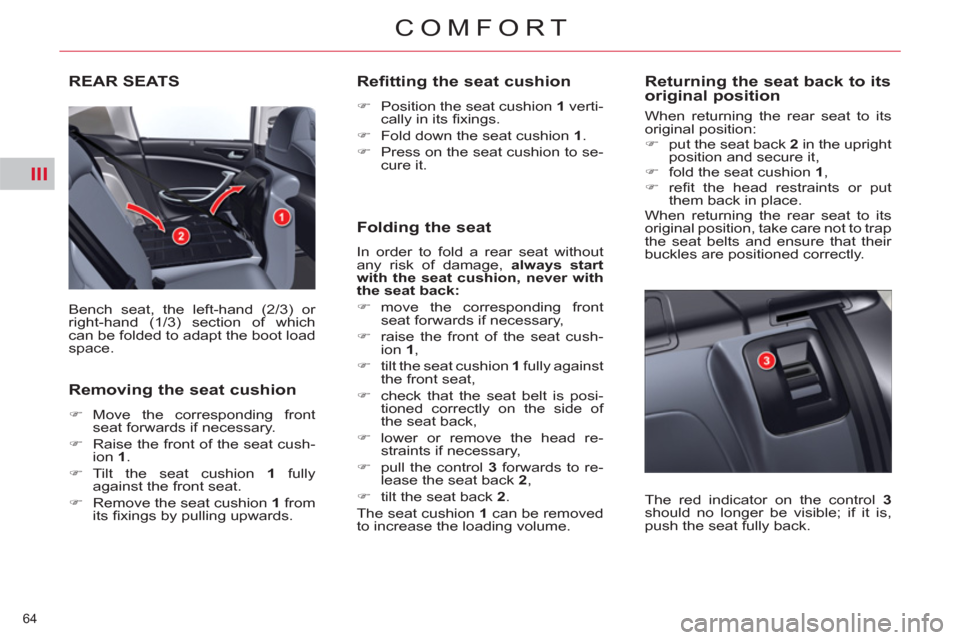
REAR SEATS
Bench seat, the left-hand (2/3) or
right-hand (1/3) section of which
can be folded to adapt the boot load
space.
Removing the seat cushion
�)
Move the corresponding front
seat forwards if necessary.
�)
Raise the front of the seat cush-
ion 1
.
�)
Tilt the seat cushion 1
fully
against the front seat.
�)
Remove the seat cushion 1
from
its fi xings by pulling upwards.
Refitting the seat cushion
�)
Position the seat cushion 1
verti-
cally in its fi xings.
�)
Fold down the seat cushion 1
.
�)
Press on the seat cushion to se-
cure it.
Folding the seat
In order to fold a rear seat without
any risk of damage, always start
with the seat cushion,
never with
the seat back:
�)
move the corresponding front
seat forwards if necessary,
�)
raise the front of the seat cush-
ion 1
,
�)
tilt the seat cushion 1
fully against
the front seat,
�)
check that the seat belt is posi-
tioned correctly on the side of
the seat back,
�)
lower or remove the head re-
straints if necessary,
�)
pull the control 3
forwards to re-
lease the seat back 2
,
�)
tilt the seat back 2
.
The seat cushion 1
can be removed
to increase the loading volume.
Returning the seat back to its
original position
When returning the rear seat to its
original position:
�)
put the seat back 2
in the upright
position and secure it,
�)
fold the seat cushion 1
,
�)
refi t the head restraints or put
them back in place.
When returning the rear seat to its
original position, take care not to trap
the seat belts and ensure that their
buckles are positioned correctly.
The red indicator on the control 3
should no longer be visible; if it is,
push the seat fully back.
Page 67 of 316
III
65
COMFORT
MIRRORS
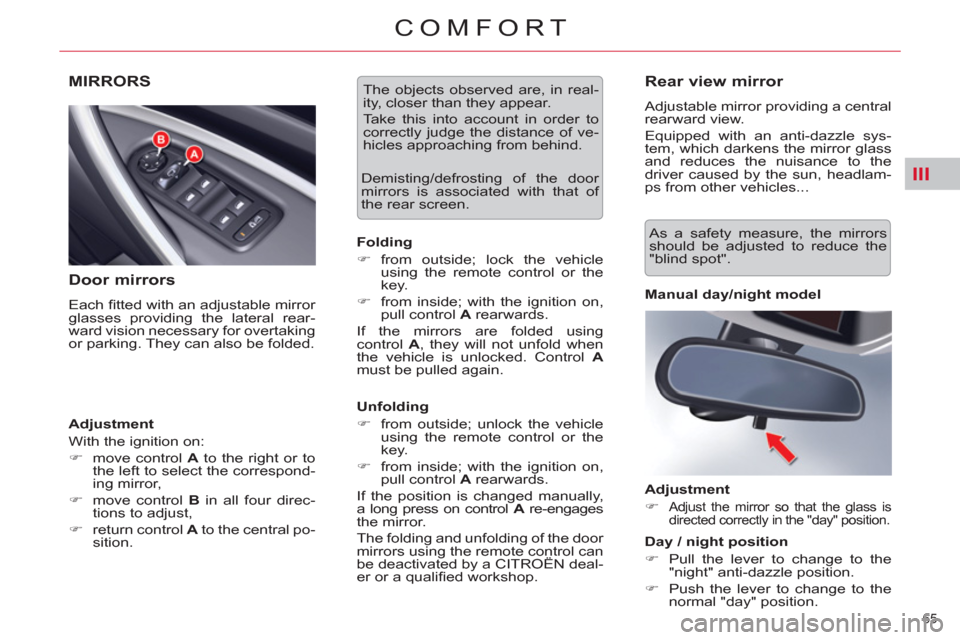
Door mirrors
Each fi tted with an adjustable mirror
glasses providing the lateral rear-
ward vision necessary for overtaking
or parking. They can also be folded.
Adjustment
With the ignition on:
�)
move control A
to the right or to
the left to select the correspond-
ing mirror,
�)
move control B
in all four direc-
tions to adjust,
�)
return control A
to the central po-
sition. Demisting/defrosting of the door
mirrors is associated with that of
the rear screen.
Folding
�)
from outside; lock the vehicle
using the remote control or the
key.
�)
from inside; with the ignition on,
pull control A
rearwards.
If the mirrors are folded using
control A
, they will not unfold when
the vehicle is unlocked. Control A
must be pulled again.
Unfolding
�)
from outside; unlock the vehicle
using the remote control or the
key.
�)
from inside; with the ignition on,
pull control A
rearwards.
If the position is changed manually,
a long press on control A
re-engages
the mirror.
The folding and unfolding of the door
mirrors using the remote control can
be deactivated by a CITROËN deal-
er or a qualifi ed workshop.
The objects observed are, in real-
ity, closer than they appear.
Take this into account in order to
correctly judge the distance of ve-
hicles approaching from behind.
Rear view mirror
Adjustable mirror providing a central
rearward view.
Equipped with an anti-dazzle sys-
tem, which darkens the mirror glass
and reduces the nuisance to the
driver caused by the sun, headlam-
ps from other vehicles...
Manual day/night model
Adjustment
�)
Adjust the mirror so that the glass is
directed correctly in the "day" position.
Day / night position
�)
Pull the lever to change to the
"night" anti-dazzle position.
�)
Push the lever to change to the
normal "day" position.
As a safety measure, the mirrors
should be adjusted to reduce the
"blind spot".
Page 68 of 316
III
66
COMFORT
As a safety precaution, these ope-
rations must only be carried out
while the vehicle is stationary.
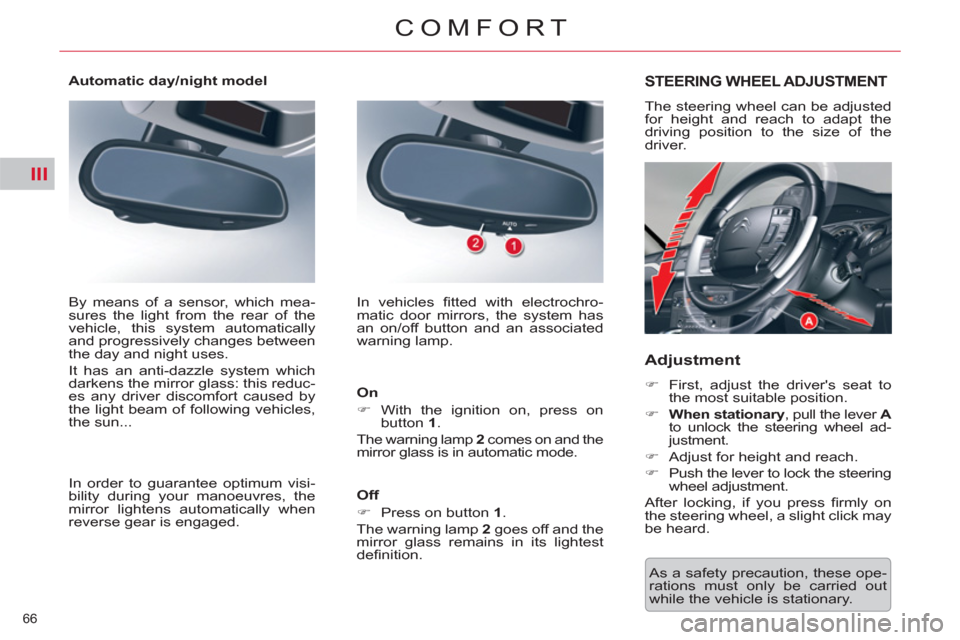
STEERING WHEEL ADJUSTMENT
The steering wheel can be adjusted
for height and reach to adapt the
driving position to the size of the
driver.
Adjustment
�)
First, adjust the driver's seat to
the most suitable position.
�)
When stationary
, pull the lever A
to unlock the steering wheel ad-
justment.
�)
Adjust for height and reach.
�)
Push the lever to lock the steering
wheel adjustment.
After locking, if you press fi rmly on
the steering wheel, a slight click may
be heard.
Automatic day/night model
In order to guarantee optimum visi-
bility during your manoeuvres, the
mirror lightens automatically when
reverse gear is engaged. By means of a sensor, which mea-
sures the light from the rear of the
vehicle, this system automatically
and progressively changes between
the day and night uses.
It has an anti-dazzle system which
darkens the mirror glass: this reduc-
es any driver discomfort caused by
the light beam of following vehicles,
the sun... In vehicles fi tted with electrochro-
matic door mirrors, the system has
an on/off button and an associated
warning lamp.
On
�)
With the ignition on, press on
button 1
.
The warning lamp 2
comes on and the
mirror glass is in automatic mode.
Off
�)
Press on button 1
.
The warning lamp 2
goes off and the
mirror glass remains in its lightest
defi nition.
Page 69 of 316
IV
67
ACCESS
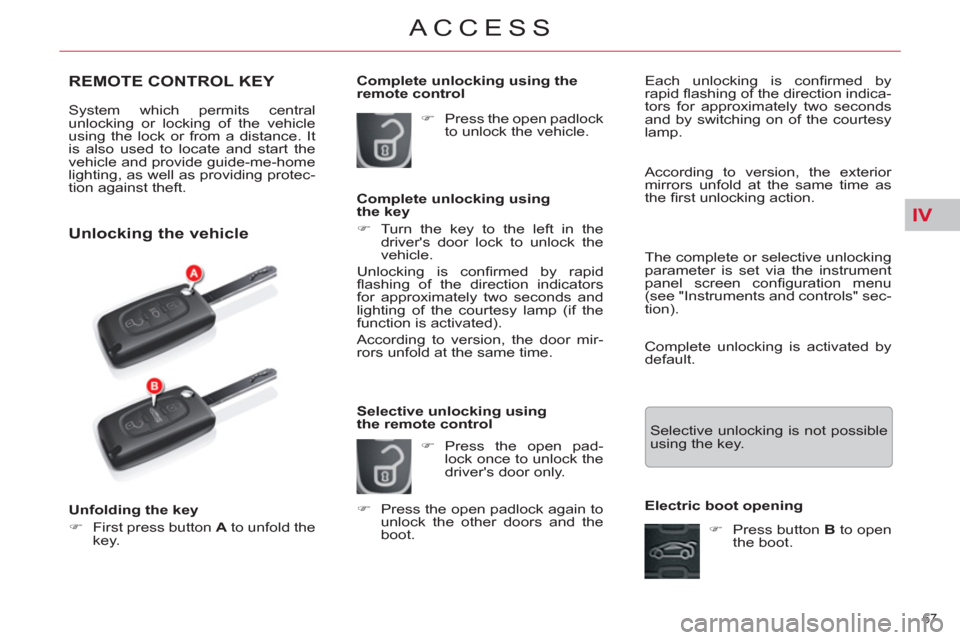
REMOTE CONTROL KEY
System which permits central
unlocking or locking of the vehicle
using the lock or from a distance. It
is also used to locate and start the
vehicle and provide guide-me-home
lighting, as well as providing protec-
tion against theft.
Unlocking the vehicle
Complete unlocking using the
remote control
Unfolding the key
�)
First press button A
to unfold the
key.
�)
Press the open padlock
to unlock the vehicle.
Complete unlocking using
the key
�)
Turn the key to the left in the
driver's door lock to unlock the
vehicle.
Unlocking is confi rmed by rapid
fl ashing of the direction indicators
for approximately two seconds and
lighting of the courtesy lamp (if the
function is activated).
According to version, the door mir-
rors unfold at the same time.
Selective unlocking using
the remote control
�)
Press the open pad-
lock once to unlock the
driver's door only.
�)
Press the open padlock again to
unlock the other doors and the
boot. According to version, the exterior
mirrors unfold at the same time as
the fi rst unlocking action.
The complete or selective unlocking
parameter is set via the instrument
panel screen confi guration menu
(see "Instruments and controls" sec-
tion).
Complete unlocking is activated by
default.
Selective unlocking is not possible
using the key.
Each unlocking is confi rmed by
rapid fl ashing of the direction indica-
tors for approximately two seconds
and by switching on of the courtesy
lamp.
Electric boot opening
�)
Press button B
to open
the boot.
Page 70 of 316
IV
68
ACCESS
Normal locking using the key
�)
Turn the key to the right in the
driver's door lock to lock the ve-
hicle completely.
Locking is confi rmed by fi xed light-
ing of the direction indicators for ap-
proximately two seconds and by the
courtesy lamp going off.
According to version, the door mir-
rors fold at the same time. If one of the doors, the rear screen
or the boot is still open, the central
locking does not take place.
When the vehicle is locked, if it is un-
locked inadvertently, it will lock again
automatically after thirty seconds un-
less a door is opened.
When stationary with the engine
off, locking is confi rmed by fl ashing
of the interior locking control indi-
cator lamp.
The folding and unfolding of the
door mirrors using the remote
control can be deactivated by a
CITROËN dealer or a qualifi ed
workshop.
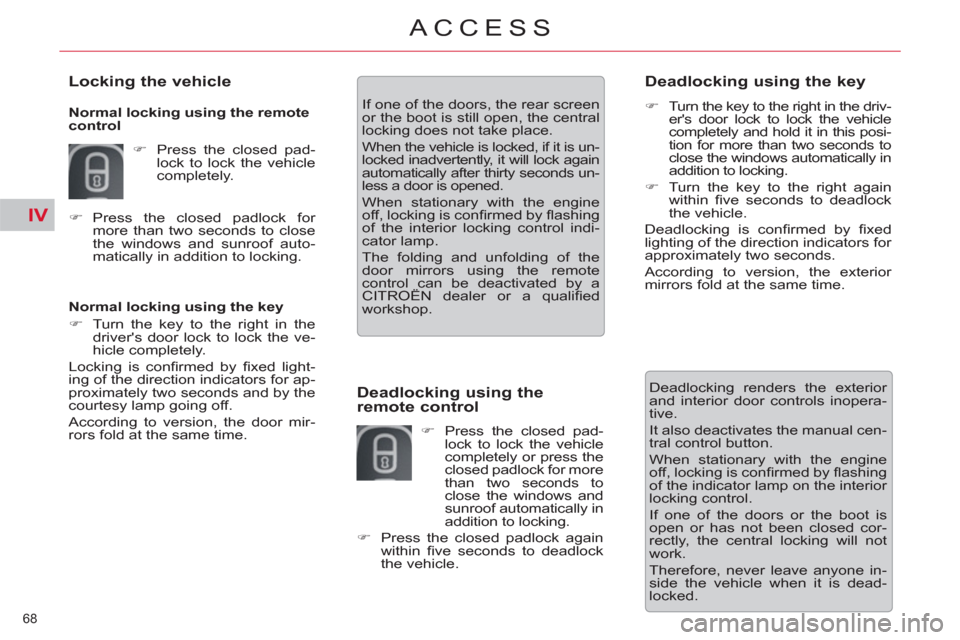
Deadlocking using the
remote control
�)
Press the closed pad-
lock to lock the vehicle
completely or press the
closed padlock for more
than two seconds to
close the windows and
sunroof automatically in
addition to locking.
�)
Press the closed padlock again
within fi ve seconds to deadlock
the vehicle.
Locking the vehicle
Normal locking using the remote
control
�)
Press the closed pad-
lock to lock the vehicle
completely.
�)
Press the closed padlock for
more than two seconds to close
the windows and sunroof auto-
matically in addition to locking.
Deadlocking using the key
�)
Turn the key to the right in the driv-
er's door lock to lock the vehicle
completely and hold it in this posi-
tion for more than two seconds to
close the windows automatically in
addition to locking.
�)
Turn the key to the right again
within fi ve seconds to deadlock
the vehicle.
Deadlocking is confi rmed by fi xed
lighting of the direction indicators for
approximately two seconds.
According to version, the exterior
mirrors fold at the same time.
Deadlocking renders the exterior
and interior door controls inopera-
tive.
It also deactivates the manual cen-
tral control button.
When stationary with the engine
off, locking is confi rmed by fl ashing
of the indicator lamp on the interior
locking control.
If one of the doors or the boot is
open or has not been closed cor-
rectly, the central locking will not
work.
Therefore, never leave anyone in-
side the vehicle when it is dead-
locked.