Citroen C5 2014.5 (RD/TD) / 2.G Owners Manual
Manufacturer: CITROEN, Model Year: 2014.5, Model line: C5, Model: Citroen C5 2014.5 (RD/TD) / 2.GPages: 344, PDF Size: 12.9 MB
Page 91 of 344

89
Rear armrest
Comfort and storage system for the rear passengers.
Cup-holder
The rear cup-holder A is located in the rear
central armrest.
F
L
ower the rear armrest.
F
P
ull for wards to extract the cup-holder.
Storage
F Lift up the upper part of the rear central armrest to access storage space B .
12 V accessory socket
This is located in the rear ashtray.
Max power: 100 W.
3
Ease of use and comfort
Page 92 of 344

90
Side blinds
F Pull on the tab A and position the blind on the hook B .
Rear blind (Saloon)
F Pull on the tab C to unreel the blind,
F
p osition the blind on the hooks D .
Ski flap
A flap in the backrest, located to the rear of the
armrest, facilitates the carrying of long objects.
To o p e n
F Lower the rear armrest.
F
P ull the flap handle down.
F
L
ower the flap.
F
L
oad the objects from inside the boot.
Ensure that the objects are well secured
and that they do not impede the
operation of the gear lever.
Ease of use and comfort
Page 93 of 344

91
Boot fittings (Saloon)
1. Boot floor (spare wheel storage).2. B oot lamp.
3. L ocation for 6 CD changer.
Luggage securing rings
F Use the 4 securing rings on the boot floor to secure your luggage.
For safety reasons in the event of sharp
braking, you are advised to place heavy objects
as far for ward in the boot as possible.
3
Ease of use and comfort
Page 94 of 344

92
Boot fittings (Tourer)
1. Hook
F or shopping bags.
2.
T
o r c h
T
o recharge, return it to its storage
position.
3.
Sto
rage net 1. L
uggage-cover blind
(
see details on following page)
2.
L
uggage securing rings
U
se the 4 stowing rings provided on the
boot floor to secure your loads.
F
or safety reasons in the event of sharp
braking, you are advised to place heavy
objects as far for wards as possible.
3.
Hoo
ks
T
hese allow a cargo net to be fitted (see
details on following page). 1. B
oot lamp
2. 1 2 V accessories socket
(100 W maximum)
C
igarette lighter type 12 volt socket. It is
located on the rear right-hand trim.
3.
L
oading height control
Y
ou can change the height of the vehicle to
make loading or unloading easier.
4.
Hoo
k
F
or shopping bags.
5.
Sto
rage net or closed housing
L
ocation for the 6 CD changer.
Ease of use and comfort
Page 95 of 344

93
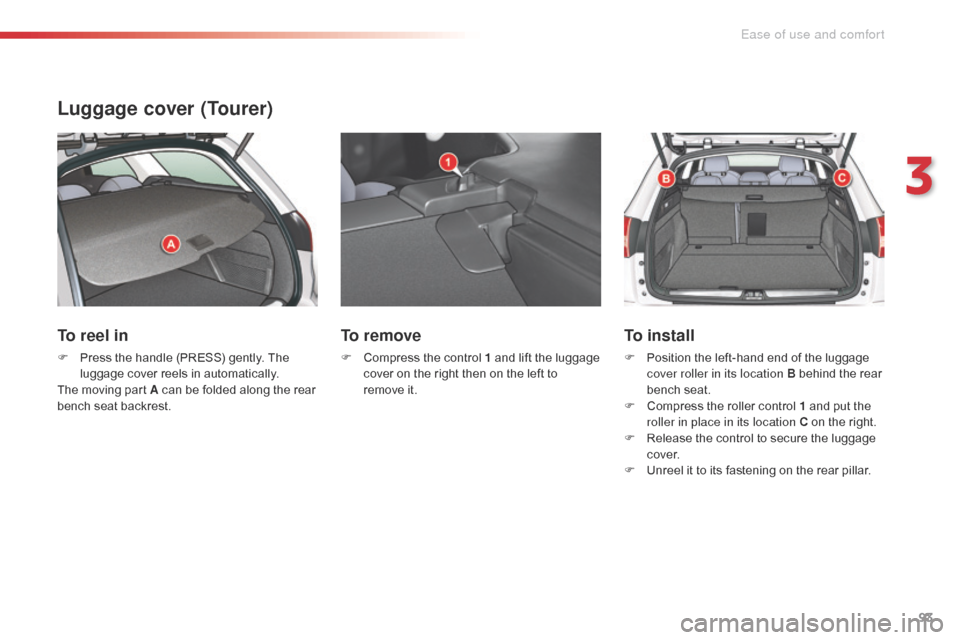
Luggage cover (Tourer)
To reel in
F Press the handle (PRESS) gently. The luggage cover reels in automatically.
The moving part A
can be folded along the rear
bench seat backrest.
To remove
F Compress the control 1 and lift the luggage cover on the right then on the left to
remove it.
To install
F Position the left-hand end of the luggage cover roller in its location B behind the rear
bench seat.
F
C
ompress the roller control 1 and put the
roller in place in its location C on the right.
F
R
elease the control to secure the luggage
c ove r.
F
U
nreel it to its fastening on the rear pillar.
3
Ease of use and comfort
Page 96 of 344

94
High load retaining net
(Tourer)
Hooked onto the special upper and lower
fixings, this permits use of the entire loading
volume up to the roof:
-
b
ehind the rear seats (row 2),
-
b
ehind the front seats (row 1) when the rear
seats are folded.
When positioning the net, check that the strap
loops are visible from the boot; this will make
slackening or tightening easier.
Installation
F fold down the backs of the rear seats,
F p osition the high load retaining net roller
above the two rails 1 located behind
the rear seats (2/3 bench seat). The
two
notches 2 must be placed above the
two rails, F
s lide the two rails 1 into the notches 2 and
push the roller (lengthways) from right to
left to secure it,
F
r
eposition the rear seat backs.
Ease of use and comfort
Page 97 of 344

95
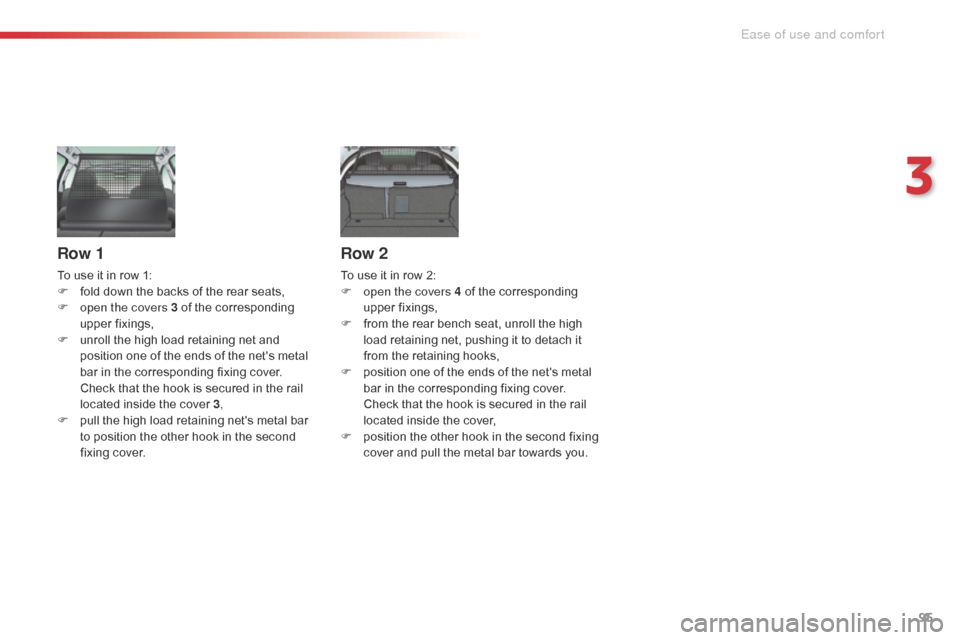
Row 1
To use it in row 1:
F f old down the backs of the rear seats,
F
o
pen the covers 3 of the corresponding
upper fixings,
F
u
nroll the high load retaining net and
position one of the ends of the net's metal
bar in the corresponding fixing cover.
Check that the hook is secured in the rail
located inside the cover 3 ,
F
p
ull the high load retaining net's metal bar
to position the other hook in the second
fixing cover.
Row 2
To use it in row 2:
F o pen the covers 4 of the corresponding
upper fixings,
F
f
rom the rear bench seat, unroll the high
load retaining net, pushing it to detach it
from the retaining hooks,
F
p
osition one of the ends of the net's metal
bar in the corresponding fixing cover.
Check that the hook is secured in the rail
located inside the cover,
F
p
osition the other hook in the second fixing
cover and pull the metal bar towards you.
3
Ease of use and comfort
Page 98 of 344

96
A few driving recommendations
Driving on flooded roads
We strongly advise against driving on flooded
roads, as this could cause serious damage
to the engine or gearbox, as well as to the
electrical systems of your vehicle. Observe the driving regulations at all times and
remain vigilant whatever the traffic conditions.
Pay close attention to the traffic and keep your
hands on the wheel so that you are ready to
react at any time to any eventuality.
On a long journey, a break every two hours is
strongly recommended.
In difficult weather, drive smoothly, anticipate
the need to brake and increase the distance
from other vehicles.
Important!
Never drive with the parking brake
applied - Risk of overheating and
damage to the braking system!
Do not park or run the engine when
stationary in areas where inflammable
substances and materials (dry grass,
dead leaves...) might come into contact
with the hot exhaust system - Risk of
fire!
Never leave a vehicle unsupervised
with the engine running. If you have
to leave your vehicle with the engine
running, apply the parking brake
and put the gearbox into neutral or
position
N or P, depending on the type
of gearbox.
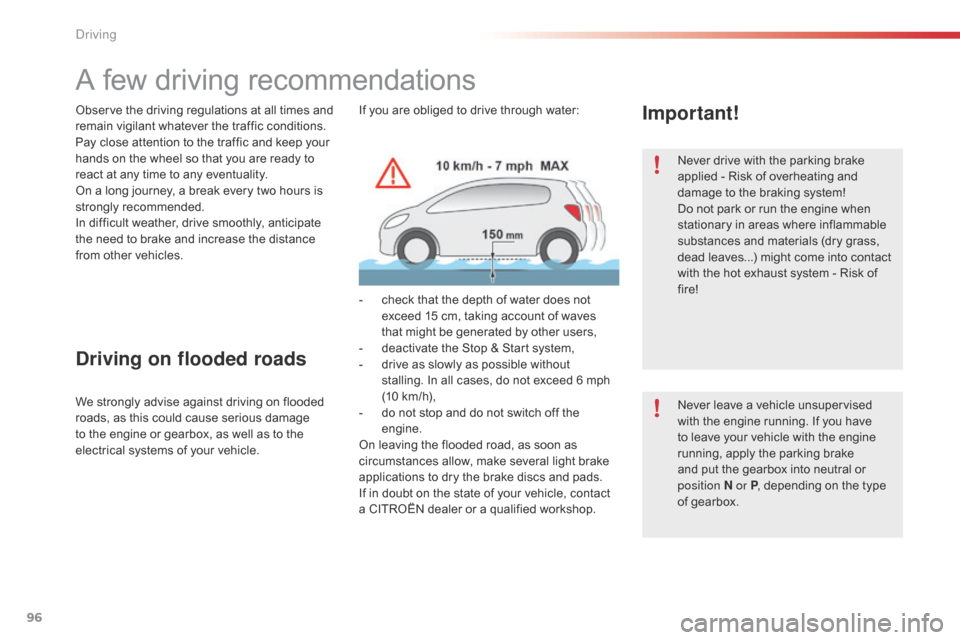
If you are obliged to drive through water:
-
c
heck that the depth of water does not
exceed 15 cm, taking account of waves
that might be generated by other users,
-
d
eactivate the Stop & Start system,
-
d
rive as slowly as possible without
stalling. In all cases, do not exceed 6 mph
(10
km/h),
-
d
o not stop and do not switch off the
engine.
On leaving the flooded road, as soon as
circumstances allow, make several light brake
applications to dry the brake discs and pads.
If in doubt on the state of your vehicle, contact
a CITROËN dealer or a qualified workshop.
Driving
Page 99 of 344

97
Anti-theft protection
Electronic engine immobiliser
The key contains an electronic chip which has
a special code. When the ignition is switched
on, this code must be recognised in order for
starting to be possible.In the event of a fault, you are
informed by illumination of this
warning lamp, an audible signal and
a message in the screen.
In this case, your vehicle will not start; contact
a CITROËN dealer as soon as possible.
Starting-switching off the engine
Keep safely, away from your vehicle,
the label attached to the keys given to
you on acquisition of the vehicle.
Ignition switch
It has 3 positions:
- p osition 1 (Stop) : insert and removing
the
key,
-
p
osition 2 (Ignition on) : steering column
unlocked, ignition on, Diesel preheating,
engine running,
-
p
osition 3 (Starting) .
Ignition on position
It allows the use of the vehicle's electric
equipment or portable devices to be charged.
Avoid attaching heavy objects to the
key, which would weigh down on its
blade in the ignition switch and could
cause a malfunction.
This electronic engine immobiliser locks the
engine management system a few minutes
after the ignition is switched off and prevents
starting of the engine by anyone who does not
have the key.
Once the state of charge of the battery drops
to the reserve level, the system switches to
energy economy mode: the power supply is
cut off automatically to preserve the remaining
battery charge.
4
Driving
Page 100 of 344

98
Starting the engine
Wait until this warning lamp goes off in the
instrument panel then operate the starter
motor by turning the key to position 3
without pressing the accelerator pedal,
until the engine starts. Once the engine is
running, release the key.
With the parking brake applied and the gearbox
in neutral or position N or P:
F
d
epress the clutch pedal fully (manual
gearbox),
or
F
p
ress the brake pedal firmly (electronic or
automatic gearbox),
F
i
nsert the key into the ignition switch; the
system recognises the code,
F
u
nlock the steering column by simultaneously
turning the steering and the key.
F
W
ith a petrol engine, operate the starter
motor by turning the key to position 3
without pressing the accelerator pedal,
until the engine starts. Once the engine is
running, release the key. Never leave the engine running in
an enclosed area without adequate
ventilation: internal combustion
engines emit toxic exhaust gases,
such as carbon monoxide. Danger of
intoxication and death.
In very severe wintry conditions
(temperatures below -23°C), to ensure
the correct operation and durability of
the mechanical components of your
vehicle, engine and gearbox, it is
necessary to leave the engine running
for 4 minutes before moving off.
In wintry conditions, the warning lamp
can stay on for a longer period. When
the engine is hot, the warning lamp
does not come on.
In certain cases, you may have to apply
more force to the steering (wheels on
full lock, for example). F
W ith a Diesel engine, turn the key to
position 2 , ignition on, to operate the
engine pre-heating system.
If the engine does not start straight
away, switch off the ignition. Wait a
few moments before operating the
starter motor again. If the engine does
not start after several attempts, do not
keep trying: you risk damaging the
starter motor or the engine. Contact
a CITROËN dealer or a qualified
workshop. In temperate conditions, do not leave
the engine at idle to warm up but move
off straight away and drive at moderate
speed.
Driving