Citroen C5 2015 (RD/TD) / 2.G Owner's Manual
Manufacturer: CITROEN, Model Year: 2015, Model line: C5, Model: Citroen C5 2015 (RD/TD) / 2.GPages: 344, PDF Size: 12.95 MB
Page 181 of 344

179
C5_en_Chap07_securite-enfant_ed01-2014
Some also have an upper strap which is
attached to the ring B or C .
To attach the child seat to the TOP TETHER:
-
r
emove and stow the head restraint before
installing a child seat on this seat (refit it
once the child seat has been removed),
-
p
ass the strap of the child seat centrally
between the head restraint rod apertures,
-
r
aise the TOP TETHER cover, located on
the rear shelf (Saloon) or the roof (Tourer),
-
s
ecure the upper strap fixing to the ring B
or C ,
-
t
ighten the upper strap.
The TOP TETHER is used to secure the
upper strap of child seats that have one. This
arrangement limits the for ward tipping of the
child seat in the event of a front impact.
For information on the possibilities for installing
ISOFIX child seats in your vehicle, refer to the
summary table.The incorrect installation of a child seat
in a vehicle compromises the child's
protection in the event of an accident.
Observe strictly the fitting instructions
provided with the child seat.
This ISOFIX mounting system provides fast,
reliable and safe fitting of the child seat in
your
vehicle.
The ISOFIX child seats are fitted with two
latches which are secured easily on the two
rings A, following installation of the guides
(supplied with the seat).
7
Child safety
Page 182 of 344

180
C5_en_Chap07_securite-enfant_ed01-2014
ISOFIX child seat recommended by CITROËN and type
approved for your vehicle
RÖMER BabySafe Plus ISOFIX (size category E)
Group 0+: up to 13 kg
Installed in the rear ward facing position using an ISOFIX base which is attached to the rings A .
The base has a support leg, adjustable for height, that must be in contact with the floor of the vehicle.
This child seat can also be secured using a seat belt. In this case, only the shell is used and is attached to the vehicle seat using the three-point sea belt.
RÖMER Duo Plus ISOFIX (size category B1 )
Group 1: from 9 to 18 kg
Installed in the for ward facing position.
Fitted with an upper strap to be secured to the upper ring B or C ,
referred to as the TOP TETHER.
Three seat body angles: sitting, reclining, lying.
This child seat can also be used on seats which are not fitted with ISOFIX mountings. In this case, it must be attached to the vehicle seat using the three-point seat belt.
Follow the instructions for fitting the child seat given in the seat manufacturer's installation guide.
Child safety
Page 183 of 344

181
C5_en_Chap07_securite-enfant_ed01-2014
Positions for fitting ISOFIX child seats
I UF: Seat position suitable for installation of an I sofix Universal " For ward facing" seat attached
using the top tether.
IL- SU: Seat position suitable for installation of an I S
oFI
X Semi- Universal child seat, either:
-
r
ear ward facing fitted with an upper strap or a support leg
-
f
or ward facing fitted with a support leg,
-
a s
hell fitted with an upper strap or a support leg.
To attach the upper strap, refer to the "ISOFIX mountings" section. Weight of child/
Age given as a guide
Up to 10 kg (group 0)
Up to approx. 6 months Up to 10 kg
(group 0)
Up to 13 kg (group 0+)
Up to approx. 1 year 9 to 18 kg (group 1)
Approx. 1 to 3 years
Type of ISOFIX child seat Shellrearward facing rearward facing forward facing
ISOFIX size class F G C D E C D A B B1
ISOFIX universal and semi-universal
child seats can be installed on the outer
rear seats IL- SU
* IL- SU IL- SUIUF/IL- SU
*
T
he ISOFIX shell, fixed to the lower rings of
an ISOFIX seat, occupies two rear seats.
In conformity with European law, this table shows you the possibilities for the installation of ISOFIX child seats to seats in the vehicle fitted with ISOFIX
mounting points.
For ISOFIX universal and semi-universal child seats, the ISOFIX size class, defined by a letter from A to G
, is shown on the child seat to the right of the
ISOFIX logo.
Remove and stow the head restraint
before installing a child seat with a
backrest on a passenger seat. Refit the
head restraint once the child seat has
been removed.
7
Child safety
Page 184 of 344

182
C5_en_Chap07_securite-enfant_ed01-2014
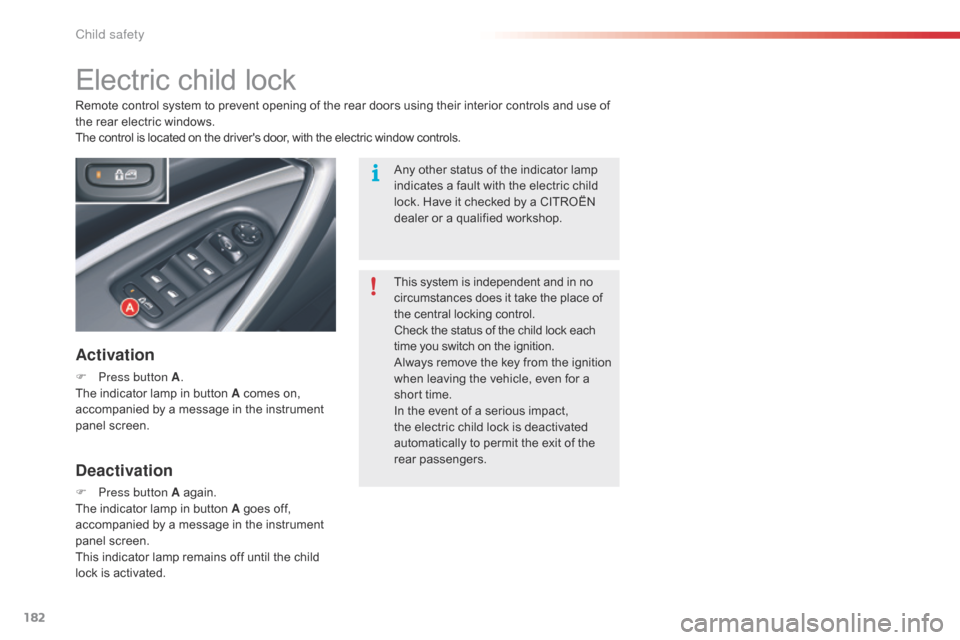
Electric child lock
Activation
F Press button A.
The indicator lamp in button A comes on,
accompanied by a message in the instrument
panel screen. Remote control system to prevent opening of the rear doors using their interior controls and use of
the rear electric windows.
The control is located on the driver's door, with the electric window controls.
Deactivation
F Press button A again.
The indicator lamp in button A goes off,
accompanied by a message in the instrument
panel screen.
This indicator lamp remains off until the child
lock is activated. This system is independent and in no
circumstances does it take the place of
the central locking control.
Check the status of the child lock each
time you switch on the ignition.
Always remove the key from the ignition
when leaving the vehicle, even for a
short time.
In the event of a serious impact,
the electric child lock is deactivated
automatically to permit the exit of the
rear passengers. Any other status of the indicator lamp
indicates a fault with the electric child
lock. Have it checked by a CITROËN
dealer or a qualified workshop.
Child safety
Page 185 of 344

183
C5_en_Chap08_information_ed01-2014
Fuel tank
Capacity of the tank: approximately 71 litres*.
Low fuel level
When the minimum level
in the tank is reached, this
warning lamp comes on in the
instrument panel, accompanied
by an audible warning and a message in the
multifunction screen. When it first comes on,
there remains around 5 litres of fuel in the tank.
You must refuel to avoid running out of fuel.
F
P
ress at the top left corner, then pull on its
edge. F
t
urn the key a quarter turn to lock and
unlock the filler cap,
F
w
hen refuelling, place the cap on hook A,
F
f
ill the tank, but do not persist after the
third cut-off ; this could cause your vehicle
to malfunction.
While you are refuelling, the engine must be
stopped and the ignition switched off.
For a petrol engine with a catalytic
converter, unleaded fuel is compulsory.
Opening the fuel flap Refuelling
* 55 litres for Slovakia. Additions of fuel must be of at least
5 litres to be taken into account by the
fuel gauge.
The filler neck is narrower to ensure
that only unleaded petrol nozzles can
be put in.
Opening the filler cap may create a
noise of an inrush of air. This vacuum,
which is entirely normal, is caused by
the sealing of the fuel system.
With Stop & Start, never refuel with the
system in STOP mode; you must switch
off the ignition with the key.
8
Practical information
Page 186 of 344

184
C5_en_Chap08_information_ed01-2014
Misfuel prevention (Diesel)*
When a petrol filler nozzle is introduced into the
fuel filler neck of your Diesel vehicle, it comes
into contact with the flap. The system remains
closed and prevents filling.
Do not persist but introduce a Diesel type
filler nozzle.
* According to country of sale. Mechanical device which prevents filling the tank of a Diesel vehicle with petrol. It avoids the risk of
engine damage that can result from filling with the wrong fuel.
Located in the filler neck, the misfuel prevention device appears when the filler cap is removed.
Operation
It remains possible to use a fuel can to
fill the tank.
In order to ensure a good flow of fuel,
do not place the nozzle of the fuel can
in direct contact with the flap of the
misfuel prevention device and pour
s l ow l y.
Practical information
Page 187 of 344

185
C5_en_Chap08_information_ed01-2014
Fuel used for petrol
engines
The petrol engines are compatible with
E10 bio-petrol (containing 10 % ethanol),
conforming to European standards EN 228
and EN 15376.
E85 type fuels (containing up to 85 % ethanol)
are reserved exclusively for vehicles marketed
for the use of this type of fuel (BioFlex
vehicles). The quality of the ethanol must
comply with European standard EN 15293.
Fuel used for Diesel
engines
The Diesel engines are compatible with
biofuels which conform to current and future
European standards (Diesel fuel which
complies with standard EN 590 mixed with
a biofuel which complies with standard
EN
14214) available at the pumps (containing
up to 7 % Fatty Acid Methyl Ester).
B30 biofuel can be used in certain Diesel
engines. However, this use, even occasional,
requires strict application of the special
servicing conditions. Contact a CITROËN
dealer or a qualified workshop.
The use of any other type of (bio)fuel
(vegetable or animal oils, pure or diluted,
domestic fuel...) is strictly prohibited (risk of
damage to the engine and fuel system).
Travelling abroad
As Diesel fuel pump nozzles may
be different in other countries, the
presence of the misfuel prevention
device may make refuelling impossible.
Before travelling abroad, we
recommend that you check with the
CITROËN dealer network, whether your
vehicle is suitable for the fuel pumps in
the country in which you want to travel.
8
Practical information
Page 188 of 344

186
C5_en_Chap08_information_ed01-2014
Bleeding the Diesel fuel filter
Protective cover
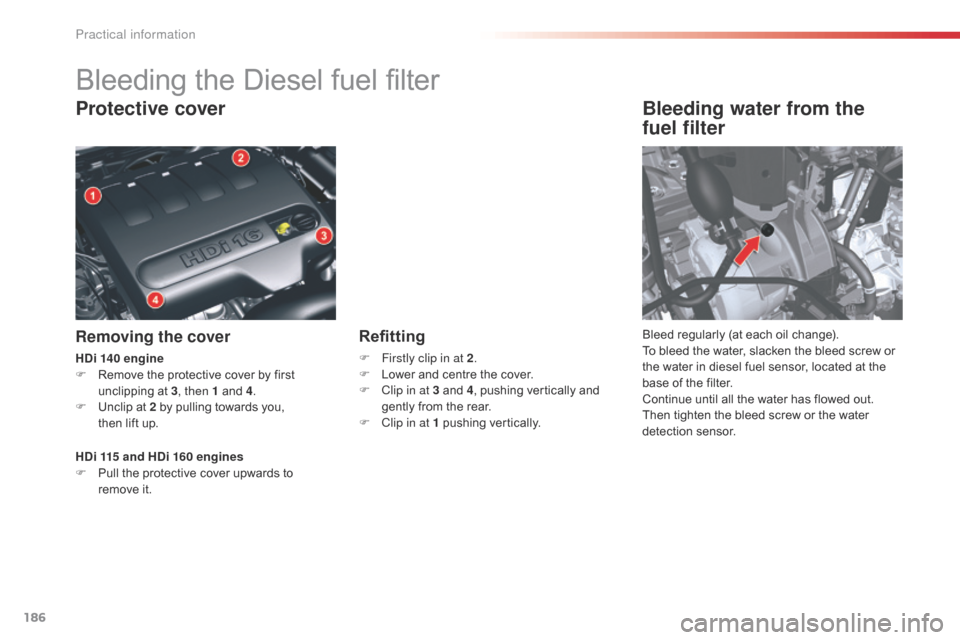
Removing the cover
Bleeding water from the
fuel filter
Bleed regularly (at each oil change).
To bleed the water, slacken the bleed screw or
the water in diesel fuel sensor, located at the
base of the filter.
Continue until all the water has flowed out.
Then tighten the bleed screw or the water
detection sensor.
HDi 115 and HDi 160 engines
F
P
ull the protective cover upwards to
remove it.
HDi 140 engine
F
R
emove the protective cover by first
unclipping at 3 , then 1 and 4.
F
U
nclip at 2 by pulling towards you,
then lift up.Refitting
F Firstly clip in at 2 .
F L ower and centre the cover.
F
C
lip in at 3 and 4 , pushing vertically and
gently from the rear.
F
C
lip in at 1 pushing vertically.
Practical information
Page 189 of 344

187
C5_en_Chap08_information_ed01-2014
Running out of fuel (Diesel)
F Unclip the protective cover to gain access to the priming pump.
F
U
nclip the protective cover to gain access
to the priming pump.
Priming the fuel system
In the event of running out of fuel:
F a fter filling (minimum 5 litres) and removing
the protective cover, operate the manual
priming pump, until some resistance is felt,
F
o
perate the starter motor while depressing
the accelerator pedal slightly until the
engine starts. HDi engines make use of advanced
technology.
For any work on your vehicle, contact
a qualified workshop that has the
skills and equipment required, which a
CITROËN dealer is able to provide.
If the engine fails to start at the first attempt,
wait fifteen seconds before trying again.
If the engine fails to start after a few attempts,
operate the priming pump again and then try to
start the engine.
When the engine is idling, accelerate slightly to
complete the bleeding of the circuit.
HDi 115 engine
HDi 140 and HDi 160 engines
8
Practical information
Page 190 of 344

188
C5_en_Chap08_information_ed01-2014
Temporary puncture repair kit
The kit is located in the boot under the floor.
Complete system consisting of a compressor
and a sealant cartridge which permits the
temporary repair
of the tyre so that you can
drive to the nearest garage. This repair kit is available from
CITROËN dealers or a qualified
workshop.
It is designed to repair holes of a
maximum diameter of 6 mm, located
exclusively on the tyre tread or
shoulder. Avoid removing any foreign
bodies which have penetrated the tyre.
The vehicle's electric system allows the
connection of a compressor for long
enough to inflate a tyre after a puncture
repair or for inflating a small inflatable
accessory.
Practical information