ECU Citroen C5 2016 (RD/TD) / 2.G Owner's Manual
[x] Cancel search | Manufacturer: CITROEN, Model Year: 2016, Model line: C5, Model: Citroen C5 2016 (RD/TD) / 2.GPages: 366, PDF Size: 30.93 MB
Page 22 of 366

20
C5_en_Chap01_controle-de-marche_ed01-2015
Return to the main
instrument panel screen
display
Successive rotations of the left-hand thumb
wheel on the steering wheel allow you to return
to the main instrument panel screen display
(vehicle speed), via the navigation information
screen, then the screen displaying only the
total mileage and the trip mileage (bottom of
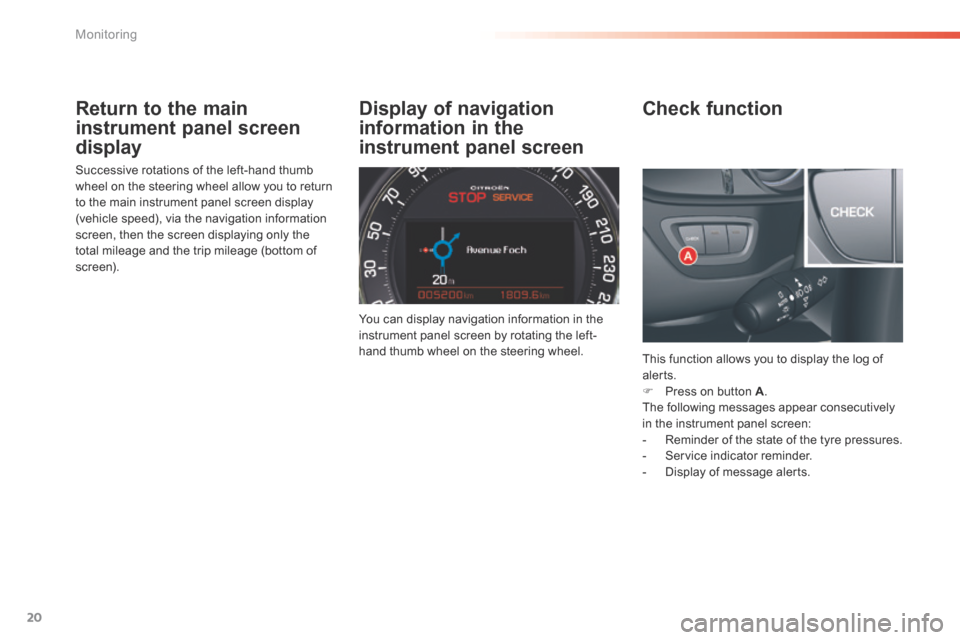
screen).You can display navigation information in the
instrument panel screen by rotating the left-
hand thumb wheel on the steering wheel.This function allows you to display the log of
alerts.
F Press on button A .
The following messages appear consecutively
in the instrument panel screen:
- Reminder of the state of the tyre pressures.
- Service indicator reminder.
- Display of message alerts.
Check function
Display of navigation
information in the
instrument panel screen
Monitoring
Page 69 of 366

67
C5_en_Chap03_ergo-et-confort_ed01-2015
Storing driving positions
System which stores the settings of the driver's
seat. It allows two positions to be stored.
Use the buttons located on the door, driver's
side.
When storing a driving position, the air
conditioning settings are also memorised.
Storing a position
Using buttons M / 1 / 2
F Switch on the ignition.
F Adjust your seat.
F Press button M , then press button 1 or 2
within four seconds.
An audible signal confirms that the settings
have been stored.
Storing a new position cancels the previous
position.
Welcome function
The welcome function assists entry and exit
from the vehicle.
After switching off the ignition and opening
the driver’s door, the driver's seat moves back
automatically and then stays in this position,
ready for the next entry to the vehicle.
When switching on the ignition, the seat moves
for ward to the memorised driving position.
When moving the seat, take care that no
person or object hinders the automatic
movement of the seat.
This function is deactivated by default.
You can activate or deactivate this function in
the vehicle parameters menu.
To adjust the air conditioning, refer to
the "Air conditioning" section.For your safety, avoid storing a driving
position while driving.
Recalling a stored position
Ignition on or engine running
F b
riefly press button 1 or 2 to recall the
corresponding position.
An audible signal indicates the end of the
adjustment.
When the ignition is on, after a few consecutive
position recalls, the function will be deactivated
until the engine is started, to prevent
discharging of the battery.
3
Ease of use and comfort
Page 74 of 366

72
C5_en_Chap03_ergo-et-confort_ed01-2015
Removing the seat cushionReturning the seat backrest to
its original position
F Put the seat backrest 3 into the fully upright
position and secure it.
F Return the seat cushion 1 to its original position.F Refit the head restraints or put them back in place.
When returning the rear seat to its
original position, take care not to trap
the seat belts and ensure that their
buckles are positioned correctly. F
Move the corresponding front seat for ward
if necessary.
F Raise the front of the seat cushion 1 .
F Tilt the seat cushion 1 fully against the front
seat.
Refitting the seat cushion
F Position the seat cushion 1 vertically.
F Insert one of the fixing brackets 2 into one
of the seat cushion supports. Carry out the
same operation for the other side keeping it
firmly towards the middle.
F Fully fold down the seat cushion 1 .
F Press on the seat cushion to secure it.
The red indicator on the control 2 should
no longer be visible; if it is, push the seat
backrest 3 fully back. F
Extract the fixing brackets 2
from the seat
cushion support by keeping it firmly towards the
middle. Carry out the same operation for the
other side.
F Remove the seat cushion 1 by pulling upwards.
Ease of use and comfort
Page 92 of 366

90
C5_en_Chap03_ergo-et-confort_ed01-2015
Side blinds
F Pull the tab A to unreel the blind.
F Position the blind on the hook B .
Rear blind (Saloon)
F Pull the tab C to unreel the blind.
F Position the blind on the hooks D .
Ski flap
A flap in the backrest, located to the rear of the
armrest, facilitates the carrying of long objects.
To o p e n
F Lower the rear armrest.
F Pull the flap handle down.
F Lower the flap.
F Load the objects from inside the boot.
Ensure that the objects are well secured
and that they do not impede the
operation of the gear lever.
Ease of use and comfort
Page 93 of 366

91
C5_en_Chap03_ergo-et-confort_ed01-2015
Boot fittings (Saloon)
1. Boot floor
(storage for the spare wheel and the tools) 2.
Boot lamp
3. Open storage or Closed storage well
For vehicles so equipped, this is the
location for the Hi-Fi amplifier.
Luggage securing rings
F Use the 4 securing rings on the boot floor
to secure your luggage.
For safety reasons in the event of sharp
braking, you are advised to place heavy
objects as far for ward in the boot as
possible.
3
Ease of use and comfort
Page 94 of 366

92
C5_en_Chap03_ergo-et-confort_ed01-2015
Boot fittings (Tourer)
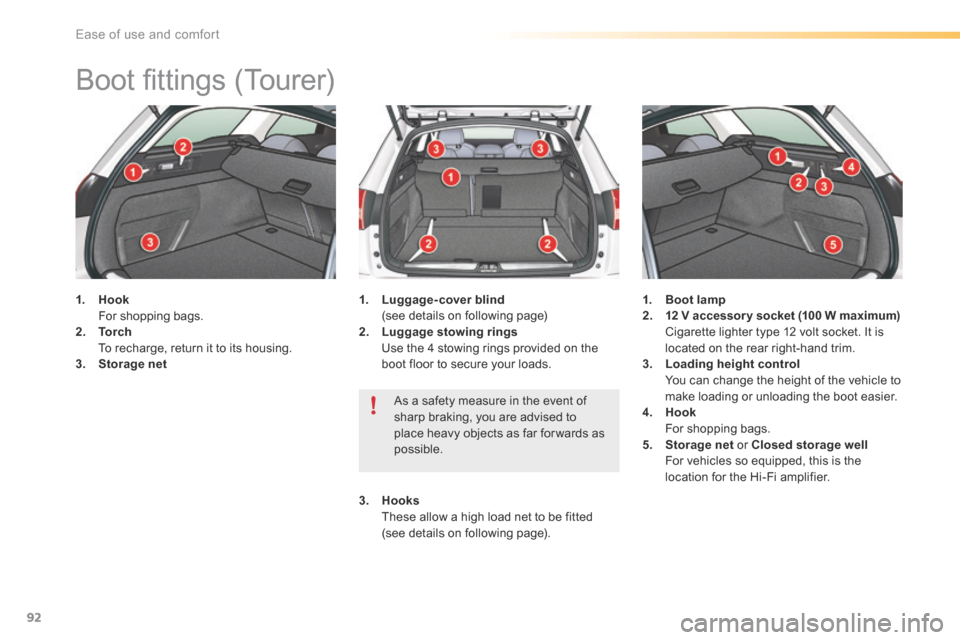
1. Hook
For shopping bags.
2. To r c h
To recharge, return it to its housing.
3. Storage net 1.
Luggage-cover blind
(see details on following page)
2. Luggage stowing rings
Use the 4 stowing rings provided on the
boot floor to secure your loads. 1.
Boot lamp
2. 12 V accessor y socket (100 W maximum)
Cigarette lighter type 12 volt socket. It is
located on the rear right-hand trim.
3. Loading height control
You can change the height of the vehicle to
make loading or unloading the boot easier.
4. Hook
For shopping bags.
5. Storage net or Closed storage well
For vehicles so equipped, this is the
location for the Hi-Fi amplifier.
As a safety measure in the event of
sharp braking, you are advised to
place heavy objects as far for wards as
possible.
3. Hooks
These allow a high load net to be fitted
(see details on following page).
Ease of use and comfort
Page 95 of 366

93
C5_en_Chap03_ergo-et-confort_ed01-2015
Luggage cover (Tourer)
To reel in
F Press the handle (PRESS) gently. The
luggage cover reels in automatically.
The moving part A can be folded along the rear
bench seat backrest.
To remove
F Compress the control 1 and lift the luggage
cover on the right then on the left to
remove it.
To install
F Position the left-hand end of the luggage
cover roller in its location B behind the rear
bench seat.
F Compress the roller control 1 and put the
roller in place in its location C on the right.
F Release the control to secure the luggage
c ove r.
F Unreel it to its fastening on the rear pillar.
3
Ease of use and comfort
Page 96 of 366

94
C5_en_Chap03_ergo-et-confort_ed01-2015
High load retaining net
(Tourer)
Hooked onto the special upper and lower
fixings, this permits use of the entire loading
volume up to the roof:
- behind the rear seats (row 2),
- behind the front seats (row 1) when the rear
seats are folded.
When positioning the net, check that the strap
loops are visible from the boot; this will make
slackening or tightening easier.
Installation
F Fold down the backrests of the rear seats.
F Position the high load retaining net roller
above the two rails 1 located behind the
rear seats (2/3 bench seat). The two
notches 2 must be placed above the
two rails. F
Slide the two rails 1 into the notches 2 and
push the roller (lengthways) from right to
left to secure it.
F Reposition the rear seat backrests.
Ease of use and comfort
Page 97 of 366

95
C5_en_Chap03_ergo-et-confort_ed01-2015
Row 1
To use it in row 1:
F fold down the backrests of the rear seats,
F open the covers 3 of the corresponding
upper fixings,
F unroll the high load retaining net and
position one of the ends of the net's metal
bar in the corresponding fixing cover.
Check that the hook is secured in the rail
located inside the cover 3 ,
F pull the high load retaining net's metal bar
to position the other hook in the second
fixing cover.
Row 2
To use it in row 2:
F open the covers 4 of the corresponding
upper fixings,
F from the rear bench seat, unroll the high
load retaining net, pushing it to detach it
from the retaining hooks,
F position one of the ends of the net's metal
bar in the corresponding fixing cover.
Check that the hook is secured in the rail,
located inside the cover 4 ,
F position the other hook in the second fixing
cover and pull the metal bar towards you.
3
Ease of use and comfort
Page 150 of 366

148
C5_en_Chap06_securite_ed01-2015
direction
indicators
F Left: lower the lighting stalk beyond the
point of resistance.
F Right: raise the lighting stalk beyond the
point of resistance.
Three flashes of the direction
indicators
F Press briefly upwards or downwards,
without going beyond the point of
resistance; the direction indicators will
flash 3 times.
Hazard warning lamps
Visual warning by means of the direction
indicators to alert other road users to a vehicle
breakdown, towing or accident.Automatic operation of
hazard warning lamps
When braking in an emergency, depending on
the deceleration, the hazard warning lamps
come on automatically.
They switch off automatically the first time you
accelerate.
F You can also switch them off by pressing
the button.
Selection of the left or right direction indicators
to signal a change of direction of the vehicle.
F Press this button, the direction indicators
flash.
They can operate with the ignition off.
Safety