ignition Citroen C5 2016 (RD/TD) / 2.G Owner's Guide
[x] Cancel search | Manufacturer: CITROEN, Model Year: 2016, Model line: C5, Model: Citroen C5 2016 (RD/TD) / 2.GPages: 366, PDF Size: 30.93 MB
Page 56 of 366
54
C5_en_Chap02_ouverture_ed01-2015
Reinitialisation
If a window does not rise automatically, its
operation must be reinitialised:
F pull the control until the window stops,
F release the control and pull it again until
the window closes fully,
F continue to hold the control for
approximately one second after the window
has closed,
F press the control to lower the window
automatically to the low position,
F when the window has reached the low
position, press the control again for
approximately one second.
The safety anti-pinch function is not
operational during these operations.
Deactivation of the rear
electric window and door
controls
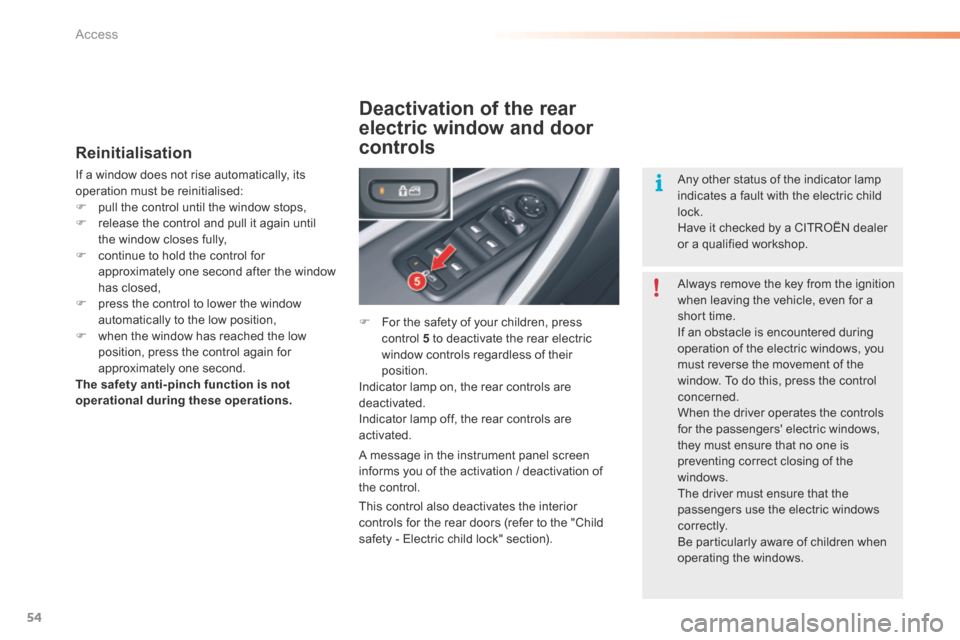
F For the safety of your children, press
control 5 to deactivate the rear electric
window controls regardless of their
position.
Indicator lamp on, the rear controls are
deactivated.
Indicator lamp off, the rear controls are
activated.
A message in the instrument panel screen
informs you of the activation / deactivation of
the control. Always remove the key from the ignition
when leaving the vehicle, even for a
short time.
If an obstacle is encountered during
operation of the electric windows, you
must reverse the movement of the
window. To do this, press the control
concerned.
When the driver operates the controls
for the passengers' electric windows,
they must ensure that no one is
preventing correct closing of the
windows.
The driver must ensure that the
passengers use the electric windows
c o r r e c t l y.
b
e particularly aware of children when
operating the windows.
This control also deactivates the interior
controls for the rear doors (refer to the "Child
safety - Electric child lock" section). Any other status of the indicator lamp
indicates a fault with the electric child
lock.
Have it checked by a CITROËN dealer
or a qualified workshop.
access
Page 63 of 366

61
C5_en_Chap02_ouverture_ed01-2015
Sunroof (Saloon)
Sunroof closed
- Press B to first notch: tilting.
- Press B to second notch: automatic
complete tilting.
- Press A to first notch: sliding towards rear.
- Press A to second notch: automatic total
sliding towards rear.
Sunroof open
- Press B to first notch: closure.
- Press B to second notch: automatic total
closure.
Operation
Tilted sunroof
- Press A to first notch: closure.
- Press A to second notch: automatic total
closure.
Your sun roof is fitted with a manually-operated
blind.
Anti-pinch
An anti-pinch device stops the sun roof from
closing, whether sliding or tilting. If it meets an
obstacle, it re-opens.
Reinitialisation
a fter a battery disconnection or if there has
been a malfunction, you have to reinitialise the
anti-pinch function.
F move control B until the roof is in the
complete tilting position,
F keep control B pressed down for a
minimum of 1 second.
During these operations, the anti-pinch
function does not operate
.
Always remove the ignition key when
leaving the vehicle, even if for a short
time.
In the event of anything being caught by
the sunroof closing, you must reverse
the roof movement.
Do this by reversing the position of the
control switch.
When the driver is operating the
sunroof, they must always make sure
that the passengers are not preventing
it from closing properly.
The driver must ensure that passengers
use the sunroof control correctly.
b e particularly aware of children when
operating the sun roof.
The sunroof and its installation are not
available in the accessory range.
2
access
Page 67 of 366
65
C5_en_Chap03_ergo-et-confort_ed01-2015
Electric adjustments
To adjust the electric seats, switch on the
ignition or start the engine if the vehicle has
gone into economy mode.
Seat adjustments are also possible for a short
period after opening one of the front doors or
switching off the ignition.
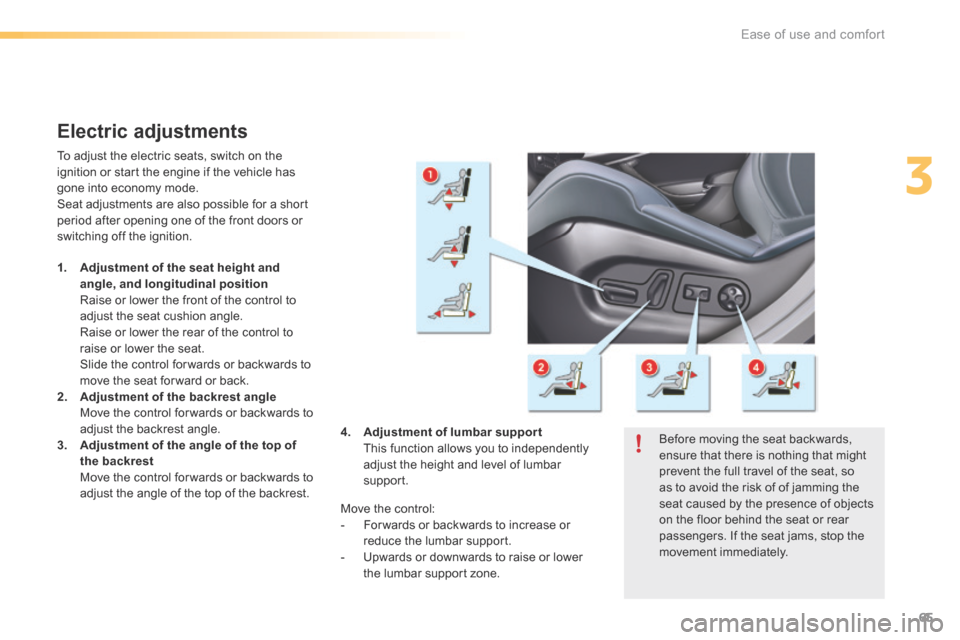
1. Adjustment of the seat height and
angle, and longitudinal position
Raise or lower the front of the control to
adjust the seat cushion angle.
Raise or lower the rear of the control to
raise or lower the seat.
Slide the control for wards or backwards to
move the seat for ward or back.
2. Adjustment of the backrest angle
Move the control for wards or backwards to
adjust the backrest angle.
3. Adjustment of the angle of the top of
the backrest
Move the control for wards or backwards to
adjust the angle of the top of the backrest. Before moving the seat backwards,
ensure that there is nothing that might
prevent the full travel of the seat, so
as to avoid the risk of of jamming the
seat caused by the presence of objects
on the floor behind the seat or rear
passengers. If the seat jams, stop the
movement immediately.
Move the control:
-
For wards or backwards to increase or
reduce the lumbar support.
- Upwards or downwards to raise or lower
the lumbar support zone.
4.
Adjustment of lumbar support
This function allows you to independently
adjust the height and level of lumbar
support.
3
Ease of use and comfort
Page 69 of 366

67
C5_en_Chap03_ergo-et-confort_ed01-2015
Storing driving positions
System which stores the settings of the driver's
seat. It allows two positions to be stored.
Use the buttons located on the door, driver's
side.
When storing a driving position, the air
conditioning settings are also memorised.
Storing a position
Using buttons M / 1 / 2
F Switch on the ignition.
F Adjust your seat.
F Press button M , then press button 1 or 2
within four seconds.
An audible signal confirms that the settings
have been stored.
Storing a new position cancels the previous
position.
Welcome function
The welcome function assists entry and exit
from the vehicle.
After switching off the ignition and opening
the driver’s door, the driver's seat moves back
automatically and then stays in this position,
ready for the next entry to the vehicle.
When switching on the ignition, the seat moves
for ward to the memorised driving position.
When moving the seat, take care that no
person or object hinders the automatic
movement of the seat.
This function is deactivated by default.
You can activate or deactivate this function in
the vehicle parameters menu.
To adjust the air conditioning, refer to
the "Air conditioning" section.For your safety, avoid storing a driving
position while driving.
Recalling a stored position
Ignition on or engine running
F b
riefly press button 1 or 2 to recall the
corresponding position.
An audible signal indicates the end of the
adjustment.
When the ignition is on, after a few consecutive
position recalls, the function will be deactivated
until the engine is started, to prevent
discharging of the battery.
3
Ease of use and comfort
Page 71 of 366

69
C5_en_Chap03_ergo-et-confort_ed01-2015
Mirrors
Each fitted with an adjustable mirror glasses
providing the lateral rear ward vision necessary
for overtaking or parking. They can also be
folded.
Adjustment
With the ignition on:
F move control A to the right or to the left to
select the corresponding mirror,
F move control B in all four directions to
adjust,
F return control A to the central position.
Folding
F From outside; lock the vehicle using the
remote control or the key.
F From inside; with the ignition on, pull
control A rearwards.
If the mirrors are folded using control A , they
will not unfold when the vehicle is unlocked.
Control A must be pulled again.
Unfolding
F From outside; unlock the vehicle using the
remote control or the key.
F From inside; with the ignition on, pull
control A rearwards.
If the position is changed manually, a long
press on control A re-engages the mirror.
Door mirrors
The objects observed are, in reality,
closer than they appear.
Take this into account in order to
correctly judge the distance of vehicles
approaching from behind.
As a safety measure, the mirrors must
be adjusted to reduce the blind spot.
Demisting / defrosting of the door
mirrors is associated with that of
the rear screen.The folding and unfolding of the door
mirrors using the remote control can be
deactivated by a CITR
oËn dealer or a
qualified workshop.
Demisting - Defrosting
See the "Demisting - Defrosting the rear
screen" section.
3
Ease of use and comfort
Page 72 of 366
70
C5_en_Chap03_ergo-et-confort_ed01-2015
Automatic day/night model
In order to guarantee optimum visibility
during your manoeuvres, the mirror lightens
automatically when reverse gear is engaged. By means of a sensor, which measures the
light from the rear of the vehicle, this system
automatically and progressively changes
between the day and night uses.
It has an anti-dazzle system which darkens the
mirror glass: this reduces any driver discomfort
caused by the light beam of following vehicles,
the sun...In vehicles fitted with electrochromatic door
mirrors, the system has an on/off button and an
associated warning lamp.
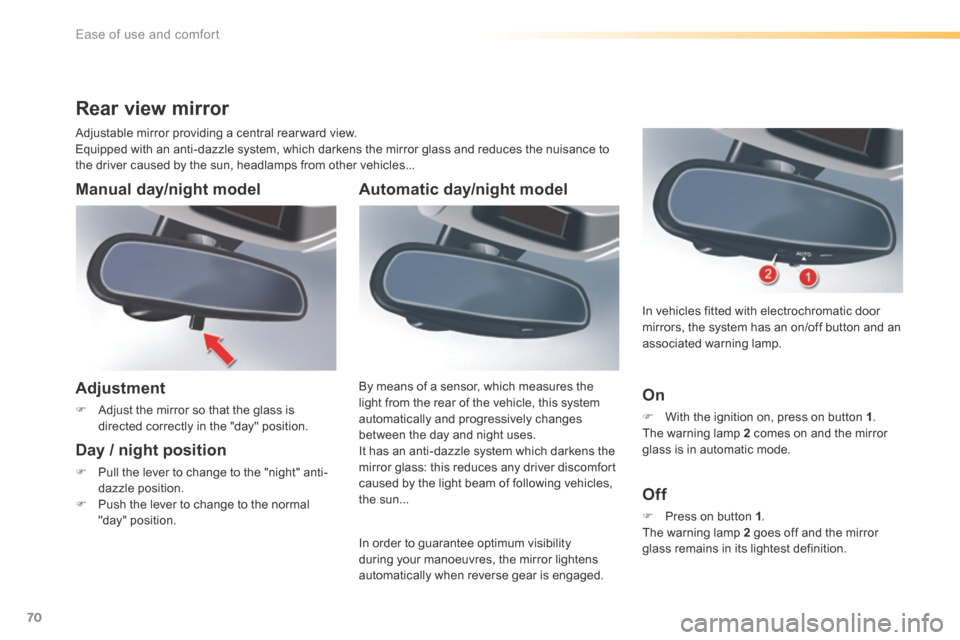
On
F
With the ignition on, press on button 1 .
The warning lamp 2 comes on and the mirror
glass is in automatic mode.
Off
F Press on button 1 .
The warning lamp 2 goes off and the mirror
glass remains in its lightest definition.
Rear view mirror
Manual day/night model
Adjustment
F Adjust the mirror so that the glass is
directed correctly in the "day" position.
Day / night position
F Pull the lever to change to the "night" anti-
dazzle position.
F Push the lever to change to the normal
"day" position.
Adjustable mirror providing a central rear ward view.
Equipped with an anti-dazzle system, which darkens the mirror glass and reduces the nuisance to
the driver caused by the sun, headlamps from other vehicles...
Ease of use and comfort
Page 85 of 366

83
C5_en_Chap03_ergo-et-confort_ed01-2015
Map reading lamps
F With the ignition on, press the
corresponding switch.
Panoramic sunroof rear
reading lamps (Tourer)
With the key in position or with the ignition on:
F Press the corresponding switch 1 .
The reading lamp concerned comes on for
ten minutes.
The rear reading lamps come on:
- when the key is removed from the ignition,
- when the vehicle is unlocked.
They switch off gradually:
- when the vehicle is locked,
- when the ignition is switched on.
Courtesy lamps
1. Front courtesy lamp
2. Map reading lamp s
Front courtesy lamp
Rear courtesy lamp
1. Rear courtesy lamp
2. Map reading lamps In this position, the courtesy lamp
comes on gradually:
Lighting off.
Lighting on.
-
when the vehicle is unlocked,
- when a door is opened,
- when the key is removed from the ignition,
- when the remote control locking button is
activated, in order to locate your vehicle.
It switches off gradually:
- when the vehicle is locked,
- when the ignition is switched on,
- 30 seconds after the last door is closed.
In lighting on mode, different lighting
times are available:
- with the ignition off, approximately
ten minutes,
- in energy economy mode,
approximately thirty seconds,
- with the engine running, unlimited.
3
Ease of use and comfort
Page 88 of 366

86
C5_en_Chap03_ergo-et-confort_ed01-2015
Sun visor
F With the ignition on, lift the flap; the mirror
is illuminated automatically.
To prevent dazzle from ahead, fold the visor
downwards.
It can be disengaged from its central fixing and
pivoted over to the side windows if required.
Cooled glove box
F To open the glove box, pull the handle and
lower the lid.
It has automatic illumination.
The glove box has an air vent A that can be
closed manually.
It provides access to the passenger's front
airbag deactivation switch B .
The glove box should be kept closed
when driving.
Front fittings
F Pull the grip towards you to open it.
Driver's storage compartment
Ease of use and comfort
Page 99 of 366
97
C5_en_Chap04_conduite_ed01-2015
Anti-theft protection
Electronic engine immobiliser
The key contains an electronic chip which has
a special code. When the ignition is switched
on, this code must be recognised in order for
starting to be possible.In the event of a fault, you are
informed by illumination of this
warning lamp, an audible signal and
a message in the screen.
In this case, your vehicle will not start; contact
a CITROËN dealer as soon as possible.
Starting-switching off the engine
Keep safely, away from your vehicle,
the label attached to the keys given to
you on acquisition of the vehicle.
Ignition switch
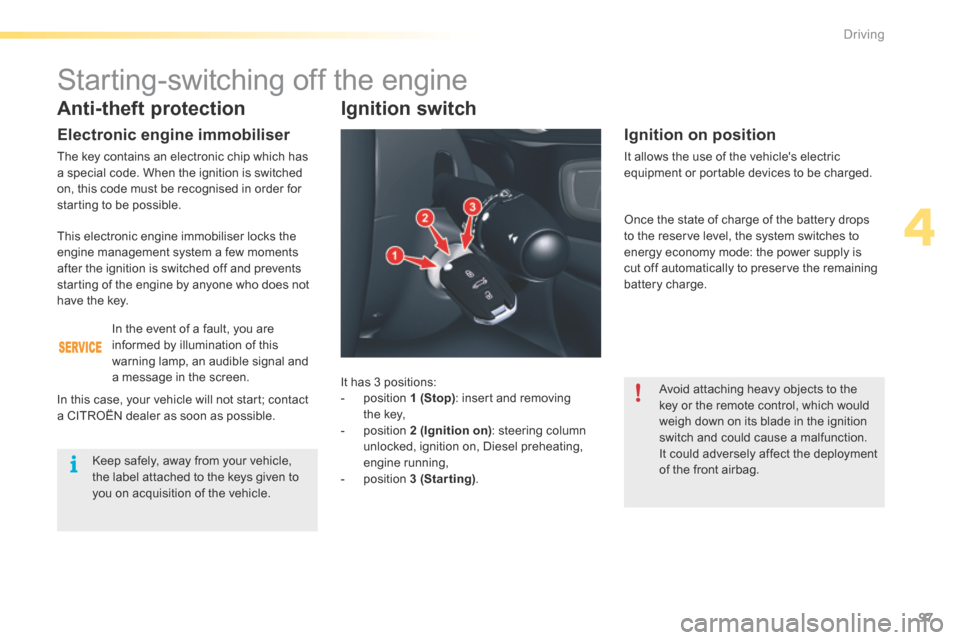
It has 3 positions:
- position 1 (Stop): insert and removing
the key,
- position 2 (Ignition on) : steering column
unlocked, ignition on, Diesel preheating,
engine running,
- position 3 (Starting).
Ignition on position
It allows the use of the vehicle's electric
equipment or portable devices to be charged.
Avoid attaching heavy objects to the
key or the remote control, which would
weigh down on its blade in the ignition
switch and could cause a malfunction.
It could adversely affect the deployment
of the front airbag.
This electronic engine immobiliser locks the
engine management system a few moments
after the ignition is switched off and prevents
starting of the engine by anyone who does not
have the key.
Once the state of charge of the battery drops
to the reserve level, the system switches to
energy economy mode: the power supply is
cut off automatically to preserve the remaining
battery charge.
4
Driving
Page 100 of 366
98
C5_en_Chap04_conduite_ed01-2015
Starting the engine
Wait until this warning lamp goes off in the
instrument panel then operate the starter
motor by turning the key to position 3
without pressing the accelerator pedal,
until the engine starts. Once the engine is
running, release the key.
With the parking brake applied and the gearbox
in neutral or position N or P:
F depress the clutch pedal fully (manual
gearbox),
or
F press the brake pedal firmly (automatic
gearbox),
F insert the key into the ignition switch; the
system recognises the code,
F unlock the steering column by simultaneously
turning the steering and the key.
F With a petrol engine, operate the starter
motor by turning the key to position 3
without pressing the accelerator pedal,
until the engine starts. Once the engine is
running, release the key. Never leave the engine running in
an enclosed area without adequate
ventilation: internal combustion
engines emit toxic exhaust gases,
such as carbon monoxide. Danger of
intoxication and death!
In very severe wintry conditions
(temperatures below -23°C), to ensure
the correct operation and durability of
the mechanical components of your
vehicle, engine and gearbox, it is
necessary to leave the engine running
for 4 minutes before moving off.
In wintry conditions, the warning lamp
can stay on for a longer period. When
the engine is hot, the warning lamp
does not come on.
In certain cases, you may have to apply
more force to the steering (wheels on
full lock, for example). F
With a Diesel engine, turn the key to
position 2 , ignition on, to operate the
engine pre-heating system.
If the engine does not start straight
away, switch off the ignition. Wait a
few moments before operating the
starter motor again. If the engine does
not start after several attempts, do not
keep trying: you risk damaging the
starter motor or the engine. Contact
a CITROËN dealer or a qualified
workshop. In temperate conditions, do not leave
the engine at idle to warm up but move
off straight away and drive at moderate
speed.
Driving