Citroen C5 2017 (RD/TD) / 2.G Owner's Manual
Manufacturer: CITROEN, Model Year: 2017, Model line: C5, Model: Citroen C5 2017 (RD/TD) / 2.GPages: 348, PDF Size: 10.72 MB
Page 251 of 348
249
C5_en_Chap09_caracteristiques-techniques_ed01-2016
Identification markings
Various visible markings for identification of the vehicle.
Refer also to the registration document for your vehicle for the vehicle type, serial number, weights...
All genuine CITROËN replacement parts are available exclusively within the dealer network.
For your safety and in order to remain within the terms of the warranty, you are advised to use only
CITROËN replacement parts.D. T
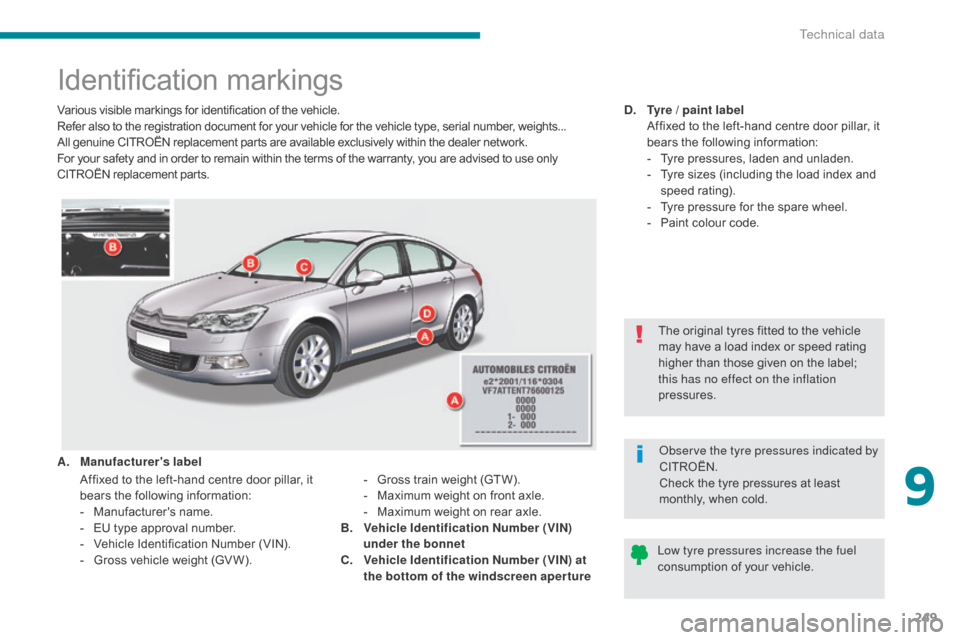
yre / paint label A
ffixed to the left-hand centre door pillar, it
bears the following information:
-
T
yre pressures, laden and unladen.
-
T
yre sizes (including the load index and
speed rating).
-
T
yre pressure for the spare wheel.
-
P
aint colour code.
Observe the tyre pressures indicated by
CITROËN.
Check the tyre pressures at least
monthly, when cold.
A.
M
anufacturer's label
-
G
ross train weight (GTW).
-
M
aximum weight on front axle.
-
M
aximum weight on rear axle.
B.
V
ehicle Identification Number (VIN)
under the bonnet
C.
V
ehicle Identification Number (VIN) at
the bottom of the windscreen aper ture Low tyre pressures increase the fuel
consumption of your vehicle.
A
ffixed to the left-hand centre door pillar, it
bears the following information:
-
M
anufacturer's name.
-
E
U type approval number.
-
V
ehicle Identification Number (VIN).
-
G
ross vehicle weight (GV W). The original tyres fitted to the vehicle
may have a load index or speed rating
higher than those given on the label;
this has no effect on the inflation
pressures.
9
Technical data
Page 252 of 348

250
C5_en_Chap10a_BTA_ed01-2016
Emergency or assistance call
Localised Emergency Call
In an emergency, press this
button for more than 2 seconds.
Flashing of the green indicator
lamp and a voice message
confirm that the call has
been made to the "Localised
Emergency Call"* centre.
Pressing this button again immediately cancels
the call.
The green indicator lamp goes off.
The green indicator lamp remains on (without
flashing) when communication is established.
It goes off at the end of the call.
Localised Emergency Call immediately locates
your vehicle, makes contact with you in your
language** and - if necessary - organises
sending of the appropriate emergency
services**. In countries where the service is not
operational, or if the locating service has been
expressly declined, the call is directed straight
to the emergency services (112) without
location. **
D
epending on the geographic cover for
"Localised Emergency Call", "Localised
Assistance Call" and the official national
language selected by the owner of the
vehicle. The list of countries covered by Telematic
services is available at dealers or
at www.citroen.co.uk.
*
D
epending on the terms and conditions for
the service, available from dealers, and
technological and technical limits. If an impact is detected by the airbag
control unit, and independently of
the deployment of any airbags, an
emergency call is made automatically.
If you benefit from the CITROËN
Connect Box offer with the SOS and
assistance pack included, there are
additional services available to you in
your MyCITROËN personal space, via
the Internet website for your country.
Audio and Telematics
Page 253 of 348
251
C5_en_Chap10a_BTA_ed01-2016
Localised Assistance Call
The fault with the system does not
prevent the vehicle being driven.Press this button for more than
2
seconds to request assistance
if the vehicle breaks down.
A voice message confirms that
the call has been made**.
Pressing this button again immediately cancels
the request.
The cancellation is confirmed by a voice
message.
Geo-location
You can deactivate geo-location by
simultaneously pressing the "Localised
Emergency Call" and "Localised Assistance
Call" buttons, followed by a press on "Localised
Assistance Call" to confirm.
To reactivate geo-location, simultaneously
press the "Localised Emergency Call" and
"Localised Assistance Call" buttons again,
followed by a press on "Localised Assistance
Call" to confirm.
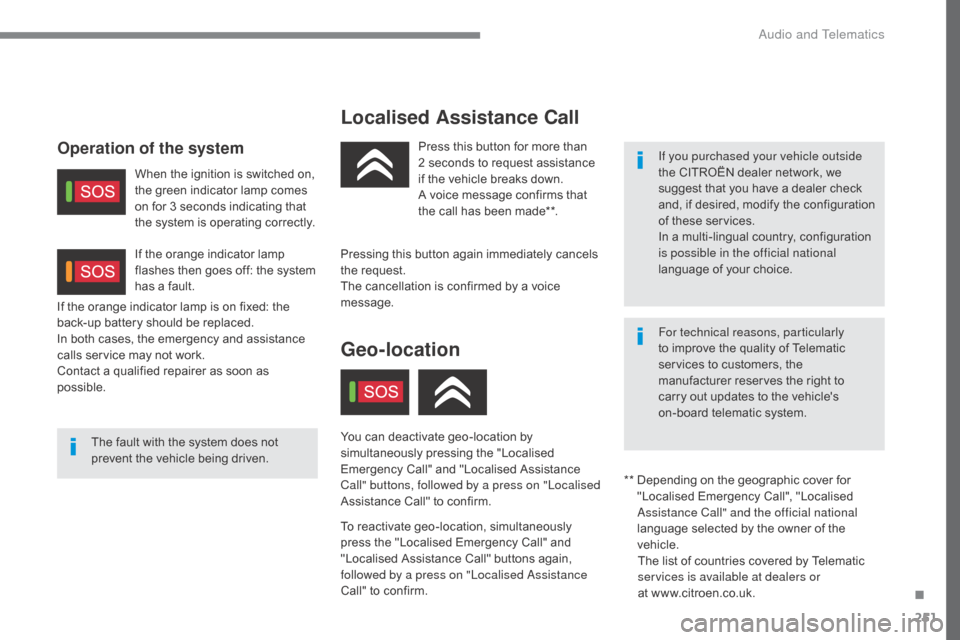
If the orange indicator lamp is on fixed: the
back-up battery should be replaced.
In both cases, the emergency and assistance
calls service may not work.
Contact a qualified repairer as soon as
possible.
Operation of the system
When the ignition is switched on,
the green indicator lamp comes
on for 3 seconds indicating that
the system is operating correctly.
If the orange indicator lamp
flashes then goes off: the system
has a fault.
If you purchased your vehicle outside
the CITROËN dealer network, we
suggest that you have a dealer check
and, if desired, modify the configuration
of these services.
In a multi-lingual country, configuration
is possible in the official national
language of your choice.
For technical reasons, particularly
to improve the quality of Telematic
services to customers, the
manufacturer reserves the right to
carry out updates to the vehicle's
on-board telematic system.
**
D
epending on the geographic cover for
"Localised Emergency Call", "Localised
Assistance Call" and the official national
language selected by the owner of the
vehicle. The list of countries covered by Telematic
services is available at dealers or
at www.citroen.co.uk.
.
Audio and Telematics
Page 254 of 348

Page 255 of 348
253
C5_en_Chap10b_SMEGplus_ed01-2016
7-inch touch screen tablet
GPS satellite navigation - Multimedia audio - Bluetooth® telephone
Contents
First steps
2 54
Steering mounted controls
2
56
Menus
2
57
Navigation
2
58
Navigation - Guidance
2
66
Tr a f fi c
2
7 0
Radio Media
2
72
Radio
2
78
DAB (Digital Audio Broadcasting) radio
2
80
Media
282
Settings
2
84
Connected services
2
92
MirrorLink
TM 292
CarPlay® 296
Telephone
2
98
Frequently asked questions
3
06
The system is protected in such a way that it will only operate in
your vehicle. As a safety measure, the driver should only carry out operations
which require prolonged attention while the vehicle is stationary.
The display of an energy economy mode message signals that
electrical systems operating are going into standby.
Refer to the energy economy mode section.
.
Audio and Telematics
Page 256 of 348
254
C5_en_Chap10b_SMEGplus_ed01-2016
First steps
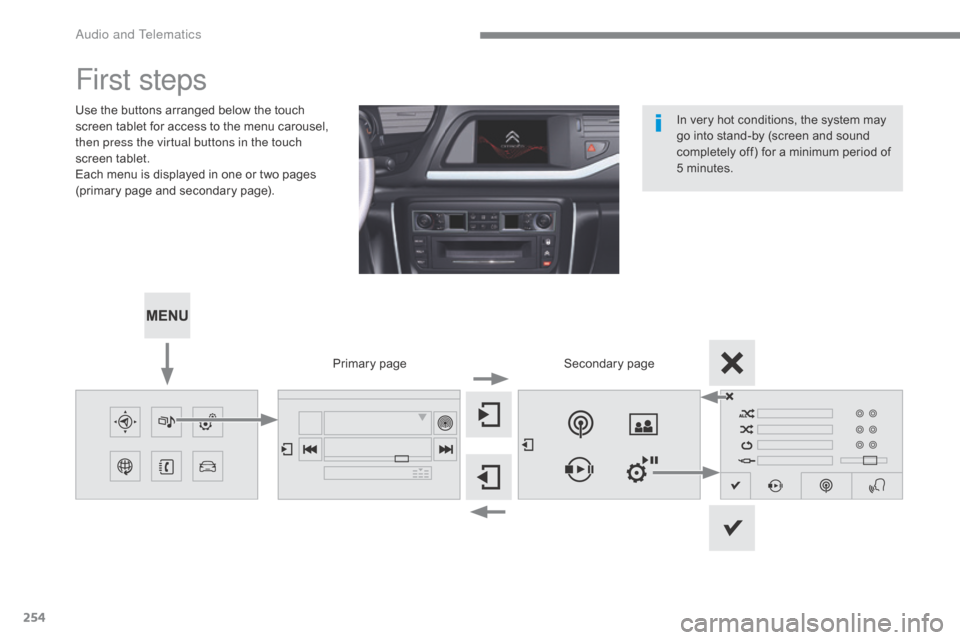
Use the buttons arranged below the touch
screen tablet for access to the menu carousel,
then press the virtual buttons in the touch
screen tablet.
Each menu is displayed in one or two pages
(primary page and secondary page).Secondary page
Primary page In very hot conditions, the system may
go into stand-by (screen and sound
completely off) for a minimum period of
5 minutes.
Audio and Telematics
Page 257 of 348
255
C5_en_Chap10b_SMEGplus_ed01-2016
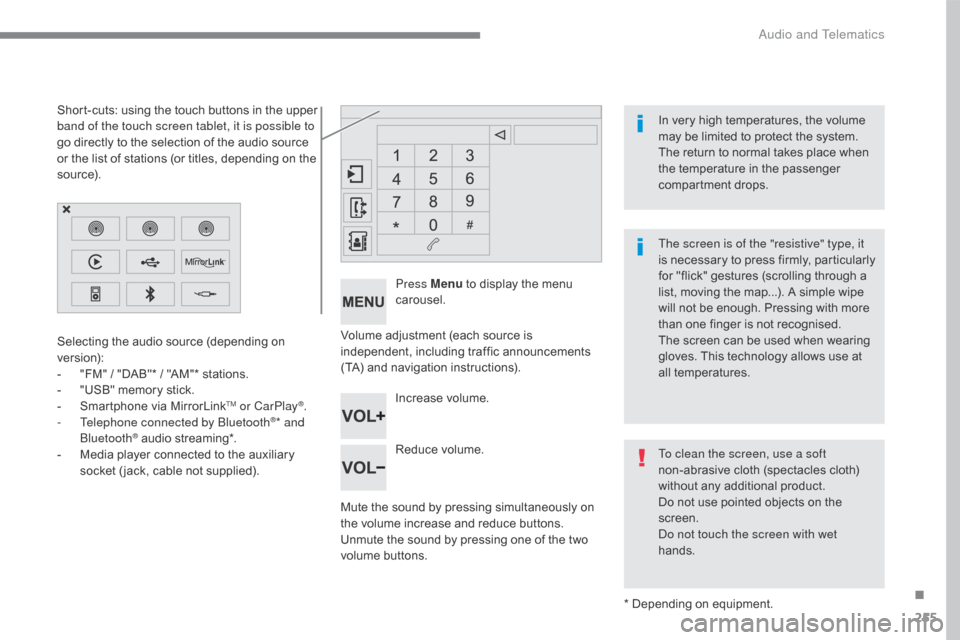
Volume adjustment (each source is
independent, including traffic announcements
(TA) and navigation instructions).
Mute the sound by pressing simultaneously on
the volume increase and reduce buttons.
Unmute the sound by pressing one of the two
volume buttons.Press Menu
to display the menu
carousel.
Increase volume.
Reduce volume.
Selecting the audio source (depending on
version):
-
"
FM" / "DAB"* / "AM"* stations.
-
"
USB" memory stick.
-
S
martphone via MirrorLink
TM or CarPlay®.
- T
elephone connected by Bluetooth®* and
Bluetooth® audio streaming*.
-
M
edia player connected to the auxiliary
socket ( jack, cable not supplied).
* Depending on equipment.
Short-cuts: using the touch buttons in the upper
band of the touch screen tablet, it is possible to
go directly to the selection of the audio source
or the list of stations (or titles, depending on the
s o u r c e).
The screen is of the "resistive" type, it
is necessary to press firmly, particularly
for "flick" gestures (scrolling through a
list, moving the map...). A simple wipe
will not be enough. Pressing with more
than one finger is not recognised.
The screen can be used when wearing
gloves. This technology allows use at
all temperatures. In very high temperatures, the volume
may be limited to protect the system.
The return to normal takes place when
the temperature in the passenger
compartment drops.
To clean the screen, use a soft
non-abrasive cloth (spectacles cloth)
without any additional product.
Do not use pointed objects on the
screen.
Do not touch the screen with wet
hands.
.
Audio and Telematics
Page 258 of 348
256
C5_en_Chap10b_SMEGplus_ed01-2016
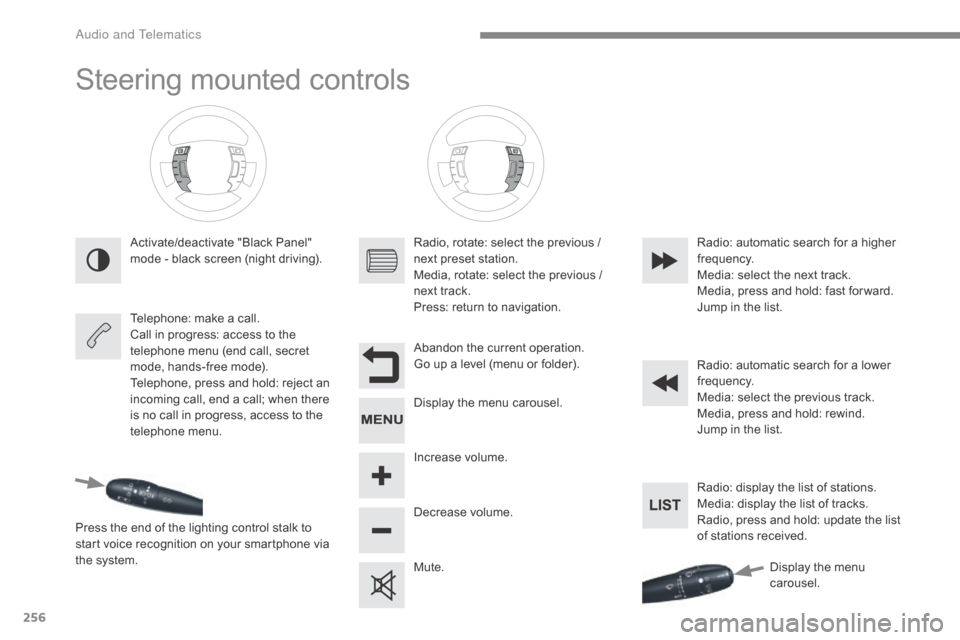
Steering mounted controls
Activate/deactivate "Black Panel"
mode - black screen (night driving).
Telephone: make a call.
Call in progress: access to the
telephone menu (end call, secret
mode, hands-free mode).
Telephone, press and hold: reject an
incoming call, end a call; when there
is no call in progress, access to the
telephone menu.
Press the end of the lighting control stalk to
start voice recognition on your smartphone via
the system. Radio, rotate: select the previous /
next preset station.
Media, rotate: select the previous /
next track.
Press: return to navigation.
Abandon the current operation.
Go up a level (menu or folder).
Display the menu carousel.
Increase volume.
Decrease volume.
Mute.Radio: automatic search for a higher
frequency.
Media: select the next track.
Media, press and hold: fast for ward.
Jump in the list.
Radio: automatic search for a lower
frequency.
Media: select the previous track.
Media, press and hold: rewind.
Jump in the list.
Radio: display the list of stations.
Media: display the list of tracks.
Radio, press and hold: update the list
of stations received.
Display the menu
carousel.
Audio and Telematics
Page 259 of 348
257
C5_en_Chap10b_SMEGplus_ed01-2016
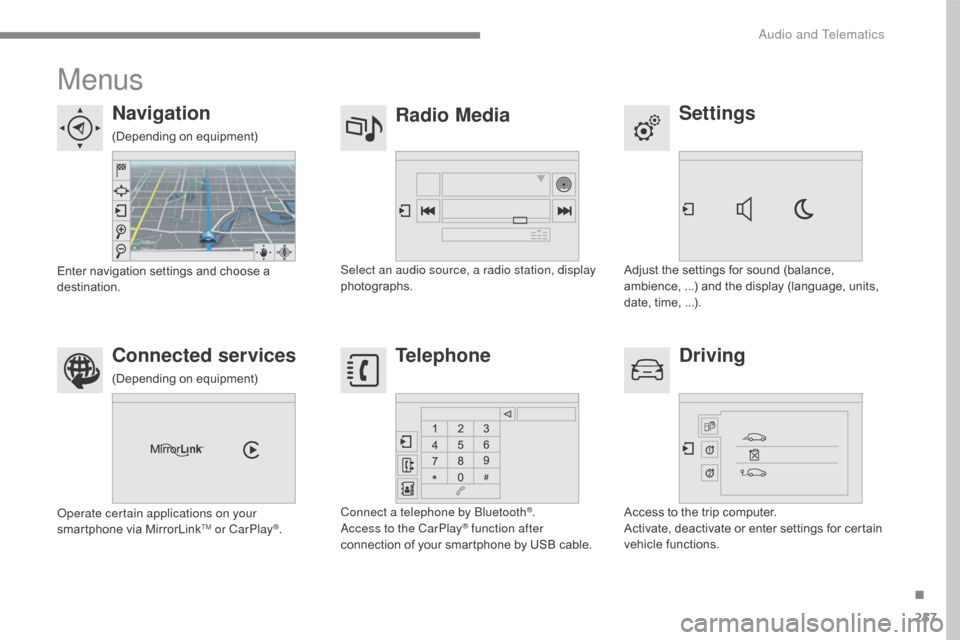
Menus
Settings
Radio Media
Navigation
Driving
Connected services Telephone
Adjust the settings for sound (balance,
ambience, ...) and the display (language, units,
date, time, ...).
Select an audio source, a radio station, display
photographs.
Enter navigation settings and choose a
destination.
Access to the trip computer.
Activate, deactivate or enter settings for certain
vehicle functions.
Operate certain applications on your
smartphone via MirrorLink
TM or CarPlay®.
Connect a telephone by Bluetooth
®.
Access to the CarPlay® function after
connection of your smartphone by USB cable.
(Depending on equipment)
(Depending on equipment)
.
Audio and Telematics
Page 260 of 348
258
C5_en_Chap10b_SMEGplus_ed01-2016
Level 1Level 2Level 3
Navigation
NavigationRoute settings
Audio and Telematics