boot Citroen C5 2017 (RD/TD) / 2.G Owner's Guide
[x] Cancel search | Manufacturer: CITROEN, Model Year: 2017, Model line: C5, Model: Citroen C5 2017 (RD/TD) / 2.GPages: 348, PDF Size: 10.72 MB
Page 203 of 348

201
C5_en_Chap07_info-pratiques_ed01-2016
Recommendations on storage
AdBlue® freezes at about -11°C and
deteriorates above 25°C. It is recommended
that bottles be stored in a cool area and
protected from direct sunlight.
Under these conditions, the fluid can be kept
for at least a year.
If the additive has frozen, it can be used once it
has completely thawed out.
Never store bottles of AdBlue
® in your
vehicle.
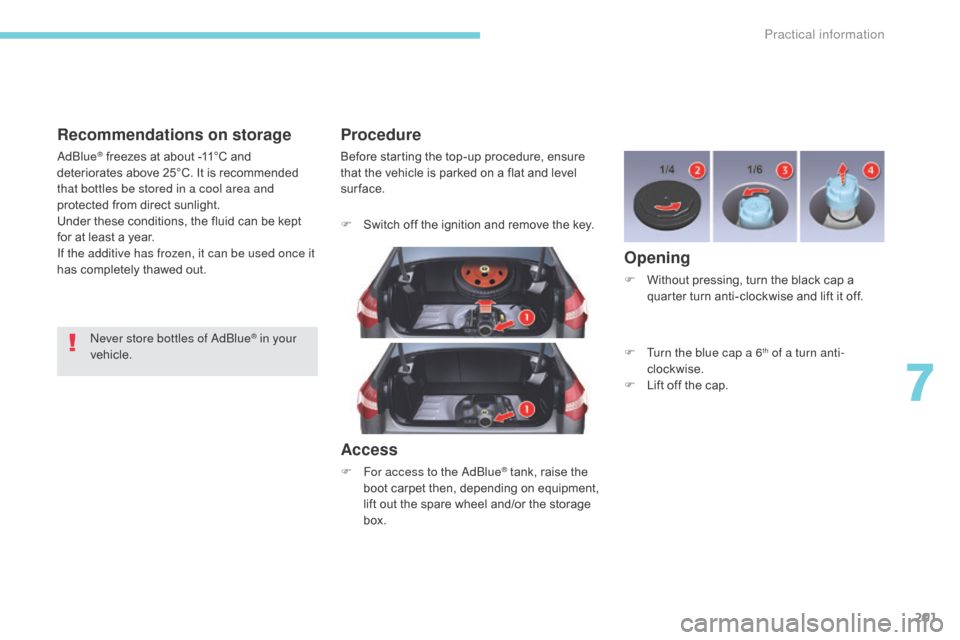
Procedure
Before starting the top-up procedure, ensure
that the vehicle is parked on a flat and level
sur face.
F
S
witch off the ignition and remove the key.
Access
F For access to the AdBlue® tank, raise the
boot carpet then, depending on equipment,
lift out the spare wheel and/or the storage
box.
Opening
F Without pressing, turn the black cap a quarter turn anti-clockwise and lift it off.
F
T
urn the blue cap a 6
th of a turn anti-
clockwise.
F
L
ift off the cap.
7
Practical information
Page 204 of 348

202
C5_en_Chap07_info-pratiques_ed01-2016
Closing
F Refit the blue cap to the tank and turn it a 6th of a turn clockwise, to its stop.
F
R
efit the black cap and turn it a quarter of
a turn clockwise without pressing. Ensure
that the indicator on the cap lines up with
the indicator on the support.
F
D
epending on equipment, return the spare
wheel and/or the storage box to the bottom
of the boot.
F
R
efit the boot carpet and close the tailgate.
Important: in the event of a top-up
after a breakdown because of a lack
of AdBlue
®, signalled by the message
"Top up emissions additive: Starting
prevented", you must wait around
5
minutes before switching on the ignition,
without opening the driver's door,
locking the vehicle or introducing the
key into the ignition switch .
Switch on the ignition, then, after
10
seconds, start the engine.
Do not dispose of AdBlue
® bottles or
containers in the household waste.
Place them in a container provided for
this purpose or take them to your dealer.
If any fluid is split or splashed, wash
immediately with cold water or wipe with
a damp cloth.
If the fluid has crystallised, clean it off
using a sponge and hot water.
F
W
ipe away any spillage around the tank
filler using a damp cloth. Important
: if your vehicle's
AdBlue
® tank is completely empty -
w
hich is confirmed by the alert
messages and the impossibility of
starting the engine, you must add at
least 3.8 litres (so two 1.89 litre bottles).
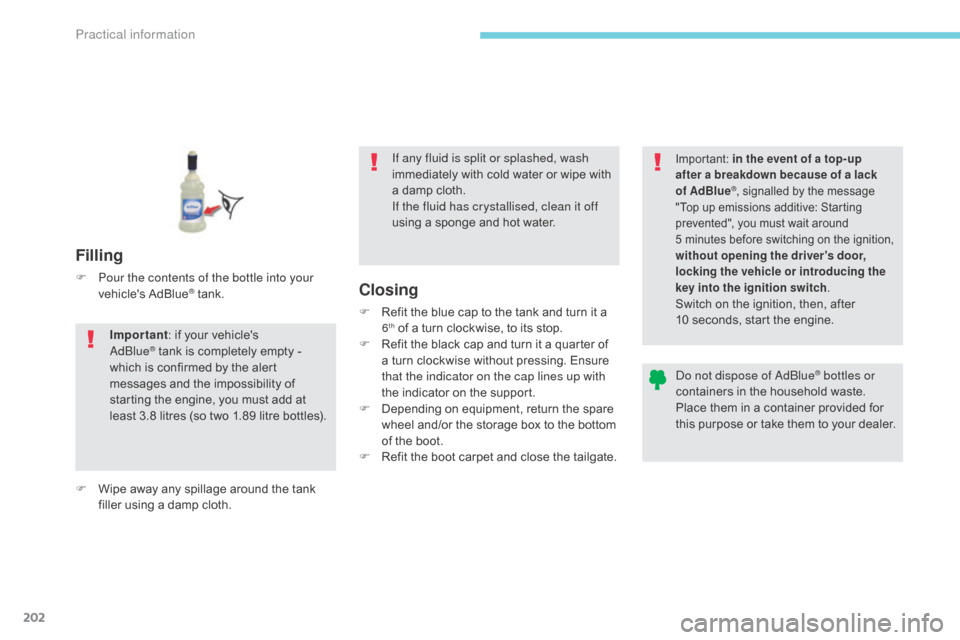
Filling
F Pour the contents of the bottle into your vehicle's AdBlue® tank.
Practical information
Page 206 of 348

204
C5_en_Chap08_en-cas-de-panne_ed01-2016
Temporary puncture repair kit
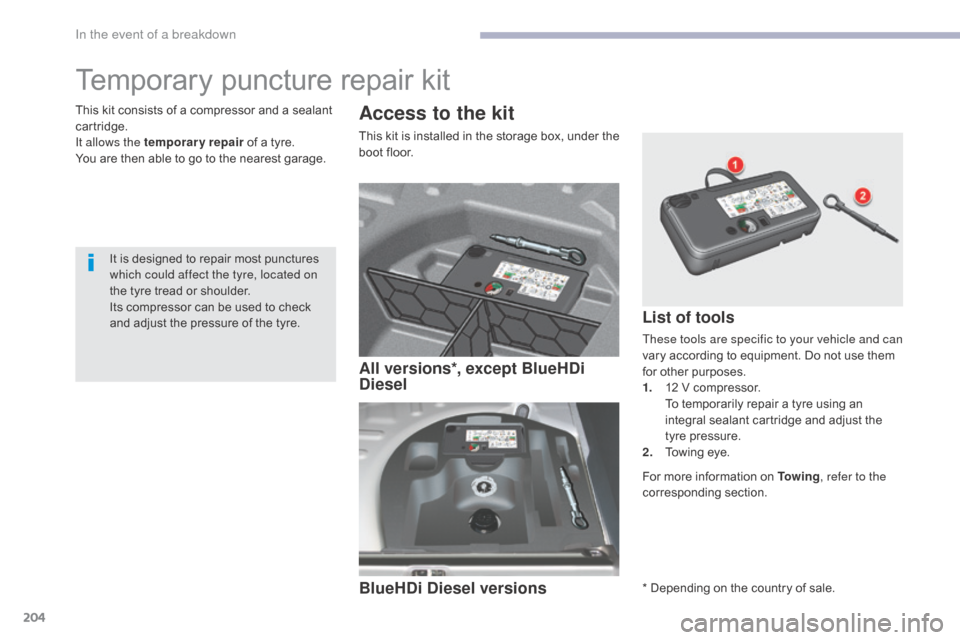
Access to the kit
This kit is installed in the storage box, under the
boot floor.
This kit consists of a compressor and a sealant
cartridge.
It allows the temporary repair
of a tyre.
You are then able to go to the nearest garage.
It is designed to repair most punctures
which could affect the tyre, located on
the tyre tread or shoulder.
Its compressor can be used to check
and adjust the pressure of the tyre.
List of tools
These tools are specific to your vehicle and can
vary according to equipment. Do not use them
for other purposes.
1.
1
2 V compressor.
T
o temporarily repair a tyre using an
integral sealant cartridge and adjust the
tyre pressure.
2.
T
owing eye.
For more information on To w i n g , refer to the
corresponding section.
All versions*, except BlueHDi
Diesel
BlueHDi Diesel versions
* Depending on the country of sale.
In the event of a breakdown
Page 214 of 348

212
C5_en_Chap08_en-cas-de-panne_ed01-2016
Access to the spare wheel
Removing the boot floor
F Saloon: raise the boot floor and fold in two.
F T ourer : raise the boot floor and hook it
using the retractable handle. Secure the
hook to the top part of the boot.
Removing the standard spare
wheel
F Detach the strap, then push the wheel for wards so as to be able to lift it.
Repositioning the standard spare
wheel
F Position the spare wheel flat in the boot, then pull it towards you.
F
N
ext place the toolbox inside the wheel,
then secure the assembly using the strap.
Removing the "space-saver"
spare wheel
F Unscrew the central nut.
F R emove the fixing parts (nut and bolt).
F
T
ake the spare wheel from the rear and lift
it towards you.
F
R
emove the wheel from the boot.
In the event of a breakdown
Page 215 of 348

213
C5_en_Chap08_en-cas-de-panne_ed01-2016
The tyre pressures are indicated on the
label located on the left-hand centre
door pillar.
Tyre pressures are given on this label
for different vehicle loading conditions.Repositioning the "space-saver"
spare wheel
F Return the spare wheel to its housing above the toolbox.
F
U
nscrew the nut on the bolt by a few turns.
F
P
lace the fixing parts (nut and bolt) in the
middle of the wheel.
F
T
ighten the central nut until it clicks to
secure the wheel.
Repositioning the boot floor
F Release the boot floor to return it to its initial position.
8
In the event of a breakdown
Page 224 of 348

222
C5_en_Chap08_en-cas-de-panne_ed01-2016
Rear lamps (Saloon)
Identify the failed bulb.
1. Brake lamps and sidelamps: P21W/5 W
2.
S
idelamps: R5W
3.
R
eversing lamps: H21W
4.
F
oglamps: H21W
5.
D
irection indicators: PY21WBoot lid-mounted lamps
F Refit the bulb holder H .
F C heck that the bulb holder H is secured
correctly by the two clips E .
F
R
efit the connector G .
F
R
eplace and fix the trim F with its 3 clips.
F
O
pen the boot.
F
U
sing a flat screwdriver, remove the 3 clips
which fix the trim in the lamp area.
F
P
artially remove the trim F .
F
D
isconnect the connector G .
F
U
nclip the bulb holder H .
F
R
eplace the failed bulb.
In the event of a breakdown
Page 225 of 348

223
C5_en_Chap08_en-cas-de-panne_ed01-2016
Wing-mounted lamps
F Remove the lateral boot trim flap A. To do
so, pull it towards the inside of the boot,
then pull it upwards.
F
D
isconnect connector B .
F
U
nscrew the 2 fixings C .
F
R
emove the lamp from its housing. F
D
etach the bulb holder D
.
F
R
eplace the failed bulb.
F
R
efit the bulb holder D
.
F
P
lace the lamp in its housing.
F
S
crew in the 2 fixings C
.
F
R
efit connector B
.
F
R
efit the side boot trim A
.
For vehicles fitted with a Hi-Fi amplifier, on the
right-hand side slacken the screw by a quarter
turn, then pull the boot side trim A up. You can use the wheelbrace to screw or
unscrew the fixings C
.
8
In the event of a breakdown
Page 226 of 348

224
C5_en_Chap08_en-cas-de-panne_ed01-2016
Tailgate-mounted lamps
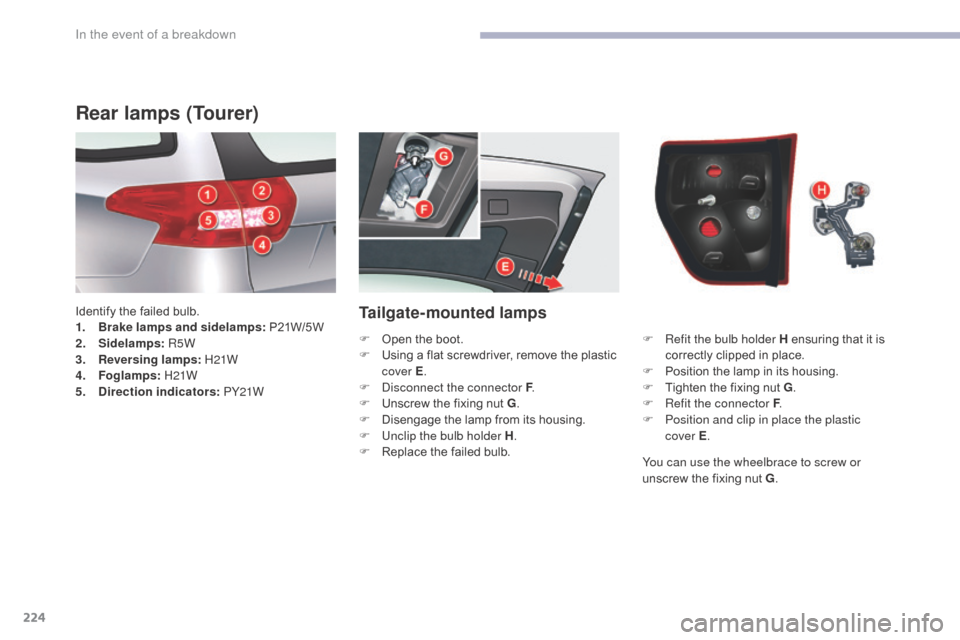
Rear lamps (Tourer)
Identify the failed bulb.
1. Brake lamps and sidelamps: P21W/5 W
2.
S
idelamps: R5W
3.
R
eversing lamps: H21W
4.
F
oglamps: H21W
5.
D
irection indicators: PY21W F
R
efit the bulb holder H ensuring that it is
correctly clipped in place.
F
P
osition the lamp in its housing.
F
T
ighten the fixing nut G.
F
R
efit the connector F.
F
P
osition and clip in place the plastic
cover
E.
F
O
pen the boot.
F
U
sing a flat screwdriver, remove the plastic
cover E .
F
D
isconnect the connector F.
F
U
nscrew the fixing nut G.
F
D
isengage the lamp from its housing.
F
U
nclip the bulb holder H.
F
R
eplace the failed bulb.You can use the wheelbrace to screw or
unscrew the fixing nut G.
In the event of a breakdown
Page 227 of 348

225
C5_en_Chap08_en-cas-de-panne_ed01-2016
Wing-mounted lamps
F Pull away the flap in the boot side trim A.
To do this, pull it towards the middle of the
boot, then pull it up.
F
D
isconnect the connector B .
F
U
nscrew the fixing nut C .
F
R
emove the lamp from its housing. F
D
etach the bulb holder D
.
F
R
eplace the faulty bulb.
F
R
efit the bulb holder D
.
F
P
lace the lamp in its housing.
F
S
crew in the fixing nut C
.
F
R
efit the connector B
.
F
R
efit the side boot trim A
.
For vehicles fitted with a Hi-Fi amplifier, on the
right-hand side slacken the screw by a quarter
turn, then pull the boot side trim A up. You can use the wheelbrace to screw or
unscrew the fixing nut C
.
8
In the event of a breakdown
Page 229 of 348

227
C5_en_Chap08_en-cas-de-panne_ed01-2016
Interior lamps
Courtesy lamps
Bulb: W5W
F U nclip the transparent cover of the roof
lamp to reach the bulb.
Rear reading lamps (Tourer)
Bulb: W5W
F D etach the cover of the reading lamp to
access the bulb.
Map reading lamps
Bulb: W5W
F D etach the cover.
F
I
f necessary, detach the partition of the
affected map reading lamp.
Boot lamp
Bulb: W5W
F D etach the lamp cover for access to the
bulb.
8
In the event of a breakdown