boot Citroen C5 2017 (RD/TD) / 2.G User Guide
[x] Cancel search | Manufacturer: CITROEN, Model Year: 2017, Model line: C5, Model: Citroen C5 2017 (RD/TD) / 2.GPages: 348, PDF Size: 10.72 MB
Page 59 of 348
57
C5_en_Chap02_ouverture_ed01-2016
Boot (Saloon)
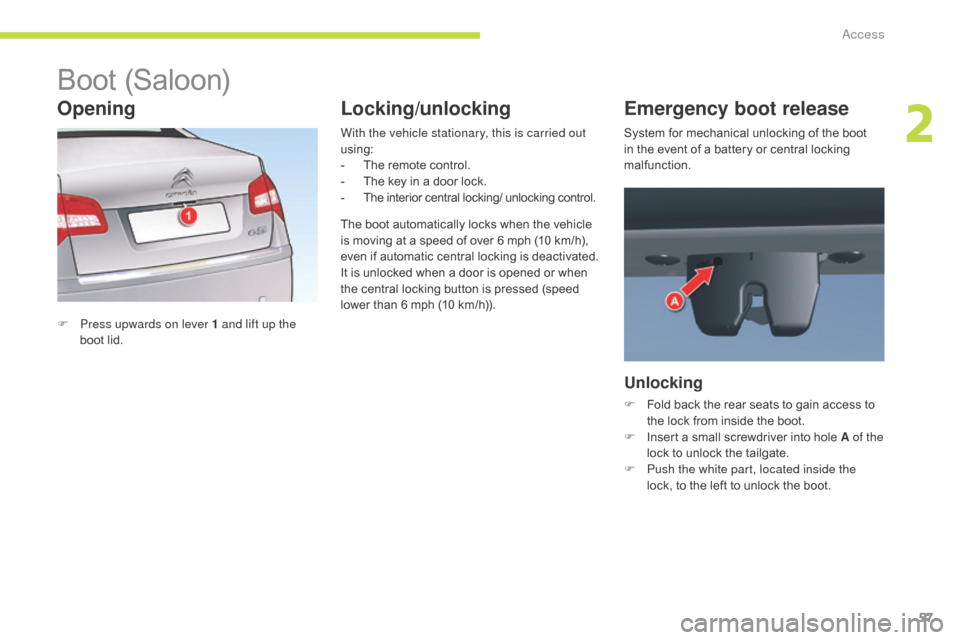
F Press upwards on lever 1 and lift up the boot lid. With the vehicle stationary, this is carried out
using:
-
T
he remote control.
-
T
he key in a door lock.
-
T
he interior central locking/ unlocking control.
The boot automatically locks when the vehicle
is moving at a speed of over 6 mph (10 km/h),
even if automatic central locking is deactivated.
It is unlocked when a door is opened or when
the central locking button is pressed (speed
lower than 6 mph (10 km/h)).
Opening Locking/unlocking Emergency boot release
Unlocking
F Fold back the rear seats to gain access to
the lock from inside the boot.
F
I
nsert a small screwdriver into hole A of the
lock to unlock the tailgate.
F
P
ush the white part, located inside the
lock, to the left to unlock the boot.
System for mechanical unlocking of the boot
in the event of a battery or central locking
malfunction.
2
Access
Page 60 of 348
58
C5_en_Chap02_ouverture_ed01-2016
Motorised opening
Boot (Tourer)
Manual opening
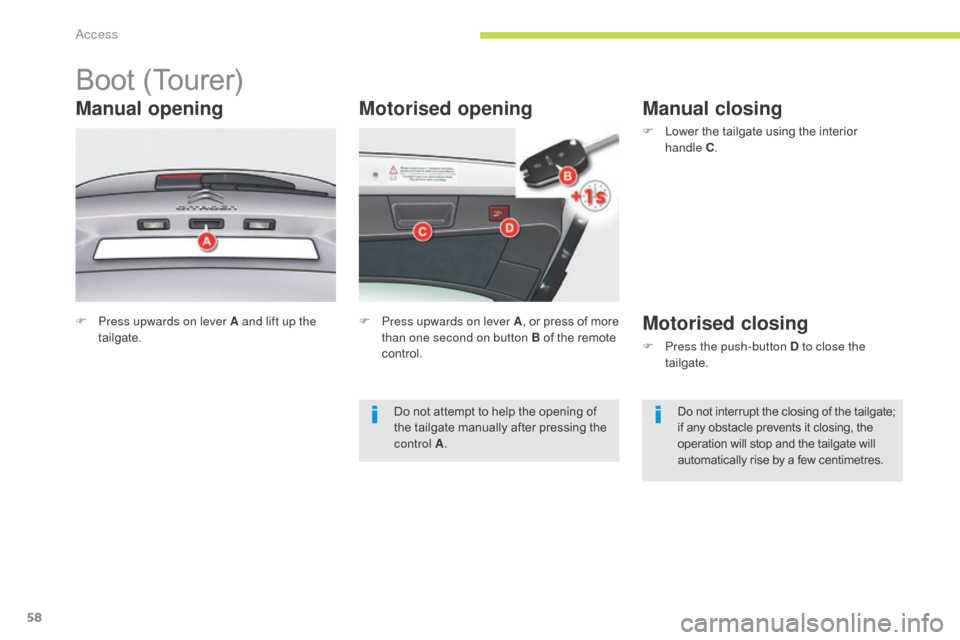
F Press upwards on lever A and lift up the tailgate. F
P ress upwards on lever A, or press of more
than one second on button B of the remote
control.
Manual closing
F Lower the tailgate using the interior handle C.
Motorised closing
F Press the push-button D to close the
tailgate.
Do not interrupt the closing of the tailgate;
if any obstacle prevents it closing, the
operation will stop and the tailgate will
automatically rise by a few centimetres.
Do not attempt to help the opening of
the tailgate manually after pressing the
control A
.
Access
Page 61 of 348
59
C5_en_Chap02_ouverture_ed01-2016
Cancelling the
memorisation
With the tailgate in the intermediate position,
you can cancel the stored position:
F
M
ake a long press on push-button D .
The system emits a long audible beep.
F
R
elease the push-button D . The tailgate
will return to the fully open position at the
next use.
Electrical protection of the
motor
If the tailgate is repeatedly opened and closed
in quick succession, the motor can start to
overheat and then cut out, preventing opening
and closing of the tailgate.
Allow the motor to cool down for ten minutes
without opening or closing the tailgate.
Closing in manual back-up mode remains
possible.
To avoid risk of injury, make sure that
no one is in the vicinity of the boot while
opening and closing.
If the tailgate is carrying extra weight
(snow, bicycle carrier, etc.) there is a
risk of it closing under this load. Support
the tailgate or first unload the bicycle
carrier or clear the snow.
When using an automatic car wash,
don’t forget to lock the vehicle so as to
avoid any risk of motorised opening of
the tailgate.
Memorisation of an
intermediate position
You can store an opening angle for the tailgate:
F M anually or automatically move the tailgate
to the required position.
F
M
ake a long press on push-button D .
The system emits a short audible beep.
F
R
elease the push-button D .
Interrupting the opening /
closing of the tailgate
When the tailgate is being opened or closed
electrically, you can interrupt its movement
at any point by pressing push-button D , the
control A or button B .
You can then open or close the tailgate
electrically or manually, if necessary moving it
in the opposite direction to release it.
Locking/unlocking
With the vehicle stationary, this is carried out
using:
-
T
he remote control.
-
T
he key in a door lock.
-
T
he interior central locking/ unlocking
control.
The boot automatically locks when the vehicle
is moving at a speed of over 6 mph (10 km/h),
even if automatic central locking is deactivated.
It is unlocked when a door is opened or when
the central locking button is pressed (at a
speed of less than 6 mph (10 km/h)).
2
Access
Page 70 of 348
68
C5_en_Chap03_ergonomie-et-confort_ed01-2016
Rear head restraints
The rear head restraints can be removed and
have two positions:
-
h
igh, position for use,
-
l
ow, storage position.
To raise a head restraint, pull it upwards.
To lower it, press the lug then the head
restraint.
To remove it, place it in the high position, push
the lug and pull it upwards.
To refit it, engage the head restraint rods in the
holes taking care to remain in line with the seat
back.
Rear seats
Bench seat, the left-hand (2/3) or right-hand (1/3) section of which can be folded to adapt the boot load space.
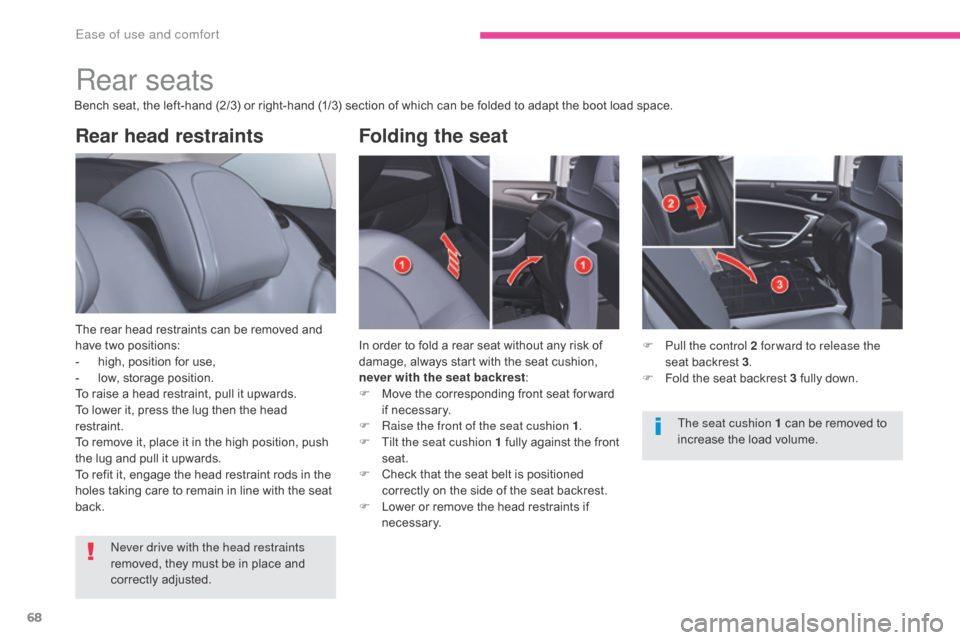
In order to fold a rear seat without any risk of
damage, always start with the seat cushion,
never with the seat backrest:
F
M
ove the corresponding front seat for ward
if necessary.
F
R
aise the front of the seat cushion 1.
F
T
ilt the seat cushion 1 fully against the front
seat.
F
C
heck that the seat belt is positioned
correctly on the side of the seat backrest.
F
L
ower or remove the head restraints if
necessary.
Folding the seat
F Pull the control 2 for ward to release the seat backrest 3 .
F
F
old the seat backrest 3 fully down.
Never drive with the head restraints
removed, they must be in place and
correctly adjusted. The seat cushion 1 can be removed to
increase the load volume.
Ease of use and comfort
Page 73 of 348
71
C5_en_Chap03_ergonomie-et-confort_ed01-2016
In order for these systems to be fully effective, follow the operation and maintenance
guidelines below:
F
T
o obtain an even air distribution, take care not to obstruct the exterior air intake grilles
located at the base of the windscreen, the nozzles, the vents and the air outlets, as well
as the air extractor located in the boot.
F
D
o not cover the sunshine sensor, located on the dashboard; this is used for regulation
of the air conditioning system.
F
O
perate the air conditioning system for at least 5 to 10 minutes, once or twice a month
to keep it in per fect working order.
F
E
nsure that the passenger compartment filter is in good condition and have the filter
elements replaced regularly.
W
e recommend the use of a combined passenger compartment filter. Thanks to its
special active additive, it contributes to the purification of the air breathed by the
occupants and the cleanliness of the passenger compartment (reduction of allergic
symptoms, bad odours and greasy deposits).
F
T
o ensure correct operation of the air conditioning system, you are also advised to
have it checked regularly as recommended in the maintenance and warranty guide.
F
I
f the system does not produce cold air, switch it off and contact a CITROËN dealer or
a qualified workshop.
When towing the maximum load on a steep gradient in high temperatures, switching off the
air conditioning increases the available engine power and so improves the towing ability.
Recommendations for ventilation and air conditioning
Stop & Start
The heating and air conditioning
systems only work when the engine is
running.
To maintain a comfortable temperature
in the passenger compartment, you can
temporarily deactivate the Stop & Start
system.
For more information on Stop & Star t ,
refer to the corresponding section. The condensation created by the air
conditioning results in a discharge
of water under the vehicle which is
per fectly normal.
If after an extended stop in sunshine,
the interior temperature is very
high, first ventilate the passenger
compartment for a few moments.
Put the air flow control at a setting high
enough to quickly change the air in the
passenger compartment.
Contains fluorinated greenhouse gas R134A.
From 1st October 2016, depending on version and country of sale, contains fluorinated
greenhouse gas R134A (gas capacity 0.525 kg +/- 0.025 kg, GWP index 1 430, 0.751 t
equivalent CO
2). The air conditioning system does not
contain chlorine and does not present
any danger to the ozone layer.
3
Ease of use and comfort
Page 87 of 348
85
C5_en_Chap03_ergonomie-et-confort_ed01-2016
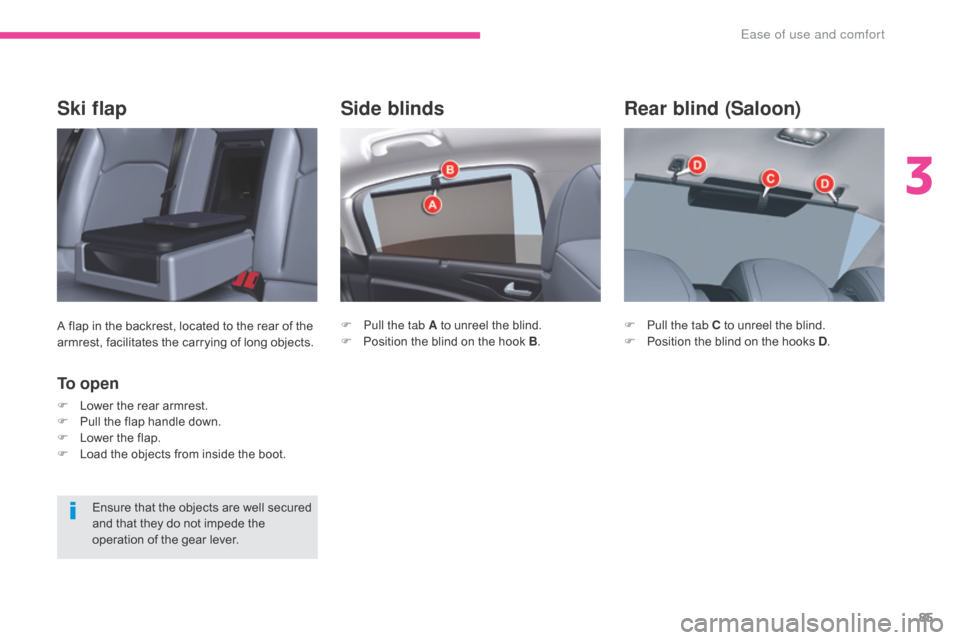
Side blinds
F Pull the tab A to unreel the blind.
F P osition the blind on the hook B .
Rear blind (Saloon)
F Pull the tab C to unreel the blind.
F
P osition the blind on the hooks D .
Ski flap
A flap in the backrest, located to the rear of the
armrest, facilitates the carrying of long objects.
To o p e n
F Lower the rear armrest.
F
P ull the flap handle down.
F
L
ower the flap.
F
L
oad the objects from inside the boot.
Ensure that the objects are well secured
and that they do not impede the
operation of the gear lever.
3
Ease of use and comfort
Page 88 of 348
86
C5_en_Chap03_ergonomie-et-confort_ed01-2016
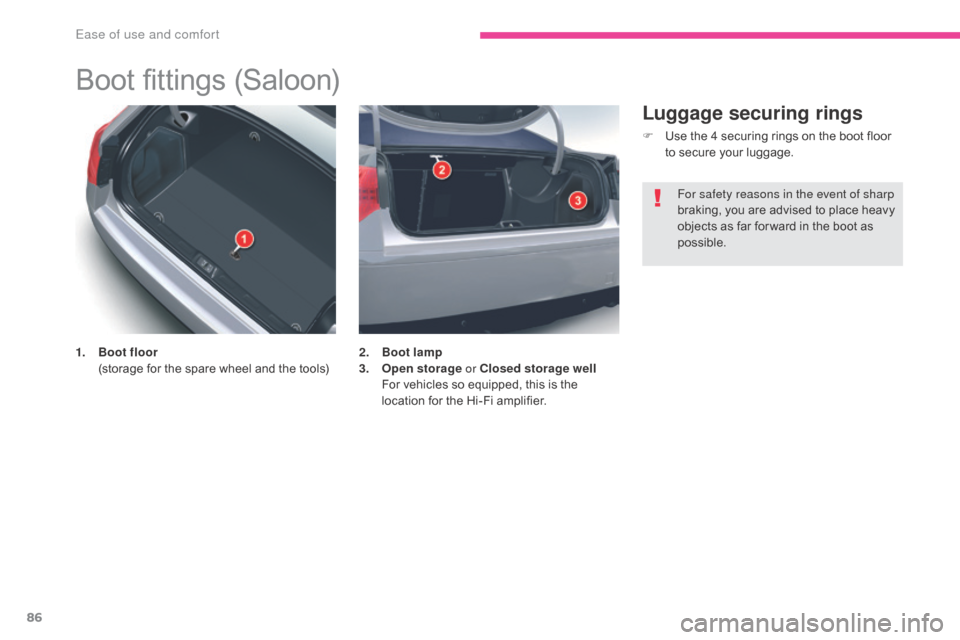
Boot fittings (Saloon)
1. Boot floor (
storage for the spare wheel and the tools) 2. B
oot lamp
3. O pen storage or Closed storage well
F
or vehicles so equipped, this is the
location for the Hi-Fi amplifier.
Luggage securing rings
F Use the 4 securing rings on the boot floor to secure your luggage.
For safety reasons in the event of sharp
braking, you are advised to place heavy
objects as far for ward in the boot as
possible.
Ease of use and comfort
Page 89 of 348
87
C5_en_Chap03_ergonomie-et-confort_ed01-2016
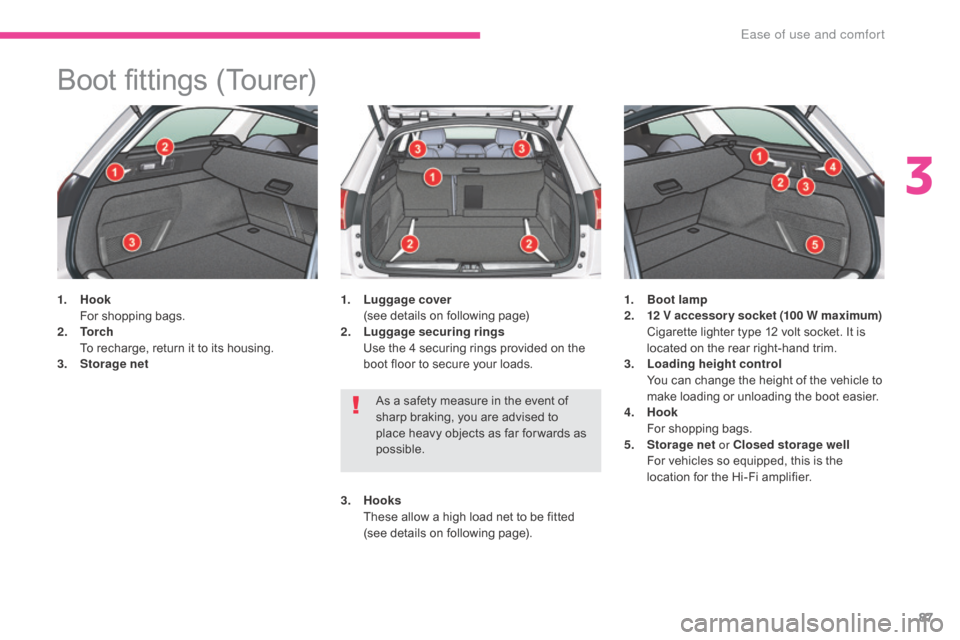
Boot fittings (Tourer)
1. Hook
F or shopping bags.
2.
T
o r c h
T
o recharge, return it to its housing.
3.
Sto
rage net 1. Lu
ggage
cover (
see details on following page)
2.
Lu
ggage securing rings
U
se the 4 securing rings provided on the
boot floor to secure your loads. 1. B
oot lamp
2. 1 2 V accessor y socket (100 W maximum)
C
igarette lighter type 12 volt socket. It is
located on the rear right-hand trim.
3.
L
oading height control
Y
ou can change the height of the vehicle to
make loading or unloading the boot easier.
4.
Hoo
k
F
or shopping bags.
5.
Sto
rage net or Closed storage well
F
or vehicles so equipped, this is the
location for the Hi-Fi amplifier.
As a safety measure in the event of
sharp braking, you are advised to
place heavy objects as far for wards as
possible.
3.
Hoo
ks
T
hese allow a high load net to be fitted
(see details on following page).
3
Ease of use and comfort
Page 91 of 348
89
C5_en_Chap03_ergonomie-et-confort_ed01-2016
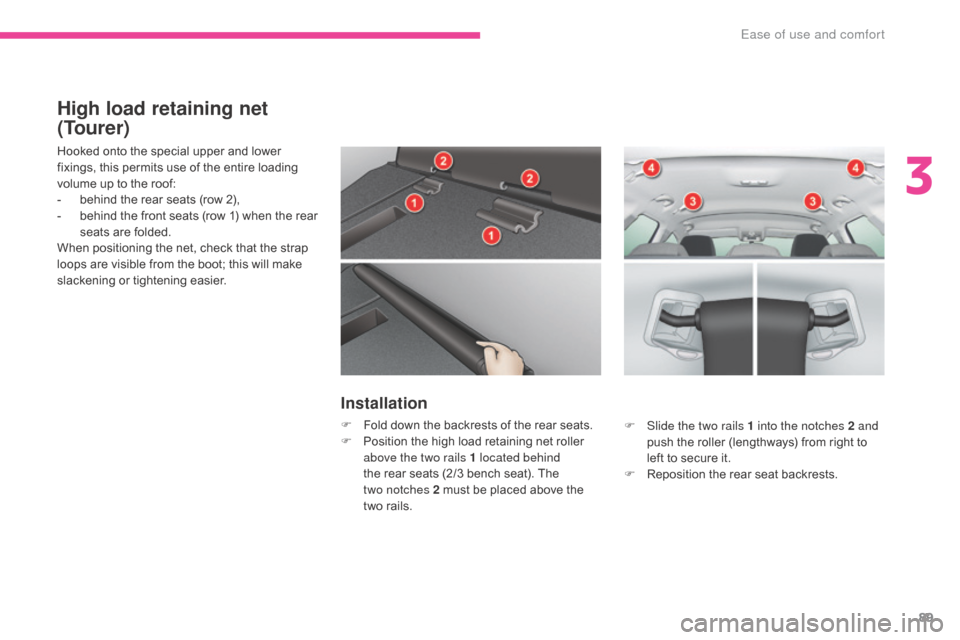
High load retaining net
(Tourer)
Hooked onto the special upper and lower
fixings, this permits use of the entire loading
volume up to the roof:
-
b
ehind the rear seats (row 2),
-
b
ehind the front seats (row 1) when the rear
seats are folded.
When positioning the net, check that the strap
loops are visible from the boot; this will make
slackening or tightening easier.
Installation
F Fold down the backrests of the rear seats.
F P osition the high load retaining net roller
above the two rails 1 located behind
the rear seats (2/3 bench seat). The
two
notches 2 must be placed above the
two
rails. F
S lide the two rails 1 into the notches 2 and
push the roller (lengthways) from right to
left to secure it.
F
R
eposition the rear seat backrests.
3
Ease of use and comfort
Page 171 of 348
169
C5_en_Chap06_securite_ed01-2016
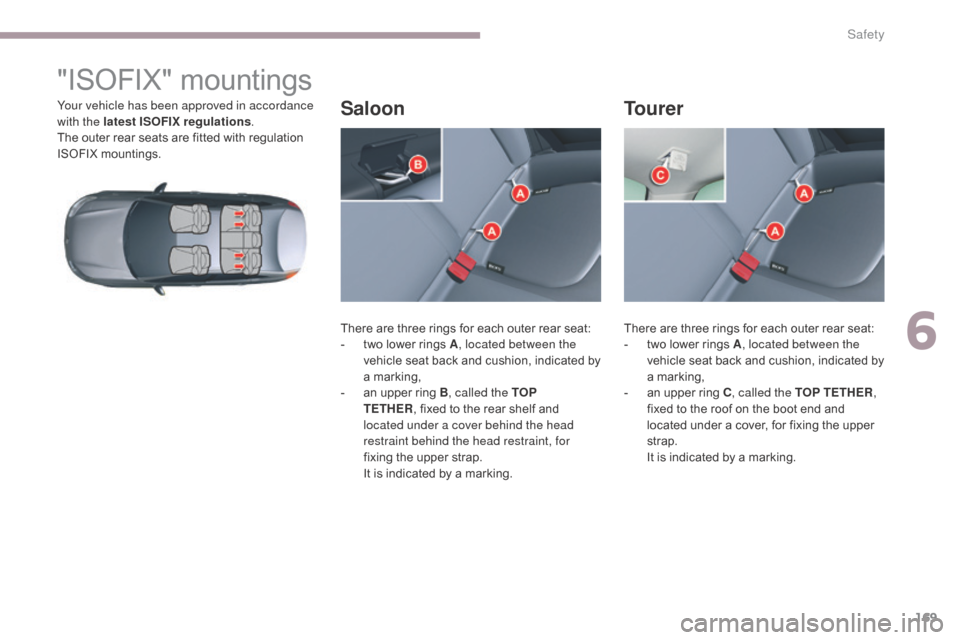
"ISOFIX" mountings
Your vehicle has been approved in accordance
with the latest ISOFIX regulations.
The outer rear seats are fitted with regulation
ISOFIX mountings.
There are three rings for each outer rear seat:
-
t
wo lower rings A, located between the
vehicle seat back and cushion, indicated by
a marking,
-
a
n upper ring B, called the TOP
TETHER ,
fixed to the rear shelf and
located under a cover behind the head
restraint behind the head restraint, for
fixing the upper strap.
I
t is indicated by a marking.There are three rings for each outer rear seat:
-
t
wo lower rings A, located between the
vehicle seat back and cushion, indicated by
a marking,
-
a
n upper ring C, called the TOP TETHER ,
fixed to the roof on the boot end and
located under a cover, for fixing the upper
strap.
I
t is indicated by a marking.SaloonTourer
6
Safety