height adjustment Citroen C5 2017 (RD/TD) / 2.G Owner's Manual
[x] Cancel search | Manufacturer: CITROEN, Model Year: 2017, Model line: C5, Model: Citroen C5 2017 (RD/TD) / 2.GPages: 348, PDF Size: 10.72 MB
Page 62 of 348
60
C5_en_Chap03_ergonomie-et-confort_ed01-2016
Front seats
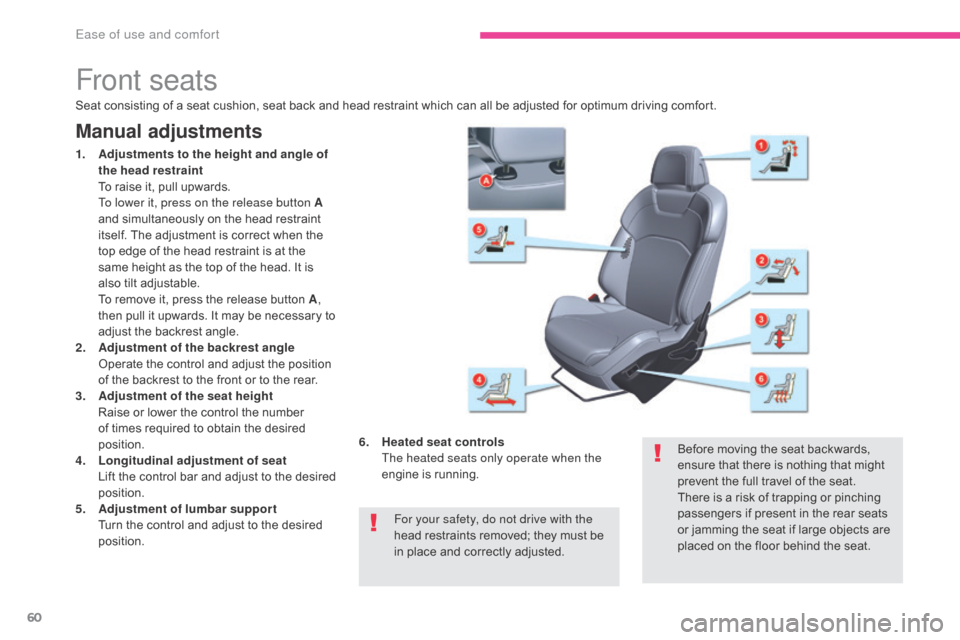
Manual adjustments
1. Adjustments to the height and angle of the head restraint
T
o raise it, pull upwards.
T
o lower it, press on the release button A
and simultaneously on the head restraint
itself. The adjustment is correct when the
top edge of the head restraint is at the
same height as the top of the head. It is
also tilt adjustable.
T
o remove it, press the release button A ,
then pull it upwards. It may be necessary to
adjust the backrest angle.
2.
A
djustment of the backrest angle
O
perate the control and adjust the position
of the backrest to the front or to the rear.
3.
A
djustment of the seat height
R
aise or lower the control the number
of times required to obtain the desired
position.
4.
L
ongitudinal adjustment of seat
L
ift the control bar and adjust to the desired
position.
5.
A
djustment of lumbar support
T
urn the control and adjust to the desired
position.
Seat consisting of a seat cushion, seat back and head restraint which can all be adjusted for optimum driving comfort.
For your safety, do not drive with the
head restraints removed; they must be
in place and correctly adjusted.Before moving the seat backwards,
ensure that there is nothing that might
prevent the full travel of the seat.
There is a risk of trapping or pinching
passengers if present in the rear seats
or jamming the seat if large objects are
placed on the floor behind the seat.
6.
H
eated seat controls
T
he heated seats only operate when the
engine is running.
Ease of use and comfort
Page 63 of 348
61
C5_en_Chap03_ergonomie-et-confort_ed01-2016
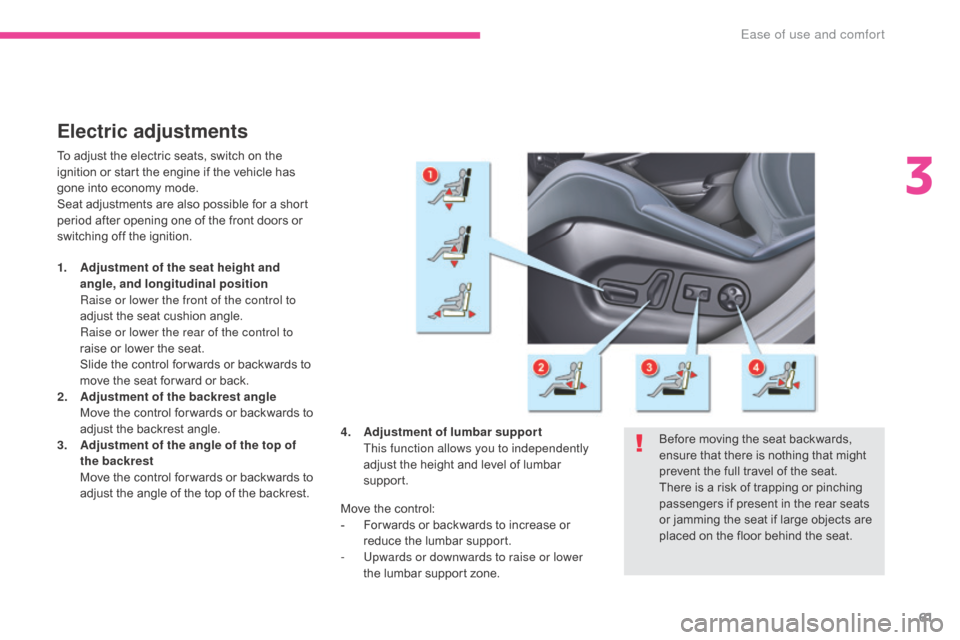
Electric adjustments
To adjust the electric seats, switch on the
ignition or start the engine if the vehicle has
gone into economy mode.
Seat adjustments are also possible for a short
period after opening one of the front doors or
switching off the ignition.
1.
A
djustment of the seat height and
angle, and longitudinal position
R
aise or lower the front of the control to
adjust the seat cushion angle.
R
aise or lower the rear of the control to
raise or lower the seat.
S
lide the control for wards or backwards to
move the seat for ward or back.
2.
A
djustment of the backrest angle
M
ove the control for wards or backwards to
adjust the backrest angle.
3.
A
djustment of the angle of the top of
the backrest
M
ove the control for wards or backwards to
adjust the angle of the top of the backrest. Before moving the seat backwards,
ensure that there is nothing that might
prevent the full travel of the seat.
There is a risk of trapping or pinching
passengers if present in the rear seats
or jamming the seat if large objects are
placed on the floor behind the seat.
Move the control:
-
F
or wards or backwards to increase or
reduce the lumbar support.
-
U
pwards or downwards to raise or lower
the lumbar support zone.
4.
A
djustment of lumbar support
T
his function allows you to independently
adjust the height and level of lumbar
support.
3
Ease of use and comfort
Page 64 of 348
62
C5_en_Chap03_ergonomie-et-confort_ed01-2016
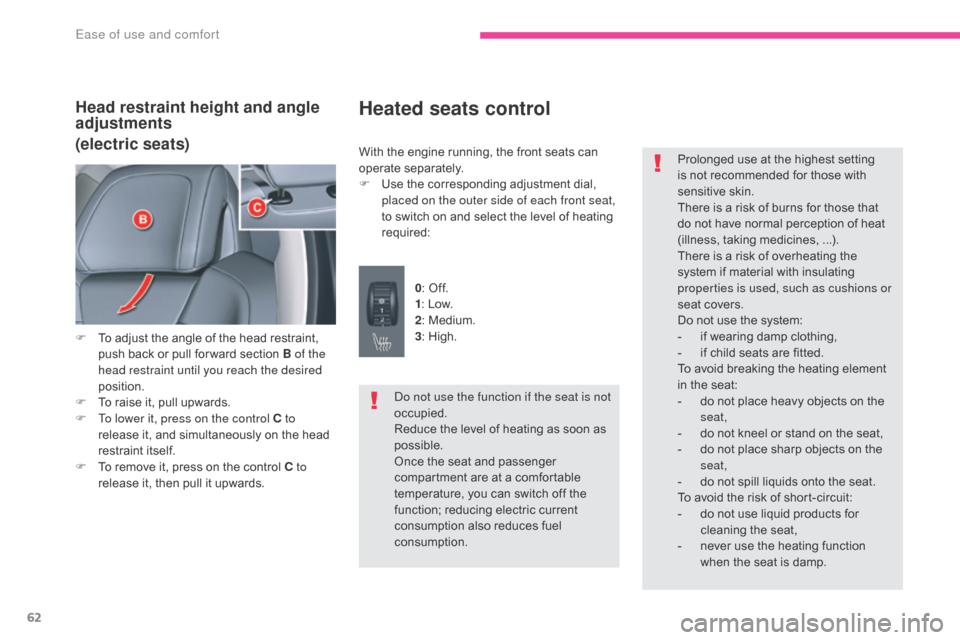
Head restraint height and angle
adjustments
(electric seats)
F To adjust the angle of the head restraint, push back or pull for ward section B of the
head restraint until you reach the desired
position.
F
T
o raise it, pull upwards.
F
T
o lower it, press on the control C to
release it, and simultaneously on the head
restraint itself.
F
T
o remove it, press on the control C to
release it, then pull it upwards.
Heated seats control
With the engine running, the front seats can
operate separately.
F
U
se the corresponding adjustment dial,
placed on the outer side of each front seat,
to switch on and select the level of heating
required:
0: Off.
1 : Low.
2 : Medium.
3 : High.
Do not use the function if the seat is not
occupied.
Reduce the level of heating as soon as
possible.
Once the seat and passenger
compartment are at a comfortable
temperature, you can switch off the
function; reducing electric current
consumption also reduces fuel
consumption. Prolonged use at the highest setting
is not recommended for those with
sensitive skin.
There is a risk of burns for those that
do not have normal perception of heat
(illness, taking medicines, ...).
There is a risk of overheating the
system if material with insulating
properties is used, such as cushions or
seat covers.
Do not use the system:
-
i
f wearing damp clothing,
-
i
f child seats are fitted.
To avoid breaking the heating element
in the seat:
-
d
o not place heavy objects on the
seat,
-
d
o not kneel or stand on the seat,
-
d
o not place sharp objects on the
seat,
-
d
o not spill liquids onto the seat.
To avoid the risk of short-circuit:
-
d
o not use liquid products for
cleaning the seat,
-
n
ever use the heating function
when the seat is damp.
Ease of use and comfort
Page 67 of 348
65
C5_en_Chap03_ergonomie-et-confort_ed01-2016
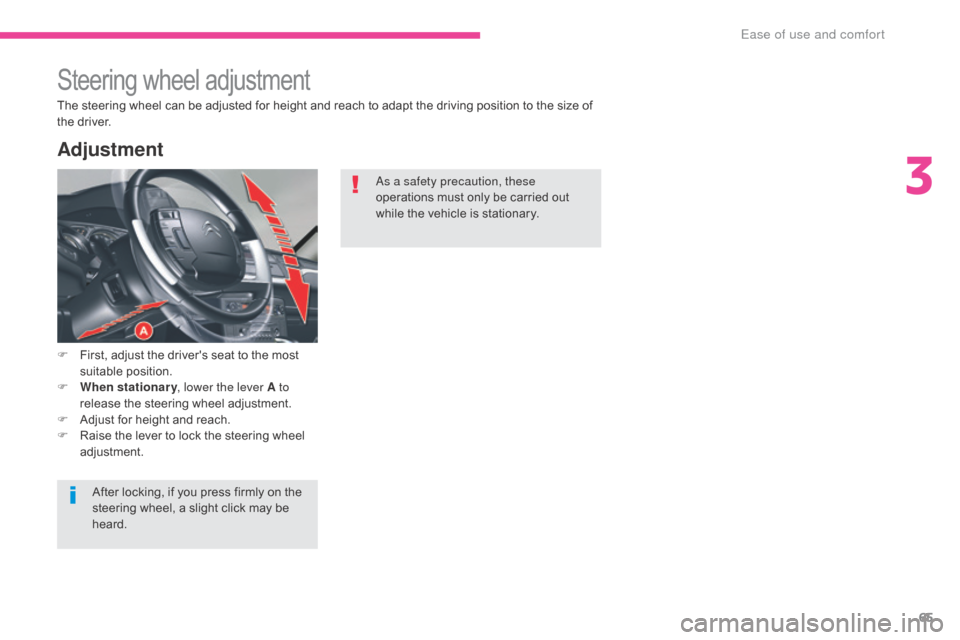
Steering wheel adjustment
F First, adjust the driver's seat to the most suitable position.
F
W
hen stationary , lower the lever A to
release the steering wheel adjustment.
F
A
djust for height and reach.
F
R
aise the lever to lock the steering wheel
adjustment.
The steering wheel can be adjusted for height and reach to adapt the driving position to the size of
the driver.
Adjustment
As a safety precaution, these
operations must only be carried out
while the vehicle is stationary.
After locking, if you press firmly on the
steering wheel, a slight click may be
heard.
3
Ease of use and comfort
Page 132 of 348
130
C5_en_Chap04_conduite_ed01-2016
"Hydractive III +" electronic suspension
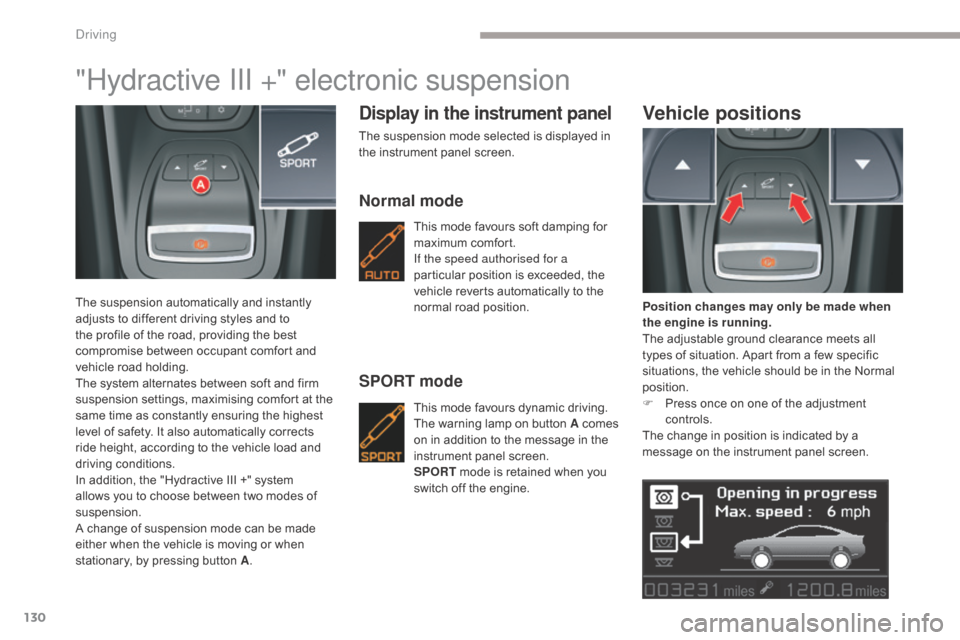
The suspension automatically and instantly
adjusts to different driving styles and to
the profile of the road, providing the best
compromise between occupant comfort and
vehicle road holding.
The system alternates between soft and firm
suspension settings, maximising comfort at the
same time as constantly ensuring the highest
level of safety. It also automatically corrects
ride height, according to the vehicle load and
driving conditions.
In addition, the "Hydractive III +" system
allows you to choose between two modes of
suspension.
A change of suspension mode can be made
either when the vehicle is moving or when
stationary, by pressing button A.
Display in the instrument panel
The suspension mode selected is displayed in
the instrument panel screen.
Normal mode
This mode favours soft damping for
maximum comfort.
If the speed authorised for a
particular position is exceeded, the
vehicle reverts automatically to the
normal road position.
SPORT mode
This mode favours dynamic driving. T
he warning lamp on button A comes
on in addition to the message in the
instrument panel screen.
SPORT mode is retained when you
switch off the engine.
Vehicle positions
Position changes may only be made when
the engine is running.
The adjustable ground clearance meets all
types of situation. Apart from a few specific
situations, the vehicle should be in the Normal
position.
F
P
ress once on one of the adjustment
controls.
The change in position is indicated by a
message on the instrument panel screen.
Driving
Page 139 of 348
137
C5_en_Chap05_eclairage-et-visibilite_ed01-2016
Manual headlamp
adjustment
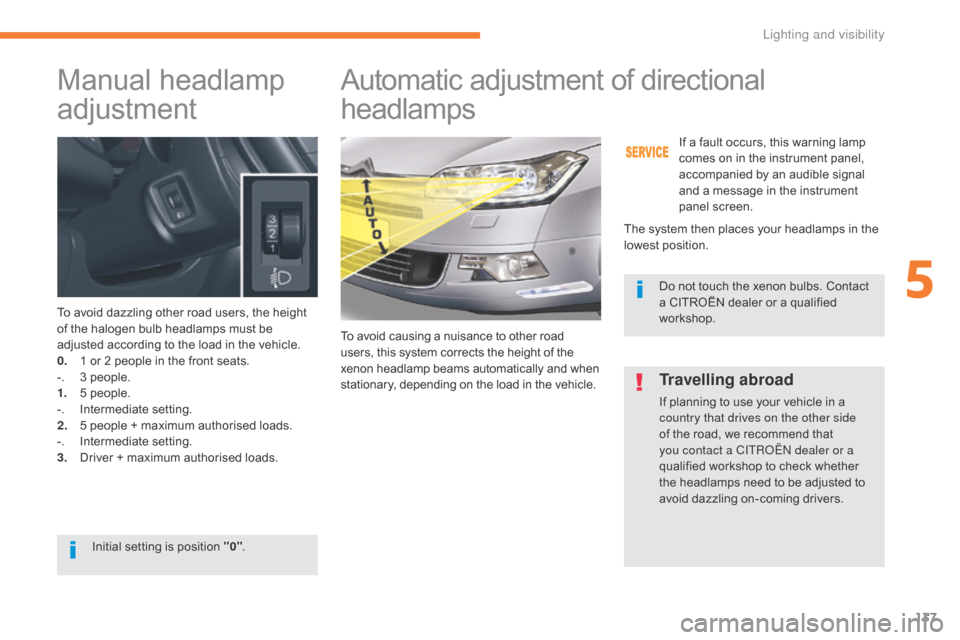
To avoid dazzling other road users, the height
of the halogen bulb headlamps must be
adjusted according to the load in the vehicle.
0.
1 o
r 2 people in the front seats.
-.
3 p
eople.
1.
5 p
eople.
-.
I
ntermediate setting.
2.
5 p
eople + maximum authorised loads.
-.
I
ntermediate setting.
3.
D
river + maximum authorised loads.
Automatic adjustment of directional
headlamps
The system then places your headlamps in the
lowest position. If a fault occurs, this warning lamp
comes on in the instrument panel,
accompanied by an audible signal
and a message in the instrument
panel screen.
Initial setting is position "0" .To avoid causing a nuisance to other road
users, this system corrects the height of the
xenon headlamp beams automatically and when
stationary, depending on the load in the
vehicle. Do not touch the xenon bulbs. Contact
a CITROËN dealer or a qualified
workshop.
Travelling abroad
If planning to use your vehicle in a
country that drives on the other side
of the road, we recommend that
you contact a CITROËN dealer or a
qualified workshop to check whether
the headlamps need to be adjusted to
avoid dazzling on-coming drivers.
5
Lighting and visibility
Page 153 of 348
151
C5_en_Chap06_securite_ed01-2016
Seat belts
Front seat belts
Fastening
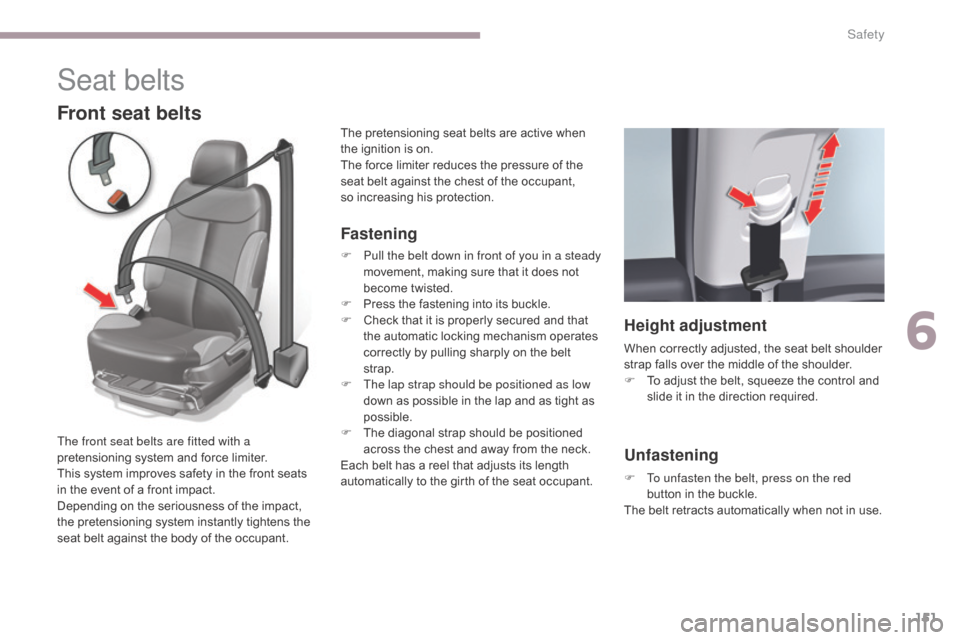
F Pull the belt down in front of you in a steady movement, making sure that it does not
become twisted.
F
P
ress the fastening into its buckle.
F
C
heck that it is properly secured and that
the automatic locking mechanism operates
correctly by pulling sharply on the belt
strap.
F
T
he lap strap should be positioned as low
down as possible in the lap and as tight as
possible.
F
T
he diagonal strap should be positioned
across the chest and away from the neck.
Each belt has a reel that adjusts its length
automatically to the girth of the seat occupant.
The front seat belts are fitted with a
pretensioning system and force limiter.
This system improves safety in the front seats
in the event of a front impact.
Depending on the seriousness of the impact,
the pretensioning system instantly tightens the
seat belt against the body of the occupant. The pretensioning seat belts are active when
the ignition is on.
The force limiter reduces the pressure of the
seat belt against the chest of the occupant,
so increasing his protection.
Height adjustment
When correctly adjusted, the seat belt shoulder
strap falls over the middle of the shoulder.
F
T
o adjust the belt, squeeze the control and
slide it in the direction required.
Unfastening
F To unfasten the belt, press on the red button in the buckle.
The belt retracts automatically when not in use.
6
Safety
Page 168 of 348
166
C5_en_Chap06_securite_ed01-2016
Installing child seats secured using
the seat belt
Seat position(s)Weight and indicative age of child
Up to 13 kg
(Groups 0 (b) and
0+)
Up to approx. 1 year From 9 to 18 kg
(Group 1)
From approx. 1 to 3 years
From 15 to 25 kg (Group 2)
From approx. 3 to 6 years
From 22 to 36 kg (Group 3)
From approx. 6 to 10
years
Row 1 Front passenger
(c) with
height adjustment (e) U (R)
U (R)U (R)U (R)
Front passenger (c) without
height adjustment (e) U
UUU
Row 2 Outer rear (d)
UUUU
Centre rear (d) (f ) UUUU
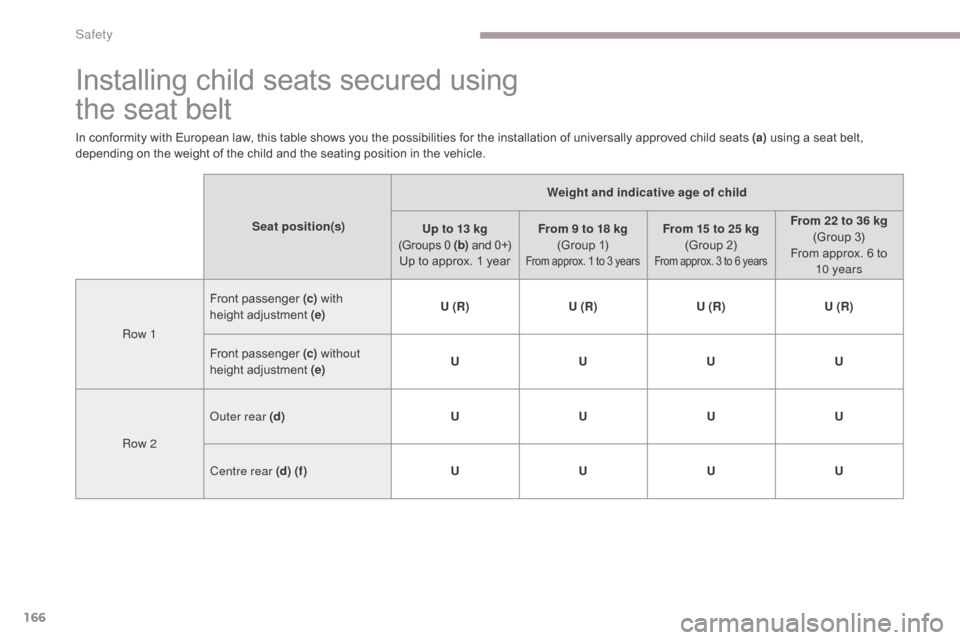
In conformity with European law, this table shows you the possibilities for the installation of universally approved child seats (a)
using a seat belt,
depending on the weight of the child and the seating position in the vehicle.
Safety
Page 216 of 348
214
C5_en_Chap08_en-cas-de-panne_ed01-2016
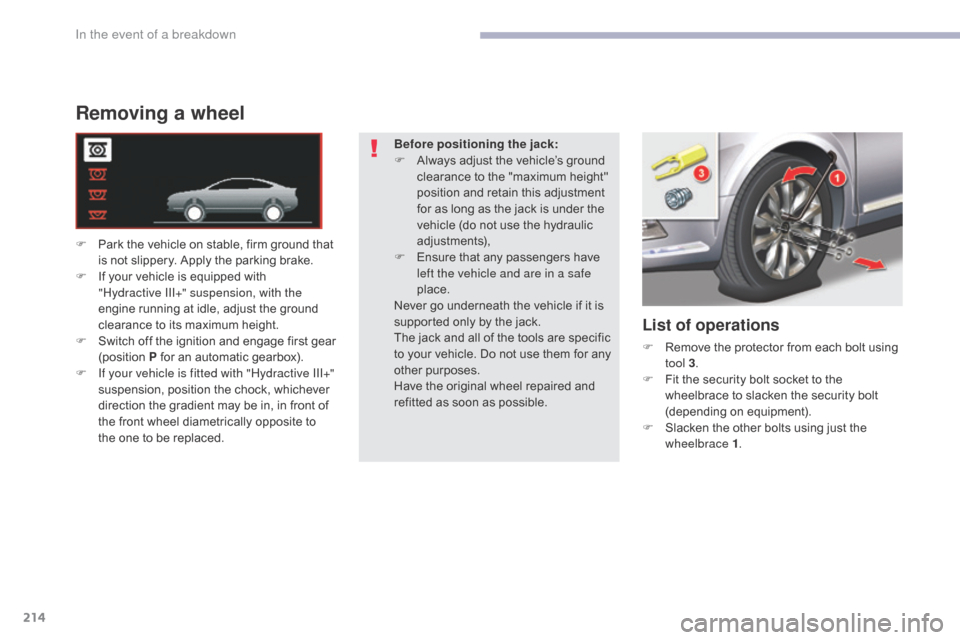
Removing a wheel
F Park the vehicle on stable, firm ground that is not slippery. Apply the parking brake.
F
I
f your vehicle is equipped with
"Hydractive
III+" suspension, with the
engine running at idle, adjust the ground
clearance to its maximum height.
F
S
witch off the ignition and engage first gear
(position P for an automatic gearbox).
F
I
f your vehicle is fitted with "Hydractive III+"
suspension, position the chock, whichever
direction the gradient may be in, in front of
the front wheel diametrically opposite to
the one to be replaced.
List of operations
F Remove the protector from each bolt using tool 3 .
F
F
it the security bolt socket to the
wheelbrace to slacken the security bolt
(depending on equipment).
F
S
lacken the other bolts using just the
wheelbrace 1 .
Before positioning the jack:
F
A
lways adjust the vehicle’s ground
clearance to the "maximum height"
position and retain this adjustment
for as long as the jack is under the
vehicle (do not use the hydraulic
adjustments),
F
E
nsure that any passengers have
left the vehicle and are in a safe
place.
Never go underneath the vehicle if it is
supported only by the jack.
The jack and all of the tools are specific
to your vehicle. Do not use them for any
other purposes.
Have the original wheel repaired and
refitted as soon as possible.
In the event of a breakdown