audio CITROEN C5 AIRCROSS 2022 Handbook (in English)
[x] Cancel search | Manufacturer: CITROEN, Model Year: 2022, Model line: C5 AIRCROSS, Model: CITROEN C5 AIRCROSS 2022Pages: 276, PDF Size: 7.92 MB
Page 5 of 276
3
Contents
Memorising speeds 125
Highway Driver Assist 126
Adaptive Cruise Control 126
Active Lane Keeping Assist 130
Active Safety Brake with Collision Risk Alert
and Intelligent emergency braking assistance
133
Distraction detection 136
Active Lane Departure Warning System 137
Blind Spot Monitoring 140
Active Blind Spot Monitoring System 141
Parking sensors 141
Top Rear Vision - Top 360 Vision 143
Park Assist 147
7Practical informationCompatibility of fuels 152
Refuelling 152
Misfuel prevention (Diesel) 153
Rechargeable hybrid system 154
Charging the traction battery
(Rechargeable hybrid engine)
160
Towing device 162
Energy economy mode 165
Snow chains 166
Very cold climate screen 166
Roof bars 167
Bonnet 168
Engine compartment 169
Checking levels 169
Checks 171
AdBlue® (BlueHDi) 173
Free-wheeling 175
Advice on care and maintenance 175
8In the event of a breakdownWarning triangle 178
Running out of fuel (Diesel) 178
Tool kit 178
Temporary puncture repair kit 180
Spare wheel 182
Changing a bulb 185
Changing a fuse 189
12
V battery 194
Accessory battery (Rechargeable hybrid) 197
Towing the vehicle 199
9Technical dataEngine technical data and towed loads 202
Petrol engines 203
Diesel engines 204
Rechargeable hybrid engine 205
Dimensions 206
Identification markings 206
10CITROËN Connect RadioFirst steps 207
Steering mounted controls 208
Menus 209
Applications 210
Radio 210
DAB (Digital Audio Broadcasting) radio 212
Media 212
Telephone 214
Settings 217
Frequently asked questions 218
11CITROËN Connect NavFirst steps 220
Steering mounted controls 221
Menus 221
Voice commands 223
Navigation 226
Connected navigation 229
Applications 231
Radio 234
DAB (Digital Audio Broadcasting) radio 235
Media 235
Telephone 237
Settings 239
Frequently asked questions 241
■
Alphabetical index
bit.ly/helpPSA
Access to additional videos
Page 6 of 276
4
Overview
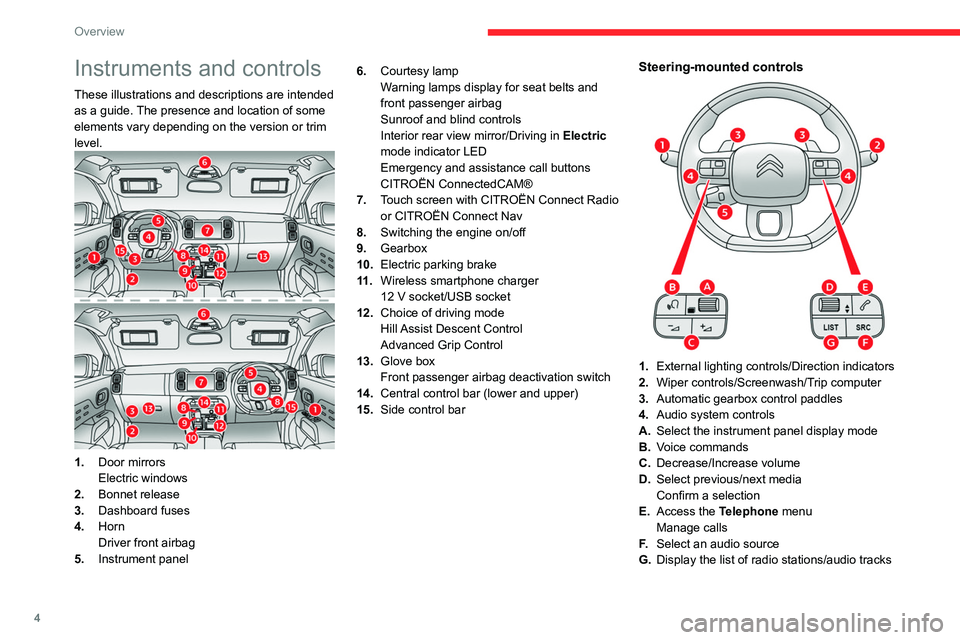
Instruments and controls
These illustrations and descriptions are intended
as a guide. The presence and location of some
elements vary depending on the version or trim
level.
1.Door mirrors
Electric windows
2. Bonnet release
3. Dashboard fuses
4. Horn
Driver front airbag
5. Instrument panel 6.
Courtesy lamp
Warning lamps display for seat belts and
front passenger airbag
Sunroof and blind controls
Interior rear view mirror/Driving in Electric
mode indicator LED
Emergency and assistance call buttons
CITROËN ConnectedCAM®
7. Touch screen with CITROËN Connect Radio
or CITROËN Connect Nav
8. Switching the engine on/off
9. Gearbox
10. Electric parking brake
11 . Wireless smartphone charger
12 V socket/USB socket
12. Choice of driving mode
Hill Assist Descent Control
Advanced Grip Control
13. Glove box
Front passenger airbag deactivation switch
14. Central control bar (lower and upper)
15. Side control bar
Steering-mounted controls
1.External lighting controls/Direction indicators
2. Wiper controls/Screenwash/Trip computer
3. Automatic gearbox control paddles
4. Audio system controls
A. Select the instrument panel display mode
B. Voice commands
C. Decrease/Increase volume
D. Select previous/next media
Confirm a selection
E. Access the Telephone menu
Manage calls
F. Select an audio source
G. Display the list of radio stations/audio tracks
Page 25 of 276
23
Instruments
1Distance that can still be travelled with the
fuel remaining in the tank (based on the
average fuel consumption over the last few miles
(kilometres) travelled).
This value may vary following a change in driving
style or terrain, leading to a significant change in
current fuel consumption.
When the range falls below 19 miles (30
km),
dashes are displayed.
After filling with at least 5 litres of fuel, the range
is recalculated and is displayed if it exceeds 62
miles (100
km).
If dashes instead of figures continue to be
displayed while driving, contact a CITROËN
dealer or a qualified workshop.
Current consumption
(mpg or l/100 km or km/l)Calculated during the last few seconds.
This function is only displayed at speeds above
19 mph (30
km/h).
Average consumption
(mpg or l/100 km or km/l)Calculated since the last trip computer
reset.
Average speed
(mph or km/h)Calculated since the last trip computer
reset.
Distance travelled
(miles or km)Calculated since the last trip computer
reset.
Stop & Start time counter
(minutes/seconds or hours/minutes)
If your vehicle is equipped with Stop & Start, a
time counter calculates the time spent in STOP
mode during a journey.
It resets to zero every time the ignition is
switched on.
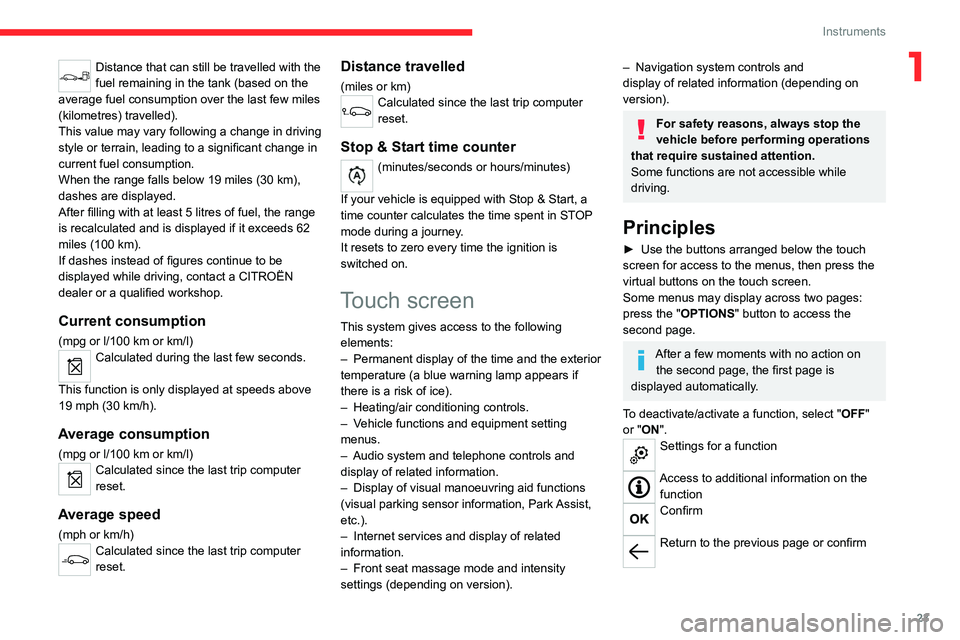
Touch screen
This system gives access to the following elements:
–
Permanent display of the time and the exterior
temperature (a blue warning lamp appears if
there is a risk of ice).
–
Heating/air conditioning controls.
–
V
ehicle functions and equipment setting
menus.
–
Audio system and telephone controls and
display of related information.
–
Display of visual manoeuvring aid functions
(visual parking sensor information, Park
Assist,
etc.).
–
Internet services and display of
related
information.
–
Front seat massage mode and intensity
settings (depending on version).
– Navigation system controls and
display of related information (depending on
version).
For safety reasons, always stop the
vehicle before performing operations
that require sustained attention.
Some functions are not accessible while
driving.
Principles
► Use the buttons arranged below the touch
screen for access to the menus, then press the
virtual buttons on the touch screen.
Some menus may display across two pages:
press the "OPTIONS" button to access the
second page.
After a few moments with no action on the second page, the first page is
displayed automatically.
To deactivate/activate a function, select " OFF"
or "ON".
Settings for a function
Access to additional information on the function
Confirm
Return to the previous page or confirm
Page 26 of 276
24
Instruments
Menus
Press the touch screen with three fingers
to show all of the menu buttons.
For more information about the menus,
refer to the sections describing the audio
and telematics systems.
Radio/Media
Climate
Settings for temperature, air flow, etc.
For more information on Manual air
conditioning and Dual-zone automatic air
conditioning , refer to the corresponding
sections.
Navigation (Depending on equipment)
Driving or Vehicle (Depending on
equipment)
Activation, deactivation and settings for certain
functions.
The functions are organised in 2 tabs: " Driving
functions" and "Vehicle settings".
Telephone
Applications
Display of available connected services
and access to the Eco-coaching function.
Settings
Main settings for the audio system, touch
screen and digital instrument panel.
Energy
Access to the rechargeable hybrid system
features (energy flow, consumption statistics,
deferred charging, eSave function).
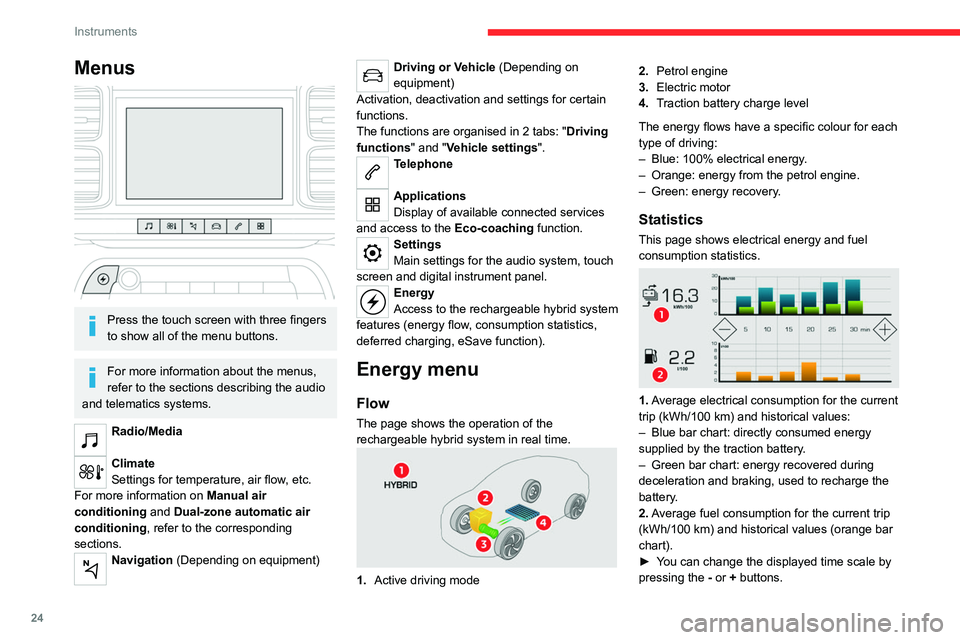
Energy menu
Flow
The page shows the operation of the
rechargeable hybrid system in real time.
1. Active driving mode 2.
Petrol engine
3. Electric motor
4. Traction battery charge level
The energy flows have a specific colour for each
type of driving:
–
Blue: 100% electrical energy
.
–
Orange: energy from the petrol engine.
–
Green: energy recovery
.
Statistics
This page shows electrical energy and fuel
consumption statistics.
1. Average electrical consumption for the current
trip (kWh/100
km) and historical values:
–
Blue bar chart: directly consumed energy
supplied by the traction battery
.
–
Green bar chart: energy recovered during
deceleration and braking, used to recharge the
battery
.
2. Average fuel consumption for the current trip
(kWh/100
km) and historical values (orange bar
chart).
►
Y
ou can change the displayed time scale by
pressing the
-
or + buttons.
Page 62 of 276
60
Ease of use and comfort
Wireless smartphone
charger
It allows wireless charging of a portable device
such as a smartphone, using the magnetic
induction principle, in accordance with the Qi 1.1
standard.
The portable device to be charged must be
compatible with the Qi standard, either by design
or by using a compatible holder or shell.
The charging area is identified by the Qi symbol.
The charger works with the engine running and
with the Stop & Start system in STOP mode.
Charging is managed by the smartphone.
With the Keyless Entry and Starting system, the
charger’s operation may be briefly disrupted
when a door is opened or the ignition is switched
off.
Charging
► With the charging area clear, place a device
in its centre.
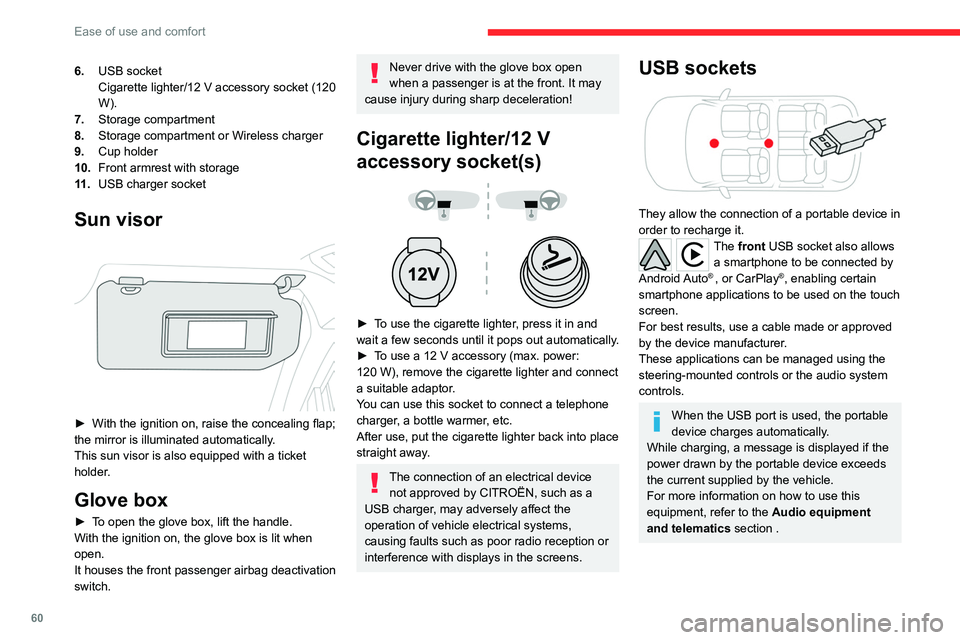
6. USB socket
Cigarette lighter/12
V accessory socket (120
W).
7. Storage compartment
8. Storage compartment or Wireless charger
9. Cup holder
10. Front armrest with storage
11 . USB charger socket
Sun visor
► With the ignition on, raise the concealing flap;
the mirror is illuminated automatically.
This sun visor is also equipped with a ticket
holder.
Glove box
► To open the glove box, lift the handle.
With the ignition on, the glove box is lit when
open.
It houses the front passenger airbag deactivation
switch.
Never drive with the glove box open
when a passenger is at the front. It may
cause injury during sharp deceleration!
Cigarette lighter/12 V
accessory socket(s)
► To use the cigarette lighter, press it in and
wait a few seconds until it pops out automatically.
►
T
o use a 12 V accessory (max. power:
120
W), remove the cigarette lighter and connect
a suitable adaptor.
You can use this socket to connect a telephone
charger, a bottle warmer, etc.
After use, put the cigarette lighter back into place
straight away.
The connection of an electrical device not approved by CITROËN, such as a
USB charger, may adversely affect the
operation of vehicle electrical systems,
causing faults such as poor radio reception or
interference with displays in the screens.
USB sockets
They allow the connection of a portable device in
order to recharge it.
The front USB socket also allows a smartphone to be connected by
Android Auto
® , or CarPlay®, enabling certain
smartphone applications to be used on the touch
screen.
For best results, use a cable made or approved
by the device manufacturer.
These applications can be managed using the
steering-mounted controls or the audio system
controls.
When the USB port is used, the portable
device charges automatically.
While charging, a message is displayed if the
power drawn by the portable device exceeds
the current supplied by the vehicle.
For more information on how to use this
equipment, refer to the Audio equipment
and telematics section .
Page 101 of 276

99
Driving
6automatically to preserve the remaining battery
charge.
Switching off the engine leads to a loss
of braking assistance.
Starting the engine
Parking brake applied:
► With a manual gearbox, place the gear lever
in neutral then depress the clutch pedal fully.
►
With an
automatic gearbox, place the gear
selector in mode N or P then depress the brake
pedal fully.
►
Insert the key into the ignition switch; the
system recognises the code.
►
Unlock
the steering column by simultaneously
turning the steering wheel and the key.
In certain cases, you may have to apply
significant force to move the steering
wheel (wheels on full lock, for example).
►
With a
petrol engine , operate the starter
motor by turning the key to position 3 without
pressing the accelerator pedal, until the engine
starts. Once the engine starts, release the key.
With petrol engines , after a cold start,
pre-heating the catalytic converter can
cause clearly-felt engine vibrations when
stationary, with the engine running, for
anything up to two minutes (accelerated idle
speed).
► With a Diesel engine, turn the key to position
2, ignition on, to operate the engine pre-heating
system.
Wait until this warning lamp goes off in the
instrument panel, then operate the starter
motor by turning the key to position 3 without
pressing the accelerator pedal, until the engine
starts. Once the engine starts, release the key.
In wintry conditions, the warning lamp
may stay on for a longer period. When
the engine is hot, the warning lamp does not
come on.
If the engine does not start straight away,
switch off the ignition. Wait a few
seconds before operating the starter motor
again. If the engine does not start after
several attempts, do not keep trying: you risk
damaging the starter motor and the engine.
Contact a CITROËN dealer or a qualified
workshop.
In mild conditions, do not leave the
engine at idle to warm up but move off
straight away and drive at moderate speed.
Switching off the engine
► Stop the vehicle.
► With the engine running in idle, turn the key
to position
1.
►
Remove the key from the ignition switch.
► To lock the steering column, turn the steering
wheel until it locks.
To facilitate unlocking of the steering column, it is recommended that the
wheels be returned to the straight ahead
position before switching off the engine.
►
Check that the parking brake is correctly
applied, particularly on sloping ground.
Never switch off the ignition before the
vehicle is at a complete stop. With the
engine off, the braking and steering
assistance systems are also cut off: risk of
loss of control of the vehicle.
When you leave the vehicle, keep the
key with you and lock the vehicle.
Energy economy mode
After switching off the engine (position 1 - Stop),
for a maximum of 30 minutes you can still
use functions such as the audio and telematic
system, the wipers, dipped beam headlamps,
courtesy lamps, etc.
For more information on Energy
economy mode, refer to the
corresponding section.
Key left in
If the key has been left in the ignition
switch at position 2 (Ignition on), the ignition
Page 103 of 276
101
Driving
6When the vehicle starts in electric mode,
it makes no noise.
Pay particular attention to pedestrians and
cyclists who may not hear the vehicle coming
despite the pedestrian horn.
Switching off
► Immobilise the vehicle.
► With a manual gearbox, ideally put the gear
lever into neutral.
►
With an
automatic gearbox, ideally select
mode
P or N.
►
Press the "
START/STOP" button..
►
For rechargeable hybrid vehicles, before
leaving the vehicle, check that the READY
indicator lamp is switched off.
In some circumstances, it is necessary to turn
the steering wheel to lock the steering column.
On certain versions with an automatic gearbox
(EAT6/EAT8), the steering column does not lock,
but the gearbox locks in mode P.
If the vehicle is not immobilised, the
engine will not switch off.
With the engine off, the braking and
steering assistance systems are also cut
off - risk of loss of control of the vehicle!
Never leave your vehicle with the
electronic key still inside.
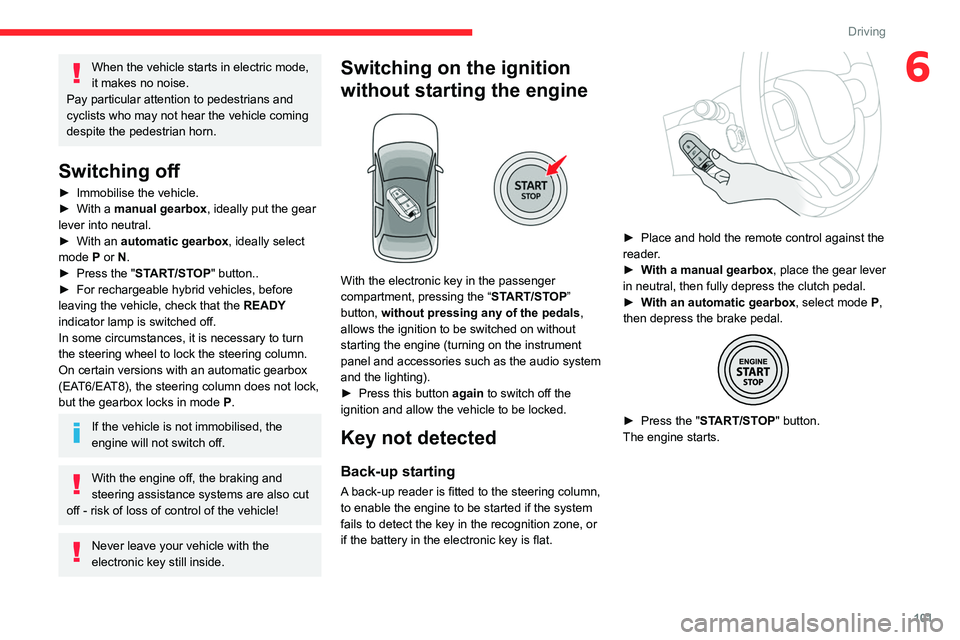
Switching on the ignition
without starting the engine
With the electronic key in the passenger
compartment, pressing the “ START/STOP”
button, without pressing any of the pedals ,
allows the ignition to be switched on without
starting the engine (turning on the instrument
panel and accessories such as the audio system
and the lighting).
►
Press this button
again to switch off the
ignition and allow the vehicle to be locked.
Key not detected
Back-up starting
A back-up reader is fitted to the steering column,
to enable the engine to be started if the system
fails to detect the key in the recognition zone, or
if the battery in the electronic key is flat.
► Place and hold the remote control against the
reader .
►
W
ith a manual gearbox, place the gear lever
in neutral, then fully depress the clutch pedal.
►
W
ith an automatic gearbox, select mode P,
then depress the brake pedal.
► Press the " START/STOP" button.
The engine starts.
Page 167 of 276

165
Practical information
7► Insert the key into the lock 7.
► Open the lock using the key .
► Hold the towball 5 firmly in one hand; using
the other hand, pull and turn the wheel 6 fully in
a clockwise direction; do not release the wheel.
►
Extract the towball from the bottom of its
carrier
1.
►
Release the wheel; it automatically stops in
the unlocked position (position B
).
► Refit the protective plug 2 to the carrier 1.
► Stow the towball in its bag away from knocks
and dirt.
Maintenance
Correct operation is only possible if the towball
and its carrier are kept clean.
Before cleaning the vehicle with a high-pressure
jet wash, the towball must be removed and the
protective plug fitted to the carrier.
Affix the enclosed label in a clearly visible location, close to the carrier or in the
boot.
Contact a CITROËN dealer or a qualified
workshop for any work on the towball system.
Energy economy mode
This system manages the duration of use of
certain functions, in order to conserve a sufficient
level of charge in the battery with the ignition off.
After switching off the engine, you can still
use functions such as the audio and telematic
system, the wipers and the dipped beam
headlamps or courtesy lamps, for a combined
duration of approximately 40 minutes.
Selecting the mode
A confirmation message is displayed when
energy economy mode is entered, and the active
functions are placed on standby.
If a telephone call is in progress at the
time, it will be maintained for around 10
minutes via the audio system’s hands-free
system.
Exiting the mode
These functions are automatically reactivated the
next time the vehicle is used.
To restore the use of these functions
immediately, start the engine and let it run:
–
For less than 10 minutes, to use the
equipment for approximately 5 minutes.
–
For more than 10 minutes, to use the
equipment for approximately 30 minutes.
Let the engine run for the specified duration to
ensure that the battery charge is sufficient.
T
o recharge the battery, avoid repeatedly or
continuously restarting the engine.
A flat battery prevents the engine from starting.
For more information on the 12
V battery,
refer to the corresponding section.
Load reduction mode
This system manages the use of certain
functions according to the level of charge
remaining in the battery.
When the vehicle is being driven, the load
reduction function temporarily deactivates certain
Page 196 of 276

194
In the event of a breakdown
Fuse No.Rating
(Amps) Functions
F24 40Trailer power supply.
F26 25Front foglamps.
12 V battery
Procedure for starting the engine using another
battery or for charging a discharged battery.
Lead-acid starter batteries
These batteries contain harmful
substances (sulphuric acid and lead).
They must be disposed of in accordance
with regulations and must never under any
circumstances be discarded with household
waste.
Take used remote control batteries and
vehicle batteries to a special collection point.
Protect your eyes and face before
handling the battery.
All operations on the battery must be carried
out in a well ventilated area and away from
naked flames and sources of sparks, to avoid
any risk of explosion or fire.
Wash your hands afterwards.
Access to the battery
The battery is located under the bonnet.
For access to the (+) terminal:
► Unlock the bonnet by activating the internal
release lever
, then the external safety catch.
►
Raise the bonnet.
(+)
Positive terminal.
It has a quick-release clamp.
(-) Negative terminal.
As the battery's negative terminal is not
accessible, a remote earth point is placed near
the battery.
Starting using another
battery
If your vehicle's battery is flat, the engine can be
started using a backup battery (either external or
from another vehicle) and jump leads or using a
battery booster.
Never start the engine by connecting a
battery charger.
Never use a 24
V or higher battery booster.
Check beforehand that the backup battery
has a nominal voltage of 12
V and a capacity
at least equal to that of the discharged
battery.
The two vehicles must not be in contact with
each other.
Switch off all electricity-consuming equipment
on both vehicles (audio system, wipers,
lighting, etc.).
Make sure that the jump leads are well away
from the engine’s moving parts (fan, belt,
etc.).
Do not disconnect the (+) terminal while the
engine is running.
Page 197 of 276

195
In the event of a breakdown
8
► Lift the plastic cover on the (+) terminal, if the
vehicle has one.
►
Connect the red cable to the (+) terminal of
flat battery
A (at the metal elbow), then to the
(+) terminal of the backup battery
B or of the
booster.
►
Connect one end of the green or black cable
to the (-) terminal of the backup battery
B or of
the booster (or to an earth point on the assisting
vehicle).
►
Connect the other end of the green or black
cable to the earth point
C
.
►
Start the engine on the assisting vehicle and
leave it running for a few minutes.
►
Operate the starter on the broken down
vehicle and let the engine run.
If the engine does not start immediately
, switch
off the ignition and wait a few moments before
trying again.
►
W
ait for it to return to idle.
►
Disconnect the jump leads in reverse order.
► Refit the plastic cover to the (+) terminal, if
the vehicle has one.
►
Allow the engine to run for at least
30
minutes, with the vehicle stationary, so that
the battery reaches an adequate state of charge.
Drive cautiously during the first 30
minutes after starting the engine.
With an automatic gearbox, never try to
start the engine by pushing the vehicle.
Charging the battery using a
battery charger
For optimum service life of the battery, it is
essential to maintain an adequate state of
charge.
In some circumstances, it may be necessary to
charge the battery:
–
When using the vehicle mainly for short
journeys.
–
If the vehicle is to be taken off the road for
several weeks.
Contact a CITROËN dealer or a qualified
workshop.
To charge the vehicle's battery yourself, use only a charger compatible with
lead-acid batteries with a nominal voltage of
12
V.
Follow the instructions provided by the
manufacturer of the charger.
Never reverse polarities.
It is not necessary to disconnect the
battery.
►
Switch the ignition off.
►
Switch off all electrical consumers (audio
system, lighting, wipers, etc.).
► Switch off charger B before connecting
the cables to the battery, so as to avoid any
dangerous sparks.
►
Ensure that the charger cables are in good
condition.
►
Lift the plastic cover on the (+) terminal, if the
vehicle has one.
►
Connect the cables of charger B
as follows:
•
the positive (+) red cable to the (+) terminal
of battery
A,
•
the negative (-) black cable to earth point C
on the vehicle.