fuse CITROEN C5 AIRCROSS 2022 Handbook (in English)
[x] Cancel search | Manufacturer: CITROEN, Model Year: 2022, Model line: C5 AIRCROSS, Model: CITROEN C5 AIRCROSS 2022Pages: 276, PDF Size: 7.92 MB
Page 5 of 276
3
Contents
Memorising speeds 125
Highway Driver Assist 126
Adaptive Cruise Control 126
Active Lane Keeping Assist 130
Active Safety Brake with Collision Risk Alert
and Intelligent emergency braking assistance
133
Distraction detection 136
Active Lane Departure Warning System 137
Blind Spot Monitoring 140
Active Blind Spot Monitoring System 141
Parking sensors 141
Top Rear Vision - Top 360 Vision 143
Park Assist 147
7Practical informationCompatibility of fuels 152
Refuelling 152
Misfuel prevention (Diesel) 153
Rechargeable hybrid system 154
Charging the traction battery
(Rechargeable hybrid engine)
160
Towing device 162
Energy economy mode 165
Snow chains 166
Very cold climate screen 166
Roof bars 167
Bonnet 168
Engine compartment 169
Checking levels 169
Checks 171
AdBlue® (BlueHDi) 173
Free-wheeling 175
Advice on care and maintenance 175
8In the event of a breakdownWarning triangle 178
Running out of fuel (Diesel) 178
Tool kit 178
Temporary puncture repair kit 180
Spare wheel 182
Changing a bulb 185
Changing a fuse 189
12
V battery 194
Accessory battery (Rechargeable hybrid) 197
Towing the vehicle 199
9Technical dataEngine technical data and towed loads 202
Petrol engines 203
Diesel engines 204
Rechargeable hybrid engine 205
Dimensions 206
Identification markings 206
10CITROËN Connect RadioFirst steps 207
Steering mounted controls 208
Menus 209
Applications 210
Radio 210
DAB (Digital Audio Broadcasting) radio 212
Media 212
Telephone 214
Settings 217
Frequently asked questions 218
11CITROËN Connect NavFirst steps 220
Steering mounted controls 221
Menus 221
Voice commands 223
Navigation 226
Connected navigation 229
Applications 231
Radio 234
DAB (Digital Audio Broadcasting) radio 235
Media 235
Telephone 237
Settings 239
Frequently asked questions 241
■
Alphabetical index
bit.ly/helpPSA
Access to additional videos
Page 6 of 276
4
Overview
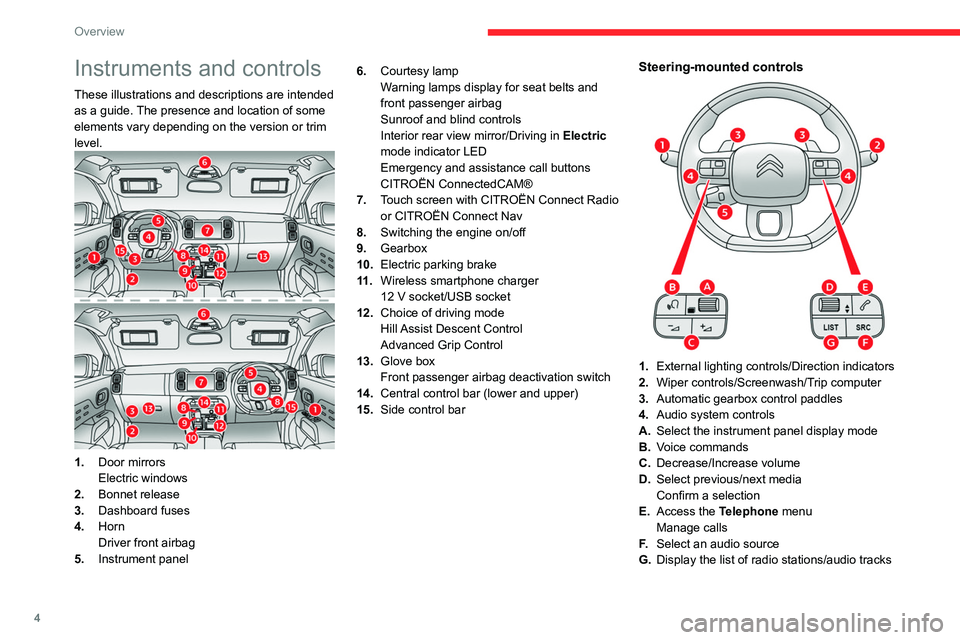
Instruments and controls
These illustrations and descriptions are intended
as a guide. The presence and location of some
elements vary depending on the version or trim
level.
1.Door mirrors
Electric windows
2. Bonnet release
3. Dashboard fuses
4. Horn
Driver front airbag
5. Instrument panel 6.
Courtesy lamp
Warning lamps display for seat belts and
front passenger airbag
Sunroof and blind controls
Interior rear view mirror/Driving in Electric
mode indicator LED
Emergency and assistance call buttons
CITROËN ConnectedCAM®
7. Touch screen with CITROËN Connect Radio
or CITROËN Connect Nav
8. Switching the engine on/off
9. Gearbox
10. Electric parking brake
11 . Wireless smartphone charger
12 V socket/USB socket
12. Choice of driving mode
Hill Assist Descent Control
Advanced Grip Control
13. Glove box
Front passenger airbag deactivation switch
14. Central control bar (lower and upper)
15. Side control bar
Steering-mounted controls
1.External lighting controls/Direction indicators
2. Wiper controls/Screenwash/Trip computer
3. Automatic gearbox control paddles
4. Audio system controls
A. Select the instrument panel display mode
B. Voice commands
C. Decrease/Increase volume
D. Select previous/next media
Confirm a selection
E. Access the Telephone menu
Manage calls
F. Select an audio source
G. Display the list of radio stations/audio tracks
Page 77 of 276

75
Safety
5General safety
recommendations
Do not remove the labels attached in
different places on your vehicle. They
include safety warnings as well as
identification information for the vehicle.
For all work on your vehicle, use a
qualified workshop that has the technical
information, skills and equipment required, all
of which a CITROËN dealer is able to
provide.
Depending on country regulations,
certain safety equipment may be
mandatory: high visibility safety vests,
warning triangles, breathalysers, spare bulbs,
spare fuses, fire extinguisher, first aid kit, mud
flaps at the rear of the vehicle, etc.
Installing electrical accessories:
– The fitting of electrical equipment or
accessories not approved by CITROËN may
cause excessive current consumption and
faults and failures with the electrical system
of your vehicle. Contact a CITROËN dealer
for information on the range of approved
accessories.
–
As a safety measure, access to the
diagnostic socket, used for the vehicle's
electronic systems, is reserved strictly for
CITROËN dealers or qualified workshops,
equipped with the special tools required (risk
of malfunctions of the vehicle's electronic
systems that could cause breakdowns or
serious accidents). The Manufacturer cannot
be held responsible if this advice is not
followed.
–
Any modification or adaptation not intended
or authorised by CITROËN or carried out
without meeting the technical requirements
defined by the Manufacturer will result in the
suspension of the commercial warranty
.
Installation of accessory radio
communication transmitters
Before installing a radio communication
transmitter with an external aerial, you must
without fail contact a CITROËN dealer for
the specification of transmitters which can
be fitted (frequency, maximum power, aerial
position, specific installation requirements),
in line with the Vehicle Electromagnetic
Compatibility Directive (2004/104/EC).
Declarations of conformity for radio
equipment
The relevant certificates are available on the
http://service.citroen.com/ACddb/ website.
Hazard warning lamps
► Pressing the red button causes all the
direction indicators to flash.
They can operate with the ignition off.
Automatic operation of hazard warning lamps
When braking in an emergency, depending on
the rate of deceleration, the hazard warning
lamps come on automatically. They switch off
automatically when you next accelerate.
They can be turned off by pressing the button
again.
Page 98 of 276

96
Safety
Do not confuse the child lock control,
which is red, with the back-up locking
control, which is black.
Electric child lock
Remote control system to prevent opening of the
rear doors using their interior controls.
Activation/Deactivation
► With the ignition on, press this button to
activate/deactivate the child lock.
A
message is displayed, confirming activation/
deactivation of the child lock.
When the indicator lamp is on, the child lock is
activated.
With the child lock activated, it is still
possible to open the doors from outside.
This system is independent and in no circumstances does it take the place of
the central locking control.
Check the status of the child lock each time
you switch on the ignition.
Always keep the electronic key with you when
leaving the vehicle, even for a short time.
In the event of a serious impact, the electric
child lock is switched off automatically to
permit the exit of the rear passengers.
Page 130 of 276

128
Driving
When moving off again, watch out for
cyclists, pedestrians and animals, as
they may not be detected properly.
Operating limits
Cruise control operates by day and night, in fog
or moderate rainfall.
Certain situations cannot be managed by the
system and require driver intervention.
Cases of non-detection by the system:
– Pedestrians, some cyclists, animals.
– Stationary vehicles (traffic jam, breakdown,
etc.).
– Vehicles crossing your lane.
– Vehicles driving in the opposite direction.
Situations in which the driver must pause the
cruise control system:
– Vehicles in a tight bend.
After a few seconds, the option is accepted and
will be memorised when the ignition is switched
off.
Temporarily exceeding the speed setting
► Fully depress the accelerator pedal. Distance
monitoring and cruise control are deactivated
while acceleration is maintained. "Cruise control
suspended" is displayed.
Deactivating the system
► Turn the thumbwheel 1 upwards to the OFF
position.
Information displayed on
the instrument panel
The following information can be seen on the
instrument panel in "DRIVING" display mode.
7. Vehicle detected by the system (full symbol)
8. Cruise control active (colour not grey)
9. Speed setting value
10. Speed suggested by the Speed Limit
Recognition and Recommendation
11 .Vehicle held stationary (versions with
automatic gearbox)
12.Inter-vehicle distance setting
13. Position of the vehicle detected by the
system
Messages and alerts
The "Driving" display mode of the digital
instrument panel must have been selected first.
The display of these messages or alerts
is not sequential.
"Cruise control paused" or "Cruise control
suspended" following a brief acceleration
by the driver.
"Cruise control active", no vehicle
detected.
"Cruise control paused", vehicle detected.
"Cruise control active", vehicle detected.
"Take back control" (orange).
►
Brake or accelerate, depending on the
context.
"Take back control" (red).
► Take back control of the vehicle
immediately: the system cannot manage the
current driving situation.
"Activation not possible, conditions
unsuitable". The system refuses to
activate cruise control, as the necessary
conditions are not fulfilled.
Stop function
"Cruise control paused" (for a few
seconds).
The system has brought the vehicle to a
complete stop and is holding it immobilised:
cruise control is paused.
The driver must accelerate to move off again,
then reactivate cruise control.
Stop & Go function
"To move off again, press the
accelerator pedal or press
the
II
button” (button 4).
The system has brought the vehicle to a
complete stop.
Within 3 seconds, the vehicle gradually and
automatically begins moving again.
After 3 seconds, the driver must accelerate or
press button 4 to move off again.
While the vehicle is immobilised, the
following recommendations apply:
–
The driver should not leave the vehicle.
–
Do not open the boot.
–
Do not drop off or pick up passengers.
–
Do not engage reverse gear
.
Page 143 of 276

141
Driving
6Operating limits
No alert is triggered in the following conditions:
– In the presence of non-moving objects (parked
vehicles, barriers, street lamps, road signs, etc.).
–
Oncoming traffic.
–
Driving on a winding road or a sharp corner
.
–
When overtaking or being overtaken by a very
long vehicle (lorry
, bus, etc.) that is detected
in the rear blind spot but is also present in the
driver’s front field of vision.
–
When overtaking quickly
.
–
In very heavy traffic: vehicles detected in
front and behind are confused with a lorry or a
stationary object.
–
If the Park
Assist function is activated.
Malfunction
If the event of a malfunction, this warning
lamp comes on in the instrument panel,
accompanied by the display of a message.
Contact a CITROËN dealer or a qualified
workshop to have the system checked.
The system may suffer temporary interference in certain weather conditions
(rain, hail, etc.).
In particular, driving on a wet surface or
moving from a dry area to a wet area can
cause false alerts (for example, the presence
of a fog of water droplets in the blind spot can
be interpreted as a vehicle).
In bad or wintry weather, ensure that the
sensors are not covered by mud, ice or snow.
Take care not to cover the warning zone in
the door mirrors, or the detection zones on
the front and rear bumpers with adhesive
labels or other objects; they may hamper
correct operation of the system.
Active Blind Spot Monitoring System
In addition to the fixed warning lamp in the door
mirror on the side in question, a correction of
trajectory will be felt if you attempt to cross
a lane marking with the direction indicator
activated, to help you avoid a collision.
This system is the combination of the Active
Lane Departure Warning System and Blind Spot
Monitoring.
These two functions must be activated and in
operation.
The speed of the vehicle must be between 40
and 87
mph (65 and 140 km/h).
These functions are especially suitable for
driving on motorways and main roads.
For more information on the Active Lane
Departure Warning System and Blind Spot
Monitoring , refer to the corresponding sections.
Parking sensors
Refer to the General recommendations on the
use of driving and manoeuvring aids .
Page 171 of 276

169
Practical information
7Closing
► Hold the bonnet and pull out the stay from the
support slot.
►
Clip the stay in its housing.
►
Lower the bonnet and release it near the end
of its travel.
►
Pull on the bonnet to check that it is locked
correctly
.
Because of the presence of electrical
equipment under the bonnet, it is strongly
recommended that exposure to water (rain,
washing, etc.) be limited.
Engine compartment
The engine shown here is an example for
illustrative purposes only.
The locations of the following elements may
vary:
–
Air filter
.
–
Engine oil dipstick.
–
Engine oil filler cap.
Petrol engine
Diesel engine
1. Screenwash fluid reservoir
2. Engine coolant reservoir
3. Brake fluid reservoir
4. Battery/Fuses
5. Remote earth point (-)
6. Fusebox
7. Air filter
8. Engine oil filler cap
9. Engine oil dipstick
The Diesel fuel system operates under
very high pressure.
All work on this circuit must be carried out
only by a CITROËN dealer or a qualified
workshop.
Checking levels
Check all of the following levels regularly in
accordance with the manufacturer's service
schedule. Top them up if required, unless
otherwise indicated.
If a level drops significantly, have the
corresponding system checked by a CITROËN
dealer or a qualified workshop.
The fluids must comply with the manufacturer's requirements and with
the vehicle's engine.
Take care when working under the bonnet, as certain areas of the engine
may be extremely hot (risk of burns) and the
cooling fan could start at any time (even with
the ignition off).
Used products
Avoid prolonged contact of used oil or fluids with the skin.
Most of these fluids are harmful to health and
very corrosive.
Do not discard used oil or fluids into
sewers or onto the ground.
Empty used oil into the containers reserved
for this purpose at a CITROËN dealer or a
qualified workshop.
Engine oil
The level is checked, with the engine having been switched off for at least 30
minutes and on level ground, either using the oil
level indicator in the instrument panel when the
Page 191 of 276
189
In the event of a breakdown
8► Insert a thin screwdriver into one of the cut-
outs in the lens.
►
Push it outwards to unclip it.
►
Remove the lens.
►
Replace the faulty bulb.
T
o refit, press the lens to clip it in.
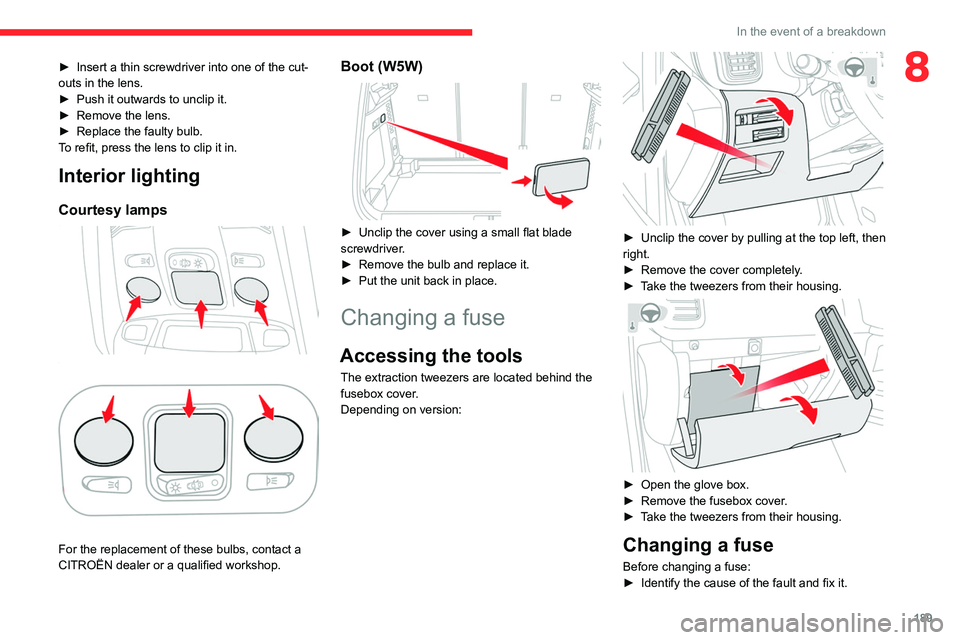
Interior lighting
Courtesy lampsFront courtesy lamp
Rear courtesy lamp
For the replacement of these bulbs, contact a
CITROËN dealer or a qualified workshop.
Boot (W5W)
► Unclip the cover using a small flat blade
screwdriver .
►
Remove the bulb and replace it.
►
Put the unit back in place.
Changing a fuse
Accessing the tools
The extraction tweezers are located behind the
fusebox cover.
Depending on version:
► Unclip the cover by pulling at the top left, then
right.
►
Remove the cover completely
.
►
T
ake the tweezers from their housing.
► Open the glove box.
► Remove the fusebox cover .
►
T
ake the tweezers from their housing.
Changing a fuse
Before changing a fuse:
► Identify the cause of the fault and fix it.
Page 192 of 276
190
In the event of a breakdown
► Stop all power consumption.
► Immobilise the vehicle and switch the ignition
off.
►
Identify the defective fuse using the current
allocation tables and diagrams.
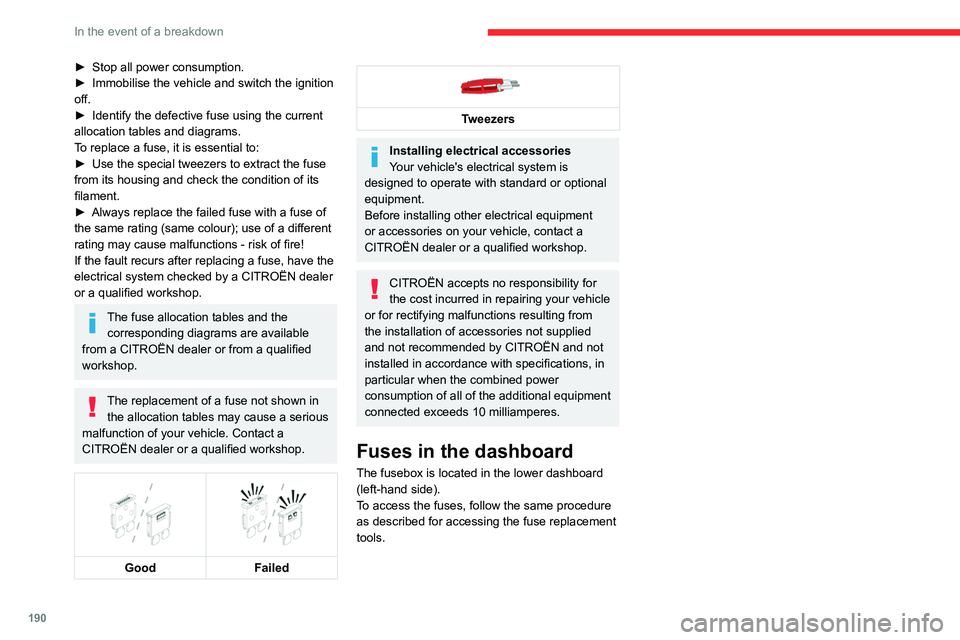
T
o replace a fuse, it is essential to:
►
Use the special tweezers to extract the fuse
from its housing and check the condition of its
filament.
►
Always replace the failed fuse with a fuse of
the same rating (same colour); use of a different
rating may cause malfunctions - risk of fire!
If the fault recurs after replacing a fuse, have the
electrical system checked by a CITROËN dealer
or a qualified workshop.
The fuse allocation tables and the corresponding diagrams are available
from a CITROËN dealer or from a qualified
workshop.
The replacement of a fuse not shown in the allocation tables may cause a serious
malfunction of your vehicle. Contact a
CITROËN dealer or a qualified workshop.
Good
Failed
Tweezers
Installing electrical accessories
Your vehicle's electrical system is
designed to operate with standard or optional
equipment.
Before installing other electrical equipment
or accessories on your vehicle, contact a
CITROËN dealer or a qualified workshop.
CITROËN accepts no responsibility for
the cost incurred in repairing your vehicle
or for rectifying malfunctions resulting from
the installation of accessories not supplied
and not recommended by CITROËN and not
installed in accordance with specifications, in
particular when the combined power
consumption of all of the additional equipment
connected exceeds 10 milliamperes.
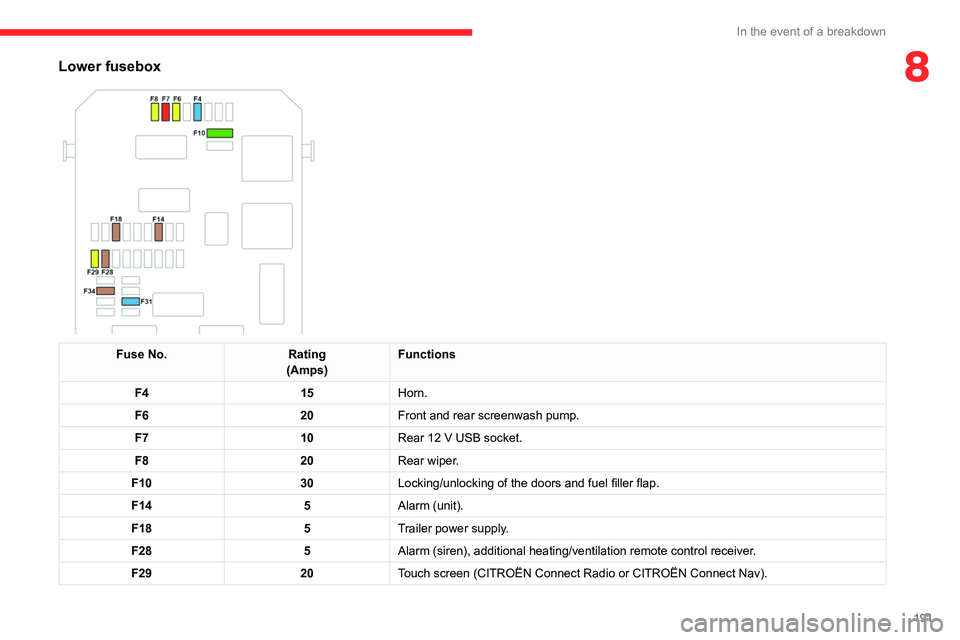
Fuses in the dashboard
The fusebox is located in the lower dashboard
(left-hand side).
To access the fuses, follow the same procedure
as described for accessing the fuse replacement
tools.
Lower fusebox
Fuse No. Rating
(Amps) Functions
F4 15Horn.
F6 20Front and rear screenwash pump.
F7 10Rear 12 V USB socket.
F8 20Rear wiper.
F10 30Locking/unlocking of the doors and fuel filler flap.
F14 5Alarm (unit).
F18 5Trailer power supply.
F28 5Alarm (siren), additional heating/ventilation remote control receiver.
F29 20Touch screen (CITROËN Connect Radio or CITROËN Connect Nav).
Page 193 of 276
191
In the event of a breakdown
8Lower fusebox
Fuse No.Rating
(Amps) Functions
F4 15Horn.
F6 20Front and rear screenwash pump.
F7 10Rear 12
V USB socket.
F8 20Rear wiper.
F10 30Locking/unlocking of the doors and fuel filler flap.
F14 5Alarm (unit).
F18 5Trailer power supply.
F28 5Alarm (siren), additional heating/ventilation remote control receiver.
F29 20Touch screen (CITROËN Connect Radio or CITROËN Connect Nav).