gearbox CITROEN C5 AIRCROSS DAG 2020 Handbook (in English)
[x] Cancel search | Manufacturer: CITROEN, Model Year: 2020, Model line: C5 AIRCROSS DAG, Model: CITROEN C5 AIRCROSS DAG 2020Pages: 292, PDF Size: 8.59 MB
Page 173 of 292

171
180° viewTop 360 Vision
The vehicle has a camera at the front, fitted
i n the grille, and a camera at the rear, located
close to the number plate lamps.
Using these cameras, the system displays
the vehicle's near surroundings on the touch
screen, offering views from the rear of the
vehicle (rear vision), when reverse gear is
engaged and views from the front of the vehicle
(front vision), when the gearbox is in neutral or
a
gear is engaged.
Rear vision
If a trailer or a bicycle carrier is fitted to
t he towball, the area behind the vehicle on
the view from above goes dark.
The surroundings are reconstructed by the
front camera only.
The 180° view facilitates reversing out of
a
parking bay, making it possible to see the
approach of vehicles, pedestrians and cyclists.
This view is not recommended for carrying out
a
complete manoeuvre.
It consists of 3
areas: left A , centre B and
right C .
This view is available only from the view
selection menu.
The system activates automatically when
reverse gear is engaged.
The system is deactivated:
-
a
utomatically above about 6
mph (10
km/h), -
w
hen shifting out of reverse (the rear view
image is replaced by the front view image
after 7
seconds),
-
b
y pressing the white arrow in the top left-
hand corner of the touch screen.
The rear vision views are similar to those for
the Top Rear Vision.
For more information on the Top Rear Vision,
refer to the corresponding section.
Front and rear vision
6
Driving
Page 174 of 292
172
F Select "Panoramic visual aid ".
AUTO mode is displayed by default, with front
vision, if the gearbox is in neutral or with a
gear
engaged, or with rear vision, if reverse is
engaged.
The system is deactivated:
-
a
utomatically above about 19 mph (30 km/h)
(the image disappears temporarily from
12
mph (20 km/h)),
-
b
y pressing the white arrow in the top left-
hand corner of the touch screen.
Standard view Zoom view
Obstacles may appear further away than
they actually are.
It is important to check the sides of the
vehicle during the manoeuvre, using the
mirrors.
The front and rear parking sensors also
provide information on the vehicle's
surroundings.
AUTO mode
With the engine running and the
speed below 12
mph (20 km/h), the
system is activated via the Driving/
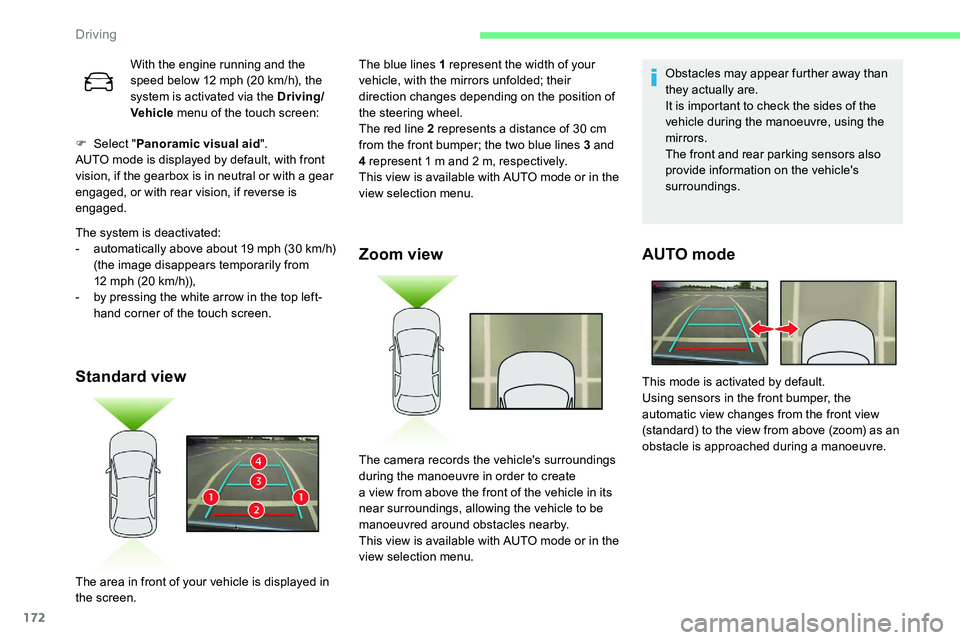
Vehicle menu of the touch screen: The blue lines 1
represent the width of your
vehicle, with the mirrors unfolded; their
direction changes depending on the position of
the steering wheel.
The red line 2
represents a distance of 30 cm
from the front bumper; the two blue lines 3
and
4
represent 1 m and 2 m, respectively.
This view is available with AUTO mode or in the
view selection menu.
The area in front of your vehicle is displayed in
the screen. The camera records the vehicle's surroundings
during the manoeuvre in order to create
a
view from above the front of the vehicle in its
near surroundings, allowing the vehicle to be
manoeuvred around obstacles nearby.
This view is available with AUTO mode or in the
view selection menu. This mode is activated by default.
Using sensors in the front bumper, the
automatic view changes from the front view
(standard) to the view from above (zoom) as an
obstacle is approached during a
manoeuvre.
Driving
Page 175 of 292
173
180° view
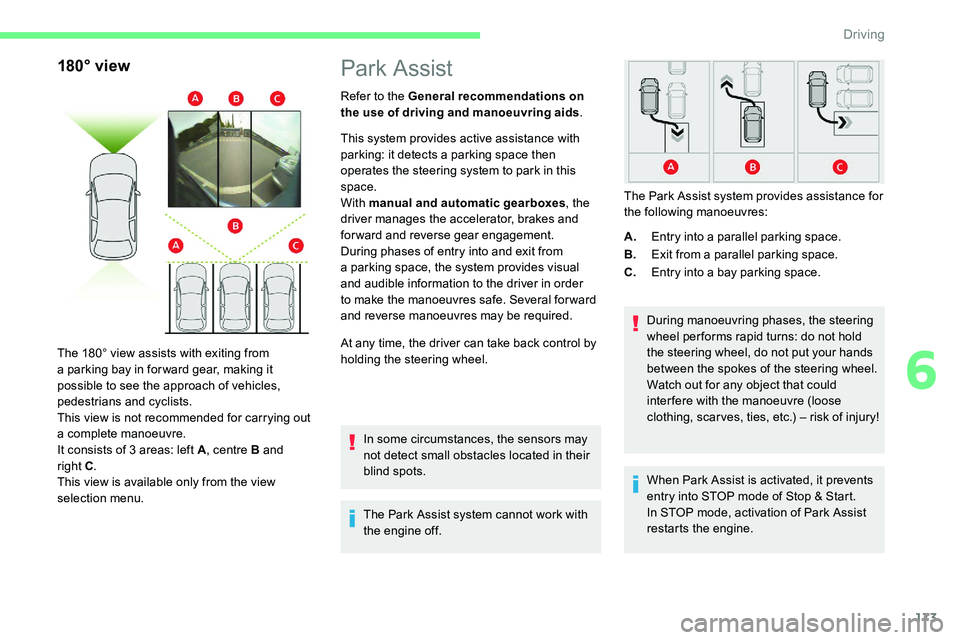
The 180° view assists with exiting from
a parking bay in forward gear, making it
possible to see the approach of vehicles,
pedestrians and cyclists.
This view is not recommended for carrying out
a
complete manoeuvre.
It consists of 3
areas: left A, centre B and
right C .
This view is available only from the view
selection menu.
Park Assist
Refer to the General recommendations on
the use of driving and manoeuvring aids .
This system provides active assistance with
parking: it detects a
parking space then
operates the steering system to park in this
space.
With manual and automatic gearboxes , the
driver manages the accelerator, brakes and
forward and reverse gear engagement.
During phases of entry into and exit from
a
parking space, the system provides visual
and audible information to the driver in order
to make the manoeuvres safe. Several for ward
and reverse manoeuvres may be required.
At any time, the driver can take back control by
holding the steering wheel.
In some circumstances, the sensors may
not detect small obstacles located in their
blind spots.
The Park Assist system cannot work with
the engine off. A.
Entry into a
parallel parking space.
B. Exit from a
parallel parking space.
C. Entry into a
bay parking space.
During manoeuvring phases, the steering
wheel per forms rapid turns: do not hold
the steering wheel, do not put your hands
between the spokes of the steering wheel.
Watch out for any object that could
inter fere with the manoeuvre (loose
clothing, scar ves, ties, etc.) – risk of injury!
The Park Assist system provides assistance for
the following manoeuvres:
When Park Assist is activated, it prevents
entry into STOP mode of Stop & Start.
In STOP mode, activation of Park Assist
restarts the engine.
6
Driving
Page 195 of 292
193
If the warning lamp stays on, this indicates
a low Diesel additive level.
For more information on Checking levels ,
refer to the corresponding section.
Following prolonged operation of the
vehicle at very low speed or at idle,
you may, in exceptional circumstances,
notice the emission of water vapour at the
exhaust on acceleration. This does not
affect the behaviour of the vehicle or the
environment.
New vehicle
The first particle filter regeneration
operations may be accompanied by a
"burning" smell, which is per fectly normal.
Manual gearbox
The gearbox does not require any
maintenance (no oil change).
Automatic gearbox
The gearbox does not require any
maintenance (no oil change).
Brake pads
Brake wear depends on the style
of driving, particularly in the case
of vehicles used in town, over short
distances. It may be necessary to
have the condition of the brakes
checked, even between vehicle
services.
Unless there is a
leak in the circuit, a drop in
the brake fluid level indicates that the brake
pads are worn.
After washing the vehicle, dampness, or
in wintry conditions, ice can form on the
brake discs and pads: braking efficiency
may be reduced. Make light brake
applications to dry and defrost the brakes.
Brake disc wear
For information on checking brake
disc wear, contact a CITROËN
dealer or a
qualified workshop.
Electric parking brake
This system does not require any
routine servicing. However, in case
of an issue, do not hesitate to have
the system checked by a
CITROËN
dealer or a
qualified workshop.
For more information on the Electric
parking brake , refer to the corresponding
section.
Wheels and tyres
The pressure must be checked on
all tyres, including the spare wheel,
when the tyres are "cold", at least
once a
month and before a long
j o u r n ey.
The pressures indicated on the tyre pressure
label are valid for "cold" tyres. If you have
driven for more than 10
minutes or more
than 6
miles (10 kilometres) at over 31 mph
(50
km/h), add 0.3 bar (30 kPa) to the values
indicated on the label.
7
Practical information
Page 206 of 292
204
Parking the vehicle
Immobilise the vehicle where it does not
block traffic: the ground must be level,
stable and non-slippery.
Apply the parking brake, unless it is
programmed to be in automatic mode;
switch off the ignition and with a manual
gearbox, engage first gear so as to lock
the wheels.
Apply the parking brake, unless it is
programmed to be in automatic mode;
switch off the ignition and with an
automatic gearbox, select mode P so as to
lock the wheels.
Check that the parking brake warning
lamps in the instrument panel are on fixed.
The occupants must get out of the vehicle
and wait where they are safe.
If necessary, place a
chock under the
wheel diagonally opposite the wheel to be
changed.
Never go underneath a
vehicle raised
using a
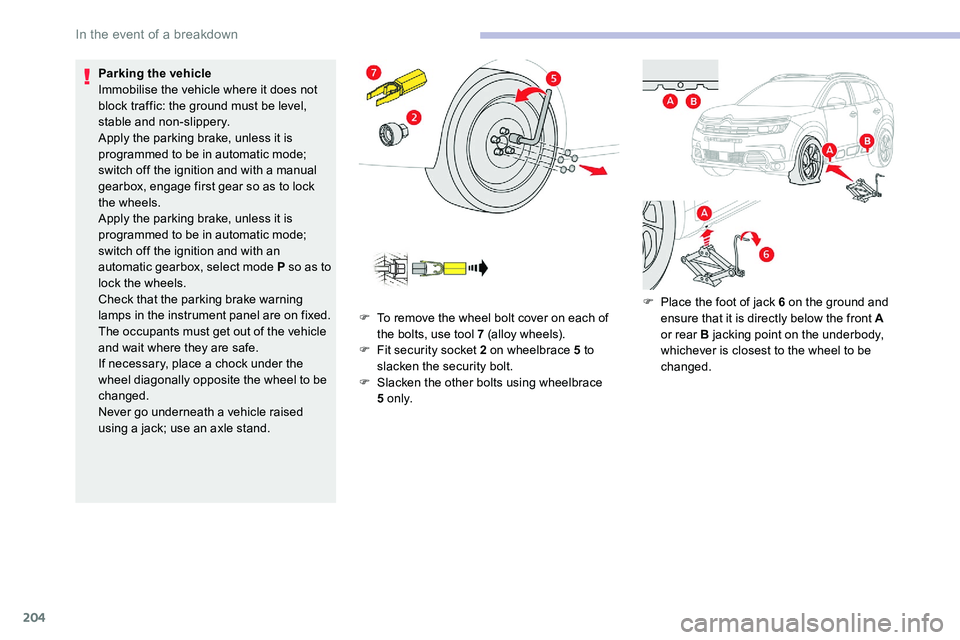
jack; use an axle stand. F
T
o remove the wheel bolt cover on each of
the bolts, use tool 7 (alloy wheels).
F
F
it security socket 2 on wheelbrace 5 to
slacken the security bolt.
F
S
lacken the other bolts using wheelbrace
5
o n l y.F
P
lace the foot of jack 6 on the ground and
ensure that it is directly below the front A
or rear B jacking point on the underbody,
whichever is closest to the wheel to be
changed.
In the event of a breakdown
Page 218 of 292
216
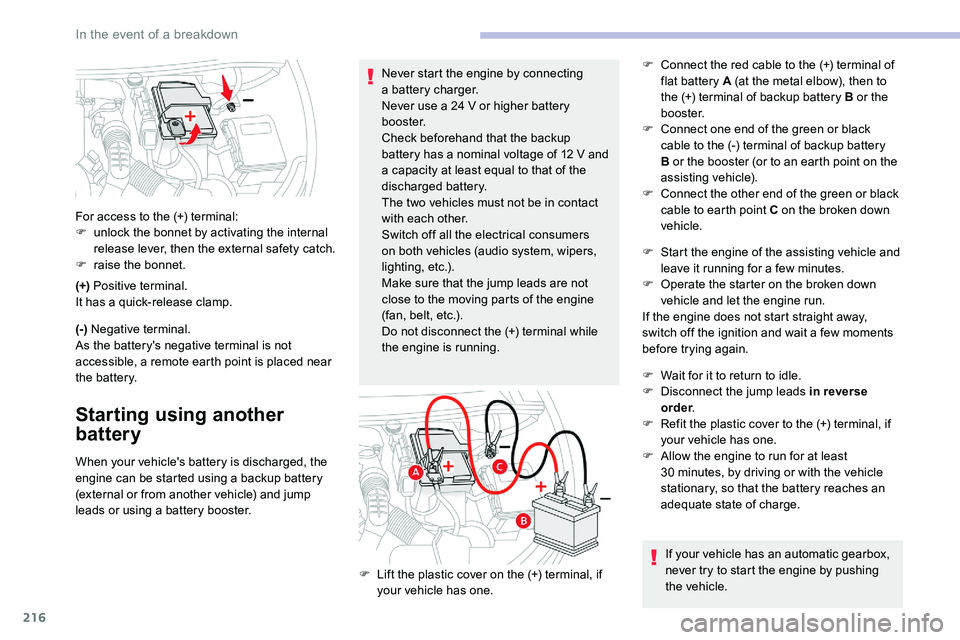
(+) Positive terminal.
It has a quick-release clamp.
(-) Negative terminal.
As the battery's negative terminal is not
accessible, a remote earth point is placed near
the battery.
Starting using another
battery
When your vehicle's battery is discharged, the
engine can be started using a backup battery
(external or from another vehicle) and jump
leads or using a
battery booster.
For access to the (+) terminal:
F
u
nlock the bonnet by activating the internal
release lever, then the external safety catch.
F
r
aise the bonnet.
Never start the engine by connecting
a battery charger.
Never use a 24 V or higher battery
b o o s t e r.
Check beforehand that the backup
battery has a nominal voltage of 12 V and
a capacity at least equal to that of the
discharged battery.
The two vehicles must not be in contact
with each other.
Switch off all the electrical consumers
on both vehicles (audio system, wipers,
lighting, etc.).
Make sure that the jump leads are not
close to the moving parts of the engine
(fan, belt, etc.).
Do not disconnect the (+) terminal while
the engine is running. F
C
onnect the red cable to the (+) terminal of
flat battery A (at the metal elbow), then to
the (+) terminal of backup battery B or the
b o o s t e r.
F
C
onnect one end of the green or black
cable to the (-) terminal of backup battery
B or the booster (or to an earth point on the
assisting vehicle).
F
C
onnect the other end of the green or black
cable to earth point C on the broken down
vehicle.
F
L
ift the plastic cover on the (+) terminal, if
your vehicle has one. F
S
tart the engine of the assisting vehicle and
leave it running for a few minutes.
F
O
perate the starter on the broken down
vehicle and let the engine run.
If the engine does not start straight away,
switch off the ignition and wait a few moments
before trying again.
F
W
ait for it to return to idle.
F
D
isconnect the jump leads in reverse
order .
F
R
efit the plastic cover to the (+) terminal, if
your vehicle has one.
F A llow the engine to run for at least
30 minutes, by driving or with the vehicle
stationary, so that the battery reaches an
adequate state of charge.
If your vehicle has an automatic gearbox,
never try to start the engine by pushing
the vehicle.
In the event of a breakdown
Page 221 of 292

219
Towing the vehicle
Procedure for having your vehicle towed or
for towing another vehicle using a removable
mechanical device.
Access to the tools
The towing eye is stored in a toolbox, under the
bo ot floor.
The opening tool for the rear protective cover is
secured to the towing eye.
For more information on the Vehicle tools ,
refer to the corresponding section.
Towing your vehicle
F On the front bumper, unclip the cover by using the tool fixed on the towing eye.
F
R
elease the cover to the right and then
downwards.
F
S
crew the towing eye in fully.
F
I
nstall the towbar.F
P
ut the gearbox into neutral.
Failure to obser ve this instruction could
result in damage to certain components
(braking, transmission, etc.) and the
absence of braking assistance the next
time the engine is started. Automatic gearbox: never tow the vehicle
with the front wheels on the ground with
the engine off.
F
U
nlock the steering and release the parking
brake.
F
S
witch on the hazard warning lamps on
both vehicles.
F
M
ove off gently, drive slowly and for a short
distance.
Towing another vehicle
F On the rear bumper, unclip the cover by using the tool fixed on the eye.
F
P
ull the cover downwards.
F
S
crew the towing eye in fully.
F
I
nstall the towbar.
8
In the event of a breakdown
Page 222 of 292
220
F Switch on the hazard warning lamps on both vehicles.
F
M
ove off gently, drive slowly and for a short
distance. General recommendations
Obser ve the legislation in force in the
country where you are driving.
Ensure that the weight of the towing
vehicle is higher than that of the towed
vehicle.
The driver must remain at the wheel of
the towed vehicle and must have a
valid
driving licence.
When towing a
vehicle with all four
wheels on the ground, always use an
approved towing arm; rope and straps are
prohibited.
The towing vehicle must move off gently.
When the vehicle is towed with its engine
off, there is no longer braking and steering
assistance.
In the following cases, you must always
call on a
professional recovery ser vice:
-
v
ehicle broken down on a motor way or
main road,
-
f
our-wheel drive vehicle,
-
w
hen it is not possible to put the
gearbox into neutral, unlock the
steering, or release the parking brake,
-
w
hen it is not possible to tow a vehicle
with an automatic gearbox, engine
running,
-
t
owing with only two wheels on the
ground,
-
w
here there is no approved towbar,
etc. available.
In the event of a breakdown
Page 225 of 292

223
Engines and towed loads – Petrol
Engines1.6 THP 165
(Euro 5) PureTech 130
S&S PureTech 175 S&S
Gearboxes E AT 6
(Automatic 6-speed) E AT 6
(Automatic 6-speed) E AT 8
(Automatic 8-speed)
Codes EP6FDTMD – AT6IIIEB2ADTS STTd
MB6E EP6FADTXD STTd
AT N 8
Model codes
J... 5GS – 5GY
5GXHNS 5GF
Cubic capacity (cm
3) 1,59 81,59 81,59 81,59 8
Max. power: EC standard (kW) 11 0121 9613 3
Fuel UnleadedUnleadedUnleadedUnleaded
Braked trailer (within the GTW limit) (kg)
on a
10% or 12% gradient 550
5501,3 5 0 1,5 0 0
Unbraked trailer (kg) 550550 739750
Maximum authorised nose weight (kg) 646454 64
9
Technical data
Page 226 of 292

224
Engines and towed loads – Diesel
EnginesBlueHDi 130 S&S2.0 HDi 180
(Euro 5) BlueHDi 180
S&S
Gearboxes BVM6
(Manual 6-speed) E AT 8
(Automatic 8-speed) E AT 8
(Automatic 8-speed) E AT 8
(Automatic 8-speed)
Codes DV5RC STTd ML6C DV5RC STTd ATN8 DW10FC – AMN8 DW10FC STTa AMN8
Model codes
J... YHZ
YHZ EHZEHZ
Cubic capacity (cm
3) 1,49 91,49 9 1,9 971,9 97
Max. power: EC standard (kW) 969613 0 13 0
Fuel DieselDieselDieselDiesel
Braked trailer (within the GTW limit) (kg)
on a
10% or 12% gradient 1,4 5 0
1, 25 0 1,6 5 01,6 5 0
Unbraked trailer (kg) 750750750750
Maximum authorised nose weight (kg) 585066 66
Technical data