seats Citroen C5 DAG 2009.5 (RD/TD) / 2.G Owner's Manual
[x] Cancel search | Manufacturer: CITROEN, Model Year: 2009.5, Model line: C5 DAG, Model: Citroen C5 DAG 2009.5 (RD/TD) / 2.GPages: 306, PDF Size: 18.91 MB
Page 28 of 306
III
45
C O M F O R T
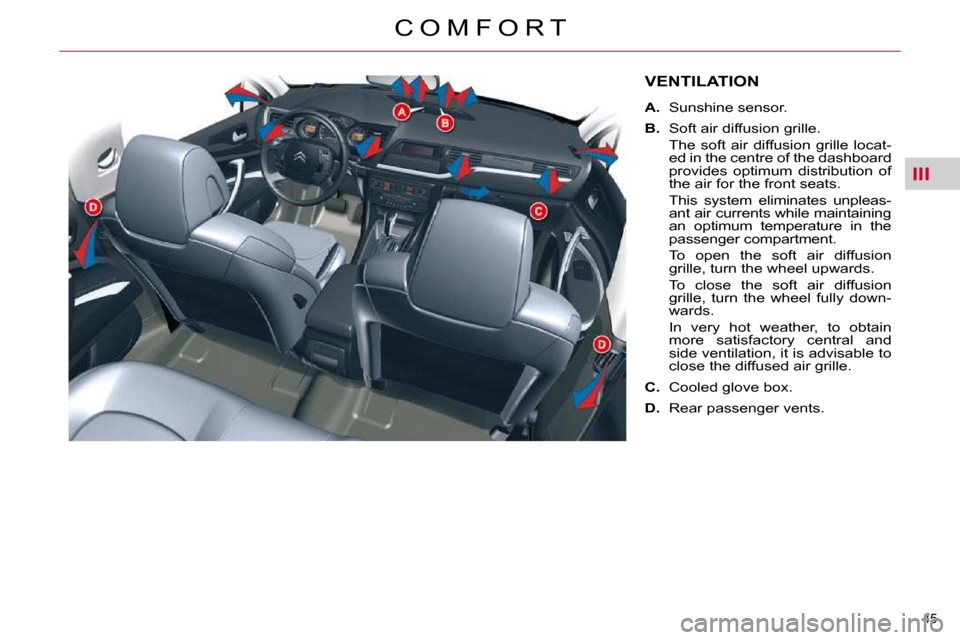
VENTILATION
A. Sunshine sensor.
B. Soft air diffusion grille.
The soft air diffusion grille locat- ed in the centre of the dashboard
provides optimum distribution of
the air for the front seats.
This system eliminates unpleas- ant air currents while maintaining
an optimum temperature in the
passenger compartment.
To open the soft air diffusion grille, turn the wheel upwards.
To close the soft air diffusion grille, turn the wheel fully down-
wards.
In very hot weather, to obtain more satisfactory central and
side ventilation, it is advisable to
close the diffused air grille.
C. Cooled glove box.
D. Rear passenger vents.
Page 29 of 306
III
46
C O M F O R T
Air conditioning
We recommend use of the automatic
regulation of the air conditioning.
It permits automatic and optimised
control of all of the following func-
�t�i�o�n�s�:� �a�i�r� �fl� �o�w�,� �t�e�m�p�e�r�a�t�u�r�e� �i�n� �t�h�e�
passenger compartment and air
distribution, by means of various
sensors (ambient temperature, sun-
shine). This eliminates any need for
you to change your settings other
than the temperature value dis-
played.
� Take care not to cover the sun-
shine sensor A .
If you select the automatic mode (by
pressing the "AUTO" control) and leave
all of the vents open, optimum comfort
will be maintained and humidity and
condensation will be removed regard-
less of the exterior climatic conditions.
The temperature in the passenger
compartment can only be lower than
the ambient temperature if the air
conditioning is on.
HEATING, VENTILATION AND AIR CONDITIONING RECOMMENDATIONS
In order to be effective, the air con-
ditioning must be used with the win-
dows closed. If the vehicle has been
parked in the sun for a long period
and the interior temperature is very
�h�i�g�h�,� �fi� �r�s�t� �v�e�n�t�i�l�a�t�e� �t�h�e� �p�a�s�s�e�n�g�e�r�
compartment with the windows
open for a few minutes, then close
the windows.
To keep the air conditioning system
in good working order it is essential
that it is operated at least once a
month.
The air conditioning uses engine power
during its operation. As a result, the fuel
consumption of the vehicle increases.
In certain cases of particularly ardu-
ous use (e.g. towing the maximum
load on a steep gradient in high
temperatures), switching off the air
conditioning saves engine power
and improves the towing capacity.
Air inlet
Check that the exterior grille for the
air inlet, at the bottom of the wind-
screen, is clean and free of dead
leaves, snow, etc.
When washing the vehicle using a
high pressure nozzle, avoid spraying
at the air inlet. Air circulation
Maximum comfort is obtained by
means of a good distribution of air in
the passenger compartment, both in
the front and in the rear.
To obtain a uniform distribution of
air, take care not to block the ex-
terior air intake grille located at the
base of the windscreen, the vents,
the air outlets under the front seats
and the air extractor located behind
�t�h�e� �fl� �a�p�s� �i�n� �t�h�e� �b�o�o�t�.�
� �T�h�e� �f�r�o�n�t� �a�n�d� �r�e�a�r� �v�e�n�t�s� �a�r�e� �fi� �t�t�e�d�
with thumbwheels to adjust the air
�fl� �o�w� �a�n�d� �d�i�r�e�c�t�i�o�n�.� �W�e� �r�e�c�o�m�m�e�n�d�
that you leave all of the vents open.
Dust filter/Odour filter
(active carbon)
� �T�h�e�r�e� �i�s� �a� �fi� �l�t�e�r� �f�o�r� �e�x�c�l�u�d�i�n�g� �o�d�o�u�r�s�
and dust.
� �T�h�i�s� �fi� �l�t�e�r� �m�u�s�t� �b�e� �c�h�a�n�g�e�d� �i�n� �l�i�n�e�
with the vehicle's servicing schedule
(see: "Maintenance and Warranty
Guide").
Page 41 of 306
III
58
C O M F O R T
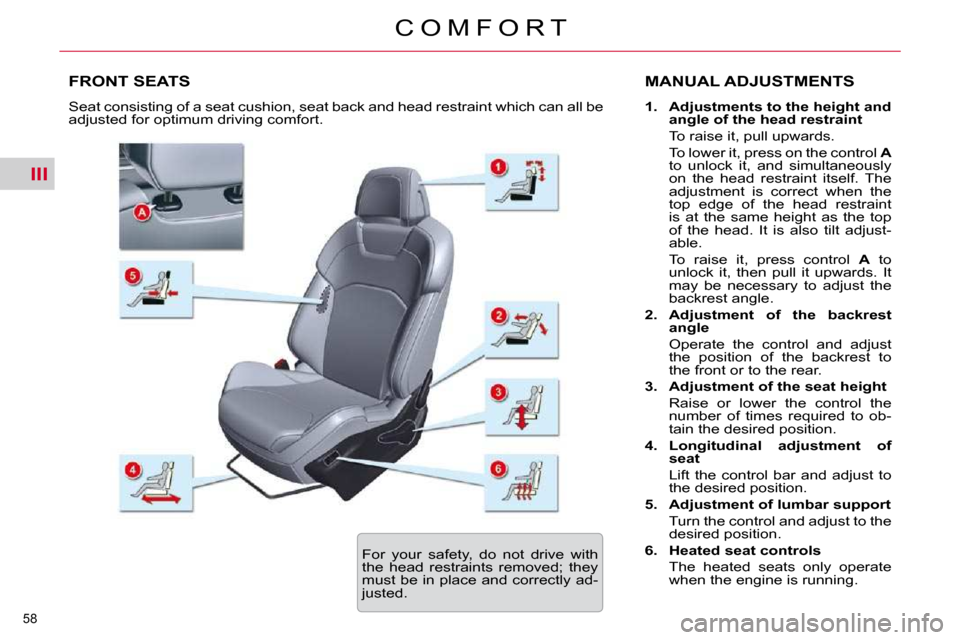
FRONT SEATS MANUAL ADJUSTMENTS
1. Adjustments to the height and
angle of the head restraint
To raise it, pull upwards.
To lower it, press on the control A
to unlock it, and simultaneously
on the head restraint itself. The
adjustment is correct when the
top edge of the head restraint
is at the same height as the top
of the head. It is also tilt adjust-
able.
To raise it, press control A to
unlock it, then pull it upwards. It
may be necessary to adjust the
backrest angle.
2. Adjustment of the backrest
angle
Operate the control and adjust the position of the backrest to
the front or to the rear.
3. Adjustment of the seat height
Raise or lower the control the number of times required to ob-
tain the desired position.
4. Longitudinal adjustment of
seat
Lift the control bar and adjust to the desired position.
5. Adjustment of lumbar support
Turn the control and adjust to the desired position.
6. Heated seat controls
The heated seats only operate when the engine is running.
Seat consisting of a seat cushion, seat back and head restraint
which can all be
adjusted for optimum driving comfort.
For your safety, do not drive with
the head restraints removed; they
must be in place and correctly ad-
justed.
Page 42 of 306
III
59
C O M F O R T
FRONT SEATS
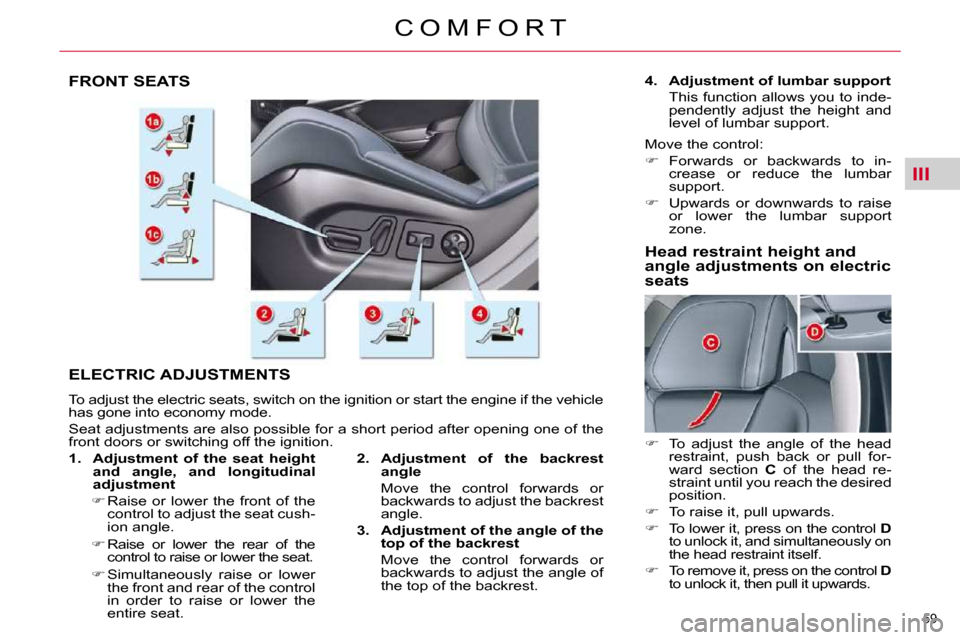
ELECTRIC ADJUSTMENTS
To adjust the electric seats, switch on the ignition or start the engine if the vehicle
has gone into economy mode.
Seat adjustments are also possible for a short period after ope ning one of the
front doors or switching off the ignition.
2. Adjustment of the backrest
angle
Move the control forwards or backwards to adjust the backrest
angle.
3. Adjustment of the angle of the
top of the backrest
Move the control forwards or backwards to adjust the angle of
the top of the backrest.
1. Adjustment of the seat height
and angle, and longitudinal
adjustment
� Raise or lower the front of the
control to adjust the seat cush-
ion angle.
� Raise or lower the rear of the
control to raise or lower the seat.
� Simultaneously raise or lower
the front and rear of the control
in order to raise or lower the
entire seat.
4. Adjustment of lumbar support
This function allows you to inde- pendently adjust the height and
level of lumbar support.
Move the control:
� Forwards or backwards to in-
crease or reduce the lumbar
support.
� Upwards or downwards to raise
or lower the lumbar support
zone.
Head restraint height and
angle adjustments on electric
seats
� To adjust the angle of the head
restraint, push back or pull for-
ward section C of the head re-
straint until you reach the desired
position.
� To raise it, pull upwards.
� To lower it, press on the control D
to unlock it, and simultaneously on
the head restraint itself.
� To remove it, press on the control D
to unlock it, then pull it upwards.
Page 43 of 306
III
60
C O M F O R T
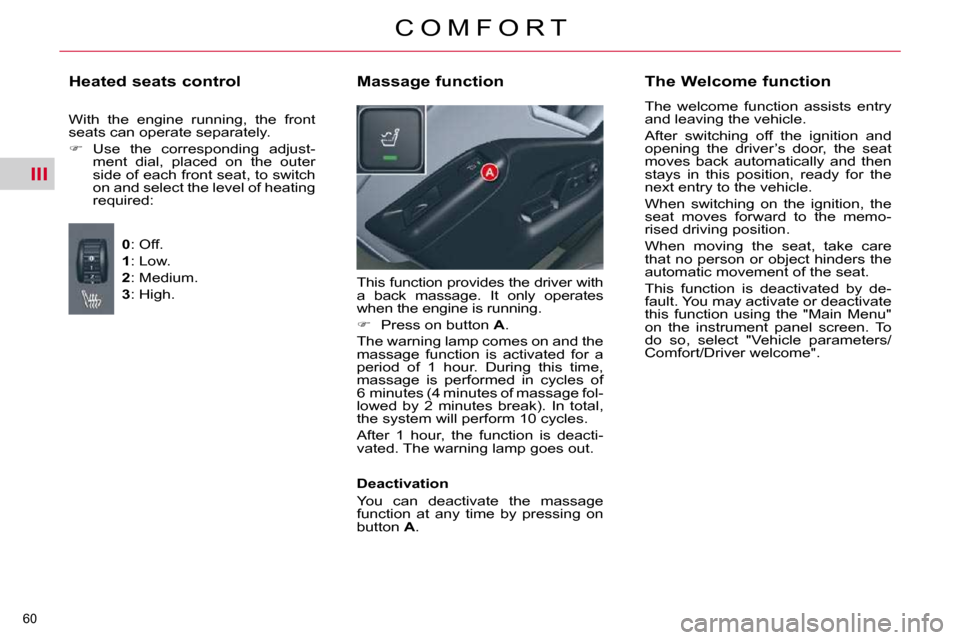
This function provides the driver with
a back massage. It only operates
when the engine is running.
� Press on button A .
The warning lamp comes on and the
massage function is activated for a
period of 1 hour. During this time,
massage is performed in cycles of
6 minutes (4 minutes of massage fol-
lowed by 2 minutes break). In total,
the system will perform 10 cycles.
After 1 hour, the function is deacti-
vated. The warning lamp goes out.
Massage function The Welcome function
The welcome function assists entry
and leaving the vehicle.
After switching off the ignition and
opening the driver’s door, the seat
moves back automatically and then
stays in this position, ready for the
next entry to the vehicle.
When switching on the ignition, the
seat moves forward to the memo-
rised driving position.
When moving the seat, take care
that no person or object hinders the
automatic movement of the seat.
This function is deactivated by de-
fault. You may activate or deactivate
this function using the "Main Menu"
on the instrument panel screen. To
do so, select "Vehicle parameters/
Comfort/Driver welcome".
Deactivation
You can deactivate the massage
function at any time by pressing on
button A .
Heated seats control
With the engine running, the front
seats can operate separately.
� Use the corresponding adjust-
ment dial, placed on the outer
side of each front seat, to switch
on and select the level of heating
required:
0 : Off.
1 : Low.
2 : Medium.
3 : High.
Page 46 of 306
III
62
C O M F O R T
REAR SEATS
Bench seat, the left-hand (2/3) or
right-hand (1/3) section of which
can be folded to adapt the boot load
space.
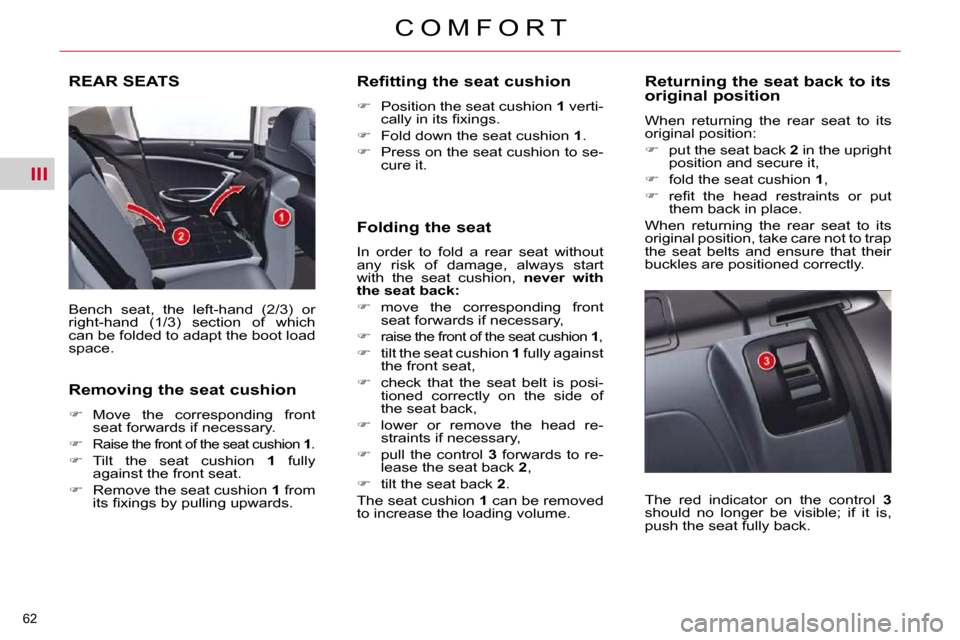
Removing the seat cushion
� Move the corresponding front
seat forwards if necessary.
�
Raise the front of the seat cushion 1 .
� Tilt the seat cushion 1 fully
against the front seat.
� Remove the seat cushion 1 from
�i�t�s� �fi� �x�i�n�g�s� �b�y� �p�u�l�l�i�n�g� �u�p�w�a�r�d�s�.� � � Refitting the seat cushion
� Position the seat cushion 1 verti-
�c�a�l�l�y� �i�n� �i�t�s� �fi� �x�i�n�g�s�.�
� Fold down the seat cushion 1 .
� Press on the seat cushion to se-
cure it.
Folding the seat
In order to fold a rear seat without
any risk of damage, always start
with the seat cushion, never with
the seat back:
� move the corresponding front
seat forwards if necessary,
�
raise the front of the seat cushion 1 ,
� tilt the seat cushion 1 fully against
the front seat,
� check that the seat belt is posi-
tioned correctly on the side of
the seat back,
� lower or remove the head re-
straints if necessary,
� pull the control 3 forwards to re-
lease the seat back 2 ,
� tilt the seat back 2 .
The seat cushion 1 can be removed
to increase the loading volume. Returning the seat back to its
original position
When returning the rear seat to its
original position:
� put the seat back 2 in the upright
position and secure it,
� fold the seat cushion 1 ,
� � � �r�e�fi� �t� �t�h�e� �h�e�a�d� �r�e�s�t�r�a�i�n�t�s� �o�r� �p�u�t�
them back in place.
When returning the rear seat to its
original position, take care not to trap
the seat belts and ensure that their
buckles are positioned correctly.
The red indicator on the control 3
should no longer be visible; if it is,
push the seat fully back.
Page 64 of 306
IV
77
O P E N I N G S
BOOT (SALOON)
� Press upwards on lever 1 and lift
up the boot lid. With the vehicle stationary, this is
carried out using:
- The remote control.
- The key in a door lock.
- The interior central locking/un-
locking control.
The boot automatically locks when
the vehicle is moving at a speed of
over 6 mph (10 km/h), even if auto-
matic central locking is deactivated.
It is unlocked when a door is opened
or when the central locking button is
pressed (speed lower than 6 mph
(10 km/h)).
Opening
Locking/unlocking Emergency tailgate release
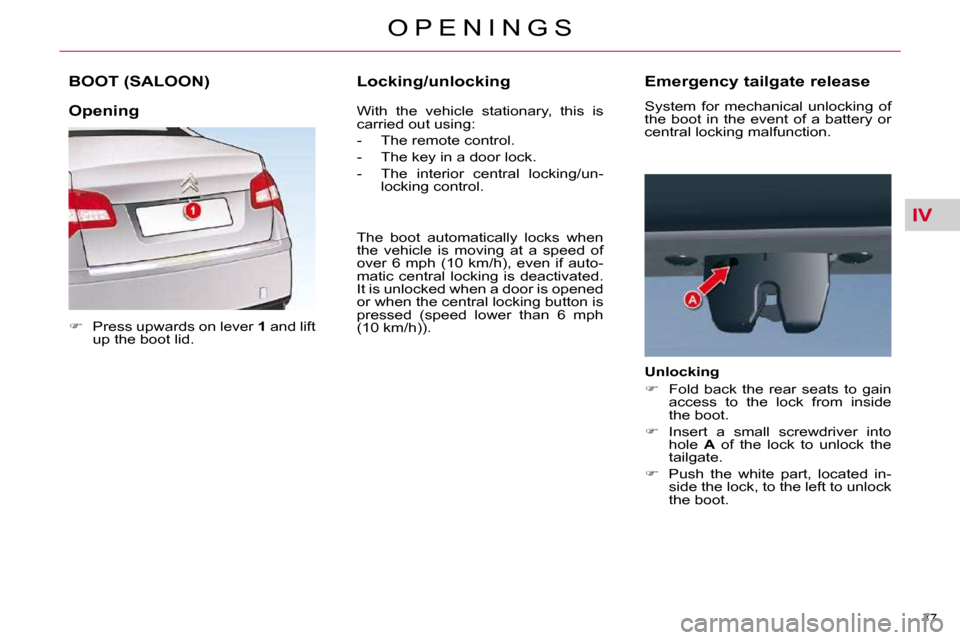
System for mechanical unlocking of
the boot in the event of a battery or
central locking malfunction.
Unlocking
� Fold back the rear seats to gain
access to the lock from inside
the boot.
� Insert a small screwdriver into
hole A of the lock to unlock the
tailgate.
� Push the white part, located in-
side the lock, to the left to unlock
the boot.
Page 74 of 306
V
87
V I S I B I L I T Y
Linked with the automatic
"Guide-me-home" lighting
Link with the automatic illumination
of headlamps provides the "guide-
me-home" lighting with the following
additional options:
- selection of the duration of light- ing for 15, 30 or 60 seconds in
the vehicle parameters on the in-
�s�t�r�u�m�e�n�t� �p�a�n�e�l� �s�c�r�e�e�n� �c�o�n�fi� �g�u�-
ration menu,
- automatic activation of "guide- me-home" lighting when auto-
matic illumination of headlamps
is in operation.
Operating fault
In the event of a malfunction of the
brightness sensor, the lamps come
on and a message appears on the
instrument panel screen, accompa-
nied by an audible signal.
Consult a CITROËN dealer.
In fog or snow, the brightness
�s�e�n�s�o�r� �m�a�y� �d�e�t�e�c�t� �s�u�f�fi� �c�i�e�n�t� �l�i�g�h�t�.�
Therefore, the lamps will not come
on automatically.
Do not cover the brightness sen-
sor, linked with the rain sensor and
located in the centre of the wind-
screen behind the rear view mirror;
the associated functions would no
longer operate.
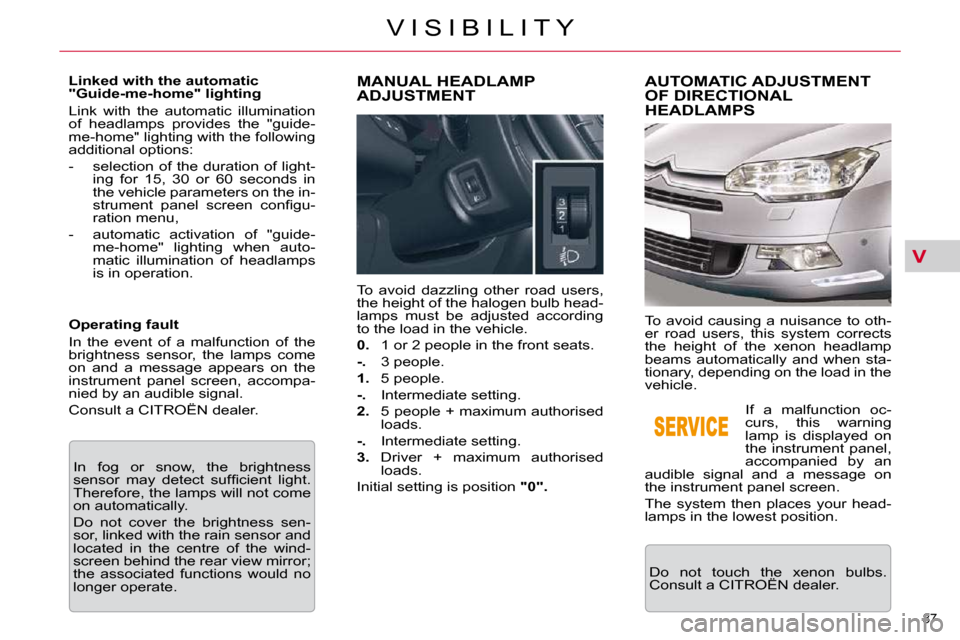
MANUAL HEADLAMP ADJUSTMENT
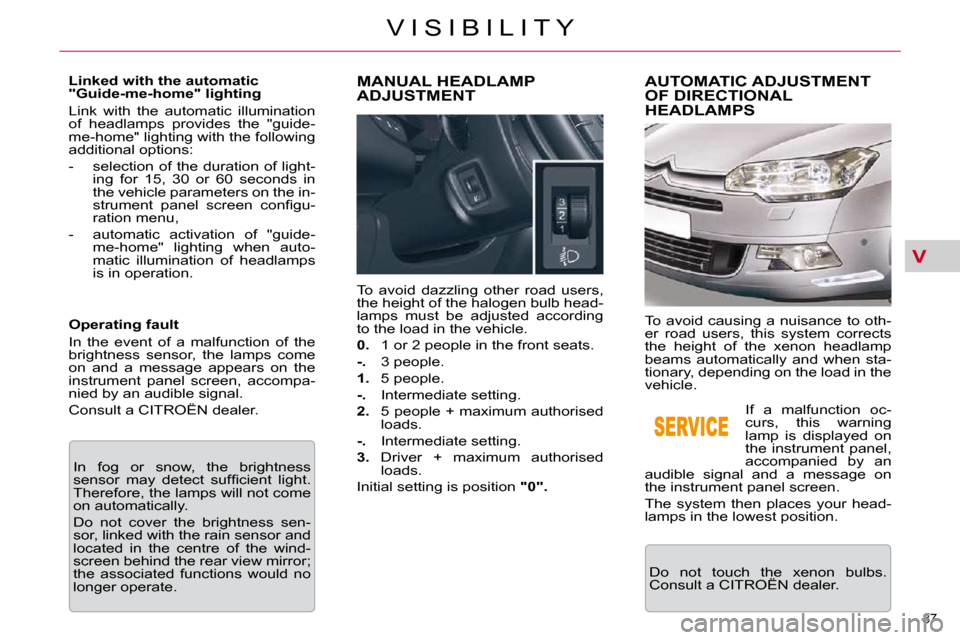
To avoid dazzling other road users,
the height of the halogen bulb head-
lamps must be adjusted according
to the load in the vehicle.
0. 1 or 2 people in the front seats.
-. 3 people.
1. 5 people.
-. Intermediate setting.
2. 5 people + maximum authorised
loads.
-. Intermediate setting.
3. Driver + maximum authorised
loads.
Initial setting is position "0".
AUTOMATIC ADJUSTMENT OF DIRECTIONAL HEADLAMPS
Do not touch the xenon bulbs.
Consult a CITROËN dealer. If a malfunction oc-
curs, this warning
lamp is displayed on
the instrument panel,
accompanied by an
audible signal and a message on
the instrument panel screen.
The system then places your head-
lamps in the lowest position.
To avoid causing a nuisance to oth-
er road users, this system corrects
the height of the xenon headlamp
beams automatically and when sta-
tionary, depending on the load in the
vehicle.
Page 76 of 306
V
87
V I S I B I L I T Y
Linked with the automatic
"Guide-me-home" lighting
Link with the automatic illumination
of headlamps provides the "guide-
me-home" lighting with the following
additional options:
- selection of the duration of light- ing for 15, 30 or 60 seconds in
the vehicle parameters on the in-
�s�t�r�u�m�e�n�t� �p�a�n�e�l� �s�c�r�e�e�n� �c�o�n�fi� �g�u�-
ration menu,
- automatic activation of "guide- me-home" lighting when auto-
matic illumination of headlamps
is in operation.
Operating fault
In the event of a malfunction of the
brightness sensor, the lamps come
on and a message appears on the
instrument panel screen, accompa-
nied by an audible signal.
Consult a CITROËN dealer.
In fog or snow, the brightness
�s�e�n�s�o�r� �m�a�y� �d�e�t�e�c�t� �s�u�f�fi� �c�i�e�n�t� �l�i�g�h�t�.�
Therefore, the lamps will not come
on automatically.
Do not cover the brightness sen-
sor, linked with the rain sensor and
located in the centre of the wind-
screen behind the rear view mirror;
the associated functions would no
longer operate.
MANUAL HEADLAMP ADJUSTMENT
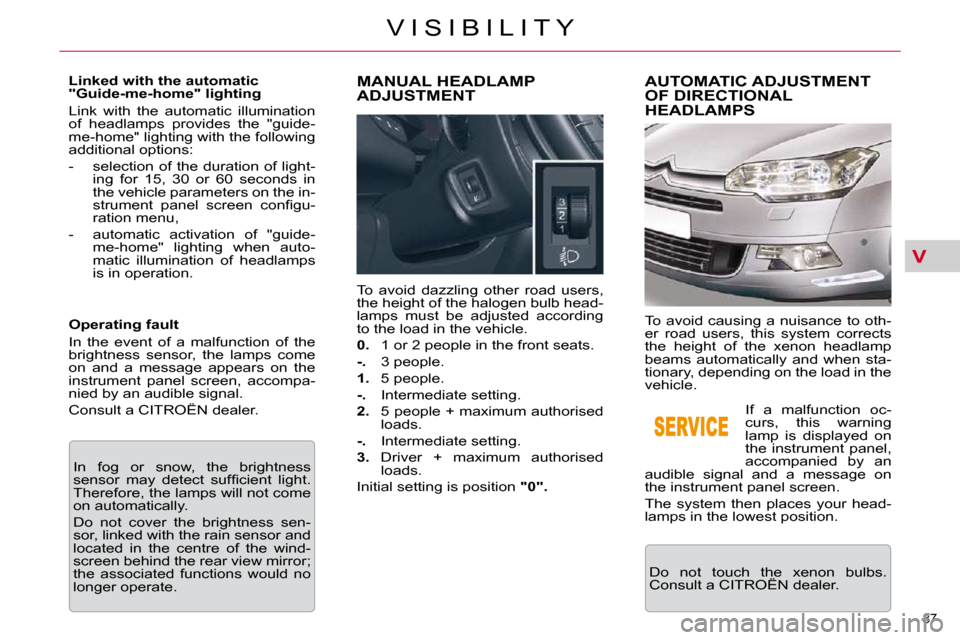
To avoid dazzling other road users,
the height of the halogen bulb head-
lamps must be adjusted according
to the load in the vehicle.
0. 1 or 2 people in the front seats.
-. 3 people.
1. 5 people.
-. Intermediate setting.
2. 5 people + maximum authorised
loads.
-. Intermediate setting.
3. Driver + maximum authorised
loads.
Initial setting is position "0".
AUTOMATIC ADJUSTMENT OF DIRECTIONAL HEADLAMPS
Do not touch the xenon bulbs.
Consult a CITROËN dealer. If a malfunction oc-
curs, this warning
lamp is displayed on
the instrument panel,
accompanied by an
audible signal and a message on
the instrument panel screen.
The system then places your head-
lamps in the lowest position.
To avoid causing a nuisance to oth-
er road users, this system corrects
the height of the xenon headlamp
beams automatically and when sta-
tionary, depending on the load in the
vehicle.
Page 77 of 306
V
87
V I S I B I L I T Y
Linked with the automatic
"Guide-me-home" lighting
Link with the automatic illumination
of headlamps provides the "guide-
me-home" lighting with the following
additional options:
- selection of the duration of light- ing for 15, 30 or 60 seconds in
the vehicle parameters on the in-
�s�t�r�u�m�e�n�t� �p�a�n�e�l� �s�c�r�e�e�n� �c�o�n�fi� �g�u�-
ration menu,
- automatic activation of "guide- me-home" lighting when auto-
matic illumination of headlamps
is in operation.
Operating fault
In the event of a malfunction of the
brightness sensor, the lamps come
on and a message appears on the
instrument panel screen, accompa-
nied by an audible signal.
Consult a CITROËN dealer.
In fog or snow, the brightness
�s�e�n�s�o�r� �m�a�y� �d�e�t�e�c�t� �s�u�f�fi� �c�i�e�n�t� �l�i�g�h�t�.�
Therefore, the lamps will not come
on automatically.
Do not cover the brightness sen-
sor, linked with the rain sensor and
located in the centre of the wind-
screen behind the rear view mirror;
the associated functions would no
longer operate.
MANUAL HEADLAMP ADJUSTMENT
To avoid dazzling other road users,
the height of the halogen bulb head-
lamps must be adjusted according
to the load in the vehicle.
0. 1 or 2 people in the front seats.
-. 3 people.
1. 5 people.
-. Intermediate setting.
2. 5 people + maximum authorised
loads.
-. Intermediate setting.
3. Driver + maximum authorised
loads.
Initial setting is position "0".
AUTOMATIC ADJUSTMENT OF DIRECTIONAL HEADLAMPS
Do not touch the xenon bulbs.
Consult a CITROËN dealer. If a malfunction oc-
curs, this warning
lamp is displayed on
the instrument panel,
accompanied by an
audible signal and a message on
the instrument panel screen.
The system then places your head-
lamps in the lowest position.
To avoid causing a nuisance to oth-
er road users, this system corrects
the height of the xenon headlamp
beams automatically and when sta-
tionary, depending on the load in the
vehicle.